FREE DINNER EBOOK! Get your copy!
  • Cookie Policy
  • GDPR Policy
  • Disclaimer
  • Terms Of Use
  • Visit my other site: Fun Cookie Recipes
sweet savory saga
  • Home
  • Dinner
  • Desserts
  • Drinks
  • Appetizers
  • Contact
  • About
  • Privacy Policy
  • Home
  • Dinner
  • Desserts
  • Drinks
  • Appetizers
  • Contact
  • About
  • Privacy Policy
  • Cookie Policy
  • GDPR Policy
  • Disclaimer
  • Terms Of Use
Visit my other site: Fun Cookie Recipes

HOME / CATEGORIES /

Latest

For this creamy broccoli cheddar soup, you need 4 cups of fresh broccoli florets. Fresh broccoli gives the soup a bright green color and rich flavor. Choose florets that are firm and vibrant. They should not have yellow spots. If you want to save time, you can buy pre-cut florets. You will also need 1 medium onion, diced, and 2 cloves of garlic, minced. The onion adds sweetness and depth. The garlic brings a warm, savory note. Together, they form the base of our soup. Sauté them in butter to unlock their flavors. This step makes the soup smell amazing! The creamy texture comes from 1 cup of heavy cream and 2 cups of sharp cheddar cheese, shredded. The heavy cream adds richness. The cheese gives it that classic cheesy flavor. Use sharp cheddar for a more intense taste. Also, don't forget the 3 tablespoons of unsalted butter. It adds a nice richness to the soup. You will also need salt and black pepper to taste. These ingredients help enhance all the flavors in the soup. {{ingredient_image_2}} First, gather your ingredients. You will need butter, onion, and garlic. Start by melting the butter in a big pot over medium heat. Once it melts, add the diced onion. Cook the onion for about five minutes. You want it to soften and become clear. Then, add in the minced garlic and cook for one more minute. Stir it well. The garlic should smell amazing. Next, it's time for the broccoli. Add the fresh broccoli florets to the pot. Pour in the vegetable broth, making sure to cover the broccoli. Turn the heat up to bring the liquid to a boil. Once it boils, lower the heat to a simmer. Let it cook for about ten minutes. The broccoli should be tender and easy to pierce with a fork. Now, carefully take the pot off the heat. If you have an immersion blender, use it to blend the soup right in the pot. If not, pour the soup into a regular blender in batches. Be careful with the hot soup! Once blended, return it to the pot. Turn the heat back to medium. Stir in the heavy cream, shredded cheddar cheese, and Dijon mustard. Keep mixing until the cheese melts and the soup is creamy. Finally, add salt and black pepper to taste. Enjoy your warm and comforting bowl topped with crunchy croutons! To get a smooth and creamy soup, you need to blend it well. Use an immersion blender right in the pot. If you don’t have one, pour the soup into a regular blender. Blend in small batches to avoid spills. Make sure to blend until there are no chunks left. If the soup feels too thick, add a bit more vegetable broth or cream. This will help you reach that velvety texture. Salt and pepper are key to making flavors pop. Start with a little and taste as you go. Adding Dijon mustard gives the soup a nice tang. You can also try a pinch of nutmeg for warmth. Fresh herbs like thyme or parsley can brighten the dish. If you want a spicy kick, add a little red pepper flakes. These simple adjustments make a big difference. Store any leftover soup in an airtight container. It can stay in the fridge for up to three days. To reheat, pour the soup into a pot over low heat. Stir often to keep it from sticking. If the soup thickens in the fridge, add a splash of broth or cream while reheating. You can also microwave it in a bowl, but cover it to avoid splatters. Enjoy your creamy broccoli cheddar soup warm again! Pro Tips Use Fresh Broccoli: Fresh broccoli will provide the best flavor and texture for your soup. Look for bright green florets and avoid any yellowing or wilting. Cheese Selection: Opt for a high-quality sharp cheddar cheese for a more intense flavor. You can also experiment with different cheeses like Gruyère or Monterey Jack for a unique twist. Adjust Creaminess: For a lighter version, substitute half of the heavy cream with milk or a non-dairy alternative. This can help reduce calories while still keeping the soup creamy. Flavor Boost: Add a pinch of nutmeg or cayenne pepper for a subtle depth of flavor. These spices can elevate your soup and make it even more delightful. {{image_4}} This soup is already vegetarian, but you can add more veggies. Try carrots or kale for extra color. You can also swap the heavy cream for cashew cream. This change keeps it rich and creamy while adding a nutty flavor. Good news! This creamy broccoli cheddar soup is naturally gluten-free. Just ensure your vegetable broth does not contain gluten. Always check the labels on any broth you buy. You can also use gluten-free croutons for a tasty topping. You can make this soup your own with fun add-ins. Try adding cooked quinoa or rice for a heartier meal. For a kick, toss in some red pepper flakes. For toppings, croutons add a nice crunch. You can also sprinkle extra cheese on top. Fresh herbs like parsley or chives brighten the dish. Enjoy making this soup unique to your taste! This creamy broccoli cheddar soup is not only tasty but also filling. Each serving has about 400 calories. The main sources of calories come from cheese and cream. These ingredients add richness but also boost the calorie count. The soup offers a satisfying meal, especially in colder months. Broccoli is a superfood packed with vitamins. It contains vitamins C and K, which help keep your body strong. Eating broccoli can boost your immune system and support bone health. It also has fiber, which aids digestion. This soup lets you enjoy broccoli’s benefits in a comforting way. The cheese and cream in this soup give it a creamy texture. Sharp cheddar cheese adds flavor and calcium. Heavy cream adds richness and makes the soup smooth. However, these ingredients also increase fat content. Enjoy this soup in moderation for a balanced diet. Yes, you can use frozen broccoli. It saves time and is easy to find. Frozen broccoli cooks quickly. Just add it to the pot like fresh broccoli. The taste may be slightly different, but it will still be good. To store leftover soup, let it cool first. Pour it into an airtight container. You can keep it in the fridge for about three days. If you want to save it longer, freeze it. It can last up to three months in the freezer. Some great side dishes include simple salads, crusty bread, or grilled cheese sandwiches. You can also serve it with crackers or breadsticks. These sides add flavor and texture to your meal. Enjoy pairing them with this creamy broccoli cheddar soup! This blog covered how to make a delicious broccoli soup. We looked at key ingredients like fresh broccoli, onions, and dairy, which build the base. I shared step-by-step instructions, tips for perfect consistency, and variations like vegetarian options. The nutritional facts highlight broccoli's health benefits. In the end, you can enjoy this soup any way you like. Remember, cooking is about creativity and personal taste!

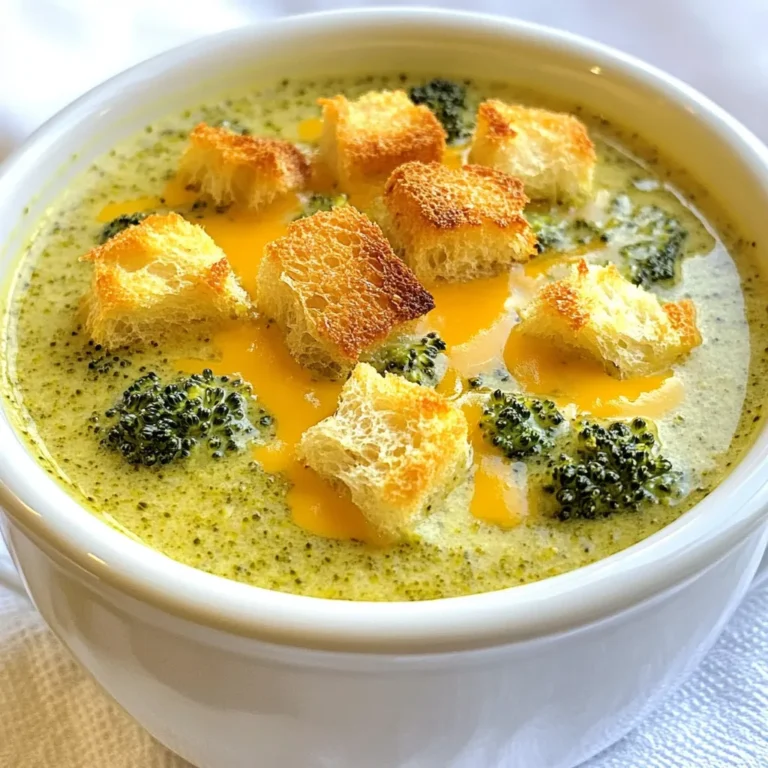
Creamy Broccoli Cheddar Soup Savory and Simple Recipe

- 4 bone-in, skin-on chicken thighs - 1/4 cup raw honey - 1/4 cup quality Dijon mustard - 2 tablespoons extra virgin olive oil - 2 cloves garlic, finely minced - 1 teaspoon dried thyme - 1 teaspoon smoked paprika - Salt and freshly cracked black pepper to taste - Fresh parsley, finely chopped (for garnish) For this honey mustard chicken thighs recipe, the main ingredients shine. I use bone-in, skin-on chicken thighs for their rich flavor and juicy texture. The raw honey adds a sweet touch that balances well with the tangy Dijon mustard. These two ingredients create a delightful sauce that coats the chicken perfectly. To boost flavor, I include extra virgin olive oil, garlic, dried thyme, and smoked paprika. Olive oil keeps the chicken moist as it bakes. The minced garlic gives a fragrant aroma. Thyme adds earthiness, while smoked paprika brings a subtle warmth. Finally, I season the chicken with salt and freshly cracked black pepper. These basics highlight the other flavors without overpowering them. For garnishing, I sprinkle freshly chopped parsley on top. This adds color and a fresh taste that brightens the dish. With these ingredients, you set the stage for a flavorful and easy meal that everyone will love! {{ingredient_image_2}} 1. First, preheat your oven to 400°F (200°C). This makes sure your chicken cooks well. 2. In a bowl, mix together the honey and Dijon mustard. Add olive oil, minced garlic, dried thyme, and smoked paprika. 3. Whisk until the mixture is smooth. Don’t forget to add salt and pepper to taste! 1. Use paper towels to dry the chicken thighs. This helps the skin get crispy. 2. Season both sides of the chicken with salt and pepper. This step adds great flavor. 3. Place the chicken thighs in a baking dish, skin-side up. Pour the honey mustard mixture over each piece. Make sure they are all coated. 1. Bake the chicken in your preheated oven for 35 to 40 minutes. The chicken should reach 165°F (75°C) inside. 2. For crispy skin, switch your oven to broil for the last 2 to 3 minutes. Keep a close watch to avoid burning! 3. Once done, take the chicken out and let it rest for 5 minutes. This keeps the meat juicy. Marinating chicken helps build flavor. Here are some best practices: - Use a bowl or a resealable bag for marinating. - Make sure the marinade covers all parts of the chicken. - For best flavor, let it marinate for at least 20 minutes. Longer is even better! You can bake or grill honey mustard chicken thighs. Here’s a quick rundown: - Baking: Preheat your oven to 400°F (200°C). Bake for 35-40 minutes. - Grilling: Heat the grill to medium-high. Cook for 6-8 minutes on each side. Check the internal temperature. Chicken should reach 165°F (75°C). Use a meat thermometer for accuracy. Garnish your chicken with fresh parsley for a pop of color. Here are some side dish ideas to pair with your meal: - Roasted seasonal vegetables add a nice touch. - A crisp green salad balances the meal. - Mashed potatoes or rice can make it more filling. Pro Tips Pat the Chicken Dry: Ensuring the chicken thighs are completely dry before seasoning and cooking will help achieve that perfect crispy skin. Marinate for Maximum Flavor: Allowing the chicken to marinate for a few hours or overnight will deepen the flavors of the honey mustard mixture. Use a Meat Thermometer: To ensure the chicken is perfectly cooked, use a meat thermometer to check that the internal temperature reaches 165°F (75°C). Rest Before Serving: Letting the chicken rest for a few minutes after baking allows the juices to redistribute, keeping the meat juicy and tender. {{image_4}} You can change the taste of honey mustard chicken thighs easily. Try adding spices or herbs. For a kick, mix in cayenne pepper or chili powder. You can also use fresh herbs like rosemary or basil. They add great flavor and aroma. Want to swap the protein? You can use chicken breast or even pork chops. Just remember to adjust the cooking time. Chicken breast cooks faster than thighs, so check it sooner. If you want a different cooking style, try using a slow cooker. Coat the chicken thighs with the honey mustard mix. Place them in the slow cooker and cook on low for 6-7 hours. This method makes the meat super tender. Grilling is another fun option. Marinate the chicken as usual. Preheat your grill to medium heat. Cook the chicken thighs for about 6-8 minutes on each side. This gives them a nice smoky flavor. Looking to enhance your meal? Consider adding some complementary sauces. A tangy barbecue sauce or a creamy ranch dip can pair well. They add depth to your honey mustard chicken. For side dishes, think about roasted vegetables. Carrots, broccoli, or potatoes work great. A fresh salad with mixed greens also makes a nice balance. These sides help round out your meal and add variety. To store leftovers, place the chicken thighs in an airtight container. This keeps them fresh and safe. You can store them in the fridge for up to four days. Make sure they cool down a bit before sealing the container. This will help prevent moisture build-up. You can freeze honey mustard chicken thighs if you want to keep them longer. First, let them cool completely. Wrap each thigh in plastic wrap, then put them in a freezer bag. They can last in the freezer for up to three months. When you are ready to eat, thaw them in the fridge overnight. For reheating, place them in the oven at 350°F (175°C) until heated through. Preparing chicken thighs in advance is a great time-saver. You can marinate them a day before cooking. Keep them in the fridge in a bowl covered with plastic wrap. For meal prep, use clear containers. This helps you see what you have ready to eat. You can also label them with dates to keep track of freshness. How long should I marinate honey mustard chicken thighs? You should marinate the chicken thighs for at least 20 minutes. This allows the flavors to soak in. For a stronger taste, refrigerate them for a few hours. This extra time makes a big difference. Can I use boneless chicken thighs for this recipe? Yes, boneless chicken thighs work well too. They will cook faster than bone-in thighs. Adjust the cooking time to about 25-30 minutes. Make sure they reach the right temperature. Can I use maple syrup instead of honey? Yes, maple syrup can replace honey. It gives a different but tasty flavor. Use the same amount as the recipe calls for honey. What can I use instead of Dijon mustard? You can use yellow mustard or whole grain mustard. Both can work in this recipe. The flavor will change a bit, but it will still be good. What temperature should chicken be cooked to? Chicken should reach an internal temperature of 165°F (75°C). This ensures it is safe to eat. Use a meat thermometer to check the temperature. How do I know when the chicken is fully cooked? Check the juices running clear and the internal temperature. If juices are pink, it needs more cooking. Once it reaches 165°F, you are good to go. This blog post covered the key steps to make honey mustard chicken thighs. We discussed essential ingredients, preparation, cooking methods, and storage tips. Marinate your chicken for great flavor, and enjoy cooking with different methods. Don’t hesitate to try variations, like grilling or adding spices. Remember, cooking is about fun and creativity. With the right approach, you’ll impress yourself and others at the dinner table. Enjoy making this dish and explore all the meal prep options!

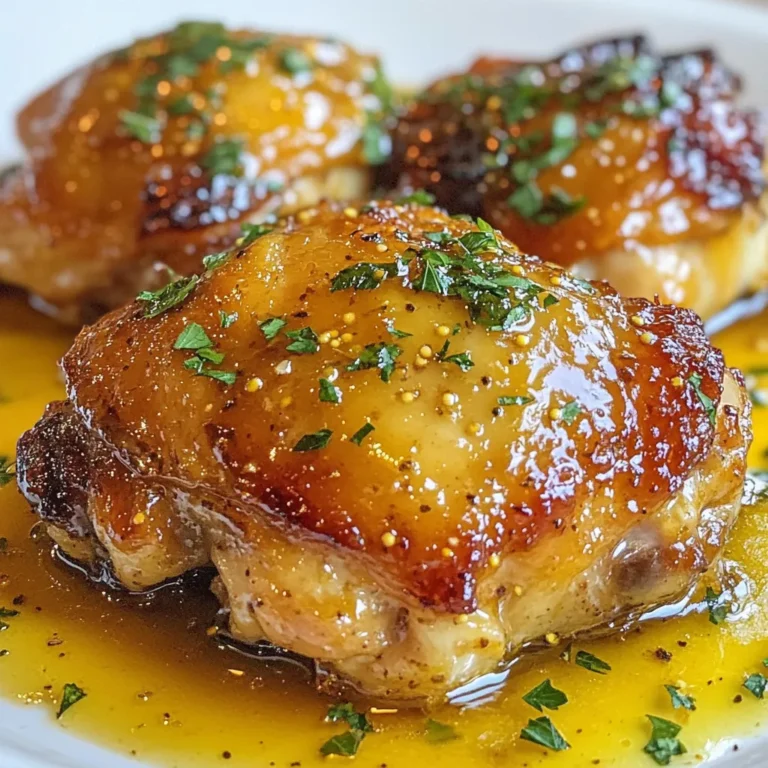
Honey Mustard Chicken Thighs Easy and Flavorful Recipe

- 8 oz linguine or spaghetti - 1 lb large shrimp, peeled and deveined - 4 tablespoons unsalted butter, divided - 4 cloves garlic, finely minced - 1 teaspoon red pepper flakes - Zest and juice of 1 lemon - 1/4 cup fresh parsley, finely chopped - Salt and freshly ground black pepper, to taste - Grated Parmesan cheese, to serve I love using fresh ingredients to make this dish shine. The shrimp brings a sweet flavor. I prefer large shrimp for their juicy bite. They cook quickly and soak up flavors well. The linguine or spaghetti adds a nice texture and holds the sauce well. I use unsalted butter for a clean taste. Garlic is the star here. I finely mince it to release its flavor. The red pepper flakes give a gentle kick. You can adjust this to your taste. The lemon zest and juice brighten the dish. They add a fresh contrast to the rich butter. For garnishing, I use fresh parsley for color and flavor. It also adds a nice crunch. Salt and pepper enhance all the flavors. Lastly, grated Parmesan cheese is a must for serving. It adds a creamy touch that completes this dish. These ingredients come together to create a simple yet flavorful meal. To start, fill a large pot with water and add salt. Bring it to a rolling boil. Add 8 oz of linguine or spaghetti. Cook it as per the package's directions until it is al dente. Once it’s ready, be sure to save ½ cup of the starchy pasta water. Then, drain the pasta and set it aside. Reserving pasta water is key. This starchy water helps bind the sauce to the pasta, giving it a nice creamy texture later. Next, grab a spacious skillet and place it over medium heat. Melt 2 tablespoons of butter in the skillet. Add 1 lb of large shrimp in a single layer. Make sure they don’t crowd the pan. Season the shrimp with salt, freshly ground black pepper, and 1 teaspoon of red pepper flakes. Cook for about 2 to 3 minutes on each side. The shrimp should turn pink and be fully cooked. After that, carefully take the shrimp out and transfer them to a plate. This method ensures your shrimp are juicy and flavorful. Now, let’s make the garlic butter sauce. In the same skillet, add the remaining 2 tablespoons of butter. Toss in 4 finely minced garlic cloves. Sauté for about 1 minute, stirring constantly. You want the garlic to be fragrant and lightly golden. Be cautious not to burn the garlic, as burnt garlic tastes bitter. Once it’s ready, it’s time to bring back the shrimp. Return the cooked shrimp to the skillet with the garlic butter. Then, add the lemon zest and juice from 1 lemon, followed by the drained pasta. Gently toss everything together. If the pasta seems dry, add a bit of the reserved pasta water to achieve a smooth and even coating. Stir in ¼ cup of freshly chopped parsley. Taste your dish, and adjust the seasoning with extra salt and pepper if needed. Serve the pasta in bowls and sprinkle generously with grated Parmesan cheese. Enjoy the delightful mix of flavors! To cook perfect al dente pasta, start with a large pot of salted water. Bring it to a rolling boil before adding your linguine or spaghetti. Follow the package directions, but check a minute early. The pasta should be firm yet tender. Remember to reserve half a cup of pasta water before draining. This starchy water helps bind the sauce later. When sautéing shrimp, keep them in a single layer in the pan. This helps them cook evenly. Cook for about 2-3 minutes on each side. Look for a bright pink color to know they are done. Overcrowding can lead to uneven cooking, so work in batches if necessary. Want to spice things up? Adjust the red pepper flakes to your taste. Start with one teaspoon, then add more if you like heat. Mix it well with the shrimp for even flavor. To enhance the lemon flavor, use both lemon zest and juice. The zest adds a bright note, while the juice gives it a fresh kick. You can also add more zest after cooking for extra brightness. For garnishing, fresh parsley adds a pop of color. Sprinkle it on top before serving. You can also add lemon wedges on the side. This makes the dish look more inviting. Serve your Garlic Butter Shrimp Pasta in individual bowls. For a touch of elegance, pair it with a green salad. The fresh greens balance the richness of the pasta. {{image_4}} If you want to change the pasta, try gluten-free or whole grain options. These can add a twist and make the dish fit your needs. You can also swap shrimp for chicken or tofu. Chicken gives a heartier bite, while tofu is great for a vegetarian choice. Adding veggies can brighten the dish. Spinach or cherry tomatoes work well. They not only add color but also enhance the taste. You can also play with herbs. Basil or cilantro can bring fresh notes to the garlic butter sauce. Experiment and find what you love! To make this dish low-carb or keto-friendly, swap pasta for zucchini noodles or spaghetti squash. This lets you enjoy the flavors without the carbs. If you need a dairy-free option, use olive oil instead of butter. Nutritional yeast can replace cheese and add a cheesy flavor without the dairy. To store Garlic Butter Shrimp Pasta, let it cool first. Place it in an airtight container. This helps keep the flavors fresh. You can also use plastic wrap if you don't have a container. In the fridge, it lasts about three days. If you see any change in color or smell, it's best to toss it. To reheat, you can use a skillet or the microwave. For the skillet, add a splash of water or broth. Heat on low, stirring gently. This keeps the shrimp tender and the pasta moist. If using a microwave, cover the bowl with a damp paper towel. This helps keep the dish from drying out. Heat in short bursts, stirring in between. You can freeze Garlic Butter Shrimp Pasta, but it's best to do so without the shrimp. Cooked shrimp may become rubbery after freezing. To freeze, place the pasta in a freezer-safe bag. Squeeze out excess air to prevent freezer burn. When you're ready to eat, defrost in the fridge overnight. Reheat gently on the stove, adding a bit of water or broth. I love using linguine or spaghetti for this dish. Both types hold the sauce well. You can also try fettuccine for a thicker bite. When cooking, aim for al dente. This means the pasta should still have a slight bite. It helps create a great texture with the shrimp and sauce. Yes, you can prep some parts in advance. Cook the pasta and store it in the fridge. Keep it in a sealed container. You can also season and cook the shrimp ahead. Store them separately to keep them fresh. When ready to eat, just combine everything in a pan. Heat gently and add a splash of pasta water. To complete your meal, I suggest a fresh green salad. A crisp Caesar salad works great too. You can also serve garlic bread on the side. It’s perfect for soaking up extra sauce. Steamed vegetables like asparagus or broccoli add color and nutrition. If you want heat, add more red pepper flakes. Start with a half teaspoon more for a kick. You can also mix in some sliced jalapeños for extra spice. Another option is to add a dash of hot sauce. Just remember to taste as you go! This blog post shared how to make Garlic Butter Shrimp Pasta. We covered the main ingredients, key cooking steps, tips for flavor, and interesting variations. You learned about storing leftovers and reheating them. Remember, you can adjust spices and use different proteins or pasta. This dish is flexible and perfect for any meal. Enjoy your cooking and let your kitchen shine with this tasty recipe!

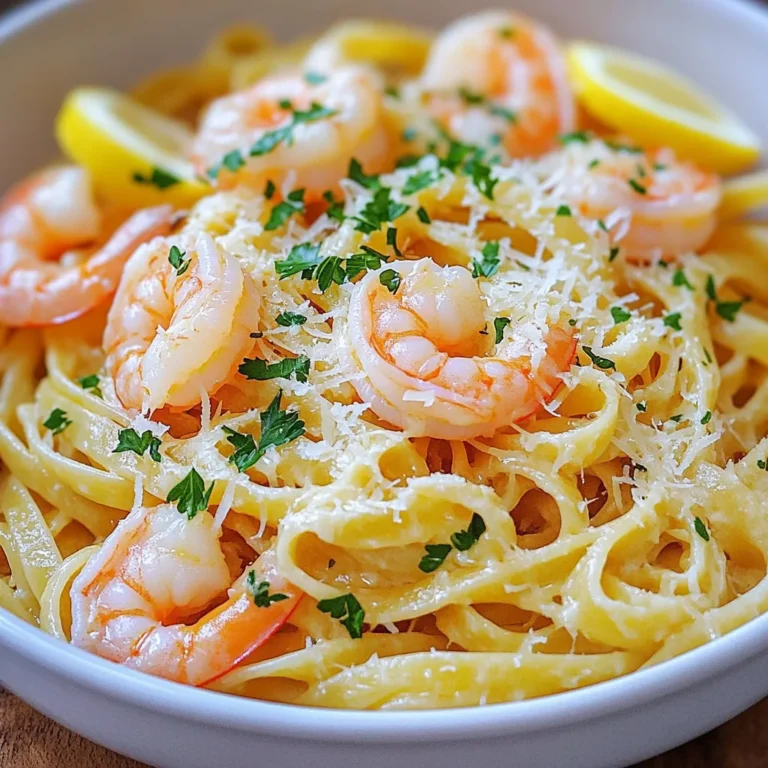
Garlic Butter Shrimp Pasta Easy and Flavorful Delight

- 1 loaf of brioche bread, cut into 1-inch cubes - 3 large eggs - 2 cups whole milk The main star of this dish is brioche bread. It is soft and sweet, making it perfect for soaking. Next, we need eggs. They give the casserole its rich texture. Whole milk adds creaminess and keeps everything moist. - 2 teaspoons ground cinnamon - 1/4 teaspoon ground nutmeg - 1 tablespoon pure vanilla extract The spices bring warmth and depth to the dish. Ground cinnamon is a must for that classic apple flavor. Ground nutmeg adds a hint of spice that balances the sweetness. Vanilla extract enhances all the flavors and rounds out the taste. - 1 cup unsweetened applesauce - 1/4 cup pure maple syrup - 2 medium apples, peeled, cored, and diced into small pieces - 1/2 cup chopped walnuts (optional) - Powdered sugar, for dusting - Fresh apple slices, for garnish Applesauce keeps the casserole moist and adds natural sweetness. Maple syrup adds richness and a touch of caramel flavor. Fresh apples give a nice crunch. If you like, toss in walnuts for added texture. Lastly, powdered sugar and fresh apple slices make for a beautiful presentation. Enjoy the layers of flavor! 1. Preheat your oven to 350°F (175°C). This step is key for even baking. 2. Grab a 9x13-inch baking dish and grease it. Use butter or cooking spray to keep the casserole from sticking. 1. In a large mixing bowl, mix together 3 large eggs, 2 cups of whole milk, 1 cup of unsweetened applesauce, 1/4 cup of pure maple syrup, 1 tablespoon of pure vanilla extract, 2 teaspoons of ground cinnamon, and 1/4 teaspoon of ground nutmeg. Whisk it all until smooth. 2. Now, gently fold in the cubed brioche bread. Make sure each piece gets coated well. Let this mixture sit for about 10 minutes. This lets the bread soak up all those yummy flavors. 3. After the bread has soaked up the mixture, add in 2 diced apples and 1/2 cup of chopped walnuts, if you like. Mix everything evenly so that the apples and nuts are spread throughout. 1. Pour the mixture into your prepared baking dish. Spread it out evenly to help it cook well. 2. Bake for 35 to 40 minutes. You want the top to turn golden brown. To check if it’s done, insert a knife in the center. If it comes out clean, it's ready. 3. Once baked, take it out and let it cool for 5 to 10 minutes. This cooling time makes it easier to slice. 4. Right before serving, dust the top with some powdered sugar. You can also add fresh apple slices for a nice touch. To get the best texture for your casserole, soaking the bread is key. Cut the brioche into 1-inch cubes. Mix it well with the egg mixture. Let it rest for about 10 minutes. This ensures the bread absorbs the flavors without getting too soggy. For baking, set your oven to 350°F (175°C). Bake for 35 to 40 minutes. You want the top to turn golden brown. A knife should come out clean when inserted in the center. This tells you it’s ready! Choosing the right apples can make a big difference. I love using sweet varieties like Honeycrisp or Fuji. They add natural sweetness and a nice texture. You can also mix different apples for more depth in flavor. Don't be afraid to play with spices! Besides cinnamon and nutmeg, you might try adding a dash of allspice or ginger. These can bring warmth and extra flavor to your casserole. Garnishing makes a dish more appealing. Just before serving, dust the top with powdered sugar. This adds a nice touch. You can also add fresh apple slices on top. They not only look good but also add freshness. For gatherings, serve the casserole warm. Pair it with whipped cream or a scoop of vanilla ice cream. It makes for a delightful treat that everyone will enjoy! {{image_4}} You can switch up the bread in this recipe. Try using challah or whole wheat bread. Challah adds a rich flavor. Whole wheat bread gives a nice nutty taste. Each choice changes the texture too. Brioche is soft and fluffy, while these options offer more heartiness. Seasonal changes can make this dish even better. In fall, add cranberries for a tart twist. They pair well with apples and cinnamon. You can also explore different fruits like pears or peaches. Nuts like pecans or almonds add crunch and flavor. If you follow certain diets, this recipe can still work for you. For gluten-free options, use gluten-free bread. This keeps the dish tasty without gluten. If you want a vegan version, replace eggs with flax eggs and use plant-based milk. This way, everyone can enjoy this delicious casserole. To keep your Apple Cinnamon French Toast Casserole fresh, store it in the fridge. Place leftovers in an airtight container to prevent drying out. If you don’t have one, wrap it tightly with plastic wrap. This helps keep moisture in and flavors intact. You can freeze portions of the casserole for later use. First, let it cool completely after baking. Cut it into pieces and wrap each piece in plastic wrap. Then, place the wrapped pieces in a freezer-safe bag or container. For best texture, thaw in the fridge overnight before reheating. In the fridge, your casserole will last about 3 to 4 days. If you freeze it, it can stay good for up to 3 months. Just remember that the longer it sits, the more the texture may change. Enjoy it fresh for the best taste! Yes, you can make this casserole the night before. Just follow these steps: - Mix all the ingredients as usual. - Pour the mixture into the baking dish. - Cover it tightly with plastic wrap or foil. - Place it in the fridge overnight. This lets the bread soak up the flavors and makes it even better. If you need an egg substitute, try these options: - 1/4 cup unsweetened applesauce for each egg. - 1/4 cup mashed banana per egg. - 1 tablespoon ground flaxseed mixed with 2.5 tablespoons water. These choices work well for various diets and still keep the casserole tasty. Yes, you can use a slow cooker! Here’s how: - Prepare the mixture as you would for the oven. - Grease the slow cooker with cooking spray. - Pour the mixture into the slow cooker. - Cook on low for 4 to 6 hours. Check for doneness by inserting a knife. It should come out clean. To keep your casserole from being soggy, follow these tips: - Let the bread soak only for about 10 minutes. - Use stale or day-old bread. It absorbs moisture better. - Make sure the apples are diced small to cook evenly. - Bake until the top is golden brown. These steps help you achieve the perfect texture every time. Apple cinnamon French toast casserole combines simple ingredients for a tasty dish. You learned about key ingredients, preparation, and baking steps. We explored variations for different diets and creative presentation tips too. Remember, soaking the bread and the right baking time make a big difference. Embrace your creativity by trying new apples or spices. This dish is perfect for gatherings and can easily be stored or frozen for later. Enjoy making a delicious breakfast that brings warmth to your home.

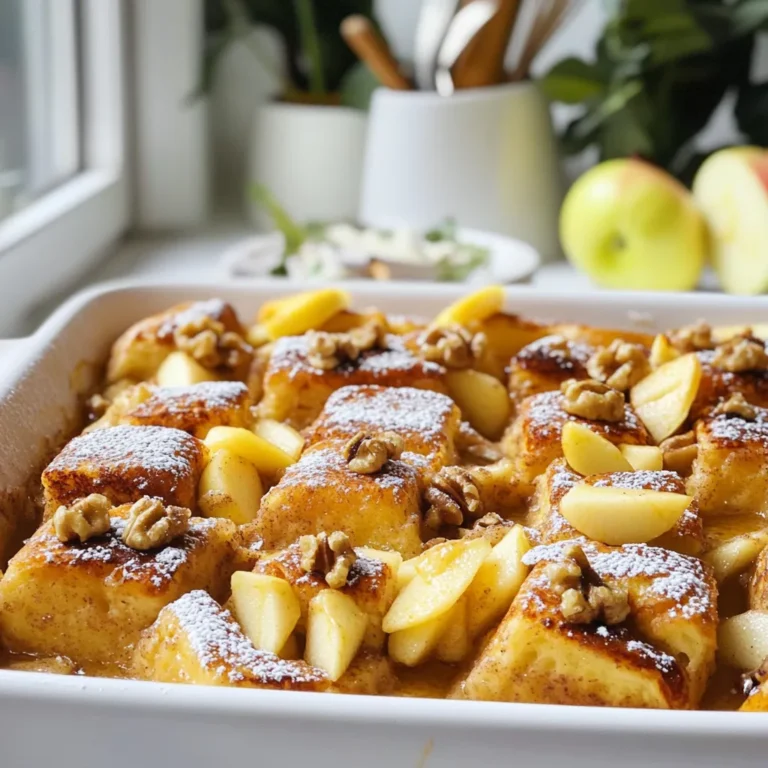
Apple Cinnamon French Toast Casserole Easy Recipe

- 12 oz (340g) penne pasta - 1 can (14 oz) artichoke hearts, drained and roughly chopped - 3 cups fresh spinach, roughly chopped - 1 cup heavy cream - 1 cup grated Parmesan cheese - 3 cloves garlic, minced - 1 teaspoon onion powder - 1 teaspoon Italian seasoning - 2 tablespoons olive oil - Salt and pepper to taste - Red pepper flakes (optional, for heat) Gather these ingredients before you start cooking. Each one plays a key role in making your pasta creamy and full of flavor. The penne pasta will be the base, and the artichoke hearts add a unique taste. Fresh spinach brings color and nutrition. Heavy cream and Parmesan create a rich sauce. The spices and olive oil enhance the overall dish. When you have all your ingredients ready, cooking becomes smooth. It makes the process easier, and you’ll enjoy your time in the kitchen. Remember, fresh ingredients lead to the best results. Let's get cooking! - Heat 2 tablespoons of olive oil in a large pot over medium heat. - Once hot, add 3 cloves of minced garlic. Sauté for about 1 minute until fragrant. - Pour in 3 cups of vegetable broth and bring to a gentle simmer. - Add 12 ounces of penne pasta, 1 can of artichoke hearts, and seasonings. - Include 1 teaspoon of onion powder, 1 teaspoon of Italian seasoning, and a pinch of salt and pepper. - Stir well to coat the pasta in the broth. - Cover the pot and cook according to package instructions, about 10-12 minutes. Stir occasionally to prevent sticking. - When the pasta is nearly al dente and liquid is absorbed, reduce heat to low. - Gradually stir in 1 cup of heavy cream and 1 cup of grated Parmesan cheese. - Mix until the cheese melts and the sauce is creamy. - Add 3 cups of chopped spinach and cook for 2-3 minutes until wilted. - Taste and adjust seasoning. Add red pepper flakes if you like some heat. - How to prevent pasta from sticking: Stir the pasta during cooking. This keeps it from clumping. Use enough liquid in the pot. This helps the pasta move freely and cook evenly. - Perfecting the creamy sauce: Add the cream slowly after the pasta cooks. Stir it in well. This makes the sauce smooth and rich. Grate fresh Parmesan cheese for best flavor. - Garnishing with Parmesan and black pepper: Serve the pasta in bowls. Top each serving with a sprinkle of Parmesan. Add freshly cracked black pepper for a nice touch. This enhances the dish's flavor and looks. - Adding sautéed artichoke hearts for presentation: For a fancy look, sauté extra artichoke hearts. Place them on top of the pasta. This adds color and texture to your dish. - Substituting heavy cream and cheese for lighter options: You can use half-and-half or coconut milk instead of heavy cream. For cheese, try nutritional yeast or a vegan cheese blend. These options still give a creamy feel while being lighter. {{image_4}} You can easily boost the protein in this dish. Try adding cooked chicken, shrimp, or tofu. - Chicken: Use cooked, shredded chicken for a hearty touch. - Shrimp: Sauté shrimp until pink and add them during the last few minutes. - Tofu: Use firm tofu, cubed and sautéed until golden. These options make the pasta even more filling and satisfying. To make your dish pop, add extra herbs and spices. - Herbs: Fresh basil or parsley can brighten the flavors. - Spices: A pinch of nutmeg adds warmth. - Lemon Zest: Grate some lemon zest for a fresh twist. This will lift the creamy sauce and add brightness. Experimenting with flavors can turn this dish into your signature meal. Want to make this pasta vegan? It’s simple! - Cream: Substitute heavy cream with coconut cream or cashew cream. - Cheese: Use nutritional yeast or vegan cheese for a cheesy taste. - Broth: Ensure your vegetable broth is vegan-friendly. This vegan version keeps all the creaminess and flavor without animal products. Enjoy the same deliciousness while sticking to your diet! To keep your One Pot Creamy Spinach Artichoke Pasta fresh, store it in a sealed container. This helps to keep the flavors intact and prevents spills. Make sure it cools to room temperature before sealing. In the fridge, it lasts for about 3 to 5 days. If you want to enjoy this dish later, storing it correctly is key. Always check for any signs of spoilage before eating. Freezing this pasta is a great option if you want to save some for later. Start by letting it cool down completely. Then, place it in a freezer-safe container or bag. Be sure to remove as much air as possible to prevent freezer burn. You can freeze it for up to 2 months. When you’re ready to eat, take it out and let it thaw overnight in the fridge. To reheat, add a splash of vegetable broth or water to the pot. This helps bring back the creamy texture. Heat it on low, stirring often. Enjoy your creamy pasta just like new! Yes, you can use frozen spinach! Just thaw and drain it well before adding. Frozen spinach is convenient and still tasty. It may have a softer texture, but it works great in this dish. To make this dish gluten-free, use gluten-free penne pasta. Many brands offer tasty options. Just follow the cooking time on the package. It’s that simple! Reheat gently on the stove or in the microwave. If it seems thick, add a splash of broth or cream. Stir often to keep it creamy. This dish heats up nicely. Yes, you can prepare this meal ahead. Cook the pasta and sauce, then cool and store it in the fridge. When you’re ready to eat, reheat and add spinach just before serving. Enjoy a quick and tasty meal! This article covered how to make a tasty creamy spinach artichoke pasta. We explored the key ingredients, step-by-step cooking, and clever tips. You learned about dairy options, protein add-ins, and how to store leftovers. In my view, this dish is simple and satisfying. With countless variations, you can customize it to your taste. Enjoy cooking and sharing this delightful meal with friends and family!

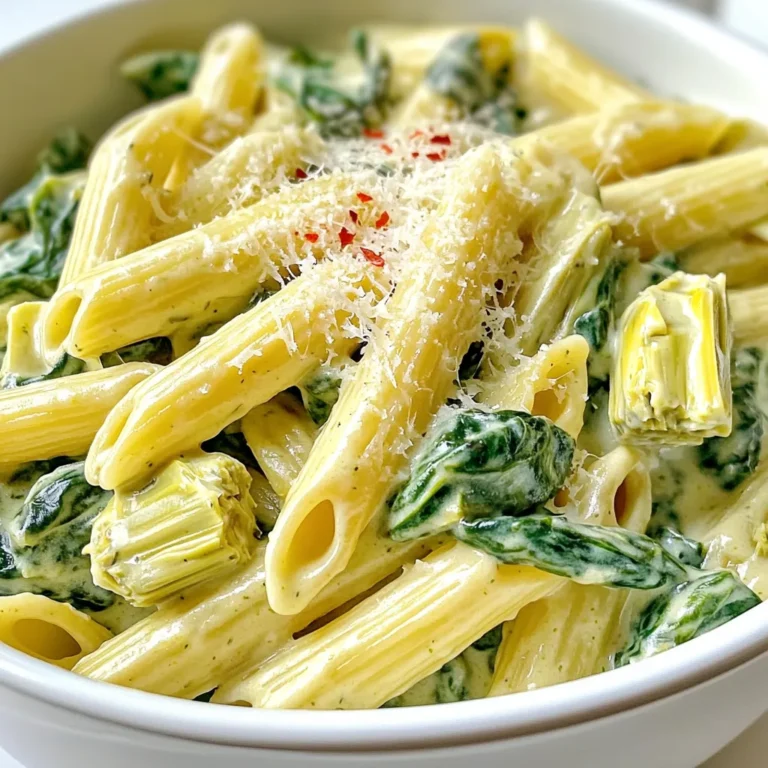
One Pot Creamy Spinach Artichoke Pasta Delight

- 1 lb large shrimp, peeled and deveined - 2 tablespoons honey - 2 tablespoons sriracha sauce - 1 tablespoon soy sauce - 1 tablespoon minced garlic (approximately 3 cloves) - 1 teaspoon grated ginger - 2 tablespoons olive oil - 1 tablespoon lime juice (freshly squeezed) - Chopped green onions for garnish - Sesame seeds for garnish - Large skillet - Mixing bowl - Whisk - Tongs - Measuring spoons - Calories: 250 - Protein: 24g - Fat: 10g - Carbohydrates: 12g - Fiber: 1g - Sugar: 9g This dish is not only quick to make, but it also brings bold flavors to your table. The honey adds sweetness, while the sriracha gives it a nice kick. Perfect for busy nights or when you want to impress guests! 1. Start with a small bowl. Add honey, sriracha sauce, soy sauce, minced garlic, grated ginger, and lime juice. 2. Whisk all the ingredients together until smooth. Make sure there are no lumps. 3. Get your shrimp ready. Peel and devein them if not done yet. 1. Heat olive oil in a large skillet over medium-high heat. Wait until it shimmers. 2. Place the shrimp in the skillet in a single layer. Don’t overcrowd them! 3. Cook the shrimp for about 2 minutes. They should turn pink on one side. 4. Flip each shrimp with tongs. Pour the honey sriracha mixture over them evenly. 5. Cook for another 2-3 minutes, stirring often. The shrimp should be fully cooked and coated well. 6. Look for pink and opaque shrimp. Remove the skillet from heat. 1. Let the shrimp rest for about one minute. This helps the sauce thicken a bit. 2. Serve the shrimp hot. Garnish with chopped green onions and sesame seeds. Enjoy the sweet and spicy flavor! When making Minute Honey Sriracha Shrimp, avoid these pitfalls: - Overcrowding the skillet: This can steam the shrimp instead of searing them. - Cooking on high heat: High heat can burn the sauce. Medium-high works best. - Not checking for doneness: Shrimp cook fast. They should turn pink and opaque. This dish pairs well with many sides: - Steamed rice: The rice soaks up the sauce, adding flavor. - Quinoa: For a healthy twist, use quinoa instead of rice. - Salad: A fresh side salad balances the sweet and spicy flavors. To cook shrimp just right: - Use fresh shrimp: Fresh shrimp taste better and cook evenly. - Don't overcook: Shrimp only need 4-5 minutes total. Watch for color change. - Let them rest: After cooking, let the shrimp sit for a minute. This helps the sauce thicken. These tips will ensure your dish shines every time! {{image_4}} You can switch up the sauce for new flavors. Try using teriyaki sauce for a sweet twist. A spicy garlic sauce will also pair well with shrimp. If you like tang, use a sweet chili sauce. Each choice keeps the dish tasty and fun. You can use different proteins if you want a change. Chicken breast works well and cooks fast. Tofu is a great option too, especially for a vegetarian dish. Use firm tofu and cut it into cubes. If you choose fish, salmon or scallops will fit nicely with the sauce. Adding veggies makes this dish even better. Bell peppers add color and crunch. Snap peas or broccoli will also work for a nice bite. Simply toss them in the pan with the shrimp. Cook them for a few minutes until tender. This small change boosts nutrition and makes your meal more filling. After enjoying your Minute Honey Sriracha Shrimp, let the dish cool down. Place leftovers in an airtight container. Keep it in the fridge. It will stay fresh for up to two days. If you need to store it longer, try freezing it instead. To reheat the shrimp, use a skillet over low heat. Add a splash of water or oil to keep it moist. Stir gently until it’s warm. You can also use a microwave. Heat on low for about one minute. Check to avoid overcooking. For freezing, make sure the shrimp is cooled. Place it in a freezer-safe bag. Remove as much air as you can. It will keep well for up to three months. When you’re ready to eat, thaw in the fridge overnight. Then reheat as described above. You can prepare the sauce ahead of time. Mix the honey, sriracha, soy sauce, garlic, ginger, and lime juice. Store it in the fridge for up to three days. When you are ready to cook, just toss the shrimp in the sauce. This will save you time on a busy night. The heat level depends on the sriracha used. If you like it mild, use less sriracha. For more heat, add extra sriracha to the sauce. The sweetness of honey balances the spice. This gives you a nice sweet and spicy taste that many enjoy. Yes, you can use frozen shrimp. Just thaw them first. Place the shrimp in cold water for about 20 minutes. Once thawed, peel and devein if needed. The cooking time may be a bit longer. Just make sure they turn pink and opaque before serving. This blog post covered the key steps to making a delicious shrimp dish. We explored the essential ingredients, needed tools, and nutritional info. I shared easy preparation and cooking steps, plus tips to avoid common mistakes. You learned about fun variations and how to store leftovers properly. In conclusion, cooking shrimp can be simple and fun. With these tips, you can create tasty meals that impress! Enjoy your cooking journey!

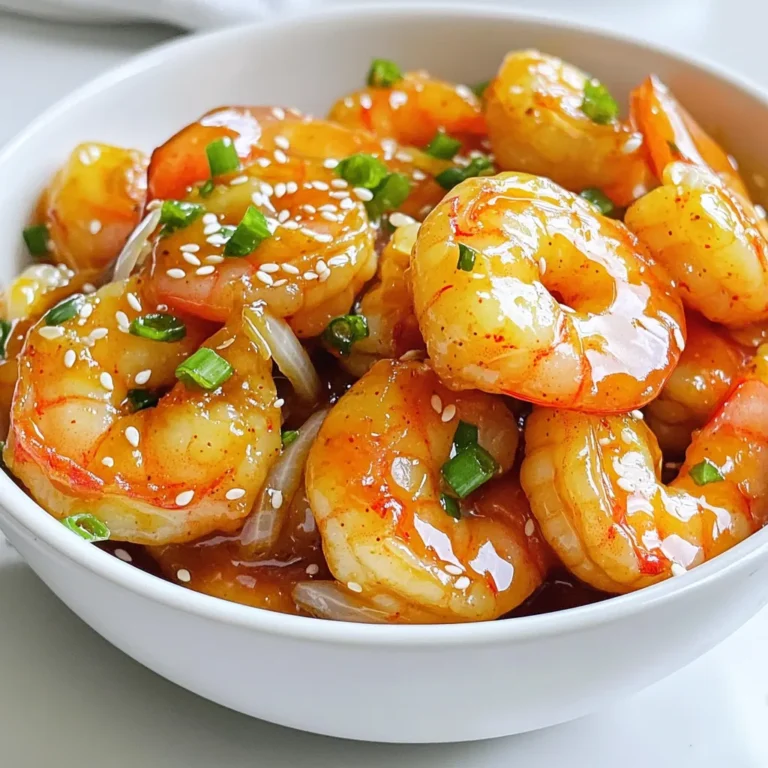
Minute Honey Sriracha Shrimp Quick and Easy Recipe

- 12 oz (340g) spaghetti or fettuccine - 4 cups fresh spinach, roughly chopped - 1 cup heavy cream - 1 cup vegetable broth - 4 cloves garlic, minced - 1 small onion, finely chopped - 1 tablespoon olive oil - 1 teaspoon Italian seasoning - ¼ cup grated Parmesan cheese - Fresh basil leaves for garnish In this recipe, we use simple yet fresh ingredients. The spaghetti or fettuccine serves as the base. I love how they soak up the creamy sauce. Fresh spinach adds a nice touch of color and nutrition. Heavy cream gives the dish its rich texture. Vegetable broth adds depth to the flavor. For seasonings, garlic and onion are key. They create a wonderful aroma as they cook. Olive oil helps sauté these ingredients, adding a silky feel. Italian seasoning brings all the flavors together. You can add Parmesan cheese for extra creaminess. Fresh basil is a perfect garnish to brighten the dish. Overall, these ingredients make a satisfying meal that is easy to prepare. 1. Start by heating 1 tablespoon of olive oil in a large pot over medium heat. 2. Add 1 small, finely chopped onion. Sauté it for about 3-4 minutes. You want it to be soft and translucent. 3. Next, add 4 cloves of minced garlic and 1 teaspoon of Italian seasoning. Cook for 1-2 minutes, stirring often. The garlic should smell great and be tender. 1. Carefully pour in 1 cup of vegetable broth and 1 cup of heavy cream. Stir well to mix all the flavors. 2. Now, add 12 ounces of spaghetti or fettuccine to the pot. Make sure the pasta is fully submerged in the liquid. 3. Increase the heat until the mixture comes to a gentle boil. 4. Once boiling, reduce the heat to medium-low. Cover the pot and let it simmer for 10-12 minutes. Stir occasionally to avoid sticking. The pasta should be al dente, and most of the liquid should be absorbed. If it looks too dry, add a splash more broth. 1. After cooking, gently fold in 4 cups of roughly chopped spinach. If you like cheese, add ¼ cup of grated Parmesan cheese too. Stir well. 2. Cook for another minute until the spinach wilts and the sauce is creamy. 3. Season with salt and freshly ground black pepper to taste. 4. Remove from heat and let it sit for a minute. This helps the sauce thicken before serving. To ensure perfect pasta texture, cook it al dente. This means it should be firm when bitten. Start testing the pasta a few minutes before the time on the package. Keep an eye on it. To avoid sticking during cooking, stir the pasta often. This helps separate the noodles. Adding a splash of olive oil to the pot can also prevent sticking. For spice adjustments, try adding a pinch of red pepper flakes. This will give your dish a nice kick. You can also add a squeeze of lemon juice for brightness. If you want creaminess without Parmesan, try cream cheese or ricotta. Both options blend well and add richness. The ideal accompaniments for this pasta include garlic bread and a fresh salad. A simple green salad pairs nicely. For presentation, serve the pasta in big bowls. Garnish with fresh basil leaves and a sprinkle of extra cheese. This makes a lovely, inviting dish. {{image_4}} You can easily change this recipe to fit your needs. For gluten-free pasta, use rice or quinoa pasta. These options taste great and cook well in this dish. For a dairy-free version, try coconut or cashew cream. Both give a nice creaminess without the dairy. Want to add some protein? You can toss in cooked chicken or shrimp. Just add them in when you mix in the spinach. You can also add other veggies like bell peppers or mushrooms. They add flavor and color to your pasta. To change the flavor, use different herbs or spices. Basil or thyme can work well. If you want some heat, sprinkle in chili flakes. This gives your dish a spicy kick that makes it exciting. To keep your creamy garlic spinach pasta fresh, use airtight containers. Glass or plastic containers work well. Store it in the fridge right after it cools down. This dish lasts about 3 to 5 days in the fridge. Make sure to check for any off smells before you eat. When you are ready to enjoy leftovers, reheat gently. Use a pan on low heat for best results. Add a splash of vegetable broth or cream to keep it creamy. Stir often to prevent sticking. You can also use the microwave, but be careful not to overheat it. You can freeze this pasta, but it may change texture. Let it cool completely before freezing. Use freezer-safe bags or containers. It stays good for about 2 to 3 months. To reuse, thaw it overnight in the fridge. After that, reheat it gently on the stove or microwave. Add a little cream or broth to bring back its creamy goodness. You can easily make this creamy garlic spinach pasta vegan. Just swap out the heavy cream for a plant-based cream like coconut or cashew cream. Use vegetable broth to keep it flavorful. For cheese, you can try nutritional yeast for a cheesy taste or skip it altogether. This way, you keep all the yum without dairy. Yes, you can use different pasta types! Penne, rigatoni, or whole wheat pasta work well too. Just make sure to adjust the cooking time. Each pasta has its own texture and flavor, so pick what you like best. This pasta pairs well with many sides. A crisp green salad adds freshness. Garlic bread brings a nice crunch and flavor. You could also enjoy it with roasted veggies for an extra health boost. Each side enhances your meal, making it even better! This blog post covered how to make creamy garlic spinach pasta, from ingredients to serving suggestions. You learned about the key ingredients, like pasta and spinach, and enhancing flavors with seasonings. You also discovered tips for cooking, storage, and variations to fit dietary needs. Remember, this dish is versatile and easy to adapt. Experiment with different add-ons and flavors to make it your own. Enjoy your cooking journey and savor every delicious bite of this comforting dish!

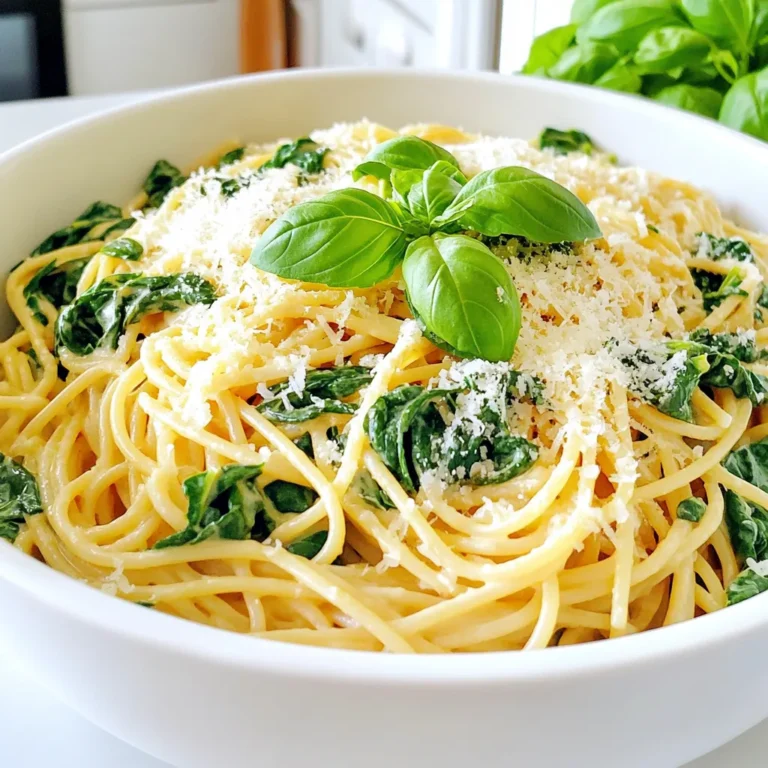
Creamy Garlic Spinach Pasta One Pot Delight

- 2 cups rolled oats - 1 cup almond flour - 1 teaspoon baking powder - 1 teaspoon ground cinnamon - 1/2 teaspoon ground nutmeg - 1/4 teaspoon sea salt - 1/2 cup honey or maple syrup - 1/2 cup unsweetened applesauce - 1/4 cup coconut oil, melted - 2 medium apples, peeled and diced into small chunks - 1/2 cup walnuts, chopped (optional) - 1/4 cup raisins or dried cranberries (optional) I love these apple cinnamon oatmeal bars because they are simple to make and full of flavor. You start with the dry ingredients. This includes rolled oats, almond flour, baking powder, cinnamon, nutmeg, and sea salt. Each one plays a big role in the final taste and texture. The oats give great chewiness. Almond flour adds a nice nutty flavor. Next, you mix the wet ingredients. In a bowl, whisk together honey or maple syrup, applesauce, and melted coconut oil. This mix brings sweetness and moisture to the bars. I often choose honey for its rich flavor, but maple syrup works well too. Now, for the fun part: add-ins! Diced apples add a fresh crunch. You can also toss in walnuts, raisins, or dried cranberries. These add-ins give extra texture and taste. I like using walnuts for a bit of crunch. The dried fruit adds natural sweetness. Gathering these ingredients is easy and quick. You can find all of them at your local store. The combination of flavors will make your kitchen smell amazing as they bake. - Preheat the oven to 350°F (175°C). - Prepare a 9x9-inch baking pan by greasing or lining it with parchment paper. - In a large bowl, combine: - 2 cups rolled oats - 1 cup almond flour - 1 teaspoon baking powder - 1 teaspoon ground cinnamon - 1/2 teaspoon ground nutmeg - 1/4 teaspoon sea salt - Stir these dry ingredients well until they mix evenly. - In a separate bowl, whisk together: - 1/2 cup honey or maple syrup - 1/2 cup unsweetened applesauce - 1/4 cup melted coconut oil - Mix until the blend is smooth and combined. - Gradually pour the wet mixture into the dry ingredients. - Stir gently but thoroughly until everything is evenly mixed into a batter. - Fold in: - 2 medium apples, peeled and diced into small chunks - 1/2 cup walnuts, chopped (optional) - 1/4 cup raisins or dried cranberries (optional) - Make sure the fruits and nuts are well spread throughout the batter. - Pour the batter into the prepared baking pan. - Use a spatula to smooth the top. - Place the pan in the oven and bake for 25-30 minutes. - Check if it’s done by inserting a toothpick; it should come out clean. - Once baked, let it cool in the pan for 10 minutes. - Carefully move the bars to a wire rack to cool completely. To get the best texture for your bars, do not overmix the batter. Mixing too much can make them tough. Just stir until you see no dry spots. Check doneness with a toothpick. Insert it into the center of the bars. If it comes out clean, they are ready. If you want to reduce the sweetness, use less honey or maple syrup. Start with a little less and taste the batter. You can always add more if needed. This way, you can control how sweet you want your bars. Feel free to change the flavors. You can add more spices like ginger or a pinch of cloves. Using flavored applesauce can also add a nice twist. Try cinnamon or even pumpkin spice applesauce for a fun change! {{image_4}} For a nut-free option, you can easily swap out the almond flour. Use oat flour or a gluten-free blend instead. This change keeps the bars soft and chewy, just like the original. Oat flour adds a nice flavor too. Plus, it makes the bars safe for those with nut allergies. If you want a vegan version, replace honey with maple syrup. This swap gives the bars a sweet touch without any animal products. You might need to adjust the binder if your mixture feels too loose. Adding a bit more applesauce can help. Get creative with your flavor! You can mix in chocolate chips for a sweet surprise. A splash of vanilla extract brightens up the taste too. Dried fruits like cranberries or apricots can add tangy notes. Each option makes the bars unique and fun to eat! You can store the Apple Cinnamon Oatmeal Bars at room temperature or in the fridge. If you opt for room temperature, place them in an airtight container. They will stay fresh for about three days. For longer storage, put them in the fridge. This will keep them good for up to a week. To freeze the bars, let them cool completely first. Then, wrap each bar tightly in plastic wrap. Place the wrapped bars in a freezer bag or an airtight container. They can last in the freezer for about three months. When you're ready to eat one, simply take it out and let it thaw at room temperature. You can also microwave it for about 15 seconds for a warm snack. To maintain freshness, always store the bars in an airtight container. Keeping them away from light and heat will help too. If you follow these steps, you can enjoy your bars at their best for up to a week at room temperature or longer if refrigerated. Yes, you can use quick oats. However, the texture will change. Quick oats cook faster and break down more. This makes the bars softer. Rolled oats give a chewier bite. If you prefer a firmer bar, stick with rolled oats. To make these bars gluten-free, use certified gluten-free oats. You can also swap almond flour with a gluten-free flour blend. Check labels to ensure all other ingredients are gluten-free. This way, you can enjoy the bars without worry. If you need a substitute for applesauce, mashed bananas work well. They add sweetness and moisture. You can also use plain yogurt for a creamy texture. Both options will keep the bars moist and tasty. You can store these bars for up to a week at room temperature. Keep them in an airtight container. For longer storage, refrigerate them for up to two weeks. You can even freeze them for up to three months. Just thaw before eating. Yes, you can add protein powder. Start with 1/4 cup and mix it into the dry ingredients. You may need to add a bit more liquid, like water or milk, to keep the batter moist. This way, you boost protein without changing the taste much. The oatmeal bar recipe gives you a simple, tasty treat. We covered dry and wet ingredients, mixing tips, and baking steps. You learned how to customize and store your bars. Feel free to swap ingredients to fit your taste and needs. Now it's time to enjoy your homemade snacks. Baking healthy treats doesn’t have to be hard. With this recipe, you can enjoy delicious and nutritious bars any time. Happy baking!

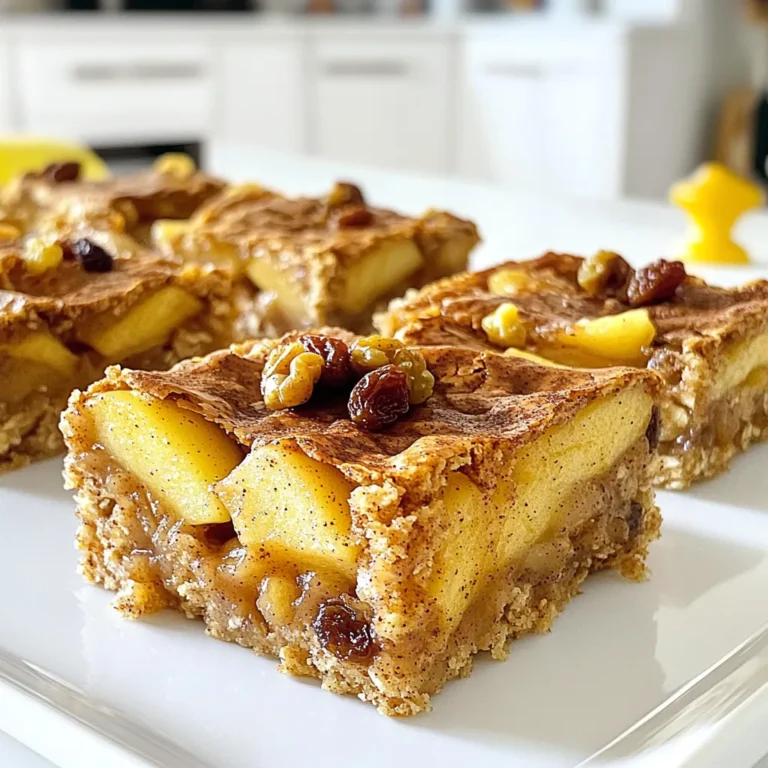
Apple Cinnamon Oatmeal Bars Tasty and Simple Recipe

To make Air Fryer Parmesan Broccoli, you need the following ingredients: - 2 cups broccoli florets - 1 tablespoon extra-virgin olive oil - 1/2 cup finely grated Parmesan cheese - 1 teaspoon garlic powder - 1/2 teaspoon onion powder - 1/2 teaspoon smoked paprika - Salt and freshly ground black pepper to taste - 2 tablespoons freshly squeezed lemon juice Each ingredient plays a key role in making this dish tasty. The broccoli provides a healthy base. Olive oil helps the seasonings stick and adds flavor. Parmesan cheese gives a nice, rich taste. Garlic and onion powders add depth. Smoked paprika gives a slight kick, while lemon juice adds a fresh zing. Be sure to use fresh broccoli florets for the best crunch. The olive oil should be extra-virgin for maximum flavor. Grated Parmesan is preferred since it melts and sticks well to the broccoli. These ingredients come together to create a delightful side dish. Trust me; this recipe will transform your view of broccoli! Set your air fryer to 390°F (200°C). Preheat it for about 5 minutes. This step helps the broccoli cook evenly and get crispy. First, rinse 2 cups of broccoli florets under cold water. Chop them into bite-sized pieces. Use a paper towel to dry the florets well. This will help them become crispy in the air fryer. In a large bowl, mix the dried broccoli with 1 tablespoon of olive oil. Add in 1 teaspoon of garlic powder, 1/2 teaspoon of onion powder, 1/2 teaspoon of smoked paprika, and salt and pepper to taste. Toss everything together until the broccoli is coated. Place the seasoned broccoli in the air fryer basket in a single layer. Avoid crowding the basket. Air fry for 8-10 minutes at 390°F (200°C). Halfway through, shake the basket to ensure even cooking. Look for a crispy and golden brown color. Once cooked, take the broccoli out and drizzle 2 tablespoons of lemon juice over it. This adds a fresh taste that pairs well with the cheese. Serve it right away for the best flavor and crunch! To get the best crunch from your broccoli, dry it well. Water on the surface will steam the broccoli, making it soggy. After rinsing, use a paper towel to pat it dry. This step is key. Also, give the broccoli space in the air fryer. Overcrowding can block air flow, leading to uneven cooking. Arrange the florets in a single layer for the most crispiness. You can boost the flavor of your broccoli in many ways. Try adding a pinch of red pepper flakes for heat. If you like herbs, consider thyme or oregano. These spices pair well with Parmesan cheese. You can mix and match based on your taste. Feel free to experiment with flavors to find your favorite blend. Serving your broccoli well can make it more appealing. Use a bright platter to showcase the colors. Adding lemon wedges on the side not only looks nice, but also adds a zesty touch. For a final flourish, sprinkle extra Parmesan on top. This small detail can impress your guests and elevate your dish. {{image_4}} I love using Parmesan cheese in this recipe, but you can switch things up! Try using Pecorino Romano for a sharper taste. Grated Asiago also works well, adding a nice nutty flavor. If you want a milder cheese, go for mozzarella. Just remember to adjust the quantity for melting and flavor. Broccoli shines here, but you can add other veggies too! Cauliflower florets make a great substitute. You can also mix in some sliced bell peppers or zucchini for extra color and flavor. Even green beans can join the party! Just keep the pieces similar in size for even cooking. Air frying is fun, but you can bake these in an oven too! Preheat your oven to 400°F (200°C) and spread the seasoned broccoli on a baking sheet. Bake for about 15 minutes, shaking halfway through. If you prefer the stovetop, sauté the broccoli in a pan over medium heat with a bit of oil. Just be sure to keep it moving for even cooking! To keep your crispy Air Fryer Parmesan broccoli fresh, place it in an airtight container. Store it in the fridge for up to three days. Make sure the broccoli cools down before sealing it. This helps prevent steam buildup, which can make the broccoli soggy. To reheat the broccoli and keep it crispy, use the air fryer again. Set it to 350°F (175°C) and heat for about 3-5 minutes. You can also use a toaster oven. This method helps maintain the texture and flavor. Avoid microwaving, as it can make the broccoli soft. If you want to freeze the broccoli, follow these steps. First, let it cool completely. Then, place it in a freezer-safe bag. Remove as much air as possible before sealing. You can store it for up to three months. To thaw, place it in the fridge overnight. Reheat in the air fryer or oven to restore crispiness. For this recipe, I recommend an air fryer with a capacity of at least 3.5 quarts. This size works well for cooking 2 cups of broccoli. Look for a model with adjustable temperature settings and a timer. Brands like Philips or Ninja offer great features and reliability. They heat quickly and cook evenly, which is key for crispy results. Yes, you can use frozen broccoli. However, it will cook differently. Frozen broccoli has more moisture, so it may not get as crispy. To use frozen broccoli, thaw it first and pat it dry. This helps reduce the moisture. Cook it for a few extra minutes to ensure it becomes tender and slightly crispy. To make this dish vegan, swap the Parmesan cheese for a plant-based alternative. Nutritional yeast is a great choice. It adds a cheesy flavor without dairy. You can also use vegan cheese shreds if you prefer. Just follow the same steps in the recipe, and you’ll have a tasty vegan treat! The air fryer is your best friend for making crisp, tasty broccoli. We covered how to choose your ingredients, prep the broccoli, and season it perfectly. You learned tips for crispiness and how to add your own flavors. Whether you want to try new cheeses or cook other veggies, the options are endless. Remember, storing leftovers properly helps keep their taste. Enjoy your crispy broccoli and experiment with your favorite flavors. Simple steps lead to delicious results, so dig in!

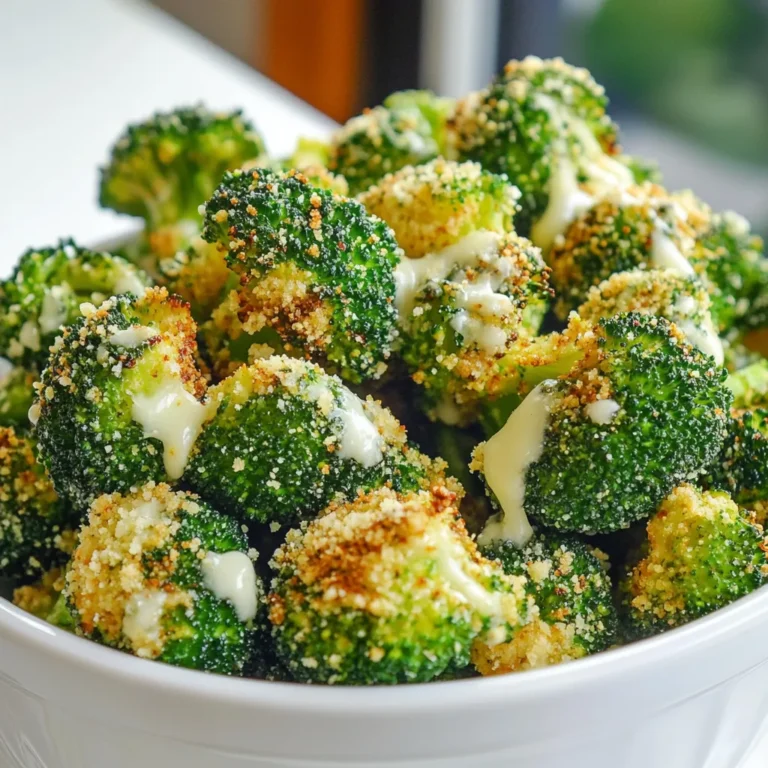
Air Fryer Parmesan Broccoli Tasty and Crisp Treat

This recipe for caramel swirl pumpkin brownies needs the right mix of ingredients for that perfect taste. Here’s what you will need: - 1 cup all-purpose flour - 1/2 cup unsweetened cocoa powder - 1 teaspoon baking powder - 1/4 teaspoon salt - 1/2 cup unsalted butter, melted and slightly cooled - 1 cup granulated sugar - 2 large eggs, at room temperature - 1 teaspoon pure vanilla extract - 1/2 cup canned pumpkin puree (not pumpkin pie filling) - 1/4 teaspoon pumpkin pie spice - 1/2 cup caramel sauce (store-bought or homemade) - 1/4 cup chopped walnuts or pecans (optional for added crunch) Each ingredient plays a key role. The flour and cocoa powder form the base, giving a rich texture. Baking powder helps the brownies rise. Salt adds depth to the sweetness. Melted butter ensures moisture, while sugar brings balance. Eggs bind everything together, making the brownies fudgy. Vanilla extract adds warmth, and pumpkin puree gives that autumn flavor. Pumpkin pie spice enhances the taste with warmth and sweetness. Caramel sauce creates that delicious swirl, and nuts add a nice crunch. Feel free to adjust the nuts based on your taste. These ingredients combine to create a truly delightful treat! Start by preheating your oven to 350°F (175°C). Grab a 9x9-inch baking pan. Lightly grease it with cooking spray. You can also line it with parchment paper. This step helps with easy removal later. In a medium mixing bowl, add 1 cup of all-purpose flour. Then, mix in 1/2 cup of unsweetened cocoa powder. Next, add 1 teaspoon of baking powder and 1/4 teaspoon of salt. Whisk these dry ingredients together well. Set this bowl aside for now. In a large mixing bowl, pour in 1/2 cup of slightly cooled melted butter. Add 1 cup of granulated sugar. Mix these together until smooth. You can use a whisk or an electric mixer. After that, add 2 large eggs, one at a time. Follow with 1 teaspoon of pure vanilla extract. Beat until everything is blended and smooth. Now it's time to add flavor. Gently fold in 1/2 cup of canned pumpkin puree. Sprinkle in 1/4 teaspoon of pumpkin pie spice. Mix until well combined. Next, take your bowl of dry ingredients. Gradually add it to the wet mixture. Stir gently until just combined. Be careful not to overmix. This keeps your brownies fudgy. Pour the thick brownie batter into your prepared baking pan. Use a spatula to spread it evenly. Smooth out the top so it looks nice. Now, drizzle 1/2 cup of caramel sauce generously over the brownie batter. Grab a knife or a toothpick. Carefully swirl the caramel into the batter. This creates a beautiful marbled effect. If you want, sprinkle 1/4 cup of chopped walnuts or pecans on top. Place the pan in the oven and bake for 25-30 minutes. Check for doneness by inserting a toothpick. It should come out mostly clean. Once baked, let the brownies cool in the pan for at least 15 minutes. If you used parchment paper, lift the brownies out of the pan. Place them on a wire rack to cool completely. Cut them into squares for serving. Enjoy your delicious caramel swirl pumpkin brownies! To get that soft and fudgy texture, do not overmix your batter. Mix the wet and dry ingredients just until combined. This keeps the brownies moist. Use unsalted butter for a rich taste. Melt it until slightly cool before mixing. The right amount of cocoa powder adds a deep flavor. A mix of flour and cocoa gives the brownies their perfect chew. Remember, your baking time is key. Check for doneness with a toothpick; a few crumbs should stick. Swirling caramel can be fun! Pour the caramel sauce over the brownie batter in lines. Use a knife or toothpick to create swirls. Do this gently to avoid mixing it in too much. Aim for a marbled look. Too much mixing will lose that lovely swirl effect. If the caramel is thick, warm it slightly to make it easier to drizzle. The goal is to create a beautiful pattern on top. You can add a twist to these brownies. Chopped walnuts or pecans give a nice crunch. Add them on top before baking for texture. You can also try mixing in chocolate chips for extra sweetness. For a spiced kick, add a pinch of cinnamon or nutmeg. These little changes can make your brownies unique. Experiment with flavors to find what you love! {{image_4}} You can make these brownies gluten-free! Just swap the all-purpose flour for a gluten-free blend. Many blends work well, but look for ones with a good mix of starches and flours. This change keeps the texture soft and fudgy. Want a vegan version? Replace the eggs with flax eggs. Use one tablespoon of ground flaxseed mixed with three tablespoons of water for each egg. Let it sit until it thickens. Swap the butter for coconut oil or a vegan butter substitute. Make sure to check your caramel sauce, too. Some brands are vegan-friendly, or you can make your own! You can play with the flavors in these brownies. Add a pinch of cinnamon or nutmeg for warmth. Try folding in some chocolate chips for extra sweetness. You might even add dried fruit, like cranberries, for a nice contrast. If you like nuts, use pecans or walnuts to add crunch. Each twist can make your brownies unique! To keep your caramel swirl pumpkin brownies fresh, store them in an airtight container. Place a piece of parchment paper between layers to avoid sticking. They stay good at room temperature for about 3 days. You can also refrigerate them for up to a week. Just remember to bring them back to room temperature before serving for the best taste. Freezing brownies is easy and smart. First, let them cool completely. Then, cut them into squares. Wrap each piece in plastic wrap and place them in a freezer-safe bag. This way, you can enjoy them later. They can last up to 3 months in the freezer. When you want to eat one, just take it out and thaw it in the fridge overnight. Reheating brownies is simple and quick. You can use a microwave or an oven. For the microwave, heat one brownie for about 10-15 seconds. If you use the oven, preheat it to 350°F. Place the brownie on a baking sheet and heat for 5-10 minutes. This brings back the gooey texture and warms the caramel. Enjoy them warm for that melty experience! No, you should not use pumpkin pie filling. Pumpkin pie filling has added sugars and spices. This can change the taste and texture of your brownies. Stick to pumpkin puree for the best results. You can test if the brownies are done by using a toothpick. Insert it into the center of the brownies. If it comes out with a few moist crumbs, your brownies are ready. If it comes out wet with batter, they need more time. These brownies go well with whipped cream or vanilla ice cream. A scoop of ice cream adds creaminess. You can also serve them with a drizzle of extra caramel sauce. A sprinkle of nuts on top gives a nice crunch, too. Yes, you can make them ahead of time. Once they cool completely, store them in an airtight container. They will stay fresh for about four days. You can also freeze them for up to three months. Just thaw them in the fridge before serving. These caramel swirl pumpkin brownies combine rich flavors and textures. We started with simple ingredients, then followed easy steps to create a great treat. Remember the tips for perfect texture and creative twists for fun variations. Store them well, and enjoy them fresh or frozen. With these brownies, you can impress your friends and family. So gather your ingredients and get baking! You won't regret it.

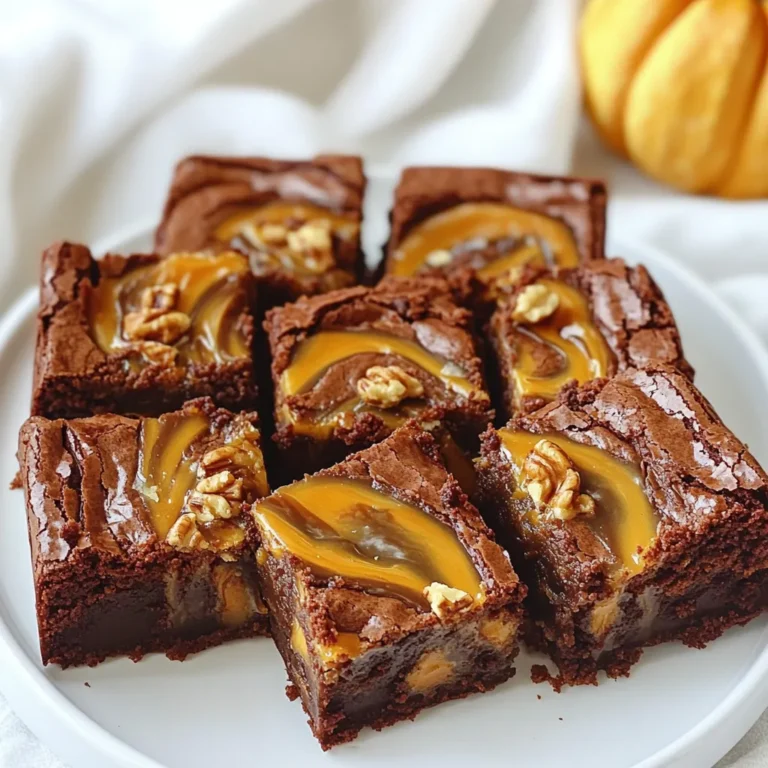
Caramel Swirl Pumpkin Brownies Irresistible Delight

1 2 … 18 NEXT
sweet savory saga

explore

DessertsDinnerAppetizersDrinks

Our Policies

  • Cookie Policy
  • Copyright Policy
  • Disclaimer
  • GDPR Policy
  • Terms Of Use
Back to Top
  • About
  • Contact Us
  • Privacy Policy
© 2025 sweet savory saga