FREE DINNER EBOOK! Get your copy!
  • Cookie Policy
  • GDPR Policy
  • Disclaimer
  • Terms Of Use
  • Visit my other site: Fun Cookie Recipes
sweet savory saga
  • Home
  • Dinner
  • Desserts
  • Drinks
  • Appetizers
  • Contact
  • About
  • Privacy Policy
  • Home
  • Dinner
  • Desserts
  • Drinks
  • Appetizers
  • Contact
  • About
  • Privacy Policy
  • Cookie Policy
  • GDPR Policy
  • Disclaimer
  • Terms Of Use
Visit my other site: Fun Cookie Recipes

HOME / CATEGORIES /

Latest

To make a delicious Cherry Cheesecake Dip, you need these main ingredients: - 1 package (8 oz) cream cheese, softened to room temperature - 1 cup powdered sugar, sifted - 1 teaspoon pure vanilla extract - 1 cup sour cream, full-fat for creaminess - 1/2 cup cherry pie filling, with real cherries if possible - 1/2 cup crushed graham crackers, plus extra for garnish These ingredients create a smooth and creamy dip. The cream cheese gives it a rich base. The powdered sugar adds sweetness. The vanilla extract brings warmth. Sour cream adds a nice tang. Cherry pie filling provides bursts of flavor and texture. You can elevate your dip with fun garnishes and dippers. Try these options: - Fresh cherries - Mint leaves for a pop of color - Additional crushed graham crackers for crunch For dippers, you can use: - Graham crackers - Pretzel sticks - Fresh fruits like apple slices or strawberries These extras make the dip even more appealing and tasty. They also add a fun way to enjoy the dip with friends and family. If you need to make changes, don’t worry! Here are some easy substitutions: - Use Greek yogurt instead of sour cream for a lighter option. - Swap the cherry pie filling for other fruit fillings like blueberry or strawberry. - If you need a dairy-free option, try vegan cream cheese. These substitutions keep the flavor while meeting your needs. Feel free to mix and match based on what you have at home! To start, grab a medium mixing bowl. Place your softened cream cheese inside. Use an electric mixer to beat it until smooth. You want it creamy with no lumps. Next, slowly add the sifted powdered sugar. Begin mixing on a low speed. When it is combined, increase to medium speed. Mix until fluffy and well-blended. Once the sugar is mixed in, pour in the vanilla extract and sour cream. Mix these ingredients until the dip is completely smooth. Take your time and make sure there are no lumps. A smooth texture is key for a great dip. Now, take a spatula and gently fold in the cherry pie filling. You want to keep some cherry pieces for texture. This adds a fun bite to each scoop. Spoon your creamy dip into a nice serving bowl. Let it take shape in the bowl. Now, sprinkle crushed graham crackers on top for crunch. Place the dip in the fridge for at least 30 minutes. This chill time helps the flavors blend. When ready to serve, arrange a variety of dippers around the bowl. Try graham crackers, pretzel sticks, or fresh fruit. Garnish with fresh cherries and mint leaves for a pop of color. To get the best texture, start with softened cream cheese. This makes it easy to mix. Use an electric mixer on low speed at first. Gradually add sifted powdered sugar, then mix on medium speed. This helps create a fluffy dip. Finally, add full-fat sour cream slowly. Mix until it's smooth and creamy. Remember, no lumps! Make your dip look great! Use a decorative bowl to hold it. After you spoon the dip in, sprinkle crushed graham crackers on top. This adds a nice crunch and looks tasty. Add fresh cherries and mint leaves for color. Arrange colorful dippers around the bowl. This makes it fun and inviting! You want dippers that match the flavor of your dip. Here are some great choices: - Graham crackers - Pretzel sticks - Fresh strawberries - Apple slices - Biscotti These dippers create a fun mix of sweet and salty. Enjoy exploring different combos! {{image_4}} You can change the flavor by using other pie fillings. Try blueberry, strawberry, or even peach. Just swap the cherry pie filling with your choice. Each fruit gives the dip a new taste and look. For example, blueberry adds a nice color and sweet touch. Strawberry brings a fresh, fruity vibe. You can also mix different fillings for a fun twist! Want to make a fun snack? Try mini cheesecake dip bites! Use small cups or shot glasses. Fill each one with the dip and top with a cherry. You can add crushed graham crackers on top for a crunchy bite. These mini treats are perfect for parties or gatherings. They are easy to grab and eat! If you love no-bake treats, this twist is for you. Instead of a dip, make a no-bake cheesecake. Just follow the same steps, but add more cream cheese and sour cream. Pour the mixture into a pie crust instead of a bowl. Chill it in the fridge until firm. You will get a creamy cheesecake that is simple and delicious! Store your leftover cherry cheesecake dip in an airtight container. This keeps it fresh and tasty. Make sure to cover the dip well with plastic wrap if you do not have a container. Avoid letting air in, as it can spoil the flavor. You can keep the dip in the fridge for up to three days. After that, the taste and texture may change. Always check for any signs of spoilage before enjoying it again. You don’t need to heat this dip. If it seems a bit thick, stir in a little sour cream. This will help bring back the creamy texture. If you want to serve it cold, just give it a quick mix before serving. Enjoy the freshness! Cherry Cheesecake Dip stays fresh in the fridge for about five days. Store it in an airtight container. This keeps it creamy and prevents it from drying out. If you notice any changes in texture or smell, it is best to discard it. Yes, you can make Cherry Cheesecake Dip a day ahead. Making it early allows the flavors to blend well. Just store it in the fridge in an airtight container. When you’re ready to serve, give it a quick stir to revive its texture. Cherry Cheesecake Dip does not freeze well. The cream cheese and sour cream can separate when thawed. If you want to save time, prepare the dip mix and freeze it without the cherry filling. Add the filling fresh when you’re ready to serve. In this blog post, we explored the tasty world of Cherry Cheesecake Dip. We covered key ingredients, mixing methods, and helpful tips for the best results. You learned about variations and how to store leftovers too. Cherry Cheesecake Dip is easy to make and fun to enjoy. Perfect for any gathering, it will impress your guests. Now, go ahead and whip up this dip. Enjoy the flavors and share with friends!

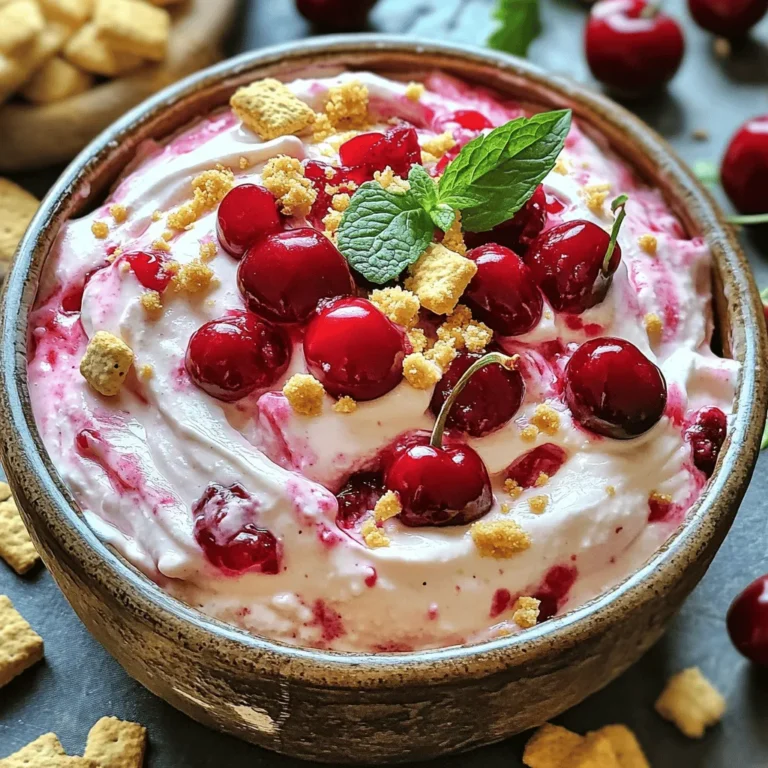
Cherry Cheesecake Dip Creamy and Flavorful Delight

- 1 cup quinoa - 2 cups vegetable broth (or water) - 3 cloves garlic, minced - Zest and juice of 1 large lemon - 2 tablespoons olive oil - 1/2 teaspoon salt - 1/4 teaspoon black pepper - 1/2 teaspoon red pepper flakes (optional) - 1/4 cup fresh parsley, finely chopped - 1/4 cup toasted pine nuts (for garnish) Gathering these ingredients makes cooking easy. First, choose your quinoa. I love using organic quinoa for its taste and health benefits. Rinse it well in cold water. This step removes the bitter coating called saponin. It helps the quinoa taste better. Next, you need good broth or water. Vegetable broth adds flavor. You can use water if you prefer. Fresh garlic makes this dish pop. Minced garlic adds a strong aroma. The lemon zest and juice bring a bright taste. Olive oil adds richness. Salt and pepper balance the flavors. Red pepper flakes give a nice kick. If you want it mild, skip this. Fresh parsley gives a fresh touch. Finally, toasted pine nuts add crunch. You can mix and match these ingredients to fit your taste. Enjoy your cooking! Rinsing quinoa is very important. It removes a bitter coating called saponin. To rinse, place the quinoa in a fine-mesh strainer. Run cold water over it for a minute. Swirl the quinoa gently with your hand. This ensures all grains get clean. In a medium pot, combine the rinsed quinoa with two cups of vegetable broth. You can also use water if you prefer. Bring this mixture to a boil over medium-high heat. Once it boils, reduce the heat to low. Cover the pot with a lid and let it simmer for about 15 minutes. The quinoa is done when all the liquid is absorbed, and the grains are fluffy. While your quinoa cooks, heat two tablespoons of olive oil in a small skillet over medium heat. Add three minced cloves of garlic. If you like some heat, toss in a bit of red pepper flakes. Sauté for about 1-2 minutes. Stir often so the garlic does not brown. Burnt garlic tastes bitter, and we want a fresh flavor. After cooking, remove the pot from the heat. Use a fork to fluff the quinoa gently. Now, pour the garlic oil mixture over the quinoa. Add the zest and juice of one large lemon. Season with half a teaspoon of salt and a quarter teaspoon of black pepper. Mix well to spread the flavors evenly. Next, fold in a quarter cup of finely chopped parsley. This adds a bright touch to the dish. Serve the quinoa warm. For a special finish, sprinkle a quarter cup of toasted pine nuts on top. This adds a nice crunch and flavor. To cook quinoa just right, timing is key. Usually, it takes about 15 minutes. You know it’s ready when the liquid is gone and the grains look fluffy. A good sign is when you see a little tail on each grain. This is called the germ, and it shows that your quinoa is perfect. For more taste, you can add different spices. Consider herbs like thyme or oregano for a twist. You can also use garlic-infused olive oil instead of regular olive oil. This can bring out more garlic flavor without the risk of burning it. To boost the health factor, add some veggies. Spinach or bell peppers mix well with quinoa. You could also toss in chickpeas or other legumes for extra protein. This makes the dish heartier and more filling. {{image_4}} Flavors can change your Lemon Garlic Quinoa. You can add citrus twists for a fresh taste. Try lime or orange juice along with lemon. These add a fun zing to your dish. You can also explore different herbs. Basil or cilantro can bring a new twist. They add a lovely aroma and taste. Just chop them up and mix them in. If you want a richer flavor, use chicken broth instead of vegetable broth. This swap adds depth and warmth to your quinoa. It’s a great option for non-vegans. You can also change the nuts you use for garnish. Instead of pine nuts, try almonds or walnuts. Both add a nice crunch and flavor. You can toast them for extra taste. You can make this dish vegan by sticking to vegetable broth. It’s already vegan-friendly with no animal products. For those following a gluten-free diet, you're in luck! Quinoa is naturally gluten-free, making this dish safe. If you're watching carbs, you can customize it too. Just cut back on the amount of quinoa or serve it with more veggies. This keeps it light and fresh while still being tasty. Store leftover Lemon Garlic Quinoa in the fridge. Use an airtight container to keep it fresh. Let the quinoa cool before placing it in the fridge. This helps avoid excess moisture. Keep it for up to four days for the best taste. When you want to enjoy the leftovers, heat them gently. You can use the microwave or a skillet on low heat. If using a microwave, add a splash of water. This moisture helps prevent dryness. Stir the quinoa halfway through reheating for even warming. You can freeze Lemon Garlic Quinoa for later use. Portion it into small containers or freezer bags. This makes it easy to defrost only what you need. When ready to eat, thaw it overnight in the fridge. Reheat as mentioned before for the best results. Quinoa lasts for about 4 to 5 days in the fridge. Make sure to store it in an airtight container. This keeps it fresh and safe to eat. If you notice any bad smell or mold, throw it away. Yes, you can make Lemon Garlic Quinoa ahead of time. Prepare it up to three days in advance. Store it in the fridge in an airtight container. Reheat it when you are ready to serve. Yes, quinoa is gluten-free. It is a great choice for those with gluten sensitivities. Quinoa provides a healthy grain option for many diets. You can serve Lemon Garlic Quinoa with many dishes. It pairs well with grilled chicken or fish. You can also enjoy it with roasted vegetables or a fresh salad. Its bright flavors complement many meals. Yes, you can swap quinoa for other grains. Brown rice, farro, or bulgur work well. Each grain offers a different texture and taste. Adjust cooking times according to the grain you choose. This blog post showed you how to make Lemon Garlic Quinoa from start to finish. You learned about the key ingredients, precise steps, helpful tips, and delicious variations. Quinoa is tasty, nutritious, and easy to prepare. You can customize it to fit your needs, whether dietary or flavor preferences. Take your time when cooking, and enjoy the process. Keep this guide handy, and keep experimenting in the kitchen! You’ll impress family and friends with your new skills and flavorful dishes.

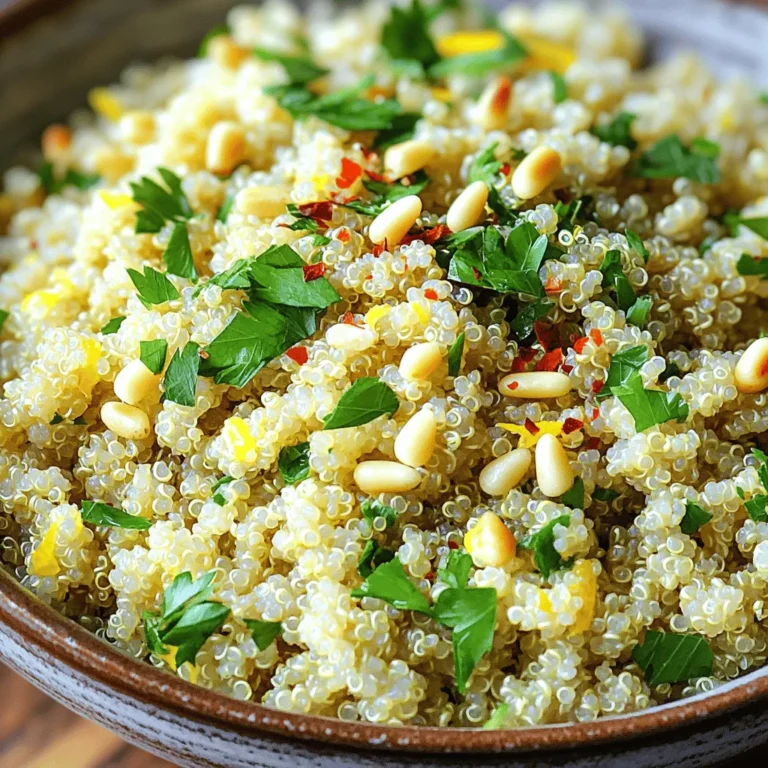
Lemon Garlic Quinoa Flavorful and Healthy Side Dish

To make vibrant Fiesta Stuffed Bell Peppers, you will need: - 4 large bell peppers (any color you like) - 1 cup cooked quinoa, fluffy and cooled - 1 can (15 oz) black beans, rinsed and drained - 1 cup corn (fresh, frozen, or canned) - 1 cup diced tomatoes (fresh or canned) - 1 small red onion, finely chopped - 2 cloves garlic, minced - 1 tablespoon chili powder - 1 teaspoon ground cumin - 1 teaspoon smoked paprika - Salt and pepper to taste - 1 cup shredded cheese (like cheddar or a Mexican blend) - Fresh cilantro, chopped - Lime wedges for serving These stuffed peppers are nutritious and filling. Each serving offers a good mix of protein, fiber, and vitamins. Here’s a breakdown: - Calories: Approx. 350 - Protein: 15g - Carbohydrates: 45g - Fiber: 10g - Fat: 15g These values can vary based on specific ingredients used. You can customize the recipe to fit your taste or dietary needs. Here are some great swaps: - For quinoa, try brown rice or couscous for a different texture. - Use chickpeas instead of black beans for a unique flavor. - Swap corn for diced zucchini or spinach for extra greens. - If you’re lactose-free, try vegan cheese or skip the cheese altogether. - For spice lovers, add jalapeños or hot sauce to the filling. These changes can make the dish your own while still keeping it delicious! Start by preheating your oven to 375°F (190°C). This makes sure the oven is hot and ready for your peppers. While it warms, take four large bell peppers. You can pick any bright color you like. Slice off the tops and scoop out the seeds and membranes. Set them upright in a baking dish. Make sure they stand still and strong. In a big bowl, mix cooked quinoa, rinsed black beans, corn, and diced tomatoes. Add in finely chopped red onion and minced garlic for flavor. Sprinkle in chili powder, cumin, and smoked paprika. Don't forget to season with salt and pepper. Stir the mix well until everything is combined. Now, spoon this colorful filling into each bell pepper. Press down gently to pack it in. Top each pepper with a good amount of shredded cheese. Add a splash of water to the bottom of your baking dish. This helps create steam while baking. Cover the dish tightly with aluminum foil. Place it in the preheated oven and bake for 30 minutes. After that, carefully remove the foil. Let it bake for another 10 to 15 minutes. You want the cheese to be bubbly and golden. Once done, take the peppers out of the oven. Let them cool for a few minutes before serving. To cook quinoa well, start by rinsing it. Rinsing removes bitter flavors. Use two cups of water for every cup of quinoa. Bring water to a boil, then add quinoa. Lower heat and cover. Let it simmer for 15 minutes. Once done, remove it from heat and let it sit for five minutes. Fluff with a fork before adding it to your peppers. To boost flavors, use fresh herbs and spices. Fresh cilantro adds a bright touch. Try adding lime juice for zing. You can also mix in some diced jalapeños for heat. Adjust spice levels to your taste. Balance flavors with salt and pepper to enhance the dish. Serve the stuffed peppers on a colorful platter. Arrange lime wedges around the peppers. Sprinkle extra cilantro over the top for a fresh look. Use vibrant bell peppers to create a feast for the eyes. A beautiful presentation makes meals more enjoyable. {{image_4}} You can easily make these stuffed peppers vegetarian. Simply use more beans or add lentils. Swap the cheese for a plant-based option if you prefer. You can also add more veggies like zucchini or mushrooms for extra texture. Chopped spinach adds nutrition and color to the filling too. If you love heat, add jalapeños or chopped chili peppers to the mix. You can also stir in some hot sauce or cayenne pepper for an extra kick. A sprinkle of crushed red pepper flakes on top gives a nice touch. Think about adding a spicy salsa on the side for more flavor. Try different grains like rice or barley instead of quinoa. Ground turkey or chicken makes a great meaty filling. You can even use seafood like shrimp for a coastal twist. For a more unique taste, consider using tofu or tempeh for protein and texture. After you make the Fiesta stuffed bell peppers, let them cool down. Place them in an airtight container. They can stay fresh in the fridge for up to 4 days. If you want to keep them longer, freezing is a good option. To freeze the stuffed peppers, wrap each one tightly in plastic wrap. Then, place them in a freezer-safe bag or container. Make sure to remove as much air as possible. They can last for about 3 months in the freezer. When you're ready to eat, just take them out and let them thaw in the fridge overnight. To reheat the stuffed peppers, preheat your oven to 350°F (175°C). Place the peppers in a baking dish. Cover them with foil to keep them moist. Heat for about 20-25 minutes or until they're warm throughout. You can also use a microwave for fast reheating. Just place them on a microwave-safe plate and heat for 2-3 minutes. Enjoy your tasty meal! To make these Fiesta Stuffed Bell Peppers gluten-free, simply replace any gluten-containing ingredients. Use gluten-free quinoa, as it is naturally gluten-free. Always check the labels on canned products like beans and diced tomatoes. They should state they are gluten-free. This way, you can enjoy the dish without worries. Yes, you can use different types of cheese! Cheddar adds sharpness, while a Mexican blend gives zest. You can even try pepper jack for some heat. Feel free to mix cheeses for a unique flavor. Just make sure the cheese melts well for that perfect topping. There are many great sides to pair with stuffed peppers. A fresh salad with lime dressing works well. You might also enjoy rice or quinoa on the side. For a heartier option, serve with tortilla chips and salsa. These sides add flavor and balance to your meal. In this blog post, we explored how to make delicious Fiesta Stuffed Bell Peppers. We covered the key ingredients, detailed step-by-step instructions, and clever tips for success. You learned about variations, storage, and answers to common questions. Cooking can be fun and rewarding. With these ideas, you can create tasty meals that suit your taste. Enjoy experimenting and sharing your tasty creations!

Fiesta Stuffed Bell Peppers Easy and Tasty Recipe

To make this creamy treat, you will need the following key ingredients: - 2 cups heavy whipping cream - 1 cup whole milk - 3/4 cup granulated sugar - 1 tablespoon pure vanilla extract - 1 tablespoon instant espresso powder - 1/2 teaspoon fine sea salt - 1/2 cup caramel sauce These ingredients create the rich, smooth base for your ice cream. The heavy whipping cream and whole milk give it a creamy texture. The sugar adds sweetness, while the vanilla and espresso powder bring out the coffee flavor. The sea salt balances the sweetness nicely. For extra texture and flavor, consider these optional ingredients: - 1/3 cup chocolate-covered espresso beans, coarsely chopped Adding chocolate-covered espresso beans gives a satisfying crunch. They also enhance the coffee flavor. You can mix them in during the last minutes of churning. When selecting ingredients, keep these tips in mind: - Use fresh, high-quality heavy cream and whole milk for the best taste. - Choose pure vanilla extract over imitation for a richer flavor. - Look for a good-quality caramel sauce, whether store-bought or homemade. Quality ingredients make a big difference in flavor. Always check labels for freshness and avoid additives. This attention to detail will elevate your caramel macchiato ice cream. Start by gathering your ingredients. You need: - 2 cups heavy whipping cream - 1 cup whole milk - 3/4 cup granulated sugar - 1 tablespoon pure vanilla extract - 1 tablespoon instant espresso powder - 1/2 teaspoon fine sea salt - 1/2 cup caramel sauce - Optional: 1/3 cup chopped chocolate-covered espresso beans In a medium saucepan, mix the heavy cream, whole milk, and sugar. Heat it on medium. Stir often until the sugar dissolves. This takes about 3 to 4 minutes. Once the sugar is gone, take the pan off the heat. Whisk in the vanilla, espresso powder, and salt. Make sure everything blends well. Let the mixture cool to room temperature. This is an important step. Once cool, cover the pan and put it in the fridge. Chill it for at least 2 hours. This step helps your ice cream become extra creamy. After chilling, pour the mixture into your ice cream maker. Churn it according to the maker's instructions. This usually takes about 20 to 25 minutes. During the last few minutes, drizzle in the caramel sauce. This creates tasty swirls in your ice cream. If you like, add the chopped espresso beans for a crunchy touch. Once it reaches a soft-serve texture, transfer the ice cream to an airtight container. Freeze it for at least 4 hours. This gives it the perfect scoopable texture. When you’re ready to serve, scoop the ice cream into bowls or cones. Drizzle some extra caramel on top for a yummy finish. To get that smooth, creamy texture, start by chilling your mixture well. The colder the base, the better the ice cream turns out. Let it sit in the fridge for at least two hours. This helps the flavors meld and enhances the creaminess. You can boost the flavor in fun ways. Try adding a splash of almond extract for a nutty twist. If you love a richer taste, mix in some chocolate syrup along with the caramel. For a touch of spice, consider a pinch of cinnamon or nutmeg. These little changes can make a big difference! When it's time to serve, think about how to make it look special. Scoop the ice cream into bowls or cones. Drizzle extra caramel sauce over the top for a sweet touch. You can also add chopped chocolate-covered espresso beans for crunch. A sprinkle of sea salt can balance the sweetness and add depth. For a coffee lover’s delight, serve it alongside a hot espresso! {{image_4}} You can enjoy caramel macchiato ice cream without dairy. Use coconut cream instead of heavy cream. Almond milk works well in place of whole milk. For sweetening, try maple syrup or agave nectar. These swaps keep the rich flavor and smooth texture. Want to take your ice cream up a notch? Add nutty flavors! Toss in almond or hazelnut extracts. You can also sprinkle in cinnamon for warmth. A touch of nutmeg gives it a festive twist. For a crunchy bite, add coarsely chopped walnuts or pecans. These extras make every scoop exciting. Your ice cream maker can change the final texture. A compressor machine gives a creamier result. If you use a bowl type, chill it well before churning. Hand-churning can work if you stir every 30 minutes. This method can take longer but yields a lovely homemade taste. To keep your caramel macchiato ice cream fresh, store it in an airtight container. This will help prevent ice crystals from forming. After churning, let it freeze for at least 4 hours. If you want to enjoy it later, consider using a freezer-safe container. A shallow container works best. It allows the ice cream to freeze evenly. Ice cream can go bad if it develops ice crystals or changes in texture. If you see a significant change in color or smell, it’s time to toss it. Old ice cream can also taste bland. Always check for a grainy texture or a strong freezer smell. To maintain that creamy texture, avoid leaving the ice cream out too long. Each time you scoop, let in air, which can create ice crystals. Store it in the back of your freezer, where it stays coldest. Cover the surface with plastic wrap before sealing the lid. This extra layer helps keep moisture out and flavor in. Yes, you can make caramel macchiato ice cream without an ice cream maker. Just pour the chilled mixture into a shallow dish. Place it in the freezer. Every 30 minutes, stir the mixture with a fork. Repeat this for about 3-4 hours. This method gives you a creamy texture, but it may not be as smooth as using a machine. To store leftover ice cream, place it in an airtight container. Make sure it is tightly sealed to prevent ice crystals. Store it in the freezer. It will stay fresh for about 2 weeks. For best taste, enjoy it sooner! If you need a substitute for heavy cream, use full-fat coconut milk or cashew cream. For whole milk, almond milk or oat milk can work well. Keep in mind that these substitutes may change the flavor and texture slightly, but they still taste great! Yes, you can make this ice cream without espresso. You can use strong brewed coffee instead. Just make sure it is cooled down before mixing in. This will still give you that coffee flavor you love. To make a crunchy topping, chop chocolate-covered espresso beans. Sprinkle them on top of your ice cream. You can also use crushed nuts or granola for added texture. These toppings add crunch and flavor to every scoop! The best way to serve caramel macchiato ice cream is in a bowl or cone. Drizzle extra caramel sauce on top for a sweet touch. You can also add a sprinkle of chopped espresso beans for a nice finish. Enjoy it with a hot shot of espresso for an extra treat! Making Caramel Macchiato Ice Cream is fun and easy. You learned key ingredients, step-by-step instructions, and helpful tips. I shared different variations, storage info, and answers to common questions. Now you can create this treat at home! Enjoy the creamy texture, rich flavor, and your own special twists. Whether you serve it alone or with toppings, it's sure to please. Get ready to impress your friends and family!

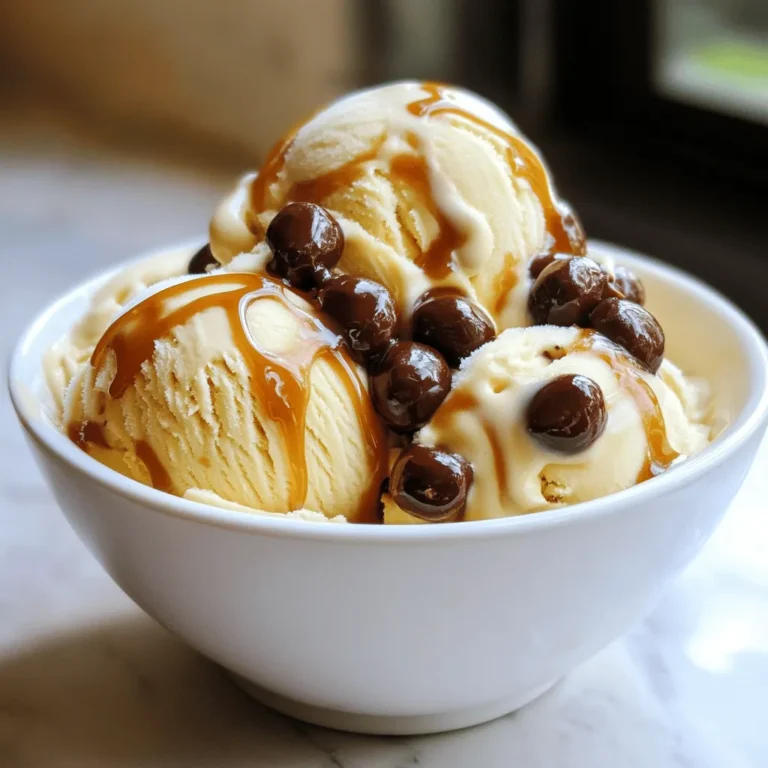
Caramel Macchiato Ice Cream Delightful and Creamy Treat

- 6 ripe Roma tomatoes, diced into small cubes - 1 cup fresh basil leaves, finely chopped - 2 cloves garlic, minced finely I love using Roma tomatoes for their firm texture. They hold up well when diced. Fresh basil adds a bright flavor. I always chop it finely to release its oils. Garlic gives the bruschetta a nice kick. The more finely you chop it, the better. - 2 tablespoons balsamic vinegar - 3 tablespoons extra virgin olive oil - Salt and freshly ground black pepper, to taste - 1 French baguette, sliced into 1/2 inch thick pieces Balsamic vinegar adds sweetness and tang. Extra virgin olive oil enriches the mix with flavor. I recommend using good quality oil for the best taste. Salt and pepper help balance the dish. The French baguette is perfect for toasting. Its crispy crust complements the soft topping. - 1/4 cup shredded mozzarella cheese for a delightful garnish Mozzarella is not a must, but it brings creaminess. If you want to indulge, sprinkle it on top. It melts slightly over the hot bruschetta, making it extra tasty. You can also skip it for a lighter option. Start by dicing six ripe Roma tomatoes into small cubes. Use a sharp knife for clean cuts. Next, finely chop one cup of fresh basil leaves. The smell will fill your kitchen with joy! Mince two cloves of garlic and add them to the bowl. Mix all these ingredients gently. Drizzle two tablespoons of balsamic vinegar and three tablespoons of extra virgin olive oil over the mix. Sprinkle salt and freshly ground black pepper to taste. Toss the mixture well and let it rest for about 15 minutes. This time helps the flavors blend nicely. While the tomato and basil mix rests, preheat your oven to 375°F (190°C). Grab one French baguette and slice it into pieces about half an inch thick. Place the baguette slices on a baking sheet in a single layer. Brush one side of each slice with olive oil. This step gives the bread a lovely crunch. Toast the baguette in the oven for 5 to 7 minutes. Keep an eye on them until they turn golden brown. Once they are crispy, take them out and let them cool for a minute. Now comes the fun part! Spoon the tomato and basil mixture generously onto the toasted side of each baguette slice. Make sure each piece gets a good amount. If you like, sprinkle shredded mozzarella cheese on top for extra flavor. Serve the bruschetta right away. You can add extra basil leaves or a drizzle of balsamic vinegar to make it look fancy. Enjoy this easy and fresh appetizer with friends or family! For the best bruschetta, I always pick ripe Roma tomatoes. They have a sweet taste and fewer seeds. This means you get more juicy flesh. Look for bright red tomatoes that feel firm but not hard. If they smell sweet, they are ripe and ready to use. Trust me, using fresh, good-quality tomatoes makes a big difference. Toasted baguette is key for great bruschetta. I slice the baguette into 1/2 inch thick pieces. Then, I brush one side with extra virgin olive oil. This adds flavor and helps it crisp up. Toast in the oven at 375°F for 5-7 minutes. You want them golden brown and crunchy. Watch them closely so they don’t burn. Want to take your bruschetta to the next level? Add a splash of balsamic vinegar for tang. A sprinkle of salt and black pepper brings out all the flavors. If you love cheese, try adding shredded mozzarella on top. It melts nicely and adds creaminess. For extra flavor, top with a few fresh basil leaves before serving. {{image_4}} You can add cheese to your bruschetta for extra flavor. Mozzarella is a great choice. It melts nicely and adds creaminess. Just sprinkle shredded mozzarella on top after you add the tomato mix. You can also try goat cheese or feta for a tangy twist. Each cheese brings a unique taste that pairs well with fresh tomatoes and basil. Want to change things up? Consider adding pesto or avocado. Pesto gives a rich, herby flavor. Just spread a thin layer on the bread before adding the tomato mix. For a creamy touch, mash ripe avocado and spread it on the toast. Both options make your bruschetta even more delicious and fun. You can adapt bruschetta to fit each season. In summer, add diced peaches or watermelon for a sweet touch. In fall, try roasted butternut squash or pumpkin. These seasonal ingredients keep the dish fresh and exciting. They also add color and new tastes, making your appetizer stand out. To store leftover bruschetta, place it in an airtight container. Keep it in the fridge. It will last for about two days. The bread may get soggy, so store the topping separate if you can. This way, you keep the crunch of the bread. When you want to enjoy the bruschetta again, reheat the bread in the oven. Set the oven to 375°F (190°C). Place the bread on a baking sheet for about 5 minutes. This will bring back its crispy texture. Avoid microwaving it, as it will make the bread soft and chewy. You can freeze the bruschetta topping if you have extra. Place it in a freezer-safe bag. Squeeze out the air and seal it tightly. It can stay in the freezer for up to three months. When you're ready, thaw it in the fridge overnight. Then, toast your bread fresh and add the topping. Enjoy the taste of summer anytime! You can prepare the tomato and basil mixture a few hours in advance. Mix the diced tomatoes, basil, and garlic. Add balsamic vinegar and olive oil, then season with salt and pepper. Let it rest for about 15 minutes as it melds flavors. Store this in the fridge until you are ready to serve. Toast the baguette slices just before serving. This keeps them crispy. The best bread for bruschetta is a French baguette. It has a nice crust and soft inside. Slice it into half-inch thick pieces. You can also use ciabatta or other crusty bread. The goal is to have a sturdy slice that holds toppings well. To keep bruschetta from getting soggy, toast the bread until it is golden brown and crispy. Use a heavy layer of tomato topping to avoid direct moisture touching the bread. If you are preparing in advance, store the topping and bread separately. Assemble them just before serving to keep everything fresh. In this blog post, we explored fresh ingredients for bruschetta and pantry staples. I shared easy steps to prepare the tomato and basil mixture, toast the baguette, and assemble your dish. We covered tips for selecting the best tomatoes and enhancing flavors. You learned various ways to customize your bruschetta and how to store leftovers properly. Bruschetta is fun to make and enjoy. Try different toppings to find your favorite!

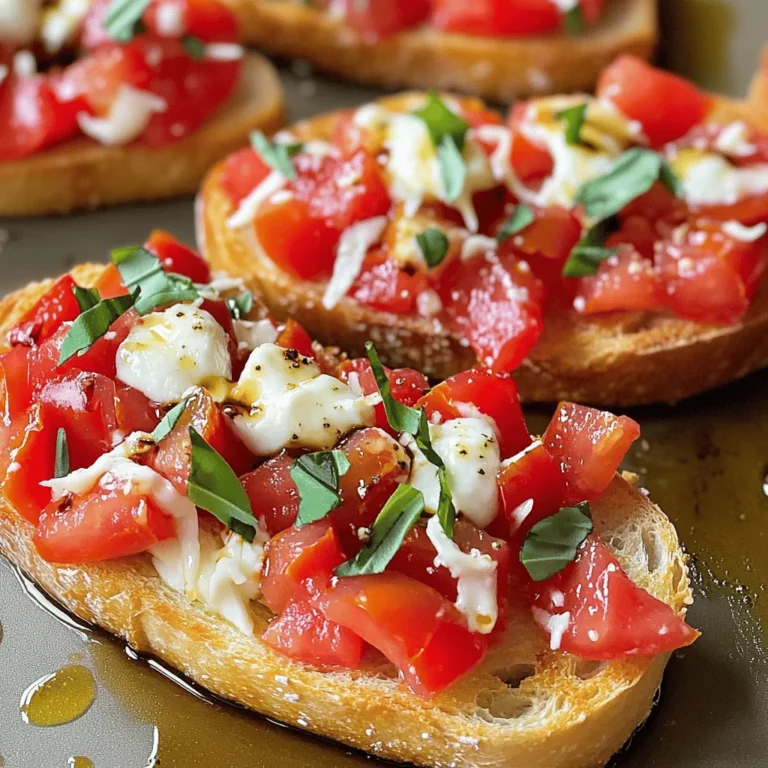
Tomato Basil Bruschetta Easy and Fresh Appetizer

For Sriracha honey roasted nuts, you'll need a few key ingredients to create that perfect blend of sweet and spicy. Here’s what you need: - 2 cups mixed nuts (almonds, cashews, walnuts, and pecans) - 2 tablespoons pure honey - 1 tablespoon Sriracha sauce - 1 tablespoon extra virgin olive oil - 1 teaspoon sea salt - 1/2 teaspoon smoked paprika - 1/4 teaspoon garlic powder - A pinch of freshly ground black pepper These ingredients work together to make a tasty and crunchy snack. The honey gives sweetness, while Sriracha adds heat. The nuts provide crunch, and the spices enhance the flavor. You can mix it up by using different nuts. Here are some alternatives: - Hazelnuts for a rich flavor - Macadamia nuts for creaminess - Peanuts for a classic crunch Feel free to combine your favorites. Each nut adds its own unique taste and texture. To boost the flavor, consider adding other spices or enhancements. Here are some ideas: - Add cayenne pepper for more heat - Use cinnamon for a sweet twist - Try a bit of brown sugar for extra sweetness These small changes can make your Sriracha honey roasted nuts even more exciting. Play around with the spices to find your perfect mix! Start by preheating your oven to 350°F (175°C). Line a baking sheet with parchment paper. This helps the nuts not stick and makes cleaning easier. In a large bowl, mix together these ingredients: - 2 tablespoons pure honey - 1 tablespoon Sriracha sauce - 1 tablespoon extra virgin olive oil - 1 teaspoon sea salt - 1/2 teaspoon smoked paprika - 1/4 teaspoon garlic powder - A pinch of freshly ground black pepper Whisk or stir until it’s smooth. This mixture is your flavorful coating. Next, add 2 cups of mixed nuts to the bowl. Toss them gently to coat each nut well. Make sure every nut gets that tasty mixture. The goal is to have a rich, even layer of flavor. Spread the coated nuts in a single layer on your baking sheet. Leave space between nuts so they roast well. Bake them for 15-20 minutes. Stir the nuts halfway through. They should turn golden brown and smell amazing when done. After roasting, take the baking sheet out of the oven. Let the nuts cool completely on the parchment paper. This step makes them nice and crispy. Once cooled, transfer them to an airtight container. They stay fresh for up to two weeks, perfect for snacking anytime! To get the best taste, find the right mix. The sweetness of honey blends well with the spicy Sriracha. Use a little less Sriracha if you want it milder. If you love heat, add more! I suggest you taste the mixture before coating the nuts. Adjust it until it feels just right for you. Keep a close eye while the nuts roast. Every oven is different, so check them at the 15-minute mark. Stir them halfway to ensure even cooking. If they turn too dark, they can taste bitter. You want a golden brown color for that perfect crunch! These nuts make a great snack anytime. Serve them in a nice bowl at parties. They also fit well in gift bags for friends. Pair them with cheese or fruits for a fun charcuterie board. You can even sprinkle them over salads for an extra crunch. Enjoy your tasty creation! {{image_4}} If you love spice, you can boost the heat! Try adding more Sriracha. Start with an extra half tablespoon. For a smoky kick, use chipotle powder instead of smoked paprika. You can also toss in cayenne pepper. Just a pinch adds a nice kick without being too much. Want more sweetness? Swap honey for maple syrup or agave nectar. Both add a lovely flavor. You could even mix in a bit of brown sugar for a deeper taste. If you enjoy coconut, try using coconut sugar. It adds a unique twist while keeping the sweetness. No nuts? No problem! You can use seeds instead. Pumpkin seeds and sunflower seeds work great. They bring a nice crunch and flavor. You can also try roasted chickpeas for a different texture. Just make sure to adjust the roasting time since they cook faster than nuts. To keep your Sriracha honey roasted nuts fresh, store them in an airtight container. This helps keep moisture out and crunch in. I recommend using glass or plastic containers with tight lids. You can also use resealable bags if you squeeze out the air. Keep the nuts in a cool, dark place, away from direct sunlight. When stored properly, these nuts can last up to two weeks. After that, they may lose their crunch and flavor. If you notice any change in taste or smell, it's best to toss them out. Always check before enjoying another handful! If your nuts lose their crunch, don’t worry! You can easily re-crisp them. Preheat your oven to 350°F (175°C). Spread the nuts on a baking sheet in a single layer. Roast them for about 5-10 minutes. Keep an eye on them to avoid burning. Let them cool before enjoying that delightful crunch again! Yes, you can! Feel free to mix and match. Almonds, cashews, walnuts, and pecans work great. You can also try pistachios or hazelnuts for fun twists. Just remember to adjust the roasting time if you choose larger nuts. They may need a bit longer to cook. To make this recipe vegan, replace honey with maple syrup or agave nectar. Both will add sweetness and keep the flavor intact. The rest of the ingredients are already vegan-friendly, so you’re good to go! You can find Sriracha Honey Roasted Nuts at many grocery stores. Check the snack aisle or the bulk section. If you’re looking for a quick option, try online retailers or specialty food shops. You might even find them at a local farmer's market! Nuts are packed with nutrients! They provide protein, healthy fats, and fiber. They can help lower cholesterol and improve heart health. Plus, nuts are great for brain function due to their rich antioxidant content. Enjoying Sriracha Honey Roasted Nuts offers both flavor and health perks! You’ve learned how to make Sriracha Honey Roasted Nuts, covering key ingredients, and simple steps. You also discovered tips for flavor balance and storage. Whether you enjoy spicy or sweet variations, this recipe offers something for everyone. Remember to keep an eye on the roasting time to avoid overcooking. Use what works best for you, and share this tasty snack with friends. Making these nuts can be fun and rewarding—enjoy every bite!

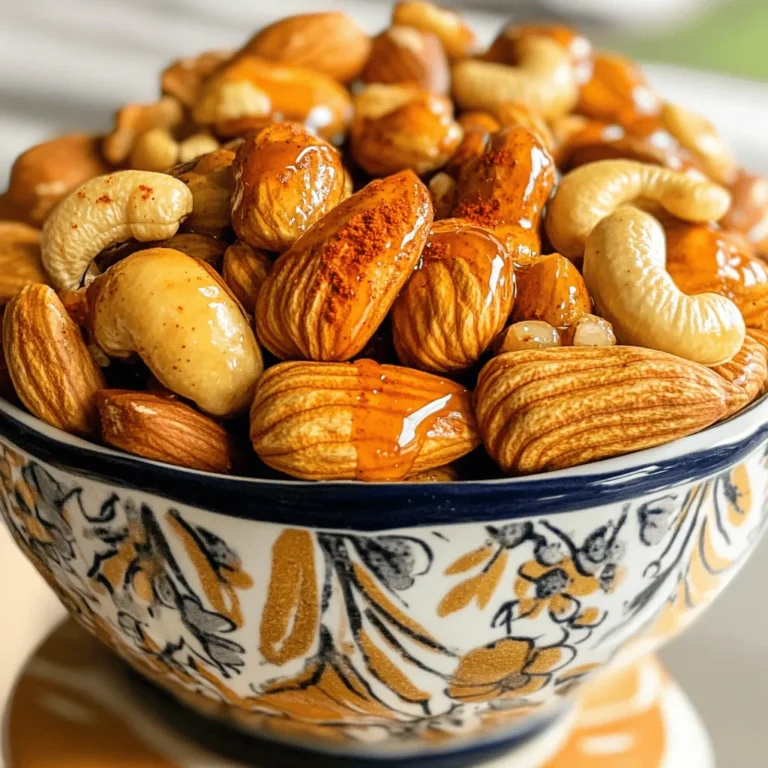
Sriracha Honey Roasted Nuts Flavorful Crunchy Snack

- 1 lb (450g) chicken breast, diced - 1 tablespoon olive oil - 4 cloves garlic, minced - 1 medium onion, chopped - 3 medium carrots, diced - 2 stalks celery, diced - 4 cups chicken broth - 1 cup heavy cream - 2 cups potato gnocchi - 1 cup fresh spinach, roughly chopped - 1 cup grated Parmesan cheese - 1 teaspoon dried thyme - 1 teaspoon dried oregano - Salt and black pepper, to taste - Fresh parsley, finely chopped for garnish I love using fresh ingredients in my Garlic Parmesan Chicken Gnocchi Soup. Fresh chicken makes the soup rich and tasty. Olive oil adds a nice flavor and helps cook the chicken. Garlic is a must; it gives the soup its special touch. Onions, carrots, and celery add great texture and taste. I always chop them small so they cook well. Chicken broth forms the base of the soup. It brings all the flavors together. Heavy cream adds thickness and creaminess. I prefer potato gnocchi for this soup. They are soft and absorb the flavors. Fresh spinach adds color and nutrients. Parmesan cheese makes everything creamy and cheesy. Thyme and oregano are my go-to herbs. They add warmth and depth. Finally, I like to season with salt and black pepper. A sprinkle of fresh parsley at the end brightens the dish. This soup is satisfying and full of flavor. You can switch the chicken for turkey or even tofu for a plant-based option. If you want a dairy-free soup, use coconut cream or cashew cheese. You can also make homemade gnocchi if you prefer. Store-bought works well for busy days. These swaps keep the soup fun and flexible! 1. Heat 1 tablespoon of olive oil in a large pot over medium heat. 2. Add 1 pound of diced chicken breast, seasoning with salt and pepper. 3. Sauté the chicken for about 5-7 minutes until browned and cooked through. 4. Remove the chicken and place it on a plate. 5. In the same pot, add 1 chopped onion, 3 diced carrots, and 2 diced celery stalks. 6. Sauté the vegetables for 5-6 minutes until they soften and the onion turns transparent. 7. Next, stir in 4 minced garlic cloves. Cook for 1-2 minutes until fragrant but not burnt. 1. Pour in 4 cups of chicken broth and raise the heat to a gentle boil. 2. Sprinkle in 1 teaspoon of dried thyme and 1 teaspoon of dried oregano, stirring well. 3. Carefully add 2 cups of potato gnocchi when the broth boils. 4. Reduce the heat and let the soup simmer for 3-4 minutes, until the gnocchi floats. 5. Lower the heat again and stir in 1 cup of heavy cream. 6. Add the cooked chicken, 1 cup of roughly chopped spinach, and 1 cup of grated Parmesan cheese. 7. Cook for another 2-3 minutes until the spinach wilts and the cheese melts. 1. Taste the soup and adjust the seasoning with salt and pepper as needed. 2. Ladle the soup into bowls, and garnish with finely chopped fresh parsley. 3. For an extra touch, add more grated Parmesan cheese on top. 4. Serve the soup with crusty bread for dipping to enhance the cozy feel. Best practices for browning chicken To get a nice brown color on your chicken, heat the olive oil in your pot until it shimmers. Then, add the diced chicken in a single layer. Don’t overcrowd the pot. This lets each piece get that lovely brown crust. Sear it for about 5-7 minutes until no longer pink. How to sauté vegetables for optimal flavor Sautéing vegetables is easy and fun! After cooking the chicken, use the same pot. Add chopped onion, diced carrots, and diced celery. Stir them for 5-6 minutes. This softens them and brings out their natural sweetness. Be sure the onion turns translucent for the best flavor. Achieving the perfect creamy texture To make your soup creamy, add heavy cream at the right time. Once the gnocchi are cooked, lower the heat. Stir in the cream slowly, then add the chicken and cheese. This helps create a rich, smooth soup that feels cozy. Preventing curdling when adding cream To avoid curdling, make sure the soup isn’t boiling when you add the cream. If it’s too hot, the cream can separate. Lower the heat to a gentle simmer and stir it in slowly. Pairing with sides (bread, salad) This soup is rich and filling. Pair it with crusty bread for dipping. A light salad with fresh greens also works well. This balances the meal and adds some crunch. Ideal serving temperatures Serve your soup hot, but not boiling. Let it cool a bit before serving. This way, you get all the flavors without burning your tongue! {{image_4}} You can easily change the vegetables in this soup. Try mushrooms or peas for a new twist. They add texture and flavor. You can also swap herbs for a fresh taste. Fresh basil, parsley, or dill work well. These swaps keep the soup exciting. If you need gluten-free options, look for gluten-free gnocchi. Many brands offer this choice now. For low-carb diets, consider using cauliflower gnocchi. It tastes great and fits your diet. These options let everyone enjoy the soup. Spices can take this soup to the next level. A pinch of red pepper flakes adds warmth. Paprika gives it a nice, smoky flavor. You can also add toppings like crispy bacon bits or fresh chives. These small touches make a big difference. They enhance both taste and presentation. To store leftover soup, cool it quickly. Place the soup in a shallow container. Cover it well with a lid or wrap. This keeps the soup fresh longer. Store it in the fridge for up to three days. When reheating, use a pot over low heat. Stir the soup often to keep it smooth. If it seems thick, add a splash of chicken broth or cream. This helps restore its creamy texture. For freezing garlic parmesan chicken gnocchi soup, let it cool first. Use freezer-safe containers to avoid leaks. Leave some space at the top for expansion. The soup can last in the freezer for about three months. To thaw, place the container in the fridge overnight. For a quicker method, set it in cold water. When ready to eat, reheat in a pot over low heat. Stir often, and add a bit of broth if it is too thick. In the fridge, the soup stays fresh for three days. In the freezer, it lasts about three months. Always check for signs of spoilage before eating. Enjoy your soup while it’s still tasty! How long does it take to cook Garlic Parmesan Chicken Gnocchi Soup? It takes about 30 minutes to cook this soup. You will spend around 15 minutes prepping the ingredients. The cooking time is about 15 minutes. Can I make this soup in advance? Yes, you can make this soup in advance. Just store it in the fridge for up to 3 days. Reheat it gently on the stove when you are ready to eat. Is it possible to freeze Garlic Parmesan Chicken Gnocchi Soup? You can freeze this soup, but gnocchi might become soft. Store it in an airtight container for up to 3 months. Thaw it in the fridge before reheating. What to do if the soup is too thick? If your soup is too thick, add a little more chicken broth. Stir well and heat it gently until it reaches your desired consistency. How to prevent gnocchi from becoming mushy? To keep gnocchi firm, don't overcook them. Add them to the soup just before serving. They only need a few minutes to cook. Overview of calories and macros per serving Each serving has about 400 calories. It includes 20g of protein, 25g of carbs, and 25g of fat. Health benefits of the ingredients used This soup is rich in protein from chicken. Spinach adds vitamins A and C. Garlic has health benefits like boosting immunity. Overall, it offers a nutritious balance. This blog post covered the ingredients, steps, and tips for making Garlic Parmesan Chicken Gnocchi Soup. We explored various ingredient swaps and storage methods. You can modify the recipe based on dietary needs without compromising flavor. Cooking this soup offers a wonderful mix of taste and comfort. With these tips, you can create a delightful meal that warms every heart. Enjoy your cooking adventure and share this delicious soup with those you love.

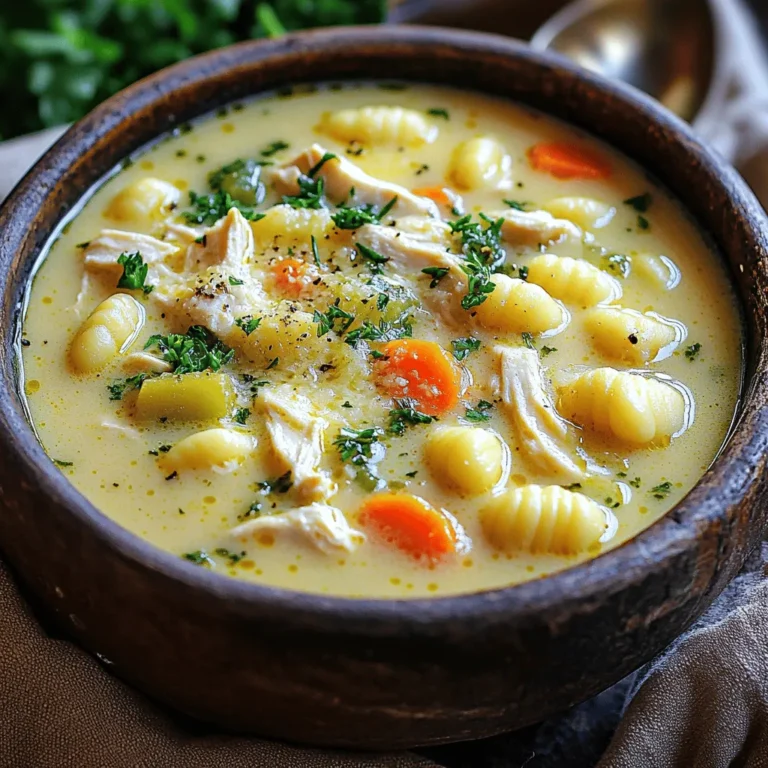
Garlic Parmesan Chicken Gnocchi Soup Cozy Comfort Dish

- 1 cup uncooked jasmine rice - 2 ½ cups vegetable broth - 2 cups broccoli florets - 1 cup shredded sharp cheddar cheese - 1 cup milk - 2 tablespoons unsalted butter - 1 medium onion - 2 cloves garlic - ½ teaspoon smoked paprika - Salt and pepper to taste - ¼ cup grated Parmesan cheese (optional) The main ingredients create a creamy and tasty dish. Jasmine rice adds a lovely aroma and a soft texture. The vegetable broth gives depth to the flavor. Broccoli florets add color and nutrients. Cheddar cheese brings a rich, sharp taste, while milk helps make the dish creamy. Butter gives a nice base. The onion and garlic add sweetness and aroma. Smoked paprika gives a hint of warmth. Salt and pepper balance the flavors. You can also add Parmesan cheese for extra richness if you like. - Types of cheese to use - Additional vegetables or proteins - Herbs and spices variations You can change things up to suit your taste! Try different cheeses like mozzarella for a milder flavor or pepper jack for a kick. You can also add veggies like bell peppers or peas for more color and nutrients. If you want extra protein, consider adding cooked chicken, shrimp, or beans. Herbs like thyme or basil can brighten the dish. Feel free to play with spices like cumin or chili powder for a unique twist. - Large skillet - Measuring cups and spoons - Cutting board and knife Having the right tools makes cooking easier. A large skillet is key for cooking everything together. Use measuring cups and spoons for accuracy. A cutting board and knife help you prepare the veggies easily. With these tools, you are set to make a great meal! Start by chopping the onion and garlic. Use a sharp knife to cut the onion finely. Mince the garlic cloves so they mix well. Next, measure out your rice and liquids. You need 1 cup of jasmine rice and 2 ½ cups of vegetable broth. Set these aside with the broccoli florets. In a large skillet, melt 2 tablespoons of butter over medium heat. Wait until it becomes frothy. Add the chopped onion and sauté for about 3-4 minutes. You want it to look soft and slightly clear. Then, stir in the minced garlic and cook for 1 more minute. Be careful not to let it burn. Next, add the uncooked jasmine rice to the skillet. Stir it well to coat every grain in the buttery mix. Toast the rice lightly for 1-2 minutes to bring out its nutty taste. Pour in the vegetable broth slowly, mixing well. Raise the heat to gently boil the mixture. Once it boils, reduce the heat to low, cover, and let it simmer for 12-15 minutes. The rice should be tender and the liquid absorbed. After the rice cooks, fold in the broccoli florets. Cover the skillet again and let it steam for another 5 minutes. The broccoli should turn bright green and tender but still crisp. Now lower the heat and pour in 1 cup of milk. Stir to mix all well. Slowly add the shredded cheddar cheese and a pinch of smoked paprika. Season with salt and pepper to your taste. Stir until the cheese melts and the dish is creamy, which takes about 2-3 minutes. If you want, sprinkle ¼ cup of grated Parmesan cheese on top. This adds extra richness. Serve the cheesy broccoli rice skillet hot. You can garnish with extra cheese or a sprinkle of crushed red pepper flakes for a bit of heat. Enjoy this creamy and simple meal! To get the best creamy texture, watch your milk. Add it slowly. This helps it mix well with other ingredients. Stir often as you add the cheese. This keeps everything smooth and tasty. Avoid overcooking the broccoli. It should stay bright green and a bit crisp. Steam it for just five minutes. If you cook it too long, it gets mushy. You want that nice bite in every forkful. Using pre-chopped veggies saves time. You can find these in the store. They cut down on prep work. This gets your meal on the table faster. For meal prep, cook a big batch. Store it in the fridge for later. You can enjoy leftovers for lunch or dinner. Just reheat when you’re ready to eat. Want a lighter dish? Try low-fat or dairy-free milk. You can also use low-fat cheese. These swaps cut calories without losing flavor. If you want to change your grain, use quinoa or brown rice. They add nice texture and extra nutrients. Adjust the cooking time as needed, but they work great in this dish. {{image_4}} You can easily boost this dish with protein. Adding cooked chicken or shrimp makes it heartier. Simply stir in diced chicken or shrimp after you add the milk. This step warms up the meat and keeps the flavors rich. If you want a vegetarian option, use beans. Black beans or chickpeas work well. They add protein and a nice texture. Want to spice it up? A dash of hot sauce will do the trick. It adds a nice kick without overpowering the dish. For a fresh twist, add lemon juice. A squeeze of lemon brightens the flavors and balances the creaminess. You can add lemon juice right before serving. This will keep the taste fresh and zesty. Cheddar cheese is a classic choice, but don’t stop there! You can explore other cheese options. Creamy mozzarella or tangy gouda can change the flavor profile. You might even try a cheese blend for depth. Mixing cheeses creates a unique taste. Just remember to adjust the amount based on your cheese choice. To keep your cheesy broccoli rice skillet fresh, follow these simple steps. First, let it cool down before storing. Use an airtight container to prevent moisture loss. This dish stays good in the fridge for about 3-4 days. Always check for any off smells before eating leftovers. When it’s time to enjoy your leftovers, you have two main options: the microwave or the stovetop. For the microwave, place a serving in a bowl, cover it, and heat for 1-2 minutes. Stir halfway through to heat evenly. If you choose the stovetop, use a non-stick pan. Add a splash of milk to keep it creamy. Heat over low until warm, stirring gently. If you want to save some for later, freezing works great! Scoop the cooled dish into freezer-safe containers. Leave some space at the top, as it expands when frozen. It can last up to 3 months in the freezer. When you're ready to eat, thaw it overnight in the fridge. Reheat it on the stovetop, adding a little milk to maintain that creamy texture. Yes, you can use brown rice. It has a longer cooking time. Brown rice takes about 40-45 minutes to cook. You will need to check the water levels. Add more broth if needed. Yes, this dish is great for meal prep. Cook the dish and let it cool. Store it in airtight containers. It stays fresh in the fridge for about 4 days. Reheat it before serving. You can use chicken broth or water. If you want a richer taste, make your own broth. Use scraps from veggies like carrots and celery. Simmer them with water for flavor. To make this dish vegan, use plant-based milk. You can replace cheese with vegan cheese. Nutritional yeast is a great option too. It adds a cheesy flavor without dairy. Yes, you can prepare this dish in advance. Cook it fully and let it cool. Store it in the fridge for up to 4 days. Simply reheat it when you are ready to serve. This blog post guided you through making a Cheesy Broccoli Rice Skillet. You learned about key ingredients, cooking steps, and tips for perfecting the dish. With options for customization and meal prep, this recipe fits many needs. Whether you're adding proteins, adjusting flavors, or storing leftovers, you'll enjoy this meal. Embrace the ease and flavor of this dish. Your kitchen adventure starts with just a few ingredients and steps. Happy cooking!

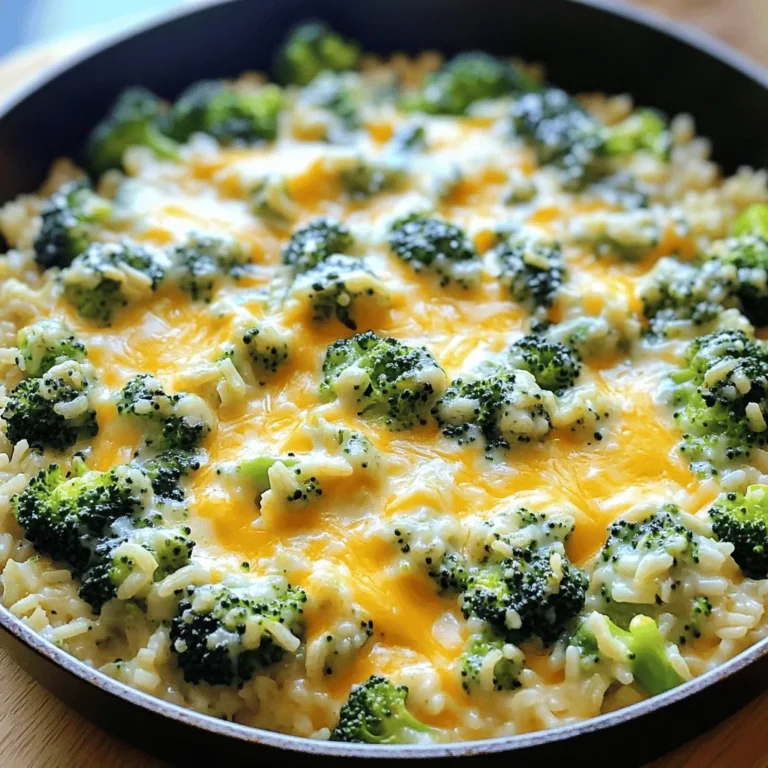
Cheesy Broccoli Rice Skillet Creamy and Simple Meal

- 4 tablespoons all-purpose flour - 4 tablespoons granulated sugar - 2 tablespoons unsweetened cocoa powder - 1/8 teaspoon baking powder - 1/8 teaspoon salt - 3 tablespoons milk (any kind) - 2 tablespoons creamy or crunchy peanut butter - 1 tablespoon vegetable oil - 1/4 teaspoon pure vanilla extract - Optional: a handful of chocolate chips for extra indulgence All-purpose flour gives the mug cake structure. You can use whole wheat flour if you want more fiber. Granulated sugar adds sweetness. You can swap this for brown sugar for a richer flavor. Unsweetened cocoa powder gives the cake a deep chocolate taste. Make sure it is unsweetened to keep your cake balanced. Baking powder helps the cake rise. If you don't have baking powder, try using baking soda, but reduce the amount to a pinch. The salt enhances the sweetness and flavor. Use sea salt or table salt; both work well. Milk keeps the batter moist. You can use almond milk, oat milk, or any milk you prefer. Peanut butter adds creaminess and a nutty taste. You can try almond butter if you like. Vegetable oil keeps the cake moist. You can use melted coconut oil as a substitute. Vanilla extract adds depth. If you don’t have it, you can skip it, but it helps! Chocolate chips are optional but make the cake extra special. You can use dark, milk, or even white chocolate chips. If you need to convert measurements: - 1 tablespoon = 3 teaspoons - 1/4 teaspoon = 0.75 milliliters - 4 tablespoons = 1/4 cup These conversions can help you adjust the recipe to your needs. Always measure carefully for the best results. First, grab your microwave-safe mug. I like to use a 12 oz mug for this recipe. Next, add the dry ingredients: - 4 tablespoons all-purpose flour - 4 tablespoons granulated sugar - 2 tablespoons unsweetened cocoa powder - 1/8 teaspoon baking powder - 1/8 teaspoon salt Use a fork to mix all the dry ingredients well. This helps the cake rise evenly. Now, pour in the wet ingredients: - 3 tablespoons milk (any kind) - 2 tablespoons creamy or crunchy peanut butter - 1 tablespoon vegetable oil - 1/4 teaspoon pure vanilla extract Mix these until the batter is smooth. If you want extra chocolate, fold in a handful of chocolate chips now. Place your mug in the microwave. Cook on high power for about 1 minute and 20 seconds. Keep an eye on it as it cooks. The cake should rise and look set. It might be a bit moist in the center, and that's okay! Carefully take the mug out of the microwave. It can be hot, so be careful! Let the cake cool for 1-2 minutes. This helps it set and makes it easier to enjoy. For a fun twist, drizzle more peanut butter on top or add whipped cream if you like. Serve it right in the mug for a cozy treat! To make your mug cake just right, use a 12 oz mug. This size helps the cake rise well. Mix your dry ingredients very well. This stops lumps from forming in the batter. When you add wet ingredients, stir until it’s smooth. If you want extra chocolate flavor, toss in some chocolate chips. If your mug cake is too dry, you may have cooked it too long. Start checking it after 1 minute. If it’s too wet, add a tiny bit more flour next time. If it overflows, try using a larger mug. You can also reduce the cooking time slightly. Serve your mug cake right in the mug for a cute look. To dress it up, sprinkle cocoa powder or add a few chocolate chips on top. You could also drizzle more peanut butter over the cake. A spoon beside the mug makes it easy to enjoy this treat! {{image_4}} You can change the flavor of your mug cake easily. Instead of cocoa powder, use matcha or cinnamon. This gives your cake a fun twist. You can also swap peanut butter for almond or cashew butter. Each nut butter brings a unique taste. For a fruity touch, add mashed banana or applesauce. This makes the cake moist and flavorful. If you need dietary changes, you have options. Use whole wheat flour instead of all-purpose flour for more fiber. If you're cutting sugar, try a sugar substitute like stevia. For a dairy-free cake, choose almond or oat milk. If you want to avoid eggs, there’s no need! This recipe is egg-free. You can enjoy a mug cake that fits your diet. Want to make your cake even better? Add-ins are the way to go! Toss in a handful of chocolate chips for a gooey treat. You can add nuts for a crunchy texture. Chopped walnuts or pecans work great. For something extra special, sprinkle mini marshmallows on top before cooking. They melt and create a sweet topping. Each add-in makes your cake a delight. To store your leftover mug cake, let it cool first. After it cools, cover the mug with plastic wrap or a lid. You can also transfer it to an airtight container. It will stay fresh for up to two days at room temperature. When you want to eat your leftover mug cake, it’s easy to reheat. Place the mug back in the microwave. Heat it for about 10 to 15 seconds. Check if it's warm enough. If not, heat for a few more seconds. Be careful not to overheat it, or it can dry out. You can freeze the mug cake, too! First, let it cool completely. Then, wrap it tightly in plastic wrap or foil. Place it in a freezer-safe container or bag. It will stay good for up to a month. When you’re ready to eat it, thaw it in the fridge or at room temperature. Reheat as mentioned above. A mug cake takes about 1 minute and 20 seconds to cook in the microwave. Keep your eyes on it as it cooks. The exact time can change based on your microwave's power. You want the cake to rise and look set. Yes, you can use any kind of milk. Almond milk, soy milk, or oat milk all work well. Just make sure it is unsweetened if you want to keep the cake from being too sweet. Absolutely! You can make this cake vegan with simple swaps. Use plant-based milk and replace the vegetable oil with melted coconut oil. Make sure to use vegan chocolate chips if you add them. You can add many tasty toppings! Try drizzling extra peanut butter on top. Whipped cream, chopped nuts, or even a scoop of ice cream can make it even more special. A sprinkle of sea salt can also enhance the flavor. In this blog post, we explored how to make a delicious mug cake quickly. We broke down the key ingredients and their swaps, shared easy step-by-step instructions, and offered tips for perfecting the cake. We discussed various flavor options, storage methods, and answered common questions. Remember, with a few simple steps, you can enjoy a warm, tasty treat anytime. Making mug cake is fun and easy, so don’t hesitate to experiment with different flavors and toppings. Enjoy your baking!

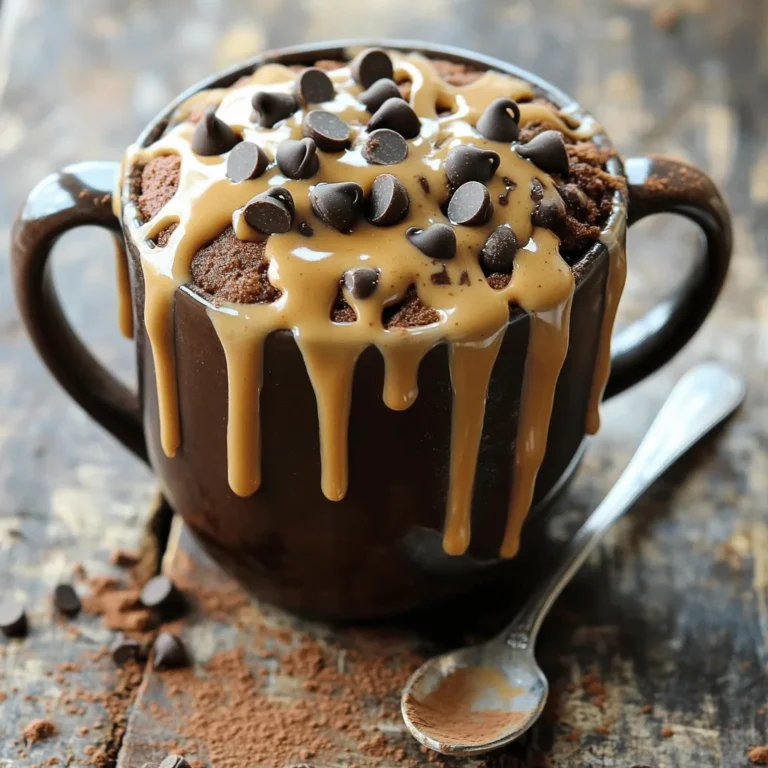
Chocolate Peanut Butter Mug Cake Quick and Easy Fix

- 1 lb white fish fillets (like tilapia or snapper) - 2 tablespoons olive oil - 8 small corn tortillas - 1 cup shredded cabbage - 2 tablespoons paprika - 1 tablespoon cayenne pepper - 1 tablespoon garlic powder - 1 tablespoon onion powder - 1 teaspoon dried oregano - 1 teaspoon salt - 1/2 teaspoon black pepper - 1 cup fresh pineapple, diced - 1/2 red onion, finely chopped - 1 jalapeño, deseeded and minced - 1/4 cup cilantro, chopped - Juice of 1 lime - Salt to taste The fish brings a light and flaky base to these tacos. The blackening spice mix adds bold flavor. The pineapple salsa gives a sweet and zesty kick. Each ingredient plays a key role. When combined, they create a fresh and exciting meal. This dish is perfect for warm days or gatherings. You can switch the fish or salsa if you like. Enjoy the process of gathering these vibrant ingredients! Start by making the spice mix. In a small bowl, combine paprika, cayenne pepper, garlic powder, onion powder, oregano, salt, and black pepper. Mix it well. This blend gives the fish its bold flavor. Next, take your fish fillets and pat them dry with paper towels. Drying removes extra moisture. This step helps the spices stick better. Rub the spice mix generously over both sides of each fillet. Ensure every bit is coated for maximum taste. Heat olive oil in a large skillet over medium-high heat. You want it hot but not smoking. Once the oil shimmers, carefully add the fish fillets to the pan. Cook for about 3-4 minutes on each side. Look for a nice blackened crust to form. This adds flavor and texture. After cooking, take the fish out and let it rest for a few minutes. Use a fork to flake the fish into bite-sized pieces. This makes it easy to fill the tacos later. In a medium bowl, mix diced pineapple, chopped red onion, minced jalapeño, chopped cilantro, lime juice, and a touch of salt. Stir everything well. This salsa brings a fresh, sweet flavor to the tacos. Let it sit for a bit so the flavors can blend. Grab a dry skillet and warm your corn tortillas. Heat them for about 30 seconds on each side. Warming makes them soft and easy to fold. This step is key for a good taco experience. Now it's time to build your tacos! Place a handful of shredded cabbage on each warm tortilla. Next, add a generous portion of the flaked blackened fish. Top it with a spoonful of the zesty pineapple salsa. This adds a bright touch and balances the spice of the fish. Serve your tacos on a colorful platter. Add lime wedges for squeezing. You can also sprinkle more cilantro on top for a nice look. Enjoy your delicious blackened fish tacos! When picking fish for blackened tacos, I suggest using white fish. Good options include tilapia or snapper. These fish have a mild taste that works well with bold spices. Always look for fresh fish at your local market. Fresh fish smells clean and has firm flesh. If frozen, make sure it is properly thawed before cooking. To get that perfect blackened crust, use a strong spice mix. I recommend paprika, cayenne, garlic, and onion powders. Pat the fish dry first; this helps the spices stick better. Apply the spice mix generously on both sides. Cook the fish in hot oil. This will create a nice sear. Don't overcrowd the pan; cook in batches if needed. Flip the fish once for even cooking. You can make parts of the dish ahead. The pineapple salsa is best made a few hours early. This lets the flavors blend nicely. Store it in the fridge until you're ready to use it. You can also season the fish a few hours before cooking. Just keep it covered in the fridge. Warm the tortillas right before serving for the best taste. {{image_4}} You can use different fish for these tacos. Here are some great choices: - Cod: This fish has a mild flavor and flakes well. - Mahi-mahi: Offers a firm texture and a touch of sweetness. - Salmon: Adds rich flavor and healthy omega-3 fats. - Trout: A tasty option with a delicate taste. Choosing a fish depends on your taste and what you find fresh. Always pick fish that are sustainable and local for the best flavor. You can switch up the salsa for fun new flavors. Here are some ideas: - Mango: Use diced mango for a sweeter taste. - Avocado: Add creamy avocado for richness. - Tomato: Diced tomatoes give a fresh twist. - Corn: Sweet corn adds a nice crunch. Mix and match these ingredients to create your favorite salsa. You can even add herbs like mint or basil for a new spin. While corn tortillas are classic, you might want to try something different. Here are some options: - Flour tortillas: Soft and chewy, they hold fillings well. - Lettuce wraps: Great for a low-carb choice. - Sweet potato tortillas: A fun, colorful option with extra flavor. - Rice paper: Perfect for a unique twist and a light feel. Experiment with these tortilla types to find what you love best. Each option can change the whole taco experience! To store leftover blackened fish tacos, place them in an airtight container. Keep the fish, tortillas, and salsa separate. This keeps the tortillas from getting soggy. Store them in the fridge for up to two days. When you’re ready to eat, you can enjoy fresh flavors again. If you want to freeze the tacos, it’s best to freeze the fish only. Wrap each piece tightly in plastic wrap and then place it in a freezer bag. The fish can last up to three months in the freezer. Avoid freezing the tortillas and salsa. These are best when fresh. To reheat the fish, you can use a skillet. Heat it over medium heat and add a little oil. Place the fish in the skillet for about three to five minutes on each side. This helps to keep it juicy and flavorful. Warm the tortillas in a dry skillet for about 30 seconds on each side. Add fresh salsa right before serving to keep the taste bright. For blackened fish tacos, I recommend using white fish. Tilapia and snapper work great. These fish have mild flavors that let the spices shine. They also cook quickly and stay moist. You want fish that flakes easily. This makes it perfect for tacos. To spice up your salsa, add more jalapeño. You can also try red pepper flakes. If you like heat, use a hotter pepper, like serrano or habanero. Just remember to remove the seeds to control the spice. Taste as you go to get the right flavor. Yes, you can use flour tortillas if you prefer them. They are softer and easier to fold. However, corn tortillas add a nice texture and flavor. If using flour, warm them just like corn tortillas. Enjoy your tacos however you like! This blog post gave you everything you need for blackened fish tacos. We covered the key ingredients, with fish, spices, and fresh salsa. You learned step-by-step how to prepare, cook, and assemble your tacos. I shared tips for choosing fish and perfecting the crust. You now know fun variations and how to store leftovers safely. Enjoy your cooking adventure! Blackened fish tacos are tasty, fresh, and easy to make.

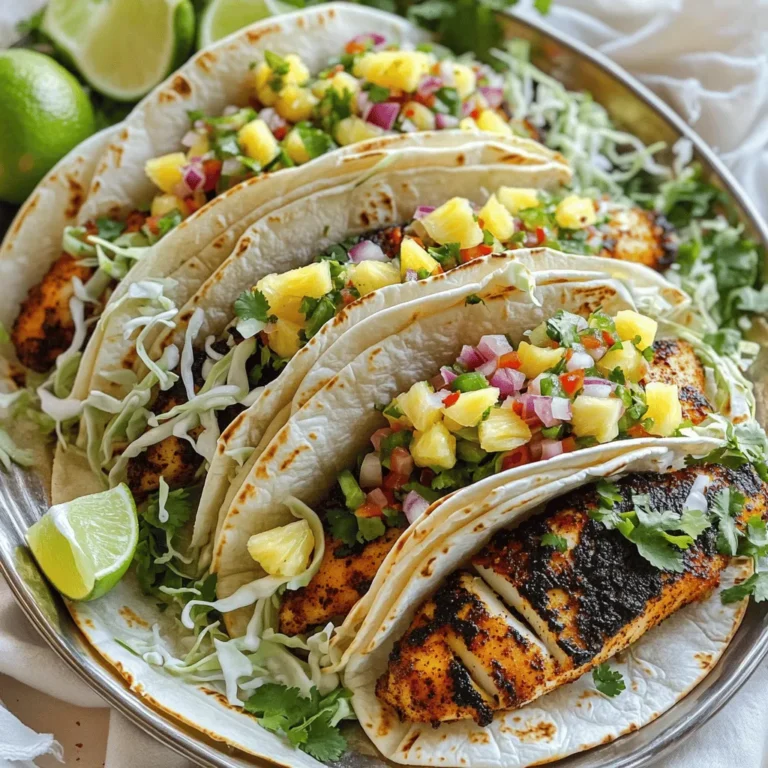
Blackened Fish Tacos with Pineapple Salsa Delight

PREV 1 … 10 11 12 … 18 NEXT
sweet savory saga

explore

DessertsDinnerAppetizersDrinks

Our Policies

  • Cookie Policy
  • Copyright Policy
  • Disclaimer
  • GDPR Policy
  • Terms Of Use
Back to Top
  • About
  • Contact Us
  • Privacy Policy
© 2025 sweet savory saga