FREE DINNER EBOOK! Get your copy!
  • Cookie Policy
  • GDPR Policy
  • Disclaimer
  • Terms Of Use
  • Visit my other site: Fun Cookie Recipes
sweet savory saga
  • Home
  • Dinner
  • Desserts
  • Drinks
  • Appetizers
  • Contact
  • About
  • Privacy Policy
  • Home
  • Dinner
  • Desserts
  • Drinks
  • Appetizers
  • Contact
  • About
  • Privacy Policy
  • Cookie Policy
  • GDPR Policy
  • Disclaimer
  • Terms Of Use
Visit my other site: Fun Cookie Recipes

HOME / CATEGORIES /

Latest

- 1 block (14 oz) firm tofu - 1 red bell pepper, sliced into thin strips - 1 cup broccoli florets, cut into bite-sized pieces - 1 medium carrot, thinly sliced - 3 green onions, finely chopped, white and green parts separated - 2 cloves garlic, finely minced - 1 inch fresh ginger, peeled and grated When I make sweet chili tofu stir fry, I start with firm tofu. It holds its shape and gives a great texture. I slice the tofu into bite-sized cubes, making it easy to eat. Adding fresh vegetables like red bell pepper, broccoli, and carrot brings color and crunch. The green onions add a nice zing, while garlic and ginger give a warm flavor that makes this dish pop. - 1/4 cup sweet chili sauce - 2 tablespoons soy sauce - 1 tablespoon lime juice, freshly squeezed The sauce is the star of this dish. Sweet chili sauce provides a perfect balance of sweetness and heat. I mix it with soy sauce for depth and freshly squeezed lime juice for brightness. This trio creates a sauce that clings to the tofu and veggies, making every bite flavorful. - Sesame seeds - Fresh cilantro For garnishes, I love using sesame seeds. They add a nice crunch and look great on the dish. Fresh cilantro gives a fresh taste that makes the stir fry even more vibrant. These garnishes are optional, but they really enhance the meal. This recipe is simple, quick, and full of flavors. You can customize it to your taste and enjoy a colorful dish on your plate. To start, drain the tofu block well. This step removes excess water. Next, wrap it in a clean towel. Place something heavy on top. Let it sit for about 15 minutes. This helps the tofu become firmer. Now, cut the pressed tofu into 1-inch cubes. Place the cubes in a bowl. Sprinkle 2 tablespoons of cornstarch over the tofu. Toss gently, coating all sides. This coating helps the tofu become crispy when cooked. Heat 1 tablespoon of vegetable oil in a large skillet over medium-high heat. Wait until the oil shimmers. Carefully add the tofu cubes in a single layer. Fry for 3-4 minutes on each side. Turn gently to avoid breaking the cubes. The tofu should be golden brown and crispy. Once done, take the tofu out and set it aside on a plate. In the same skillet, add another tablespoon of vegetable oil. Next, toss in the sliced red bell pepper, broccoli florets, and thinly sliced carrot. Stir-fry these veggies for 4-5 minutes. Keep stirring to ensure they cook evenly. The goal is vibrant colors and a slightly tender but still crisp texture. Add minced garlic and grated ginger to the skillet with the veggies. Stir-fry for 1 more minute. This step brings out their great aroma. Now, return the crispy tofu to the skillet. Pour in the sweet chili sauce, soy sauce, and fresh lime juice. Gently toss everything together. Cook for another 2-3 minutes until heated through. Finally, take the skillet off the heat. Garnish your stir fry with chopped green onions and sprinkle with sesame seeds. Enjoy the bright flavors and textures in this dish! Tofu can be a great meat alternative, but it needs some care. First, press the tofu. This step removes extra water, which helps the tofu become crispy. It also helps the tofu soak up flavors better. After pressing, cut the tofu into cubes. Next, coat the cubes in cornstarch. This coating is key. It makes the outside crunchy when you fry it. Toss the cubes gently, ensuring each side is covered well. To elevate your dish, think about extra seasonings. You can add a pinch of salt or a dash of pepper. Some chili flakes can bring heat. Fresh herbs like basil or cilantro can add a bright taste too. Don’t skip fresh lime juice! It adds a punch that wakes up all the flavors. Squeeze it right before serving for the best taste. When it comes to sides, pair your stir fry with jasmine rice or quinoa. Both make great bases for the sweet chili tofu. You can also serve it with a side salad for freshness. For a nice touch, use a big bowl. Serve the stir fry over rice and drizzle more sweet chili sauce on top. Finish with sesame seeds and fresh cilantro for a beautiful look. {{image_4}} You can switch tofu for other proteins. Chicken or shrimp works well in this dish. Just cut them into bite-sized pieces. Cook them until golden brown. They add a nice flavor and texture. If you want a vegan option, try chickpeas or tempeh. Both are tasty and full of protein. They soak up flavors well, making your stir fry delicious. Feel free to use any fresh vegetables you like. Seasonal veggies add great taste. Try snap peas, zucchini, or bell peppers. You can mix and match depending on what you have. If you don’t like certain veggies, leave them out. The stir fry is flexible, so use what makes you happy! You can change the sauce to fit your taste. If you want it sweeter, add more sweet chili sauce. For a spicy kick, add chili flakes or sriracha. You can also make your own sweet chili sauce. Just combine sugar, vinegar, and garlic for a quick version. This gives you control over the flavors! After cooking, let your sweet chili tofu stir fry cool down. You can store it in the fridge. Place it in an airtight container. This way, it stays fresh longer. It keeps well for up to three days. Don’t leave it out at room temperature for more than two hours. To reheat, you have a few options. The best way is to use a stovetop. Heat a skillet over medium heat and add a splash of water. This keeps the tofu and veggies moist. Stir gently until it’s hot. You can also use a microwave. Place it in a microwave-safe bowl and cover it. Heat in short bursts, stirring in between. This helps maintain the texture. You can freeze your stir fry if you want to save it for later. To freeze, let it cool completely. Then, pack it into freezer-safe bags. Try to remove as much air as possible. This helps prevent freezer burn. When ready to eat, take it out of the freezer. Thaw it overnight in the fridge. Reheat on the stovetop or microwave as mentioned above. Enjoy your tasty meal later! Making this dish takes about 25 minutes. - Prep time is 15 minutes. - Cooking time is around 10 minutes. Yes, you can use other sauces. - Try teriyaki sauce for a sweeter taste. - Soy sauce gives a saltier kick. - Hoisin sauce adds richness and depth. Yes, this stir fry is healthy. - Tofu is a great protein source. - Bell peppers and broccoli are rich in vitamins. - Fresh ginger and garlic boost your immune system. - You can enjoy this dish without guilt. In this post, we explored how to make Sweet Chili Tofu Stir Fry. We covered essential ingredients, like firm tofu, fresh veggies, and flavorful sauces. I shared step-by-step instructions, plus tips for crispy tofu and best serving suggestions. Remember, you can customize this dish with different proteins and veggies, making it your own. Enjoy your stir fry adventure! It’s tasty, easy, and great for any meal.

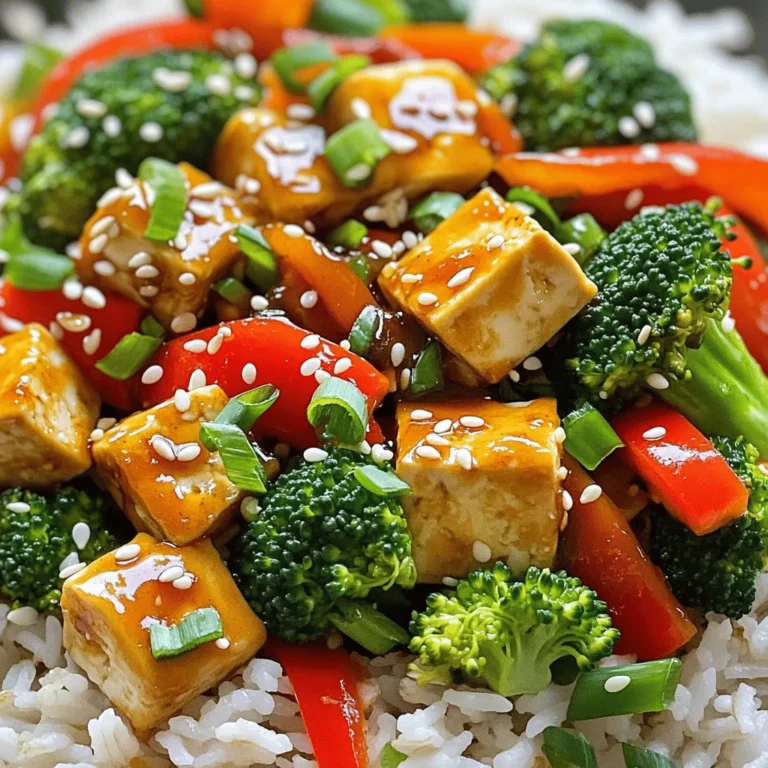
Sweet Chili Tofu Stir Fry Flavorful Easy Dinner

- 2 cups all-purpose flour - 1/4 cup granulated sugar - 2 teaspoons baking powder - 1/2 teaspoon baking soda - 1/2 teaspoon salt - 1/2 cup unsalted butter, cold and cubed - 3/4 cup heavy cream - 1 teaspoon vanilla extract - 1 cup fresh raspberries - 1/2 cup white chocolate chips - Egg wash (1 egg beaten with 1 tablespoon water) for brushing - Extra granulated sugar for sprinkling (optional) I love using fresh raspberries and creamy white chocolate in these scones. They create a perfect blend of sweet and tart. The base is simple, made with flour, sugar, and a bit of salt. The butter is key; I always use cold, cubed butter for a flaky texture. Cream and vanilla add moisture and flavor. - Lemon zest for a citrus kick - Chopped nuts like almonds or pecans - Dried fruit for added texture - Other types of chocolate, such as dark or milk Adding lemon zest brightens the flavor. Nuts give a nice crunch, while dried fruit can add sweetness. You can also swap in different chocolates for unique tastes. - Whole wheat flour instead of all-purpose flour - Coconut oil for butter if dairy-free - Almond milk for heavy cream If you want a healthier twist, whole wheat flour works well. For a dairy-free option, coconut oil is a great choice. Using almond milk instead of heavy cream also keeps things light but still tasty. First, set your oven to 400°F (200°C). This is the perfect temperature for baking scones. While it heats, line a baking sheet with parchment paper. This keeps the scones from sticking. In a large bowl, combine 2 cups of all-purpose flour, 1/4 cup granulated sugar, 2 teaspoons baking powder, 1/2 teaspoon baking soda, and 1/2 teaspoon salt. Whisk these dry ingredients together until they blend well. This step is key for even flavor. Next, add 1/2 cup of cold, cubed unsalted butter to the flour mix. Use a pastry cutter or your fingers to work the butter in. You want it to look like coarse crumbs. This creates the flaky texture we love in scones. In another bowl, mix 3/4 cup heavy cream and 1 teaspoon vanilla extract. Stir until combined. Slowly pour this mixture into the dry ingredients. Gently mix until the dough starts to come together. Don’t overmix; we want tender scones. Now, carefully fold in 1 cup of fresh raspberries and 1/2 cup of white chocolate chips. Be gentle, as you don’t want to smash the berries too much. This helps keep those lovely fruit bursts in each bite. Turn the dough out onto a lightly floured surface. Knead it a few times until it holds together. Shape it into a circle about 1 inch thick. Then, use a sharp knife to cut it into 8 wedges. Transfer the wedges to your prepared baking sheet, leaving space between them. Brush the top of each scone with an egg wash made from 1 beaten egg and 1 tablespoon water. Optionally, sprinkle some extra sugar on top for a sweet crunch. Place the baking sheet in your oven. Bake for 15-18 minutes, or until the scones are golden brown. To check if they’re done, insert a toothpick into one. It should come out clean. Once baked, let them cool for about 10 minutes before serving. To achieve that perfect flaky texture, start with cold butter. Cold butter helps create layers. When you cut the butter into the flour, aim for coarse crumbs. This keeps the butter solid. When baking, the butter melts and creates steam, which puffs up the scones. Mix the dough gently when adding the cream. Overmixing can make scones tough. You want the dough to be just combined. When you fold in your raspberries and white chocolate, be gentle. This helps keep the raspberries whole and adds juicy bites. You can boost flavor in your scones. Try adding lemon zest for a fresh twist. You can also mix in nuts or different chocolate types. These add-ins make the scones unique and exciting. For a lovely presentation, serve warm scones on a rustic board. Dust them with powdered sugar for a touch of elegance. Pair them with clotted cream or whipped cream for an extra treat. This not only looks great but also feels special. {{image_4}} You can enjoy these scones even if you need a gluten-free option. Use a gluten-free flour blend. Make sure it has a good mix of starches and proteins. This will help mimic the texture of regular flour. You might need to add a bit more cream to get the right dough consistency. Always check the blend and adjust as needed to keep your scones tender. Adding different flavors can change your scones in fun ways. For a citrus twist, add lemon zest to the dough. Just a teaspoon will brighten the taste. You can also swap in almond extract for a nutty flavor. If you prefer, mix in chopped nuts or different fruits, like blueberries or strawberries, for added variety. These small changes will keep your baking exciting. Not everyone loves sweet scones. If you want less sweetness, cut the sugar down to two tablespoons. You can also skip the extra sugar on top. For a fun twist, try topping your scones with a light glaze made from powdered sugar and milk. This adds sweetness without being too much. Enjoy making these scone variations your own! To keep your raspberry white chocolate scones fresh, place them in an airtight container. This helps them stay soft. You can store them at room temperature for up to two days. If you need them to last longer, the fridge is a great option. Just make sure to wrap them well to stop them from drying out. When you're ready to enjoy leftover scones, preheat your oven to 350°F (175°C). Place the scones on a baking sheet. Heat them for about 5 to 10 minutes. This warms them up and brings back their lovely texture. If you're in a hurry, you can use the microwave. Heat each scone for about 10-15 seconds, but this may make them a bit softer. Freezing is a good way to keep your scones for later. First, let the baked scones cool completely. Then, wrap each scone in plastic wrap. Place the wrapped scones in a freezer bag or container. They can stay frozen for up to three months. When you want one, just remove it from the freezer and follow the reheating instructions. This way, you can enjoy your treats anytime! Yes, you can use frozen raspberries. They work well in scones. However, they might add more moisture. This can make the dough wetter, so adjust flour as needed. Be gentle when folding them in to avoid mushiness. Look for a golden brown color on top. Insert a toothpick into a scone; it should come out clean. If it pulls out wet, bake for a few more minutes. Keep an eye on them to avoid overbaking. To achieve tender scones, avoid overmixing the dough. Mix just until combined. Use cold butter and heavy cream to keep the texture light. Chilling the dough for a short time can also help with tenderness. These scones taste great with clotted cream or whipped cream. You can also serve them with homemade jam for extra flavor. A cup of tea or coffee pairs well for a delightful treat. Yes, you can swap white chocolate for dark or milk chocolate. Each type adds a different flavor. You might also try using chocolate chunks for a fun twist. Just be sure to adjust sweetness if needed. In this blog post, we covered the essential ingredients for delightful raspberry white chocolate scones. I provided step-by-step instructions for perfect baking. Tips and tricks helped you create flaky scones, with storage info for leftovers. Remember, experimenting with flavors makes baking fun. Don’t hesitate to try new ingredients or methods. Enjoy baking and savor every bite! Your scone journey starts now; make it tasty and enjoyable.

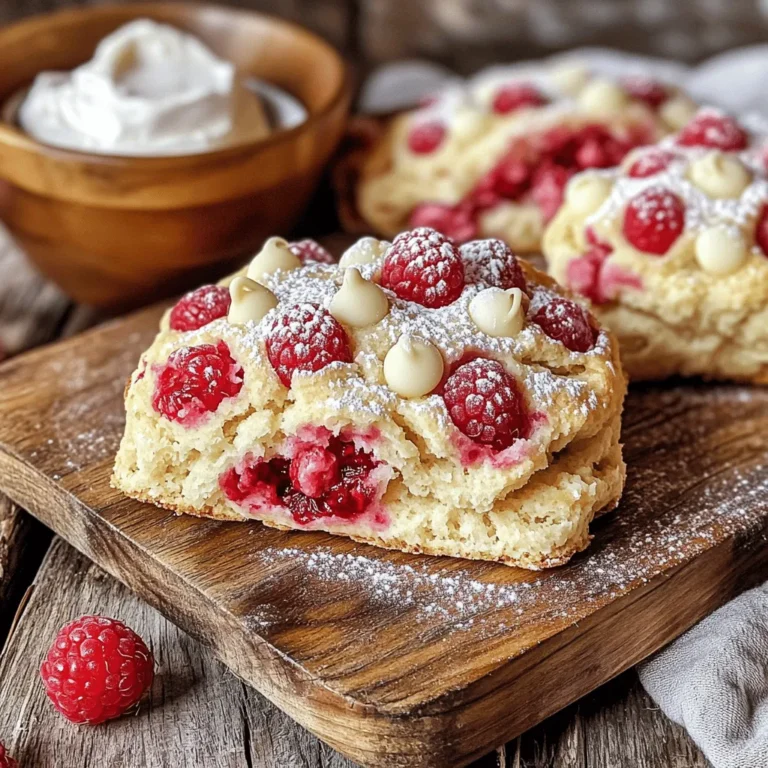
Raspberry White Chocolate Scones Delightful Treats

- 1 large cucumber - 8 oz cream cheese, softened - 1 tablespoon sour cream - 1 tablespoon fresh dill, chopped - 1 teaspoon garlic powder - 1 teaspoon onion powder - 2 teaspoons sesame seeds - 2 teaspoons poppy seeds - 1 teaspoon dried minced onion - Salt and black pepper to taste - Cherry tomatoes, halved (for garnish) Using fresh ingredients is key for great flavor. Fresh cucumbers add crunch and moisture. Cream cheese should be soft for easy spreading. Fresh dill gives a bright taste. When you use fresh items, your Everything Bagel Cucumber Bites will shine. They will taste better and look more appealing. If you need substitutes, don’t worry. You can swap the cream cheese for Greek yogurt for a lighter option. If you don’t have fresh dill, dried dill works too. You can also use any herbs you like. Don't have sesame seeds? Try sunflower seeds instead. These changes keep your bites tasty and fun! Start by washing the cucumber well under cold water. This helps remove dirt and bacteria. Next, cut it into rounds that are about ½-inch thick. Each slice should be a good size for your bites. After slicing, use a paper towel to pat each slice dry. Removing excess moisture is key. It keeps your bites from getting soggy. In a medium bowl, combine the softened cream cheese with sour cream. Add finely chopped dill, garlic powder, and onion powder. Don't forget a pinch of salt and pepper for taste. Mix these ingredients with a spatula or a mixer. You want a smooth and creamy texture. This mixture packs a lot of flavor. Take a cucumber slice and spread a generous layer of the cream cheese mixture on top. Make sure to cover it well for the best taste. Now, sprinkle the everything bagel seasoning over the cream cheese. This includes sesame seeds, poppy seeds, and dried minced onion. Press lightly so it sticks. Finally, place half of a cherry tomato on each bite. This adds color and freshness. Serve these bites right away for the best experience! To keep your cucumber bites crisp, choose firm cucumbers. Wash them well and slice them just before serving. After slicing, pat each piece dry with a paper towel. This will remove extra moisture. Moisture can make them soggy. If you can, serve them right after you make them. For smooth spreading, use softened cream cheese. Mix it with sour cream and spices in a bowl. A spatula works well for this. Spread the cream cheese thickly on the cucumber. Make sure to cover the entire slice. This adds flavor and helps the toppings stick. For a great look, arrange the bites on a colorful platter. You can add fresh herbs around them. This adds color and makes the dish pop. Placing a cherry tomato half on each bite adds a splash of red. It also gives extra taste. Remember, a beautiful display makes your food more appealing! {{image_4}} You can add many toppings to your cucumber bites. Try smoked salmon for a rich taste. A slice of radish adds a nice crunch. Crumbled feta cheese gives a salty kick. You can even add a slice of avocado for creaminess. Mixing and matching toppings keeps things fun! You don't have to stick with plain cream cheese. Flavored cream cheeses can change the game! Try chive or herb cream cheese for added zest. A spicy jalapeño cream cheese adds heat. For a sweet twist, use a honey-infused cream cheese. Each flavor will give your bites a unique taste. If you're vegan or lactose intolerant, don't worry! You can use dairy-free cream cheese instead. Cashew cream or hummus works well too. These options keep the bites tasty and creamy. You can even mix in some nutritional yeast for a cheesy flavor. Everyone can enjoy these delightful snacks! Store leftover cucumber bites in an airtight container. Layer them with parchment paper to keep them from sticking together. Place the container in the fridge right away. They will stay fresh for up to two days. To keep the bites crisp, do not add cherry tomatoes until you serve them. The tomatoes can release moisture and make the bites soggy. If you know you will have leftovers, prepare the cucumber and cheese mix separately. Assemble them just before serving for the best texture. These cucumber bites are best served cold, so there's no need to reheat them. If you want to serve them warm, you can gently heat the cream cheese mixture. Just be careful not to melt it too much. When serving, add fresh herbs or extra seasoning for a pop of flavor. Yes, you can make these bites ahead of time. Prepare the cucumber and cream cheese mix. Chill them in the fridge for a few hours. Just add the toppings before serving for the best taste. This way, they stay fresh and tasty. These cucumber bites pair well with many snacks. Try serving them with veggie sticks or crackers. Hummus or a light dip can also be a great choice. For drinks, sparkling water or light cocktails work nicely. You can mix and match to suit your guests' tastes! You can easily adjust the seasoning in the cream cheese mix. If you like garlic, add more garlic powder. For a stronger onion flavor, increase the onion powder. If you want it spicy, try adding a pinch of cayenne pepper. Taste and adjust as you go for the best flavor! In this post, we explored everything about making Everything Bagel Cucumber Bites. We covered the importance of fresh ingredients and shared easy substitutes. I provided step-by-step instructions for prep and assembly. Plus, I shared tips on keeping your bites crisp and looking great. Remember, these bites are flexible. You can mix toppings and try different cream cheese flavors. With smart storage tips, you can enjoy them later too. Have fun making these tasty treats, and don’t hesitate to get creative!

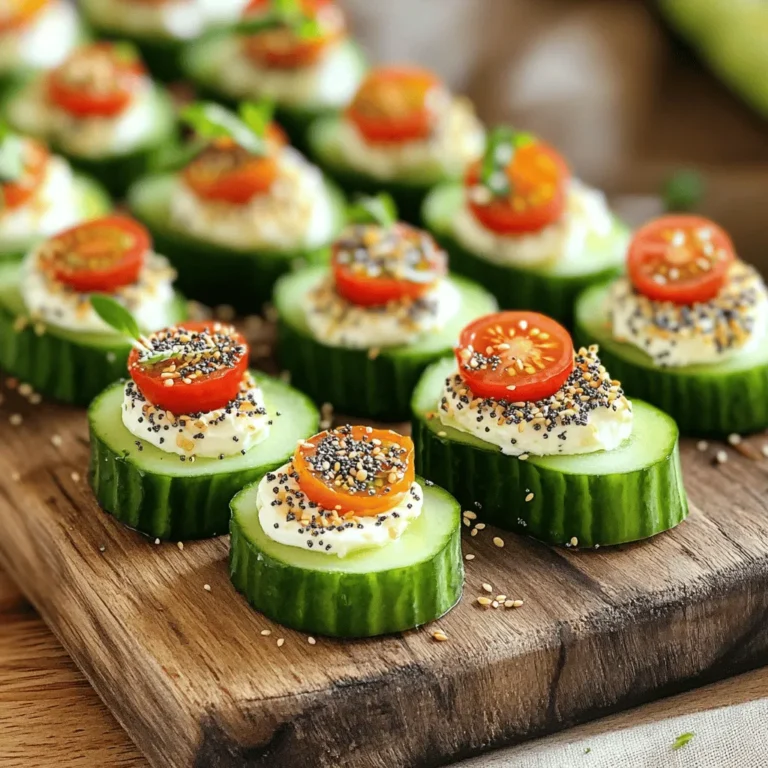
Everything Bagel Cucumber Bites Delightful Snack Idea

- 1 can (15 oz) chickpeas, thoroughly rinsed and drained - 1 cup cherry tomatoes, halved - 1 cucumber, diced - 1/2 red onion, finely chopped - 1/2 cup Kalamata olives, pitted and sliced - 1/4 cup feta cheese, crumbled - 2 tablespoons fresh parsley, finely chopped - 1 tablespoon fresh mint, finely chopped - 3 tablespoons extra virgin olive oil - 2 tablespoons fresh lemon juice - 1 teaspoon dried oregano - Salt and freshly ground black pepper to taste When you pick ingredients, look for bright colors and firm textures. - Chickpeas: Choose canned ones with no added salt for a healthy option. - Tomatoes: Select plump cherry tomatoes; they should feel heavy for their size. - Cucumbers: Pick cucumbers that are smooth and have a firm skin. - Onion: A fresh red onion should have a shiny skin and feel solid. - Olives: Look for olives that are glossy and plump for the best taste. - Feta: Get a block of feta from the deli for a better texture than crumbles. You can easily swap ingredients to fit your needs. - Chickpeas: Use black beans for a different flavor. - Feta Cheese: Try goat cheese or vegan feta for a dairy-free option. - Olive Oil: Substituting with avocado oil can offer a unique taste. - Herbs: Basil or cilantro can replace parsley and mint for varied flavor. - Lemon Juice: Lime juice can give a zesty twist if you prefer. These tasty choices let you create a salad that works for everyone. To begin, grab a big mixing bowl. Add the rinsed and drained chickpeas. These will give your salad a hearty feel. Next, toss in the halved cherry tomatoes. Their sweet burst will brighten each bite. Then, add the diced cucumber for a refreshing crunch. Finally, mix in the finely chopped red onion. This will enhance the salad's flavor and color. Now it's time to add more flavor. Gently fold in the sliced Kalamata olives. They bring a nice salty taste. Next, sprinkle in the crumbled feta cheese. This creamy cheese adds richness to the mix. After that, add the chopped fresh parsley and mint. They add a lovely herbal note. Don’t forget the dried oregano! This spice gives that classic Mediterranean flavor. For the dressing, take a small bowl. Whisk together the extra virgin olive oil and fresh lemon juice. This mix adds both richness and acidity. Then, season with salt and freshly ground black pepper. Mix until everything is smooth. Drizzle this dressing over your salad. Carefully toss everything together. Ensure each piece is coated well. Taste your salad. Adjust the seasoning if needed. Let it rest for 10-15 minutes. This allows all the flavors to mingle. Enjoy the boost of fresh Mediterranean tastes! To boost the flavor of your Mediterranean chickpea salad, start with fresh ingredients. Fresh herbs like parsley and mint give a bright taste. For extra zing, use fresh lemon juice instead of bottled. You can also add a pinch of red pepper flakes for heat. Let the salad sit for 10-15 minutes before serving. This time allows the flavors to meld beautifully. Presentation matters when serving food. For a stunning look, use a large bowl or a platter. Line the platter with leafy greens like romaine or spinach. Arrange the salad in the center and add a garnish of parsley and a lemon wedge on the side. This adds color and invites your guests to dig in. To save time, you can prep the salad ingredients ahead of time. Chop the vegetables and store them in airtight containers. You can also make the dressing in advance. Just mix the olive oil, lemon juice, salt, and pepper in a jar. Shake it well before using. This way, you can whip up the salad in no time on busy days. {{image_4}} You can easily add quinoa to your salad. Quinoa adds a nice texture and extra nutrition. Use about one cup of cooked quinoa. Mix it in after you combine the chickpeas and veggies. This makes your salad more filling and hearty. Want to make your salad more filling? Add grilled chicken or tuna. Both options give you great protein. Use about one cup of grilled chicken, sliced thinly. If you prefer tuna, one can works well. Just drain it and mix it in. This change makes the salad a full meal. For a vegan twist, skip the feta cheese. Instead, use avocado or a vegan cheese substitute. This keeps your salad creamy and tasty. If you want gluten-free options, this salad is already safe. Just be sure to check the quinoa and any dressing ingredients. You can enjoy this salad without worry! To keep your Mediterranean Chickpea Salad fresh, store it in an airtight container. Make sure to remove as much air as possible before sealing. This helps keep the salad crisp and flavorful. If you notice any liquid pooling at the bottom, drain it before serving again. Your salad can last in the fridge for about 3 days. After that, some ingredients might lose texture and taste. Check for freshness before eating. If it looks or smells off, it’s best to toss it. Freezing this salad isn’t ideal due to its ingredients. The veggies may become mushy after thawing. If you still want to freeze it, consider only freezing the chickpeas and olives. Add the fresh ingredients later for the best flavor and crunch. You can make this salad a day before serving. Prepare the salad as directed, but don’t add the dressing right away. Store the salad in the fridge in a sealed container. When you’re ready to serve, mix in the dressing. This method keeps the veggies crisp and fresh. Yes, you can swap out ingredients as needed. If you don’t have chickpeas, try white beans. No feta? Use avocado for creaminess. You can skip olives if you want less salt. The goal is to keep it fresh and flavorful while fitting your tastes. This salad pairs well with grilled meats like chicken or fish. It also goes great with pita bread or hummus. For a complete meal, serve it with a side of rice or quinoa. The bright flavors of the salad add a nice touch to any dish. This blog post shared how to make a delightful Mediterranean Chickpea Salad. You learned about the key ingredients and tips for freshness. We explored step-by-step instructions for creating the salad and dressing. I offered tips for enhancing flavor and saving time. You also discovered variations and smart storage tips. In closing, this salad is versatile and easy to adapt. It's a tasty choice for any meal. Enjoy making it your own!

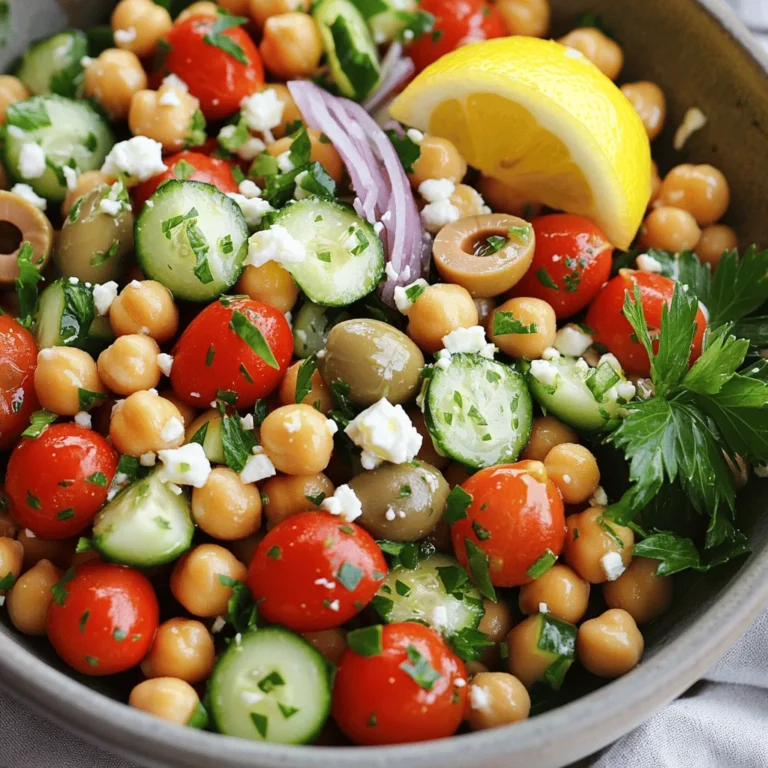
Mediterranean Chickpea Salad Fresh and Flavorful Dish

To make the Maple Pecan Sweet Potato Casserole, you will need the following fresh and tasty ingredients: - 4 large sweet potatoes, peeled and cubed - 1/2 cup pure maple syrup - 1/4 cup unsalted butter, melted - 1/2 cup milk (or any plant-based milk of your choice) - 1 teaspoon pure vanilla extract - 1/2 teaspoon ground cinnamon - 1/4 teaspoon ground nutmeg - Salt, to taste - 1 cup pecans, roughly chopped - 1/2 cup packed brown sugar - 1/4 cup all-purpose flour - 2 tablespoons melted butter (for the topping) Each ingredient plays a key role. The sweet potatoes give a creamy base, while maple syrup adds sweetness. Butter gives richness, and milk makes it smooth. Vanilla and spices boost the flavor. Pecans provide crunch, and brown sugar adds caramel notes. Flour helps bind the topping together. Together, they create a delightful dish that everyone will love. Enjoy gathering these ingredients! {{ingredient_image_2}} First, preheat your oven to 375°F (190°C). This step is key to a good bake. Next, take your four large sweet potatoes. Peel and cube them. Place the cubes in a large pot and cover them with water. Bring the water to a boil over medium-high heat. Cook the sweet potatoes for about 15-20 minutes. They should be tender when done. Drain them well, then return them to the pot. Use a potato masher or a fork to mash the sweet potatoes. Aim for a smooth, creamy texture. Add in 1/2 cup of pure maple syrup, 1/4 cup of melted butter, and 1/2 cup of milk. You can use any plant-based milk if you prefer. Mix in 1 teaspoon of pure vanilla extract, 1/2 teaspoon of ground cinnamon, 1/4 teaspoon of ground nutmeg, and a sprinkle of salt. Stir until everything is well combined and creamy. Lightly grease a 9x13 inch baking dish. Scoop the sweet potato mixture into the dish. Use a spatula to spread it out evenly. In a separate bowl, combine 1 cup of roughly chopped pecans, 1/2 cup of packed brown sugar, and 1/4 cup of all-purpose flour. Add 2 tablespoons of melted butter and stir until the pecans are coated. Sprinkle the pecan topping evenly over the sweet potato layer. Place the casserole in the preheated oven. Bake it for 25-30 minutes. Look for a golden-brown topping and ensure the casserole is hot throughout. Once it is done baking, carefully take the casserole out of the oven. Let it rest for a few minutes before serving. This rest time helps it set up nicely. To get a smooth mix, mash the sweet potatoes well. Use a potato masher or fork. Make sure there are no lumps. If you want it creamier, add more milk. You can also use a blender for a silkier texture. Just blend it slowly to avoid over-mixing. You can swap some ingredients for a healthier dish. Use coconut oil instead of butter. This will add a nice flavor and cut calories. You can also replace brown sugar with maple sugar or coconut sugar. For a dairy-free option, use almond or oat milk instead of regular milk. Add a pinch of cayenne or ginger for a spicy twist. You can also mix in some orange zest for a bright taste. If you love chocolate, sprinkle mini chocolate chips on top before baking. This adds a fun surprise and rich flavor. Each of these changes will make your dish unique and tasty. Pro Tips Choose the Right Sweet Potatoes: Opt for firm, smooth-skinned sweet potatoes for the best texture and flavor in your casserole. Make Ahead Option: You can prepare the sweet potato mixture a day in advance, just cover and refrigerate it. Add the topping before baking. Customize Your Topping: Feel free to add oats or even shredded coconut to the pecan topping for extra texture and flavor. Perfect Baking: Keep an eye on the casserole while it bakes; if the topping browns too quickly, cover it loosely with aluminum foil. {{image_4}} You can make this dish vegan easily. Just use plant-based milk for the recipe. Swap the butter with coconut oil or vegan butter. Use maple syrup as your sweetener. This keeps the dish rich and sweet. You won’t miss the dairy at all! To make this casserole gluten-free, choose gluten-free flour. You can find many brands that work well. Ensure your maple syrup is pure, as some may have additives. The rest of the ingredients are naturally gluten-free, so you’re in good shape. Pecans are great, but feel free to mix it up! Try walnuts or almonds for a different flavor. You can even combine nuts for a tasty crunch. Just make sure to chop them well. This will give your casserole a nice texture and taste. Once you finish your Maple Pecan Sweet Potato Casserole, store any leftovers in an airtight container. Make sure to let the casserole cool to room temperature first. You can keep it in the fridge for up to five days. If you want to keep it longer, freezing is a great option. To reheat, preheat your oven to 350°F (175°C). Place the casserole in a baking dish and cover it with foil. Heat for about 20 minutes or until warmed through. If you want a crunchy topping again, remove the foil during the last five minutes of heating. If you want to freeze the casserole, do it before baking. Prepare the dish as usual, then cover it tightly with plastic wrap and foil. You can freeze it for up to three months. When ready to bake, thaw overnight in the fridge before cooking. Then, bake as directed, adding a few extra minutes if needed. Yes, you can prepare this casserole ahead of time. After mixing the sweet potato filling, place it in the baking dish. Cover it tightly with plastic wrap. Store it in the fridge for up to 24 hours. When ready to bake, just add the topping and bake as directed. This casserole pairs well with many dishes. Try serving it with roasted turkey, glazed ham, or a simple green salad. You can also add cranberry sauce for a tart contrast. This dish shines at holiday dinners and festive meals alike. Leftovers can last in the fridge for about 3 to 5 days. Store them in an airtight container to keep them fresh. Reheat portions in the microwave or oven until warm. You can enjoy this dish several days after the first serving! Yes, you can use other sweeteners. Honey or agave syrup are great alternatives to maple syrup. Adjust the amount to your taste, as these sweeteners may have different sweetness levels. Just keep in mind that the flavor will change slightly. You can use coconut oil or vegan butter as a substitute for butter. Both options provide a similar texture and flavor. If you want a lighter option, try using applesauce or a nut butter in small amounts. These swaps keep the recipe creamy and delicious. This blog post covered how to make a Maple Pecan Sweet Potato Casserole. We discussed essential ingredients, easy steps, and helpful tips. You learned variations, including vegan and gluten-free options. Storing leftovers is simple, too. In the end, this dish is not just tasty; it brings warmth to any meal. I encourage you to try it and share your experience. You will love the flavors that come together in this dish. Enjoy your cooking!

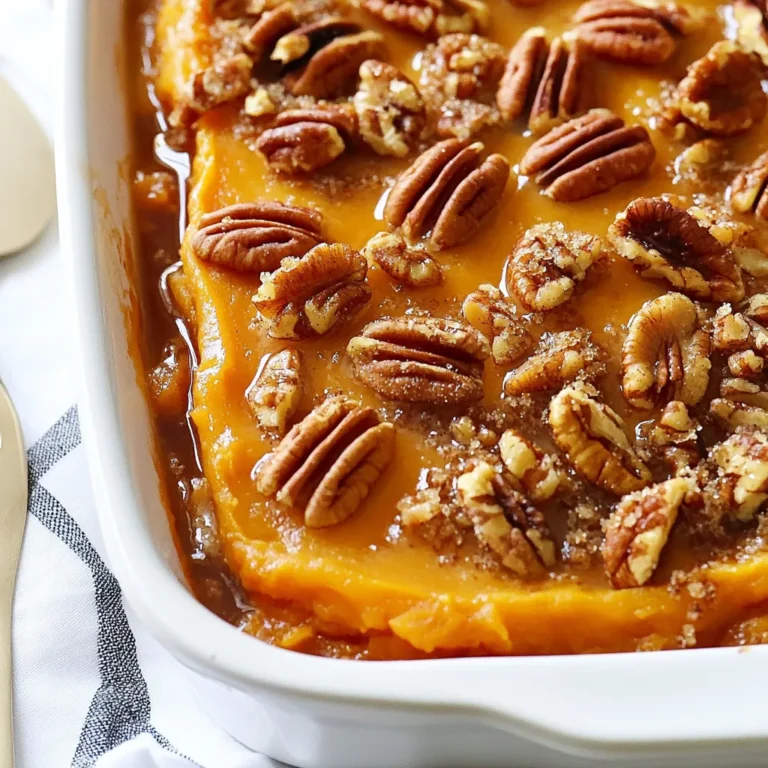
Maple Pecan Sweet Potato Casserole Delightful Dish

To make Cuban Mojo Chicken Tacos, gather these items: - 1 lb boneless, skinless chicken thighs - 1/4 cup fresh orange juice - 1/4 cup fresh lime juice - 4 cloves garlic, minced - 1 teaspoon ground cumin - 1 teaspoon dried oregano - 1/2 teaspoon smoked paprika - Salt and black pepper to taste - 2 tablespoons olive oil - 8 small corn tortillas - 1 cup red cabbage, thinly shredded - 1 avocado, sliced - Fresh cilantro leaves for garnish - Lime wedges for serving Each ingredient plays a big role in flavor. The chicken absorbs the zesty marinade well. Fresh garlic adds depth. The spices bring warmth and smoke. The cabbage gives a nice crunch. The avocado adds creaminess. For the best flavor, choose high-quality ingredients: - Spices: McCormick or Simply Organic offer fresh spices that pack a punch. - Tortillas: Look for brands like Tortilla Land or La Tortilla Factory for soft, tasty tortillas. - Avocados: Choose avocados that feel slightly soft when you gently squeeze them. They should not feel mushy. - Cabbage: Select bright red cabbage. It should feel firm and have no brown spots. Using the best brands makes a big difference in your tacos. Fresh ingredients give you the best taste and texture. {{ingredient_image_2}} To start, mix the marinade in a medium bowl. Combine fresh orange juice, lime juice, and minced garlic. Add ground cumin, dried oregano, smoked paprika, salt, and black pepper. Whisk these ingredients together until they blend well. This marinade gives your chicken a bold flavor. Marinating time is key. Let the chicken sit in the marinade for at least one hour. For the best taste, marinate it overnight. This allows the flavors to soak into the meat deeply. You can cook the chicken on a grill or in a skillet. Preheat your grill or skillet over medium-high heat. Add olive oil to the skillet to coat the bottom. Remove the chicken from the marinade, letting the extra liquid drip off. Cook the chicken for about 6-7 minutes on each side. Make sure the chicken reaches 165°F (74°C) to ensure safety. This step is crucial for a juicy and safe meal. Now, it's time to put your tacos together. Take a warm corn tortilla and lay a few slices of chicken on it. Then, add shredded red cabbage and creamy avocado slices on top. For a beautiful finish, sprinkle fresh cilantro leaves on each taco. Serve with lime wedges on the side. This adds a zesty burst of flavor. Arrange the tacos on a colorful platter for an inviting display. Marinating your chicken overnight is key. This lets the flavors sink in deep. Use fresh orange and lime juices to brighten the taste. The garlic adds a nice kick. To make your dish even better, consider adding spices like chili powder or coriander. They bring new depth to your tacos. When cooking, grilling gives a nice char, but pan-searing works well too. Start with a hot grill or skillet. Add olive oil before the chicken goes in. Cook until each side is golden and the inside reaches 165°F. This keeps the chicken tender and juicy. Don't forget to let it rest after cooking. This step helps the juices stay inside. For side dishes, pair your tacos with black beans or rice. Both add heartiness to your meal. Consider toppings like fresh salsa, lime wedges, or cheese. Shredded lettuce can also add crunch. Don't skip the fresh cilantro; it brightens the flavors. Enjoy your Cuban Mojo Chicken Tacos with a splash of lime for extra zest! Pro Tips Marinate Longer for Deeper Flavor: Allowing the chicken to marinate overnight enhances the flavors significantly, making each bite more delicious. Use a Meat Thermometer: To ensure your chicken is perfectly cooked, use a meat thermometer to check that the internal temperature reaches 165°F (74°C). Warm Tortillas Properly: Warming your corn tortillas until soft and pliable prevents them from cracking when you fold them, ensuring a better taco experience. Add a Kick: For an extra layer of flavor, consider adding sliced jalapeños or a sprinkle of chili powder to your tacos before serving. {{image_4}} You can change the chicken thighs if you want. Try using boneless chicken breasts for a leaner option. If you prefer pork, marinated pork tenderloin works well too. For a vegetarian twist, use grilled portobello mushrooms or jackfruit. Both options soak up the marinade flavors nicely. Want more heat? Add sliced jalapeños or a splash of hot sauce to the marinade. You can also use chili powder or cayenne pepper in your spice mix. If you prefer milder tacos, skip the hot sauce. Instead, use sweet bell peppers for a touch of flavor without the heat. Cuban mojo brings a bright flavor to many dishes. You can mix Cuban mojo with Asian flavors. Try adding soy sauce and ginger for a unique twist. Tacos can also take on a Mexican flair. Use chipotle sauce or mango salsa for a fun flavor mix. To keep your Cuban mojo chicken fresh, use these simple steps. Store leftovers in an airtight container. This helps to keep the chicken moist and flavorful. Place the container in the refrigerator. It will stay good for up to three days. For long-term storage, freezing works great. Wrap the chicken tightly in plastic wrap or foil. Then, place it in a freezer bag. Remove as much air as possible to prevent freezer burn. The chicken can last up to three months in the freezer. When you're ready to eat, just thaw it in the fridge overnight. To reheat the chicken without losing moisture, use a skillet. Heat it over low to medium heat. Add a splash of water or broth to the pan. This keeps the chicken juicy. Warm it for about five to ten minutes, flipping the pieces to heat evenly. For the tortillas, warming them is easy. Use a dry skillet over medium heat. Place each tortilla in the skillet for about 30 seconds on each side. This makes them soft and warm, perfect for your tacos. Enjoy your meal! Marinating chicken adds flavor and tenderness. I suggest marinating for at least 1 hour. For the best taste, marinate overnight. This way, the chicken fully absorbs the mojo sauce. Fresh orange juice and garlic work their magic when given time. Yes, you can use store-bought mojo sauce. It saves time and effort. However, homemade mojo has a fresh taste that store-bought may lack. Making your own gives you control over flavors. If you're in a hurry, store-bought is a good choice. You can use many toppings for your tacos. Here are some popular options: - Shredded red cabbage for crunch - Sliced avocado for creaminess - Fresh cilantro for a burst of flavor - Lime wedges for a zesty kick Feel free to add your favorites, like diced tomatoes or jalapeños! This guide covered the essentials for making Cuban Mojo Chicken Tacos. We discussed key ingredients, quality brands, and tips for marinating and cooking chicken. You learned about layering flavors and presentation, along with storage solutions and reheating methods. Remember, the secret to great tacos lies in using fresh ingredients and allowing time for marinating. Explore variations and find what suits your taste. Enjoy tasty, flavorful tacos in no time!

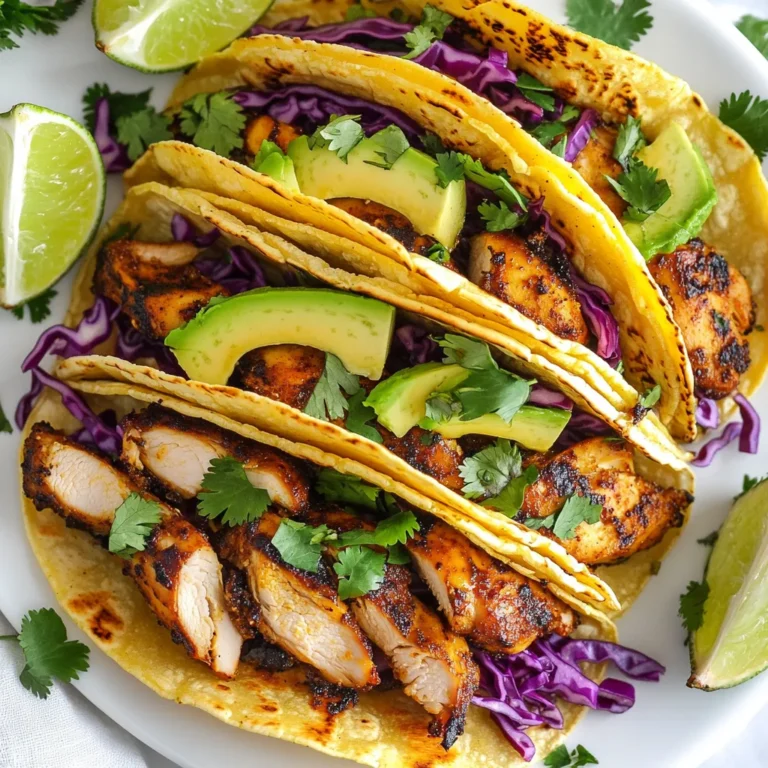
Cuban Mojo Chicken Tacos Flavorful and Easy Recipe

- 1/2 cup (1 stick) unsalted butter - 1 cup dark chocolate (70% cocoa), chopped - 1/2 cup powdered sugar - 2 large eggs - 2 large egg yolks - 1 teaspoon vanilla extract - 1/4 cup all-purpose flour - 2 tablespoons brewed espresso, cooled - 1/4 teaspoon sea salt - Cocoa powder for dusting - Optional: Whipped cream or vanilla ice cream for serving To create these rich chocolate espresso lava cakes, gather your ingredients first. You need butter, dark chocolate, and sugar. Eggs will help bind the mix. You also need vanilla for flavor and a bit of flour for texture. Espresso adds a nice coffee kick. Don’t forget the sea salt to balance it all. Lastly, cocoa powder will help the cakes come out easily from the ramekins. When you have everything ready, you can start making these delicious treats. Each ingredient plays an important role in making the cakes both rich and gooey. The chocolate and espresso blend perfectly to create a deep flavor. The result is a cake with a soft center that flows out when you cut into it. Using high-quality chocolate and fresh eggs makes a big difference. You want your cakes to taste amazing, so don't skip on these. The optional whipped cream or ice cream can add a nice touch when you serve. - Preheat your oven to 425°F (220°C). - Grease four ramekins with unsalted butter. - Dust the insides with cocoa powder. Start by preheating your oven. This step ensures the cakes bake evenly. Greasing the ramekins helps the cakes come out smoothly. The cocoa powder adds a rich chocolate flavor to the outside. - Melt chocolate and butter. - Combine eggs, sugar, and vanilla. - Fold chocolate into egg mixture. Next, melt the chocolate and butter in a microwave-safe bowl. Heat it in 20-second bursts, stirring well each time until smooth. Let it cool for a moment. In a separate bowl, whisk the eggs, powdered sugar, and vanilla together until they are mixed well. Gently fold the melted chocolate into the egg mixture. This helps blend the flavors without losing air. - Mix in flour and espresso. - Divide batter into ramekins. - Bake and cool before serving. Now, sift the flour and sea salt together. Fold this dry mix into the chocolate mixture. Add the cooled espresso for a rich kick. Divide the batter evenly among the ramekins. Fill them about three-quarters full. Bake for 12-14 minutes. The edges should be firm, but the center must stay soft. Let them cool for a minute after baking. Run a knife around the edges to loosen the cakes. Invert each ramekin onto a plate. Enjoy the gooey center with whipped cream or vanilla ice cream. To get that gooey center, watch your baking time closely. Each oven is unique. You may need to adjust cook times. Start with 12 minutes. Check if the edges are firm. The center should be soft and a bit wobbly. Temperature matters! Use room temperature eggs for better mixing. Melted chocolate and butter should cool slightly. This will help the batter blend well without cooking the eggs. Garnish your lava cakes for extra flair. A dusting of cocoa powder looks lovely. Add a fresh mint sprig for color. Fresh raspberries on the side boost both flavor and look. Serve the cakes right away. This lets the warm center flow out. Pair with whipped cream or vanilla ice cream for a rich touch. Do not overmix your batter. This can make the cakes tough instead of soft. Mix just until combined for the best texture. Every oven heats differently. If your cakes don’t ooze, it might be the oven. Adjust the baking time based on your experience. Always keep an eye on them! {{image_4}} You can easily change up the flavor of your chocolate espresso lava cakes. Adding flavored extracts can bring a new twist. Try almond for a nutty taste or orange for a citrusy zing. These flavors mix well with chocolate and espresso, making your dessert unique. You can also incorporate spices into the batter. A pinch of cinnamon adds warmth, while a touch of chili brings heat. Both enhance the rich chocolate flavor. Experiment with these additions and find your favorite combination. If you need gluten-free options, swap the all-purpose flour for a gluten-free blend. Many blends work well in this recipe. Just make sure to choose one that is suitable for baking. For a vegan version, replace the eggs with flax eggs or a commercial egg replacer. Use dairy-free butter and chocolate to keep it plant-based. This way, everyone can enjoy a delicious lava cake. When it comes to toppings, the options are endless. You can use whipped cream or vanilla ice cream for a classic touch. A sprinkle of cocoa powder on top can add a nice finish, too. Fresh fruit, like raspberries or strawberries, also pairs well. For drinks, consider a rich coffee or a glass of dessert wine. Both complement the chocolate flavor beautifully. Choose what you love to make your dessert experience special. To keep your leftover chocolate espresso lava cakes fresh, store them in the fridge. Place the cooled cakes in an airtight container. They will last for up to three days. When reheating, use the microwave. Heat them in 10-second bursts. Check often to avoid overcooking. You want that gooey center to stay liquid. You can freeze these cakes for later enjoyment. First, let them cool completely. Wrap each cake tightly in plastic wrap. Then, place them in a freezer-safe bag. They can stay frozen for up to two months. To thaw, move them to the fridge overnight. When ready to eat, reheat them in the microwave. This keeps that delicious lava center intact. Use a microwave-safe dish when reheating. You can store chocolate espresso lava cakes for 1-2 days in the fridge. Keep them in an airtight container. If you want to keep them longer, freeze them. In the freezer, they stay fresh for up to 3 months. Just remember to wrap them well. When you're ready to enjoy, thaw them in the fridge overnight. Yes, you can make the batter a few hours ahead. Store it in the fridge in a sealed bowl. This way, the flavors can blend nicely. When ready to bake, let the batter sit at room temperature for about 30 minutes. Then, pour it into the ramekins and bake as directed. This saves time for last-minute guests! If your lava cakes don't ooze, they may be overcooked. Bake them for a shorter time next time. Aim for 12-14 minutes max. The cakes should be firm around the edges but soft in the center. If they still do not ooze, check your oven's temperature. An oven thermometer can help with accuracy. You can find the full recipe for chocolate espresso lava cakes in the earlier section of this article. It will guide you through every step needed to create this delicious dessert. Enjoy the rich, molten chocolate experience! This blog post covered everything you need to make chocolate espresso lava cakes. We talked about the key ingredients, step-by-step instructions, and tips for success. You learned how to achieve that perfect lava flow and avoid common mistakes. When you try this, enjoy the process and have fun with variations. Whether you add flavors or serve with ice cream, it's all about making it your own. Now, you’re ready to impress family and friends with these delicious treats!

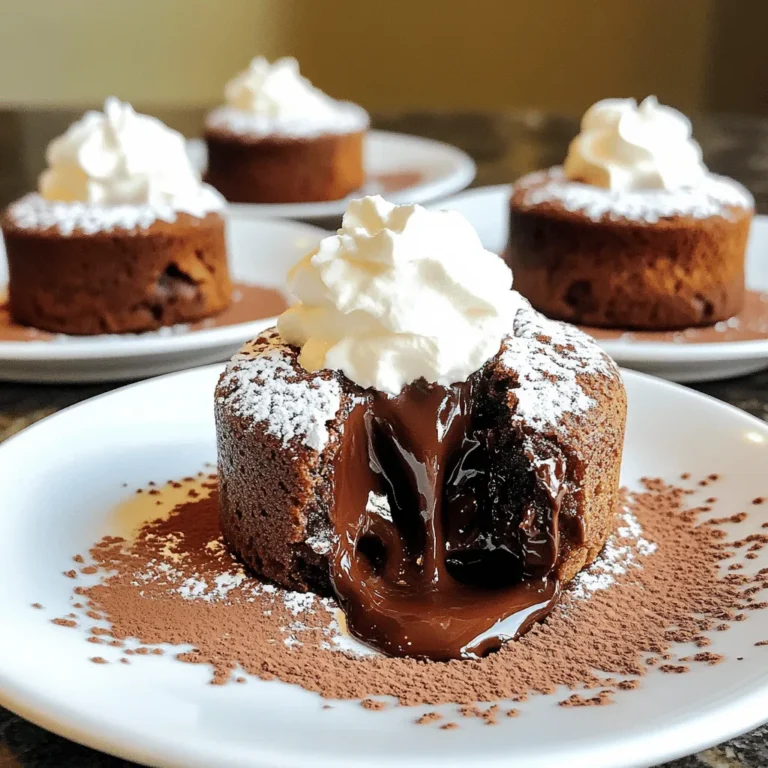
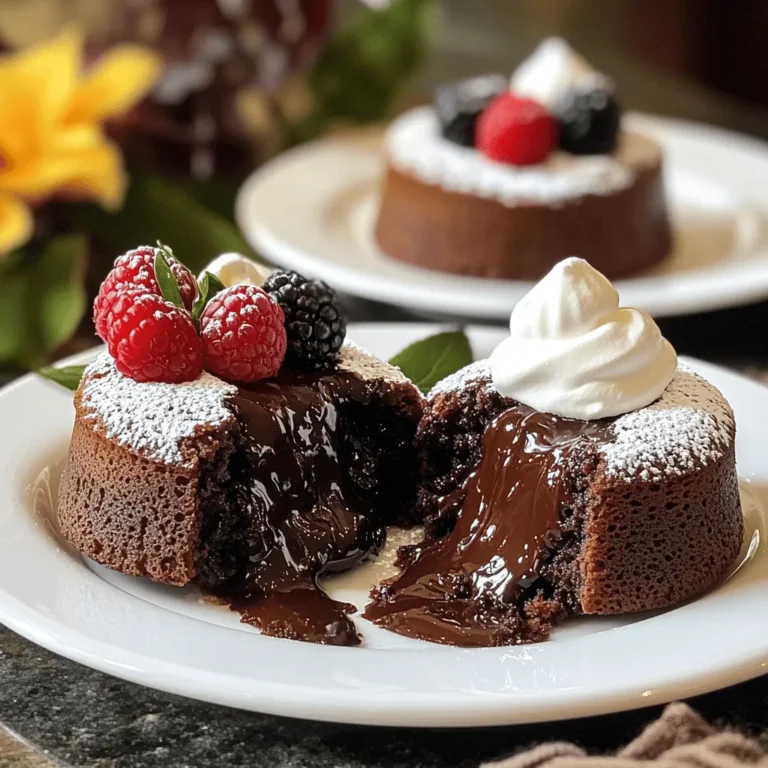
Chocolate Espresso Lava Cakes Irresistible Dessert Treat

- 2 cups cooked chicken breast, shredded into bite-sized pieces - 1/2 cup dried cranberries, roughly chopped - 1/2 cup pecans, toasted and coarsely chopped for added crunch - 1/2 cup celery, finely diced for a refreshing crunch - 1/4 cup red onion, finely chopped for a touch of sweetness - 1/2 cup plain Greek yogurt, creamy base for the dressing - 2 tablespoons mayonnaise for richness - 1 tablespoon honey for a hint of sweetness - 1 tablespoon apple cider vinegar to balance flavors - Salt and freshly cracked pepper, to taste - Fresh parsley, chopped, for garnish You can mix in other tasty ingredients. Try adding sliced grapes for sweetness. Chopped apples add a crisp bite. For spice, diced jalapeños can bring heat. You might also enjoy adding feta cheese for a tangy twist. If you need dairy-free options, use a plant-based yogurt instead of Greek yogurt. Substitute the mayonnaise with avocado for a creamy touch. For nut allergies, skip the pecans or use sunflower seeds. You can also use rotisserie chicken for a quicker option. First, gather all your ingredients. You need cooked chicken, dried cranberries, pecans, celery, and red onion. Chop the dried cranberries and pecans into smaller pieces. Dice the celery finely and chop the red onion. This creates a nice mix of flavors and textures. In a large bowl, add the shredded chicken, chopped cranberries, toasted pecans, diced celery, and red onion. Use a spatula to mix these ingredients gently, so everything blends well. Next, you will make the creamy dressing. Get a smaller bowl for this step. Whisk together the plain Greek yogurt, mayonnaise, honey, and apple cider vinegar. Keep whisking until the mixture is smooth and creamy. You want to avoid any lumps in the dressing. This dressing adds richness to the salad and balances the flavors perfectly. Now it’s time to dress the salad. Pour the creamy dressing over your chicken mixture. Use the spatula to fold the dressing into the chicken and veggies gently. Make sure everything is well-coated. Next, sprinkle salt and freshly cracked pepper over the salad. Taste it and adjust the seasonings if needed. Cover the bowl with plastic wrap and refrigerate for at least 30 minutes. This chilling time helps the flavors meld together, making every bite more delicious. When ready to serve, stir gently to recombine. Add fresh parsley on top for a bright finish. To get the best taste, focus on the sweetness and crunch. The dried cranberries add a nice sweetness. The pecans give a great crunch. Use just the right amount of apple cider vinegar. It helps balance the flavors well. If you want a sweeter taste, add a bit more honey. Taste as you go. Adjust the salt and pepper to your liking. This way, you get a salad that is just right. Serving your salad well makes a big difference. Use a large bowl or plate. Start with a bed of mixed greens. Spoon the chicken salad on top. This adds color and makes it look fresh. For extra flair, sprinkle more cranberries and pecans on top. You can also serve it in a wrap. Tortillas or pita bread work great. This keeps it fun and easy to eat. This salad pairs well with many sides. Consider serving it with a light soup. A fresh vegetable soup complements the salad. You can also serve it with crusty bread. This adds a nice touch. For drinks, try iced tea or lemonade. They keep the meal refreshing. Enjoy the salad as a lunch or light dinner option. It’s great for picnics or gatherings too! {{image_4}} You can make this salad lighter by swapping some ingredients. Use low-fat Greek yogurt instead of regular yogurt. This change cuts calories while keeping it creamy. You can also skip the mayonnaise if you prefer. For a crunch, add more celery or use cucumber. Fresh herbs like dill or cilantro can brighten the flavor too. Want to mix things up? Try using turkey or rotisserie chicken. Both provide great taste. You can even use chickpeas for a vegetarian option. Shredded tofu works well too if you want a plant-based protein. Adding smoked salmon adds a unique twist and a rich flavor. Seasonal swaps keep your salad fresh and exciting. In spring, add fresh peas or asparagus. In summer, try ripe strawberries or blueberries. Fall is perfect for diced apples or pears. In winter, use pomegranate seeds for a pop of color. These changes make your salad vibrant and full of flavor. To keep your cranberry pecan chicken salad fresh, use an airtight container. This helps prevent moisture loss and keeps the salad crisp. If you have toppings like nuts or cranberries, store them separately. This way, they stay crunchy when you serve the salad again. Always label the container with the date. This helps you track how long it has been stored. Cranberry pecan chicken salad can stay fresh in the fridge for about 3 to 4 days. After that, the taste and texture may change. Always check for any off smells or changes in color before eating. If it looks or smells funny, it's best to toss it. You can freeze cranberry pecan chicken salad, but it may change texture. To freeze, place it in a freezer-safe container. Leave some space at the top for expansion. Use within 2 months for the best flavor. When you're ready to eat it, thaw it in the fridge overnight. Mix it well before serving to restore its creamy texture. Yes, you can use canned chicken. It saves time and still tastes good. Just drain it well before adding it to the salad. Canned chicken makes the recipe quick and easy, especially on busy days. To make this dish gluten-free, focus on your ingredients. Use gluten-free mayonnaise and check the labels on your yogurt and vinegar. Most dried cranberries are gluten-free, but it’s smart to read the packaging. Fresh herbs and vegetables are naturally gluten-free, so feel free to add more for taste! This salad is packed with healthy ingredients. Here are some benefits: - Chicken: High in protein, helps build and repair muscles. - Cranberries: Rich in antioxidants, support heart health. - Pecans: Full of healthy fats, promote brain health. - Celery: Low in calories, provides hydration and fiber. - Greek yogurt: Contains probiotics, good for digestion. - Honey: Natural sweetener with some vitamins and minerals. All of these elements combine to create a nutritious meal that’s not just tasty but also supports your overall health. This blog post covered how to make a tasty Cranberry Pecan Chicken Salad. We explored the main ingredients, optional add-ins, and substitutions for dietary needs. I provided step-by-step instructions and tips for flavor balance and presentation. Variations allow for healthier options and seasonal swaps. Finally, we looked at storage tips to keep leftovers fresh. Enjoy this fun and flexible salad recipe. It’s perfect for any meal, easy to make, and packed with flavor. Dive in and let your taste buds enjoy!

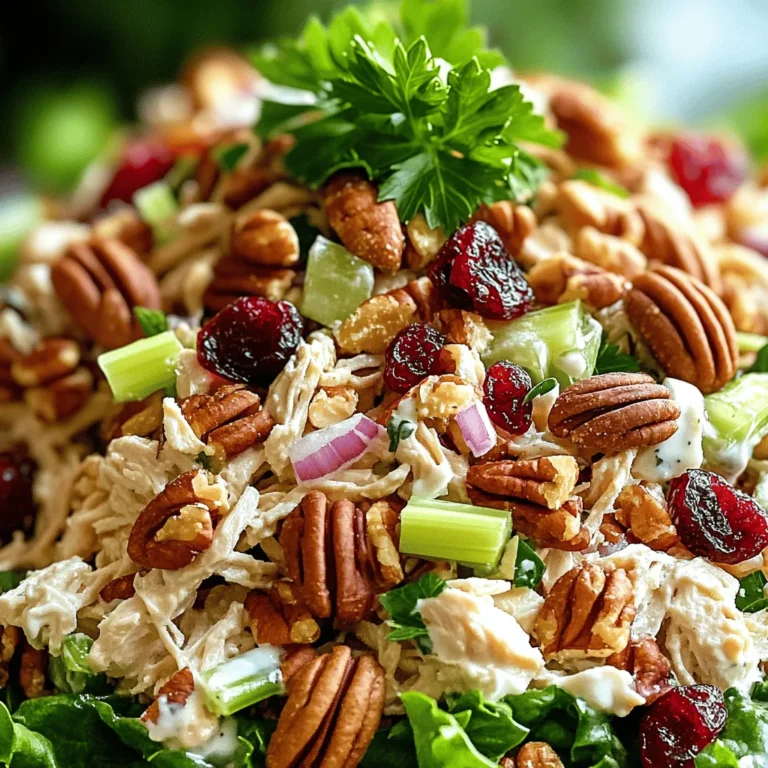
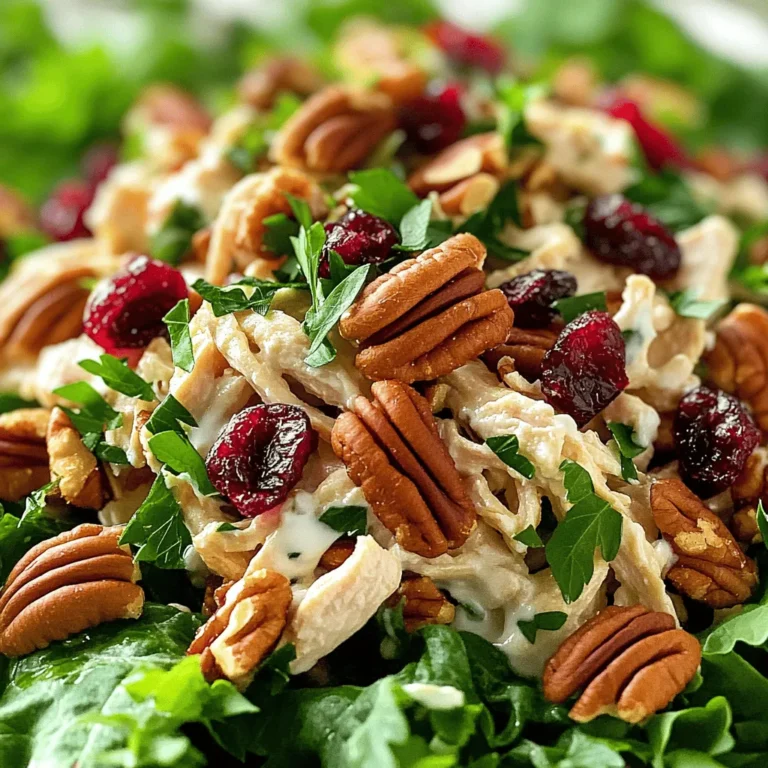
Cranberry Pecan Chicken Salad Fresh and Flavorful Treat

- 1/2 cup unsalted butter (plus extra for greasing) - 1 cup dark chocolate chips (60% cocoa or higher) - 2 large eggs - 2 large egg yolks - 1/4 cup granulated sugar - 2 tablespoons all-purpose flour - 1 tablespoon brewed espresso (or strong coffee) - 1/4 teaspoon salt - Powdered sugar, for dusting - Fresh berries, for garnish (optional) - Whipped cream, for serving (optional) To create these lava cakes, I use rich dark chocolate chips. Choose chips with 60% cocoa or higher for the best flavor. Unsalted butter gives a smooth texture. Eggs and egg yolks add fluffiness and richness. Granulated sugar sweetens the treat nicely. Flour helps the cakes hold their shape while baking. Brewed espresso adds a deep coffee flavor that enhances the chocolate. A pinch of salt balances sweetness perfectly. For serving, powdered sugar and fresh berries add a lovely touch. Whipped cream is a nice extra for those who love it! - Ramekins or muffin pan - Microwave-safe bowl and spatula - Whisk and mixing bowls Using ramekins gives the cakes a nice shape and helps with baking. If you don’t have ramekins, a muffin pan can work too. A microwave-safe bowl is essential for melting the butter and chocolate together. A spatula helps mix the ingredients well. A whisk is key for combining eggs and sugar until light and frothy. Mixing bowls are a must for keeping your workspace tidy. With these tools in hand, you are all set to create these delicious lava cakes! First, you need to preheat your oven to 425°F (220°C). This step is key for baking. While the oven heats, generously grease four ramekins with unsalted butter. Make sure to cover the sides well. This helps the cakes come out easily after baking. For extra safety, dust the greased ramekins with a little flour. Tap out any excess flour so it does not stick to the batter. Next, it’s time to melt the chocolate and butter. In a microwave-safe bowl, combine 1/2 cup of unsalted butter and 1 cup of dark chocolate chips. Heat in the microwave in 30-second bursts. Stir after each burst until smooth. Let this mixture cool a bit. In a separate bowl, whisk together 2 large eggs, 2 large egg yolks, and 1/4 cup of granulated sugar. Whisk until the mix turns light and frothy. This will take about 3 to 4 minutes. This step gives the cakes a lovely texture. Now, gently pour the melted chocolate mixture into the egg mix. Fold them together slowly until just combined. Avoid mixing too hard; we want a light batter. Next, sift 2 tablespoons of all-purpose flour and 1/4 teaspoon of salt over the batter. Also, add in 1 tablespoon of brewed espresso. Use a spatula to fold everything together until no dry bits remain. Now it's time to fill the ramekins. Evenly distribute the batter into each ramekin, filling them about 3/4 full. This gives them room to rise. Place the ramekins in your preheated oven and bake for 12 to 14 minutes. The edges should be firm, but the center must be soft and slightly jiggly. This is how you get that gooey lava center we all love. After baking, remove the ramekins from the oven and let them sit for 1 minute. Carefully run a thin knife around the edges to loosen each cake. Then, invert the ramekins onto dessert plates. Let them sit inverted for about 10 seconds before lifting the ramekins away. For a beautiful touch, dust the tops with powdered sugar. You can serve the cakes right away, adding fresh berries and a dollop of whipped cream if you like. Enjoy your delicious chocolate espresso lava cakes! To get that ooey-gooey center, avoid overbaking. The key is to watch the time closely. Bake the cakes for 12 to 14 minutes. When the edges look firm and the center jiggles, they are done. If you notice the cakes are too set, adjust the bake time down next time. To make your lava cakes shine, try garnishing them. Fresh berries like raspberries or strawberries give a bright touch. A dollop of whipped cream adds creaminess and balance to the cake's rich taste. Serve the cakes warm for the best experience. If your cakes stick to the ramekins, make sure to grease them well. Grease with butter and dust with flour. This step is crucial for easy removal. If your lava cakes do not ooze, they might be overbaked. Next time, check them a minute earlier. Adjusting the baking time can help get that perfect flow. {{image_4}} You can make a vegan version of these lava cakes. To replace eggs, use flaxseed meal mixed with water. Mix 1 tablespoon of flaxseed meal with 2.5 tablespoons of water for each egg. This will help bind the batter. For dairy, use plant-based butter and dark chocolate that is dairy-free. Look for chocolate with 60% cocoa or higher. You can also try alternative sweeteners like maple syrup or coconut sugar. They add a nice touch without losing flavor. For flour, almond or coconut flour works well. Adjust the amount slightly, as these flours absorb more moisture. If you need a gluten-free option, use a gluten-free flour blend. Look for blends that include a mix of rice flour and tapioca flour. This will keep the cakes light and rich. You may need to add a bit more liquid to the batter. This keeps the cakes moist and helps them rise. The great news is that they can still taste just as rich and chocolatey as the original. Just ensure that all other ingredients, like chocolate, are also gluten-free. Want to spice things up? Try adding flavored liqueurs, like coffee or hazelnut. Just a tablespoon will add a unique twist to your lava cakes. You can also mix in spices like cinnamon or chili powder for warmth. For added texture, consider nuts or flavored chocolate chips. Chopped hazelnuts or walnuts give a nice crunch. You can also use flavored chocolate, like orange or peppermint. These small changes can create a whole new dessert experience. To store leftover lava cakes, keep them in the fridge. Place them in an airtight container to prevent drying out. You can store them for up to two days. If you want to keep them longer, consider freezing them. When you are ready to eat, reheat them in the oven. Set the oven to 350°F (175°C) for about 10 minutes to warm through. This method helps maintain their gooey center. Avoid using a microwave, as it can overcook the cakes. You can freeze both raw and baked lava cakes. For raw cakes, fill the ramekins and cover them well with plastic wrap. This keeps air out and prevents freezer burn. Place them in the freezer for up to three months. When you want to bake them, just remove them from the freezer and bake directly from frozen. Adjust baking time to about 15-18 minutes. If you freeze baked cakes, let them cool first. Store them in an airtight container or wrap them tightly. To thaw, move them to the fridge overnight. This keeps the texture nice. When ready to serve, gently reheat them in the oven as described above. This way, you’ll enjoy the perfect lava center again! Yes, you can make the batter ahead of time. Prepare the batter and cover it well. Store it in the fridge for up to 24 hours. When ready to bake, let it sit at room temperature for about 30 minutes. This helps the batter warm up before baking. This way, you can enjoy fresh lava cakes with less fuss. To check if the lava cakes are done, look for firm edges. The center should stay soft and jiggly. Bake them for 12-14 minutes. A toothpick test can help, but don’t overbake. You want that gooey lava center, so keep an eye on them as they bake. For a great presentation, turn the cakes out onto dessert plates. Dust the tops with powdered sugar for a nice touch. Add fresh berries for color and flavor. A dollop of whipped cream beside the cake makes it even better. Serve them warm for the best experience. Yes, you can easily scale the recipe. Just double the ingredients for eight servings. Use larger ramekins or bake in batches. Keep the baking time the same for smaller cakes. For larger cakes, you may need an extra minute or two. Enjoy creating more of this delicious dessert! To make chocolate espresso lava cakes, you need key ingredients and tools. We covered the steps, from preparing the oven to achieving that perfect gooey center. Tips and variations bring more fun to this dessert. Remember to store any extras properly to keep them tasty. With these insights, you can impress anyone with your baking skills. Dive in and enjoy your delicious creation!

Chocolate Espresso Lava Cakes Irresistible Dessert Recipe

- 2 cups cooked chicken breast (shredded or diced) - 1/2 cup dried cranberries - 1/2 cup pecans (coarsely chopped) - 1/4 cup celery (finely diced) - 1/4 cup red onion (finely chopped) - 1/2 cup plain Greek yogurt - 2 tablespoons mayonnaise - 1 tablespoon honey - 1 tablespoon apple cider vinegar - Salt and black pepper - Fresh parsley for garnish - Mixed greens or lettuce leaves for serving The key to a great cranberry pecan chicken salad is simple, fresh ingredients. Start with the chicken. You can use leftover roasted chicken or poach your own. Shredded chicken adds a nice texture. Dried cranberries bring a sweet note. Pecans add crunch and flavor. Finely diced celery and red onion add freshness and a bit of bite. For the creamy dressing, I use plain Greek yogurt and a bit of mayonnaise. This combo keeps it light yet rich. Honey and apple cider vinegar balance sweetness and tang. Don't forget salt and black pepper. They enhance each flavor. If you want to elevate your dish, consider adding fresh parsley on top. Serve it on a bed of mixed greens or lettuce leaves for a fresh crunch. Keep these ingredients on hand for a quick, delicious meal anytime. - Combine chicken, cranberries, pecans, celery, and red onion. - Mix gently until all ingredients are incorporated. I start by placing the cooked chicken in a large bowl. You can shred or dice it; either works great. Next, I add the dried cranberries, which bring a sweet touch. Then, I toss in the coarsely chopped pecans for crunch. The finely diced celery adds a nice crunch and freshness. Lastly, I sprinkle in the finely chopped red onion, which gives a bit of bite. I use a spatula to mix everything gently. This helps blend the flavors without breaking the chicken apart. - Whisk together Greek yogurt, mayonnaise, honey, and apple cider vinegar. - Ensure a smooth and homogeneous mixture. In a separate bowl, I measure out the Greek yogurt. This gives a creamy base without too much fat. I add a couple of tablespoons of mayonnaise for richness. Then, I pour in the honey for sweetness and the apple cider vinegar for a little tang. I use a whisk to mix it all together. The goal is a smooth, creamy dressing that coats the salad well. - Fold the dressing into the salad mix without mashing the chicken. - Season to taste with salt and black pepper. I drizzle the dressing over the chicken salad mixture. With a spatula, I carefully fold the dressing in. I want everything to be coated without crushing the chicken pieces. Afterward, I taste and add salt and freshly cracked black pepper. This brings all the flavors together. - Refrigerate for at least 30 minutes. - Serve on a bed of mixed greens, garnished with parsley. I cover the bowl with plastic wrap and place it in the fridge. Chilling for at least 30 minutes allows the flavors to blend. When ready to serve, I place a generous scoop of salad on a bed of mixed greens. For a pretty touch, I sprinkle fresh parsley on top. You can also add more pecans for an extra crunch! To make your cranberry pecan chicken salad shine, adjust the seasoning. Taste as you go. Add salt and pepper until it feels just right for you. This personal touch makes your dish stand out. Chilling the salad is key. I recommend at least 30 minutes in the fridge. This time lets the flavors blend and develop. A beautiful plate impresses everyone. Start with a bed of mixed greens or crisp lettuce. Then, scoop a generous portion of your chicken salad on top. For extra flair, sprinkle chopped pecans over the salad. A few fresh parsley leaves add color and freshness. You need a few basic tools to prepare this dish. A large mixing bowl helps combine all the ingredients easily. Use a spatula or wooden spoon for gentle mixing. For serving, a nice salad bowl makes a big difference. Store any leftovers in airtight containers to keep them fresh. {{image_4}} You can switch up the protein in your salad. Turkey works well and adds a nice taste. If you prefer a plant-based option, tofu is a great choice. Just ensure it's firm enough to hold up in the salad. For the nuts, feel free to swap pecans for walnuts or almonds. Each nut brings its own flavor and crunch. To make this dish gluten-free, just check the labels on your yogurt and mayonnaise. Most are gluten-free, but not all brands are the same. If you need a dairy-free version, use a dairy-free yogurt. Also, look for a mayo made from plant-based ingredients. This keeps the creamy texture while fitting your dietary needs. If you want to brighten the salad, add fruits like diced apples or halved grapes. They add a sweet and juicy burst to each bite. You can also sprinkle in fresh herbs like dill or parsley. Spices like paprika or a hint of cayenne can add a nice kick. Experiment with your favorites to make the salad your own. To keep your Cranberry Pecan Chicken Salad fresh, store it in airtight containers. This prevents air from drying it out and helps maintain its flavor. The chicken salad lasts for about 3 to 4 days in the refrigerator. Just remember to seal it tightly after each serving. Can you freeze it? Yes, you can freeze this chicken salad, but it may change texture. When you freeze it, use a freezer-safe container and leave some space for expansion. To thaw, place it in the fridge overnight. This method helps keep the flavors intact. If you need to serve it after freezing, stir it well to mix any separated ingredients. Enjoy your salad fresh after thawing! Cranberry Pecan Chicken Salad will stay fresh in the fridge for about 3 to 4 days. Make sure to cover it tightly with plastic wrap or a lid. This helps keep air out and maintain its flavor. Check for any signs of spoilage, like a change in smell or color. If you see anything off, it’s best to toss it. Yes, you can make this salad ahead of time! I recommend preparing it a day before you plan to serve it. This allows the flavors to blend well. Just store it in the fridge until you’re ready to eat. You can also chop the ingredients in advance and mix them together later. This saves time when you're busy. This salad pairs well with many sides. Here are a few ideas: - Fresh fruit salad - Whole grain bread or rolls - A light soup, like tomato or vegetable - Crispy vegetable sticks, such as carrots and cucumbers These sides add variety and balance to your meal. Absolutely! This salad is great for meal prep. It stores well and is easy to pack for lunch. Just divide it into containers for quick grab-and-go meals. You can also make a larger batch. This way, you have a tasty meal ready for several days. Plus, it’s healthy and filling! This blog post shared a simple and tasty recipe for Cranberry Pecan Chicken Salad. You learned about essential and optional ingredients, plus step-by-step instructions to make it. I offered tips for perfecting your dish and ways to store it. As you prepare this salad, remember to customize it to your taste. Whether you choose chicken, turkey, or need a dairy-free option, there’s a version for you. Enjoy making this dish and the smiles it brings at mealtime!

Cranberry Pecan Chicken Salad Fresh and Simple Dish

PREV 1 … 12 13 14 … 18 NEXT
sweet savory saga

explore

DessertsDinnerAppetizersDrinks

Our Policies

  • Cookie Policy
  • Copyright Policy
  • Disclaimer
  • GDPR Policy
  • Terms Of Use
Back to Top
  • About
  • Contact Us
  • Privacy Policy
© 2025 sweet savory saga