FREE DINNER EBOOK! Get your copy!
  • Cookie Policy
  • GDPR Policy
  • Disclaimer
  • Terms Of Use
  • Visit my other site: Fun Cookie Recipes
sweet savory saga
  • Home
  • Dinner
  • Desserts
  • Drinks
  • Appetizers
  • Contact
  • About
  • Privacy Policy
  • Home
  • Dinner
  • Desserts
  • Drinks
  • Appetizers
  • Contact
  • About
  • Privacy Policy
  • Cookie Policy
  • GDPR Policy
  • Disclaimer
  • Terms Of Use
Visit my other site: Fun Cookie Recipes

HOME / CATEGORIES /

Latest

- 1 pound gnocchi (fresh or store-bought) - 2 large red bell peppers, roasted and peeled - 1 cup heavy cream - 1 small onion, finely chopped - 2 cloves garlic, minced - 1 tablespoon olive oil - 1 teaspoon dried oregano - 1/2 teaspoon smoked paprika - Salt and pepper to taste - Fresh basil leaves for garnish - Grated Parmesan cheese for serving (optional) Creating the perfect creamy red pepper gnocchi starts with choosing the right ingredients. Gnocchi, whether fresh or store-bought, serves as the base. Look for soft, pillowy gnocchi that will absorb the sauce well. Using roasted red bell peppers adds a sweet and smoky flavor. Roasting them at a high temperature brings out their natural sweetness. Once roasted and peeled, they blend into a creamy sauce that coats the gnocchi beautifully. Heavy cream is essential for that rich and smooth texture. It adds depth while balancing the bold flavors of the peppers. The small onion adds a touch of sweetness, enhancing the sauce's overall flavor. For aromatics, minced garlic and olive oil create a fragrant base. Dried oregano and smoked paprika add warmth and complexity. Finally, salt and pepper bring all the flavors together. Don't forget the garnishes! Fresh basil leaves add brightness, while grated Parmesan cheese gives a savory finish. These simple ingredients come together to create a dish that feels gourmet yet comforting. {{ingredient_image_2}} - Preheat the oven to 450°F (232°C). - Cut the red bell peppers in half and remove the seeds. - Place them cut-side down on a baking sheet lined with parchment paper. - Roast for about 20 minutes, until the skins are charred and blistered. - Transfer the peppers to a bowl and cover it with plastic wrap to steam. - After a few minutes, peel off the charred skins and set aside. Roasting red peppers brings out their sweet flavor. The charred skin adds a smoky note. This step is key for a rich sauce. - In a large skillet, heat 1 tablespoon of olive oil over medium heat. - Add the finely chopped onion and sauté for about 5 minutes. - Cook until the onion becomes soft and translucent. - Stir in 2 cloves of minced garlic and cook for an additional minute. Sautéing the onion and garlic builds a strong flavor base. Their aroma fills your kitchen, making it inviting. - Add the peeled roasted red peppers to the skillet. - Mix in 1 teaspoon of dried oregano, 1/2 teaspoon of smoked paprika, and a pinch of salt and pepper. - Cook the mixture for 3-4 minutes to blend the flavors. - Transfer this mixture to a blender and blend until smooth. - Return the puree to the skillet and stir in 1 cup of heavy cream. - Taste the sauce and adjust the seasoning if needed. The sauce should be creamy and vibrant. The spices add depth, while the cream balances the heat. - Bring a large pot of salted water to a boil. - Add 1 pound of gnocchi and cook according to package instructions. - Wait until they float to the surface, about 2-3 minutes. - Drain the gnocchi and gently fold them into the creamy red pepper sauce. Cooking gnocchi is quick and easy. When they float, they are ready to soak up the sauce. - Plate the gnocchi immediately for the best texture. - Garnish with fresh basil leaves for color and flavor. - Optionally, sprinkle grated Parmesan cheese on top. Presentation matters! Serve in shallow bowls with extra sauce for a beautiful dish. - Ensure peppers are fully charred for deeper flavor. Charred skin adds great taste. Roast them until they are blackened. This step is key. - Taste and adjust seasoning during the blending process. After blending, take a moment to taste your sauce. You can add more salt or spice. - Serve in shallow bowls with extra cream drizzled on top. This makes the dish look rich and inviting. A drizzle of cream adds a nice touch. - Use fresh basil and Parmesan for enhanced flavor and color. Fresh basil and Parmesan make your dish pop! They bring both taste and visual appeal. - What to do if the sauce is too thick or thin? If your sauce is too thick, add a splash of water or extra cream. Stir well to combine. If it is too thin, cook it a bit longer to thicken. This will help it coat the gnocchi better. Pro Tips Roast Peppers for Maximum Flavor: The roasting process enhances the sweetness of the peppers and adds a smoky depth to the sauce. Don't skip this step! Use Fresh Gnocchi for Best Texture: If possible, opt for fresh gnocchi over packaged ones, as they tend to have a lighter, more delicate texture. Adjust Cream for Desired Richness: Feel free to add more or less heavy cream depending on how rich you want the sauce to be. You can also substitute with half-and-half for a lighter version. Garnish for Visual Appeal: Adding fresh basil and Parmesan not only enhances the flavor but also makes your dish look more appetizing and colorful. {{image_4}} You can easily adapt this dish to fit your diet. For a vegan option, replace heavy cream with coconut cream. This swap gives a nice, creamy texture without dairy. If you need gluten-free gnocchi, look for gluten-free varieties in stores. They work just as well and taste great! To spice things up, add crushed red pepper to the sauce. This brings a delightful heat that pairs well with the creamy flavor. If you want extra nutrition, toss in some spinach or kale. These greens not only boost the health factor but also add vibrant color to your dish. Feel free to experiment with bell peppers. You can use yellow or orange peppers for a sweeter taste. If you're feeling adventurous, try making homemade gnocchi. Fresh gnocchi can elevate the dish with its soft and tender texture. Each variation can bring a new twist to your creamy red pepper gnocchi! Store leftovers in an airtight container in the fridge. They can stay fresh for about 3 days. Make sure to let the dish cool down before sealing it. This helps keep the flavors intact. You can freeze gnocchi and sauce separately. First, let the sauce cool completely. Then, pour the sauce into freezer-safe bags. For the gnocchi, spread them on a baking sheet. Freeze them for about an hour. Once frozen, transfer them to bags. They will keep well for up to 2 months. To reheat, you can use the stovetop or microwave. For the stovetop, add the sauce to a pan over low heat. Stir until warm, then add the gnocchi. If using the microwave, place the gnocchi and sauce in a bowl. Heat in short intervals, stirring in between. This helps keep the texture smooth and creamy. Gnocchi is a type of pasta made from a few simple ingredients. You need: - 1 pound of gnocchi (fresh or store-bought) - Potatoes or flour - Eggs (some recipes) These ingredients create a soft, pillowy texture that pairs well with many sauces. You can store creamy red pepper gnocchi in the fridge for up to three days. Keep it in an airtight container. If you want to store it longer, consider freezing it. This keeps the flavors fresh and delicious. Yes! You can prepare the sauce and cook the gnocchi in advance. First, make the creamy red pepper sauce and let it cool. Store it in the fridge. Cook the gnocchi just before serving. This helps keep the gnocchi light and fluffy. In this article, we explored how to make creamy red pepper gnocchi from scratch. We covered essential ingredients, step-by-step cooking instructions, and tips to enhance flavor. With variations to suit different diets and storage methods to keep leftovers fresh, you can enjoy this dish your way. Simple yet delicious, this gnocchi is a great meal for any occasion. Try it out and impress your family and friends with your cooking skills!

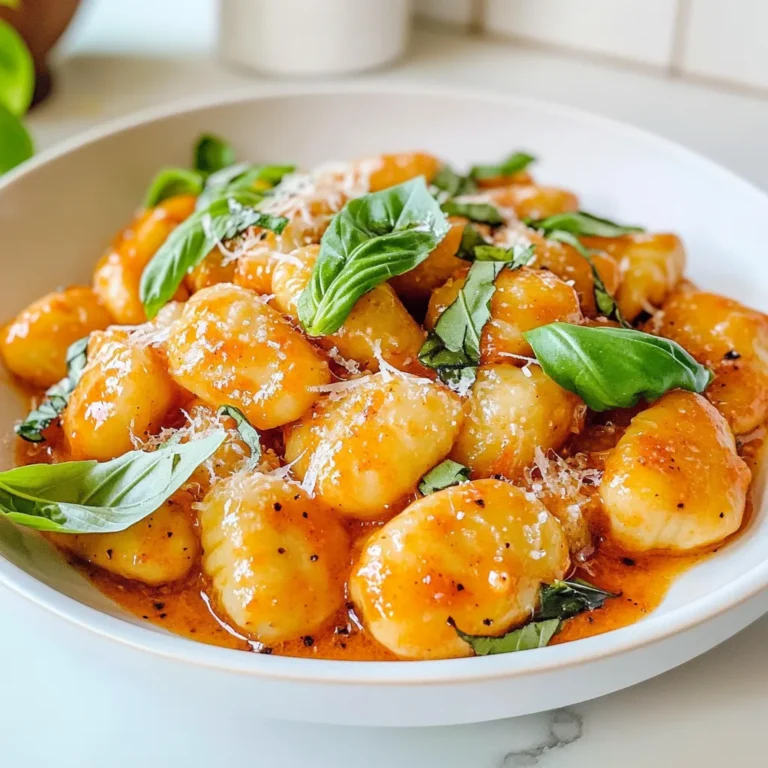
Creamy Red Pepper Gnocchi Rich and Flavorful Dish

- 2 cups rolled oats - 2 cups almond milk (or preferred milk) - 2 medium apples (e.g., Granny Smith) - 1/4 cup pure maple syrup or honey - 1 teaspoon pure vanilla extract - 1 teaspoon ground cinnamon - 1/2 teaspoon ground nutmeg - 1/4 cup chopped walnuts or pecans - 1/4 cup raisins or dried cranberries For this recipe, start with rolled oats. They give your dish a nice chew. Next, choose your milk. Almond milk works well, but any milk is fine. I like using Granny Smith apples. They add a nice tangy flavor. You will also need pure maple syrup or honey for sweetness. Now, let’s talk about spices. Vanilla extract brings warmth. Ground cinnamon is a must for that cozy taste. Nutmeg adds a hint of spice that blends well with apples. You can add nuts for crunch. Chopped walnuts or pecans are great options. Dried fruits like raisins or cranberries add extra sweetness and texture. These are optional but highly recommended for a boost in flavor. Gather these ingredients, and you’ll be ready to create a warm, inviting dish that fills your home with a wonderful aroma. {{ingredient_image_2}} - Preheat oven to 350°F (175°C). - Grease the baking dish to prevent sticking. - In a large bowl, combine 2 cups of rolled oats, 1 teaspoon of ground cinnamon, 1/2 teaspoon of ground nutmeg, 1/2 teaspoon of baking powder, and 1/4 teaspoon of fine salt. - Whisk the mixture until the ingredients blend well. - In another bowl, whisk together 2 cups of almond milk, 1/4 cup of pure maple syrup, and 1 teaspoon of pure vanilla extract. - Ensure everything combines smoothly for the best flavor. - Fold in 2 diced apples into the dry oat mixture, ensuring they are well coated. - Pour in the wet ingredients and stir until the mixture is smooth and even. - If you want extra texture and flavor, gently fold in 1/4 cup of chopped walnuts or pecans and 1/4 cup of raisins or dried cranberries. - This step is optional but adds a nice crunch and sweetness. - Pour the mixture into the greased baking dish, spreading it evenly. - Bake in your preheated oven for 30-35 minutes, until the top is golden brown. - The oatmeal should feel firm when gently pressed. To get that ideal texture, mix all your ingredients well. This helps the oats cook evenly. If your oven runs hot or cold, adjust the baking time. You want the top to be golden and firm. You can add spices like ginger or clove for a warm twist. This gives a deeper flavor that pairs well with the apples. Before serving, top your dish with fresh fruits. Slices of banana or berries add color and taste. Serve your baked oatmeal warm for the best taste. Drizzle extra maple syrup on top for sweetness. Garnish with apple slices for a fresh touch. A dollop of yogurt makes it even creamier. This adds both flavor and a nice look to your dish. Pro Tips Choosing the Right Apples: Opt for a mix of sweet and tart apples for a balanced flavor. Granny Smith and Honeycrisp are excellent choices that hold their shape well during baking. Customize Your Sweetness: Adjust the amount of maple syrup or honey according to your taste preferences. You can also reduce the sweetener if you prefer a less sweet baked oatmeal. Texture Variation: For added texture, consider mixing in other nuts or seeds, such as almonds or chia seeds, which can enhance the nutritional value and crunchiness. Storing Leftovers: Store any leftovers in an airtight container in the refrigerator for up to 5 days. Reheat individual portions in the microwave for a quick breakfast or snack. {{image_4}} You can swap out apples for other fruits. Pears add a sweet flavor. Berries like blueberries or raspberries work well too. They bring a burst of color and taste. Each fruit gives a new twist to the dish. Try mixing fruits for more fun! If you want a different sweet taste, use agave syrup. It has a mild flavor that blends nicely. Brown sugar is another great choice. It adds a rich sweetness and deeper color. Both options can make your baked oatmeal unique! For a gluten-free dish, use gluten-free oats. They are just as tasty and safe for you. This way, everyone can enjoy the meal. You won’t lose any flavor or texture. It's an easy switch that keeps the dish delicious! I recommend storing any leftovers in an airtight container in the fridge. This keeps them fresh for up to a week. When you're ready to enjoy, simply take out a portion. For quick meals, freeze individual portions. I like to use freezer-safe containers or bags. Label them with the date, and they can last for about three months. Just remember to let them cool completely before freezing. To warm up your baked oatmeal, use the microwave or oven. If using a microwave, heat for about 1-2 minutes. If using an oven, preheat it to 350°F (175°C) and warm for about 10-15 minutes. Enjoy it warm for the best taste! Yes, by using almond milk and maple syrup. This swaps out dairy and honey for plant-based options. You can still enjoy the same great taste while keeping it vegan-friendly. It lasts up to a week in the fridge. Store it in an airtight container. Just reheat your portion in the microwave or oven for a quick breakfast. Steel-cut oats require a longer cooking time and may alter texture. They don't soften as much as rolled oats. If you choose to use them, soak them overnight or cook them longer for the best results. This blog post covered how to make a delicious Apple Cinnamon Baked Oatmeal. We discussed key ingredients like oats, apples, and almond milk. You learned about mixing techniques and baking tips to achieve perfect texture. Remember, you can customize your dish with nuts or different fruits. Whether you enjoy it warm or chilled, this dish offers flexibility for your taste. Give it a try, and enjoy a wholesome meal!

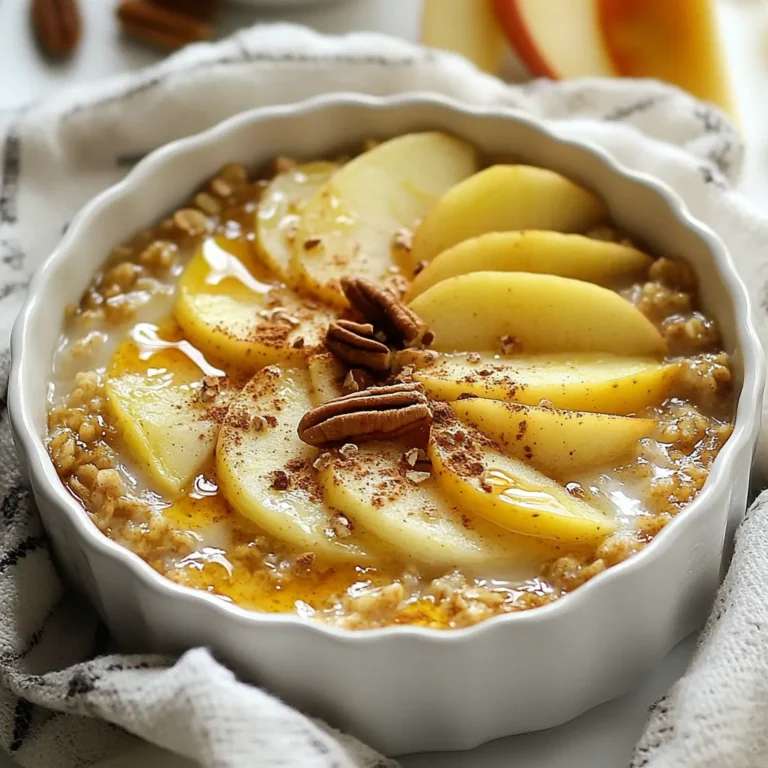
Apple Cinnamon Baked Oatmeal Comforting and Easy Dish

To make this tasty dish, gather these key ingredients: - 1 lb large shrimp, peeled and deveined - 8 oz linguine or spaghetti - 4 tablespoons unsalted butter - 4 tablespoons extra virgin olive oil - 6 cloves garlic, finely minced - 1 teaspoon red pepper flakes, adjust for spice level - 1 lemon, zested and juiced - 1/4 cup fresh parsley, finely chopped - Salt and freshly ground black pepper to taste Enhance your dish with these optional ingredients: - Grated Parmesan cheese This cheese adds a nice creamy touch. You can skip it if you want a lighter meal. For this recipe, you will need: - Large pot for boiling pasta - Large skillet for the sauce and shrimp - Colander to drain pasta - Tongs or pasta fork for mixing These tools help make the process smooth and easy. Having everything ready will save you time in the kitchen. {{ingredient_image_2}} Start by boiling a large pot of salted water. Once the water is bubbling, add 8 ounces of linguine or spaghetti. Cook it as directed on the package until it's al dente. Before you drain the pasta, save about 1 cup of the cooking water. Drain the pasta and set it aside. In a large skillet, heat 4 tablespoons of unsalted butter and 4 tablespoons of extra virgin olive oil over medium heat. Let the butter melt and mix with the oil. This blend creates a rich sauce base. After the butter melts, add 6 finely minced garlic cloves and 1 teaspoon of red pepper flakes to the skillet. Sauté for about 1-2 minutes. Stir often until the garlic smells great and turns golden. Be careful not to let it burn; burnt garlic tastes bitter. Now, add 1 pound of peeled and deveined shrimp to the skillet. Season with salt and pepper. Cook for 2-3 minutes. Flip the shrimp halfway so they cook evenly. They should turn pink and opaque when done. Next, squeeze in the juice of 1 lemon and add the lemon zest. Stir everything well to blend the flavors. Let it cook for another minute for that zesty kick. Carefully add the drained pasta to the skillet. Toss it in the garlic butter sauce to coat every strand. If it looks dry, add some of the reserved pasta water a little at a time until it has the right consistency. Stir in 1/4 cup of finely chopped fresh parsley. Mix everything well. Taste your dish and adjust the seasoning with more salt, pepper, or lemon juice if needed. Serve your garlic butter shrimp scampi hot. You can top it with grated Parmesan cheese if you like. Add a sprinkle of chopped parsley for a beautiful presentation. Enjoy your delicious meal! To get the best garlic flavor, always use fresh garlic. Fresh garlic has a bright taste that dried garlic lacks. I recommend using 6 cloves for this recipe. Chop them finely for even flavor. Sauté the garlic in butter and oil, but don't let it burn. When it turns golden brown, that's your cue. This step draws out its sweet and savory notes. For tender shrimp, cook them just right. Use large, peeled shrimp for this dish. When they turn pink and opaque, they are done. This usually takes about 2-3 minutes. If you overcook them, they will be tough. Season them with salt and pepper before cooking. This adds taste right from the start. If you have leftovers, store them in an airtight container. Put them in the fridge within two hours of cooking. They can last for up to three days. When reheating, use low heat to avoid overcooking. You can add a splash of water or broth to keep the dish moist. Enjoy your delicious meal again! Pro Tips Fresh Shrimp is Key: Always opt for the freshest shrimp available for the best flavor and texture. If using frozen shrimp, ensure they are fully thawed and patted dry before cooking. Don’t Overcook the Shrimp: Shrimp cook quickly; they should only be cooked until they turn pink and opaque. Overcooking can lead to a rubbery texture. Reserve Pasta Water: Always reserve some pasta cooking water before draining. This starchy water is perfect for adjusting the sauce's consistency and helps the sauce cling to the pasta better. Garnish with Fresh Herbs: A sprinkle of fresh parsley not only adds a pop of color but also enhances the dish's flavor. Consider adding other fresh herbs like basil or chives for a different twist. {{image_4}} You can make this dish even better by adding veggies. Some good options include: - Cherry tomatoes: These add a sweet pop. - Spinach: Toss it in for a nice green touch. - Zucchini: Slice it thin and add it to the mix. - Bell peppers: They bring great color and crunch. Adding these ingredients boosts nutrition and flavor. Just sauté them with the garlic before adding the shrimp. This way, everything cooks evenly. If shrimp isn't your thing, don't worry! There are tasty alternatives. You can use: - Scallops: They cook quickly and are sweet. - Chicken: Cut it into bite-sized pieces. - Tofu: For a plant-based option, firm tofu works well. - Fish: Salmon or white fish like cod can be great choices. These proteins offer different textures and flavors. Make sure to adjust cooking times based on what you choose. Want more heat? You can easily spice things up. Here are a few ideas: - More red pepper flakes: Add a pinch more for extra kick. - Hot sauce: Drizzle some in for a zesty twist. - Chili paste: Stir in a spoonful for bold flavor. If you prefer milder dishes, reduce the red pepper flakes or skip the spicy additions. It’s all about finding your perfect balance! After enjoying your garlic butter shrimp scampi, store leftovers in an airtight container. Let the dish cool to room temperature before sealing it. This will help keep it fresh for later. Place the container in the fridge. Properly stored, it should last for up to three days. Make sure to avoid leaving the dish out at room temperature for more than two hours to prevent bacteria growth. To reheat your shrimp scampi, the stovetop works best. Place the leftovers in a skillet over medium heat. Add a splash of water or broth to keep it moist. Stir gently until heated through. This usually takes about 5-7 minutes. You can also use the microwave. Place the shrimp in a microwave-safe bowl and cover it with a damp paper towel. Heat in 30-second intervals until warmed. Freezing garlic butter shrimp scampi is possible but not ideal. Shrimp can become rubbery when thawed. If you choose to freeze it, do so right after cooking. Allow it to cool, then place it in a freezer-safe container. It can last for up to three months in the freezer. To defrost, move it to the fridge overnight. Reheat gently on the stovetop to bring back its original flavor. Yes, you can use frozen shrimp. Just be sure to thaw them first. Place the shrimp in a bowl of cold water for about 15-20 minutes. This helps them defrost quickly. After thawing, peel and devein them if needed. Frozen shrimp can be as tasty as fresh shrimp when cooked well. If you don’t have linguine or spaghetti, try other pasta types. Penne, fettuccine, or even gluten-free pasta work great. You can also use zucchini noodles for a low-carb option. Just cook the pasta according to package instructions, like you would with linguine. To make garlic butter shrimp scampi gluten-free, use gluten-free pasta. Many brands offer great options that taste good. Always check the labels to ensure they meet your needs. You can also serve the shrimp over rice or quinoa instead of pasta for a gluten-free meal. You can prepare some parts ahead of time. Cook the pasta and shrimp separately. Store them in the fridge to keep them fresh. Then, when you’re ready, heat them and mix with the butter sauce. This makes for a quick meal that tastes fresh! Garlic butter shrimp scampi is a simple and delicious dish. We covered the main ingredients, from shrimp to pasta, and discussed optional sides. I shared easy steps to cook the dish, including tips for the best flavor. You can adjust the recipe by adding veggies or changing proteins. Proper storage can extend your leftovers, making meals last longer. Explore this recipe to impress friends and enjoy a tasty meal!

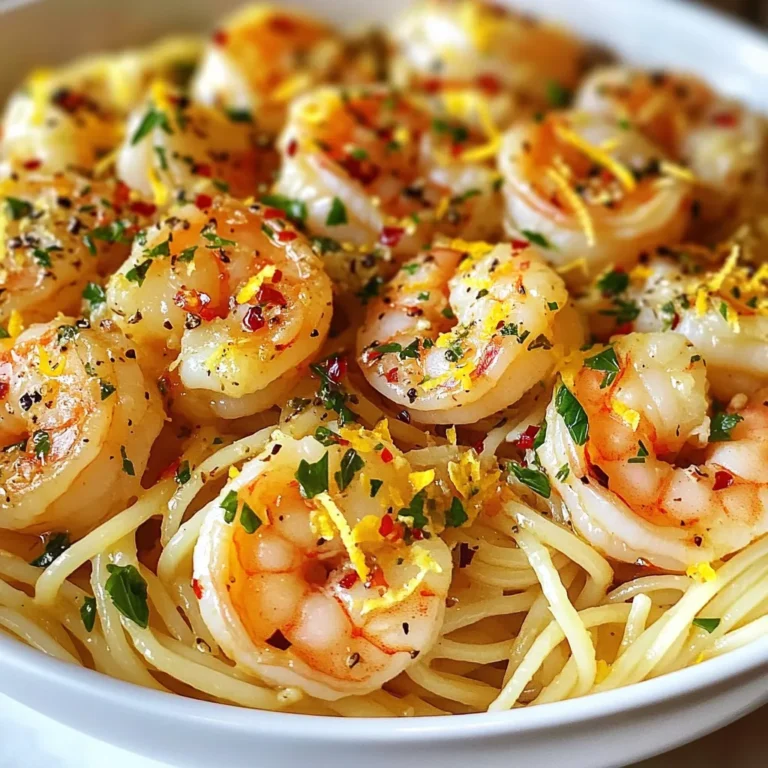
Garlic Butter Shrimp Scampi Flavorful and Easy Recipe

- 1 pound Brussels sprouts - 4 cloves of garlic - 3 tablespoons extra virgin olive oil - 1 teaspoon sea salt - 1 teaspoon freshly cracked black pepper - 1/4 teaspoon red pepper flakes (optional) - 1/2 cup freshly grated Parmesan cheese - 2 tablespoons aged balsamic vinegar - Fresh parsley for garnish When I make Roasted Garlic Parmesan Brussels Sprouts, I start with fresh Brussels sprouts. They are small green veggies that pack a punch. I trim and halve them for even cooking. Garlic adds a rich flavor, so I finely mince four cloves. Extra virgin olive oil helps everything crisp up nicely. Next, I season my sprouts. Sea salt and freshly cracked black pepper give them a classic taste. If you like heat, add red pepper flakes. They bring a nice kick. For the finishing touch, I sprinkle half a cup of grated Parmesan cheese on top. This cheese melts beautifully and creates a golden crust. A drizzle of aged balsamic vinegar adds tang and depth to the dish. Finally, I garnish with fresh parsley. This not only adds color but also a burst of freshness. {{ingredient_image_2}} - Preheat the oven to 400°F (200°C). - Trim and halve the Brussels sprouts. Make sure each piece is even for cooking. - Combine Brussels sprouts, garlic, olive oil, salt, pepper, and red pepper flakes in a bowl. - Toss until every sprout is coated in the mixture. This adds great flavor to each bite. - Spread Brussels sprouts on a baking sheet in a single layer. Cut sides should face down. - Roast for 20 minutes. Look for a nice golden color. Test with a fork for tenderness. - After 20 minutes, sprinkle Parmesan cheese over the sprouts. - Return to the oven and roast for an additional 5-7 minutes. The cheese should melt and turn golden. This method makes the Brussels sprouts crispy and full of flavor. Enjoy the delightful mix of garlic and cheese! To get the best taste from Brussels sprouts, choose firm, bright green ones. Look for sprouts that are small to medium-sized. These will be sweeter and less bitter. When it comes to garlic, fresh is key. Use whole cloves and mince them yourself. This gives a stronger flavor. You can also roast the garlic with the sprouts for a sweeter, milder taste. Always spread your Brussels sprouts in a single layer on the baking sheet. This helps them roast evenly. If they sit on top of each other, they will steam instead of roast. Watch the size of your sprouts. Smaller ones cook faster, while larger ones take more time. Adjust your cooking time by a few minutes as needed. Serve your roasted Brussels sprouts on a bright platter. The golden cheese contrasts nicely with the green color. Add a drizzle of balsamic vinegar to enhance the look and taste. You can also pair these with grilled chicken or fish for a balanced meal. A slice of lemon on the side adds a fresh touch too. Pro Tips Use Fresh Ingredients: For the best flavor, always opt for fresh Brussels sprouts and garlic. They will enhance the overall taste of the dish. Adjust the Spice Level: Feel free to customize the amount of red pepper flakes based on your heat preference. You can omit them entirely for a milder dish. Perfect Parmesan Melt: To achieve a beautiful golden crust, ensure the Parmesan cheese is evenly distributed over the sprouts before returning them to the oven. Experiment with Acidity: Try different types of vinegar, like apple cider or red wine vinegar, for a different flavor profile that complements the Brussels sprouts. {{image_4}} You can switch up the cheese in this recipe. Try using feta for a tangy taste. Goat cheese also adds a creamy touch. If you want a sharper flavor, use aged cheddar or Gruyère. Adjust the spices too. If you like more heat, add more red pepper flakes. For a milder flavor, skip the flakes altogether. You could also add lemon zest for a fresh twist. If you want a quicker option, try air frying the Brussels sprouts. Set the air fryer to 375°F (190°C) and cook for about 15 minutes. Shake the basket halfway through for even cooking. Stovetop sautéing is another fast way to cook them. Heat olive oil in a pan, add the sprouts, and cook for about 10-12 minutes. Stir often until they are golden brown and tender. Feel free to add seasonal veggies or fruits. In the fall, diced apples or butternut squash work well. In the spring, try adding asparagus or peas for a pop of green. For festive variations, mix in cranberries or pomegranate seeds. These add color and a sweet burst. You can also sprinkle some walnuts for crunch and flavor. To keep your roasted Brussels sprouts fresh, store them in an airtight container. This helps keep them moist. They stay good for about 3 to 5 days in the fridge. Always let them cool completely before storing. This prevents steam from making them soggy. You can freeze roasted Brussels sprouts, but they may lose some texture. First, let them cool down. Then, place them in a single layer on a baking sheet. Freeze them for about 1 to 2 hours. After that, transfer them to a freezer bag. Remove as much air as you can. They will last for about 2 to 3 months in the freezer. When you are ready to eat them, reheat them in the oven at 350°F (175°C). This keeps them crispy. Bake until they are heated through, which usually takes about 15 to 20 minutes. Leftover Brussels sprouts can add great flavor to many dishes. Try chopping them up and adding them to an omelet. You can also toss them into pasta or a grain bowl. Mixing them with quinoa or rice brings a nice crunch. Another idea is to make a salad. Slice the sprouts and mix them with greens, nuts, and cheese. For some fun, try this recipe for a Brussels sprouts frittata. It's quick and tasty! Roast Brussels sprouts at 400°F (200°C) for about 20 minutes. Check for a golden-brown color and tenderness. After the first roast, add Parmesan and cook for an extra 5 to 7 minutes. This gives you a nice crust on the cheese while keeping the sprouts tender. You can use frozen Brussels sprouts, but fresh ones are best. Frozen sprouts often lack crunch and flavor. They also release water when heated, which may make your dish soggy. If you use frozen, thaw and pat them dry before roasting. This helps to keep them from getting mushy. These Brussels sprouts pair well with many dishes. Serve them alongside roasted chicken, grilled fish, or a hearty steak. They also complement pasta dishes or grain bowls nicely. For a lighter meal, try them with a fresh salad or a slice of crusty bread. Add a lemon wedge for a bright finish! This article covered how to roast Brussels sprouts with garlic and Parmesan. We explored the main ingredients, seasonings, and tips to boost flavor. You learned about cooking methods and creative variations, plus how to store leftovers safely. Roasted Brussels sprouts can be a tasty addition to any meal. With a few simple steps, you can enjoy a delicious dish that stands out. I hope you try this recipe and enjoy every bite!

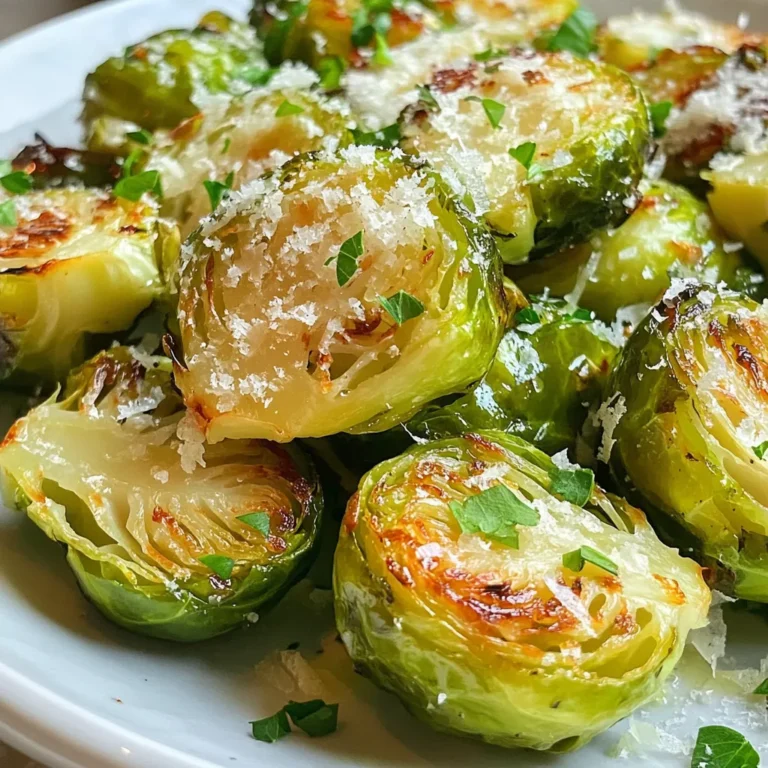
Roasted Garlic Parmesan Brussels Sprouts Delight

- 4 bone-in, skin-on chicken thighs - 1/4 cup honey - 1/4 cup Dijon mustard - 2 tablespoons apple cider vinegar - 3 cloves garlic, finely minced - 1 teaspoon dried thyme - 1 teaspoon paprika - Salt and freshly ground black pepper to taste - 2 tablespoons extra virgin olive oil - Fresh parsley, finely chopped (for garnish) To make honey mustard chicken thighs, gather these key ingredients. The chicken thighs are perfect for this dish. Their skin locks in moisture and adds great flavor. Honey and Dijon mustard create a sweet and tangy sauce. Apple cider vinegar adds brightness, while garlic gives depth. Seasonings like thyme and paprika enhance the taste. Don't forget salt and pepper to balance the flavors. Olive oil helps in the cooking process and ensures a nice sear. Finally, fresh parsley brings a pop of color and freshness to your plate. With these ingredients ready, you can create a dish that is juicy and full of flavor. Each bite will delight your taste buds. {{ingredient_image_2}} 1. Preheat your oven to 400°F (200°C). This step is key for even cooking. 2. In a bowl, mix the honey, Dijon mustard, apple cider vinegar, minced garlic, dried thyme, paprika, salt, and pepper. Whisk until smooth. This honey mustard sauce adds great flavor. 1. Pat the chicken thighs dry with paper towels. This helps the skin get crispy. 2. Season both sides of the chicken with salt and black pepper. This brings out the best taste. 3. Heat olive oil in an oven-safe skillet over medium-high heat until it shimmers. 4. Place the chicken thighs skin-side down in the skillet. Sear for 5-7 minutes until golden brown and crispy. 1. Flip the chicken thighs so the skin side is up. Pour the honey mustard sauce over them. Make sure they are well-coated. 2. Transfer the skillet to the oven and bake for 25-30 minutes. Use a meat thermometer to check if the chicken reaches 165°F (75°C). 3. Once cooked, take the skillet out of the oven. Let the chicken rest for a few minutes. This allows the juices to settle. 4. Garnish with chopped fresh parsley before serving. This adds a nice touch to your meal. To get that nice crispy skin, start by drying the chicken well. Use paper towels to pat each thigh dry. This step helps remove moisture. Extra moisture can lead to soggy skin. Then, heat the olive oil until it shimmers in the skillet. When the oil is hot, it will crisp the skin perfectly. You can boost the flavor by adding spices. Consider using rosemary or cayenne for a kick. If you plan ahead, marinate the chicken. Let it sit in the honey mustard mix for at least an hour. This makes the chicken more flavorful and juicy. Serving is just as important as cooking. Place the chicken on a rustic wooden board. Drizzle any leftover sauce on top for flair. Garnish with fresh parsley for a pop of color. For sides, roasted vegetables or a green salad pair well. They add freshness and balance to the meal. Pro Tips Pat the Chicken Dry: Ensuring your chicken thighs are patted dry helps achieve a perfectly crispy skin when seared. Use a Meat Thermometer: To ensure the chicken is cooked through, always check the internal temperature; it should reach 165°F (75°C). Let It Rest: Allowing the chicken to rest after baking helps the juices redistribute, making for a juicier bite. Customize the Sauce: Feel free to tweak the honey mustard sauce by adding herbs like rosemary or spices like cayenne for a personal touch. {{image_4}} You can use different cuts for this recipe. Boneless chicken thighs are a great choice. They cook fast and stay juicy. Chicken breasts work too if you want a leaner option. Drumsticks also fit perfectly in this dish. They add a fun twist and are easy to hold. Feel free to mix up the flavors. You can add a bit of heat for a sweet and spicy kick. Just toss in some cayenne pepper or red pepper flakes. If you have dietary needs, there are easy swaps. Use maple syrup instead of honey for a vegan option. You can also try whole grain mustard for a different taste. You can switch up how you cook this dish. Grilling adds a nice smoky flavor. Just marinate the chicken in the sauce and grill until cooked through. Slow cooking is another option. Place the chicken in a slow cooker with the sauce and let it cook on low for 6-8 hours. If you own an Instant Pot, it’s perfect for this recipe too. Just use the sauté function for searing. Then, add the sauce and cook on high pressure for about 8-10 minutes. Each method gives you tasty chicken with a unique twist. After enjoying your honey mustard chicken thighs, you may have some leftovers. To keep them fresh, let the chicken cool down to room temperature. Do not leave it out for more than two hours. Next, place the chicken in airtight containers. This prevents moisture loss and keeps flavors intact. You can also wrap them tightly in plastic wrap. Store the containers in the fridge for up to four days. For longer storage, freeze the chicken. Use freezer-safe bags or containers. This way, it stays good for up to three months. When it's time to enjoy your leftovers, reheating is key. The best methods are the oven or stovetop. For the oven, preheat it to 350°F (175°C). Place the chicken in a baking dish and cover it with foil. Heat for about 20-25 minutes or until warm. For the stovetop, heat a skillet over medium heat. Add a splash of water or broth to help keep it moist. Cook for about 5-7 minutes, flipping halfway. To maintain moisture and texture, avoid using the microwave if possible. Microwaving can dry out the chicken. Always check the internal temperature before serving. It should reach 165°F (75°C) to ensure it's safe to eat. I recommend baking honey mustard chicken thighs for 25-30 minutes at 400°F (200°C). Make sure to check the internal temperature. It should reach 165°F (75°C) to be safe for eating. This will ensure your chicken is juicy and tender. Yes, you can use other mustards. Yellow mustard adds a milder taste. Spicy brown mustard will give a bolder flavor. Each type will change the taste a bit, but they all work well with honey. Honey mustard chicken thighs go great with many sides. Here are some ideas: - Roasted vegetables like carrots and broccoli - A simple green salad with vinaigrette - Mashed potatoes or rice for a filling meal - Garlic bread to soak up the sauce In this blog post, we explored how to make honey mustard chicken thighs. We covered key ingredients, step-by-step cooking instructions, and ways to enhance flavors. Remember to dry the chicken for crispy skin and try custom flavors to suit your taste. You can also enjoy this dish with various sides. Whether you're a cooking novice or an expert, this recipe offers fun and tasty options. Enjoy your meal and impress your guests with your skills!

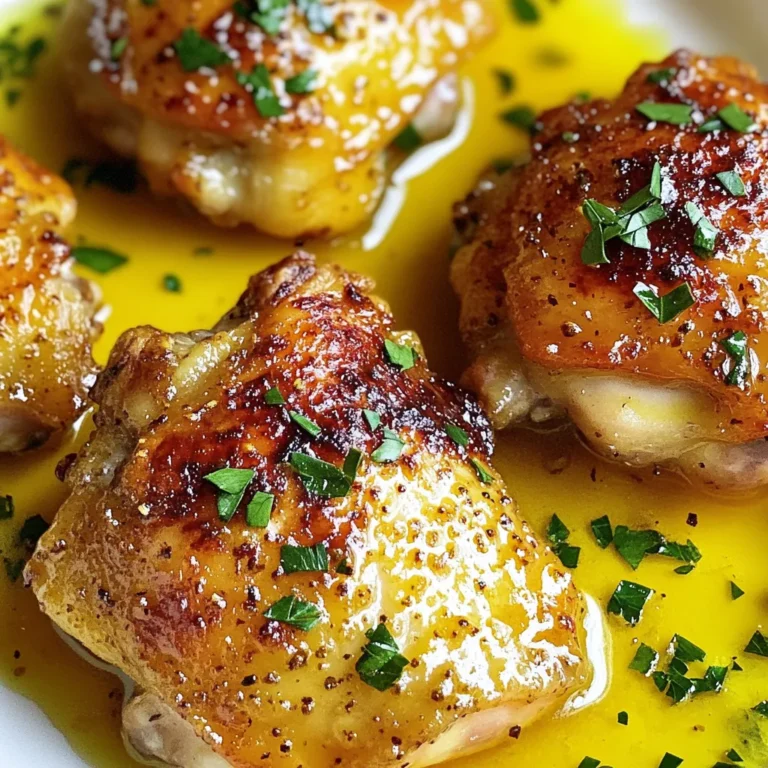
Honey Mustard Chicken Thighs Juicy and Flavorful Meal

To make Pumpkin Spice Energy Bites, you need the following ingredients: - 1 cup rolled oats - 1/2 cup canned pumpkin puree - 1/4 cup almond butter (or substitute with peanut butter) - 1/4 cup honey or maple syrup - 1 teaspoon pumpkin spice blend - 1/2 teaspoon vanilla extract - 1/4 cup ground flaxseed - 1/4 cup mini chocolate chips (optional, but highly recommended) - Pinch of salt Each ingredient in these bites serves a purpose and boosts health: - Rolled oats: Great for energy and fiber. They keep you full longer. - Pumpkin puree: Packed with vitamins A and C. It adds moisture and flavor. - Almond butter: Provides healthy fats and protein. It helps with heart health. - Honey or maple syrup: Natural sweeteners that give energy and flavor. - Pumpkin spice blend: Adds warmth and comfort. It may help digestion. - Vanilla extract: Enhances flavor. It can also improve mood. - Ground flaxseed: A source of omega-3 fatty acids. It supports heart health. - Mini chocolate chips: They add sweetness. Plus, they make the bites extra fun! - Salt: Balances flavors and enhances sweetness. If you need to swap ingredients, here are some easy options: - Rolled oats: Use quick oats for a different texture. - Almond butter: Peanut butter works well. Sunflower seed butter is a nut-free option. - Honey: Agave syrup can replace honey for a vegan choice. - Pumpkin spice blend: Make your own with cinnamon, nutmeg, and ginger. - Chocolate chips: Try dried fruit or nuts for a healthier twist. These swaps keep the flavor while catering to your needs. Enjoy making these tasty bites! {{ingredient_image_2}} To make pumpkin spice energy bites, start by gathering your ingredients. You need rolled oats, pumpkin puree, almond butter or peanut butter, honey or maple syrup, a pumpkin spice blend, vanilla extract, ground flaxseed, and a pinch of salt. If you like chocolate, have mini chocolate chips ready. This recipe is quick and takes only about 10 minutes to prep. In a large mixing bowl, add the rolled oats, pumpkin puree, almond butter, honey, pumpkin spice blend, vanilla extract, ground flaxseed, and a pinch of salt. Use a spatula or your hands to mix until you form a sticky dough. Make sure everything is well combined; this helps each bite taste amazing. If using, fold in the mini chocolate chips gently. Next, scoop out tablespoon-sized portions of the dough. Roll each portion into compact balls. This makes them easy to eat and helps them keep their shape. Line a baking sheet with parchment paper. Place the rolled energy bites on the sheet, leaving space between each ball. Chill the baking sheet in the refrigerator for at least 30 minutes. This step helps the bites firm up, giving them the right texture. After chilling, transfer the energy bites to an airtight container. This keeps them fresh and ready for snacking. Enjoy your tasty and healthy treats! To make your energy bites just right, focus on the mix. The oats give a chewy base. The pumpkin puree adds moisture. If the mix feels too wet, add a bit more oats or ground flaxseed. This helps them hold their shape. If they feel too dry, a splash of honey or maple syrup can help. You want them sticky but not gooey. Want to boost flavor? Try adding a pinch of nutmeg or cinnamon. These spices work well with pumpkin. You could also mix in some chopped nuts for crunch. If you love chocolate, the mini chocolate chips add a sweet touch. They blend well with the spices. Enjoy experimenting with flavors to find your favorite. You can make these bites ahead of time. Just prepare the mixture and roll them into balls. After that, chill them in the fridge for 30 minutes. Once they are firm, store them in an airtight container. They will stay fresh for up to a week. You can also freeze them for longer storage. Just take out a few when you want a quick, healthy snack! Pro Tips Chill for Better Texture: Allow the energy bites to chill in the refrigerator for at least 30 minutes. This helps them firm up and makes them easier to handle and eat. Mix It Up with Add-Ins: Feel free to customize your energy bites by adding other ingredients like dried fruits, nuts, or seeds for additional flavor and texture. Use Natural Sweeteners: For a healthier option, consider using natural sweeteners like agave nectar or coconut nectar instead of honey or maple syrup. Storage Tips: Store your energy bites in an airtight container in the refrigerator to keep them fresh. They also freeze well for longer storage! {{image_4}} You can switch up the flavors of your energy bites to keep things fun. Try adding dried fruit like cranberries or raisins for a sweet twist. Chopped nuts, like walnuts or pecans, add crunch and healthy fats. Want a chocolatey kick? Use cocoa powder instead of pumpkin spice. You can also swap in a different spice mix, like cinnamon or ginger, for a unique taste. These energy bites are easy to make for different diets. To make them vegan, simply replace honey with maple syrup. For a gluten-free option, confirm that your oats are certified gluten-free. Most other ingredients are naturally gluten-free, so you can enjoy these bites worry-free. If you're nut-free, use sunflower seed butter instead of almond or peanut butter. Pumpkin spice energy bites are great for any time of day. Enjoy them as a quick snack between meals. They also work well as a grab-and-go breakfast. Just pair them with yogurt or fruit for a balanced start. Feeling sweet? Serve them as a dessert. They’re perfect for gatherings, too. Display them in a mason jar or on a plate to impress your guests! To keep your pumpkin spice energy bites fresh, store them in an airtight container. This helps prevent air from drying them out. You can also layer parchment paper between bites. This will stop them from sticking together. Always keep the container in a cool, dry place or in the fridge. Stored in the fridge, these energy bites can last about one week. The cold helps maintain their flavor and texture. If you notice any changes in smell or look, it’s best to toss them. Always check before snacking! You can freeze these energy bites for longer storage. Place them in a single layer on a baking sheet. Freeze for about one hour until they harden. Then, transfer them to a freezer-safe bag or container. They can last up to three months in the freezer. When ready to eat, let them thaw in the fridge overnight. Enjoy your tasty snack whenever you like! Pumpkin spice energy bites are small, no-bake snacks made with wholesome ingredients. They combine rolled oats, pumpkin puree, almond butter, honey, and pumpkin spice. These bites are chewy, tasty, and packed with nutrients. They provide energy and comfort, perfect for any time of the day. You can make these bites healthier by using natural sweeteners. Instead of honey, try mashed banana or unsweetened applesauce. You can also reduce the chocolate chips or omit them altogether. Adding more flaxseed boosts fiber and omega-3 fatty acids, making them even better for you. Yes! If you want to avoid nuts, simply replace almond butter with sunflower seed butter or tahini. Both options work well and still give a creamy texture. Just make sure to check for allergies if you're sharing these bites with others. Absolutely! Pumpkin spice energy bites are a great snack for kids. They are fun to eat and provide energy for play. They also have a sweet taste that kids love. Just be mindful of any nut allergies when serving them. You can enjoy these bites straight from the fridge as a quick snack. They also make a great addition to lunchboxes. For a treat, pair them with a warm drink, like apple cider or hot chocolate. They’re versatile and perfect for any occasion! This article covered everything you need to know about pumpkin spice energy bites. We explored the key ingredients, their benefits, and tasty alternatives. I shared easy step-by-step instructions to prepare these bites, plus tips for the perfect texture and flavor. We also discussed variations for dietary needs and how to store them properly. Now you can enjoy these delicious snacks anytime. Get creative with flavors or share them with friends. Whether for breakfast or a treat, these bites are sure to please. Enjoy making them!

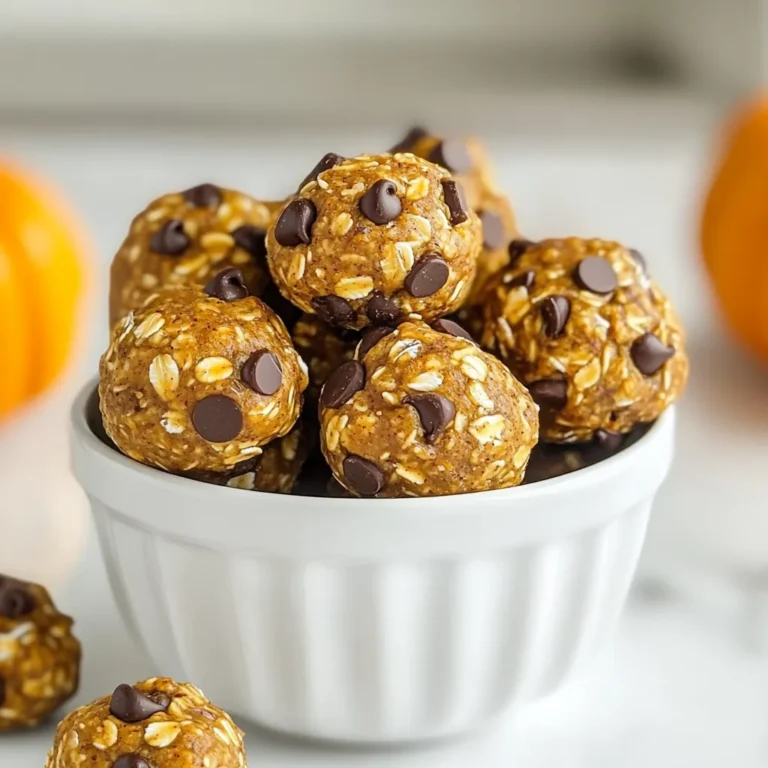
Pumpkin Spice Energy Bites Tasty and Healthy Snack

- 1 lb ground chicken - 1/4 cup breadcrumbs - 1/4 cup grated Parmesan cheese - 1 large egg - 3 cloves garlic, minced - 1 teaspoon dried Italian herbs - Salt and pepper to taste - 4 cups chicken broth - 1 cup heavy cream - 2 cups baby spinach - 1 cup carrots, diced - 1 cup celery, diced - 1/2 teaspoon red pepper flakes (optional) - Fresh parsley, chopped (for garnish) To make sure your soup turns out right, precise measurements matter. Here’s a quick guide: - Ground chicken: 1 pound is about 16 ounces. It provides a hearty base. - Breadcrumbs: 1/4 cup helps bind the meatballs. - Parmesan cheese: 1/4 cup adds flavor. - Egg: 1 large egg binds the ingredients. - Garlic: Use 3 cloves for a strong taste. - Dried Italian herbs: 1 teaspoon gives a nice herbal note. - Broth: 4 cups is the liquid base. - Heavy cream: 1 cup makes it creamy. - Spinach: 2 cups add color and nutrition. - Carrots and celery: 1 cup each for sweetness and crunch. - Red pepper flakes: 1/2 teaspoon adds heat, if you like. If you need to swap any ingredients, here are some ideas: - Ground chicken can be replaced with ground turkey for a leaner option. - Breadcrumbs can be substituted with crushed crackers or oats. - Parmesan cheese can be swapped with pecorino for a sharper taste. - Heavy cream can be replaced with coconut milk for a dairy-free version. - Spinach can be changed to kale or Swiss chard for a different green. - Carrots and celery can be replaced with bell peppers or zucchini. These swaps keep the soup tasty while catering to your needs. Enjoy crafting this delicious meal! {{ingredient_image_2}} First, gather your ingredients. You need ground chicken, breadcrumbs, Parmesan cheese, an egg, minced garlic, dried herbs, salt, and pepper. In a large mixing bowl, combine these items. Use your hands or a spoon to mix them well. Ensure every ingredient is blended. This step is key for tasty meatballs. After mixing, roll the mixture into small meatballs, about 1 inch in size. Place them on a tray as you shape them. Next, heat olive oil in a large pot or Dutch oven over medium heat. Add diced carrots and celery. Sauté these veggies for about five minutes. You want them to soften and smell fragrant. This adds great flavor to the soup. Once the vegetables are ready, it’s time to move on. Now, pour in four cups of chicken broth. Stir gently to mix the broth with the sautéed vegetables. Bring this mixture to a gentle simmer. When it starts to bubble, carefully add the meatballs to the pot. They should float when fully cooked, which takes about 10 to 12 minutes. This is where the magic happens! After the meatballs are cooked, lower the heat. Stir in one cup of heavy cream and two cups of baby spinach. Allow the soup to cook for an additional three to five minutes. You want the spinach to wilt and the soup to warm up. If you like a bit of heat, add red pepper flakes. Taste the soup and adjust with salt and pepper as needed. Finally, ladle the soup into bowls and sprinkle fresh parsley on top. This adds a lovely touch before you serve! To make great meatballs, start with fresh ingredients. Use ground chicken that is not too lean. A bit of fat helps keep them moist. Combine the chicken with breadcrumbs, Parmesan cheese, eggs, garlic, and herbs in a bowl. I prefer mixing with my hands for better texture. Roll the mixture into small balls, about one inch wide. This size cooks evenly and stays tender. - Avoid over-mixing; this can make your meatballs tough. - If the mixture feels too wet, add more breadcrumbs. - Chill the formed meatballs for 15 minutes. This helps them hold their shape while cooking. To make the soup creamy, use heavy cream. Add it after the meatballs are cooked. This ensures the cream does not curdle. Stir the cream gently into the broth. The soup should simmer, not boil, after adding the cream. This helps keep the soup smooth and velvety. - For extra flavor, consider adding a splash of lemon juice. - If you want a lighter version, use half-and-half instead of heavy cream. - Always taste the soup before serving. Adjust the seasoning to your liking. Serve the creamy garlic chicken meatball soup in rustic bowls. This adds a cozy touch. I like to garnish with fresh chopped parsley for color. Pair it with crusty bread for dipping. This adds a crunchy texture to every bite. For a fun twist, serve with a sprinkle of red pepper flakes for a bit of heat. - You can also add a sprinkle of extra Parmesan on top. - Consider a side salad for a complete meal. - This soup is perfect for sharing with family and friends. Pro Tips Use Fresh Herbs: Fresh herbs can elevate the flavor of your soup. Consider adding fresh basil or thyme just before serving for a burst of freshness. Adjust the Consistency: If you prefer a thicker soup, you can add a bit more cream or even a cornstarch slurry to achieve your desired consistency. Make Ahead: This soup can be made ahead of time. Simply store the meatballs and soup separately in the fridge and combine them when ready to serve. Flavor Boost: For extra flavor, try adding a splash of white wine to the broth before simmering the meatballs. It adds depth to the overall taste. {{image_4}} You can boost the taste of your soup with some fun add-ins. Try adding diced onions when you sauté the vegetables. Onions add a sweet flavor that pairs well with garlic. You can also toss in some mushrooms for an earthy touch. They add both flavor and texture. For those who love heat, consider extra red pepper flakes. They will spice things up. You can also add fresh herbs like basil or thyme for a bright flavor. These herbs enhance the aroma and taste of your soup. To make this soup healthier, consider swapping heavy cream for a lighter option. Use half-and-half or coconut milk instead. These choices cut down on calories while keeping a creamy texture. You can also add more veggies. Try bell peppers, zucchini, or even kale for extra nutrients. If you want protein, add beans. Great northern beans or chickpeas work well. These legumes provide fiber and make the soup more filling. You can also use lean ground turkey instead of chicken for a leaner meat option. You can easily turn this soup into a vegetarian dish. Replace the ground chicken with lentils or plant-based meat. Lentils are protein-rich and add a nice texture. For the broth, use vegetable broth instead of chicken broth. This keeps the flavor rich and satisfying. You can also add tofu for a protein boost. Cubed firm tofu works great in soups. Just let it simmer to soak up all the flavors. Lastly, don’t forget to add more vegetables. Think about corn, peas, or even sweet potatoes for a hearty twist. To store leftovers, let the soup cool down first. Once cooled, transfer the soup to an airtight container. You can keep it in the fridge for up to three days. Make sure to label the container with the date. When you're ready to enjoy it again, pour the soup into a pot. Heat it over medium heat, stirring gently. If the soup is too thick, add a splash of chicken broth or water. This will help bring back its creamy texture. Heat until it’s warm all the way through. If you want to freeze the soup, do this before adding the cream and spinach. The texture will stay better that way. Place the cooled soup in a freezer-safe container. Be sure to leave some space at the top, as it will expand when frozen. It can last in the freezer for up to three months. When you’re ready to eat, thaw it in the fridge overnight and then follow the reheating instructions. Yes, you can use ground turkey instead of chicken. Turkey has a mild taste and works well in meatballs. It offers a leaner option if you're looking for a lighter meal. Just follow the same steps in the recipe. The meatballs will still be flavorful and tender. To make this soup dairy-free, swap the heavy cream for coconut milk or a nut milk. Both options will add creaminess without dairy. You can also use a dairy-free cream substitute available in stores. Adjust the seasoning if needed to keep the flavor balanced. You can add fresh herbs like basil or thyme for more flavor. Dried herbs like rosemary or dill also work great. Feel free to mix and match according to your taste. These herbs will enhance the soup's aroma and depth, making it even more comforting. This blog post covered how to make creamy garlic chicken meatball soup. We discussed the ingredients you need and how to prepare each part of the dish. I shared tips for making perfect meatballs and how to get that creamy texture. Plus, we explored flavor variations and storage methods. This soup is easy to modify to fit your taste. Enjoy your cooking and have fun with this recipe!

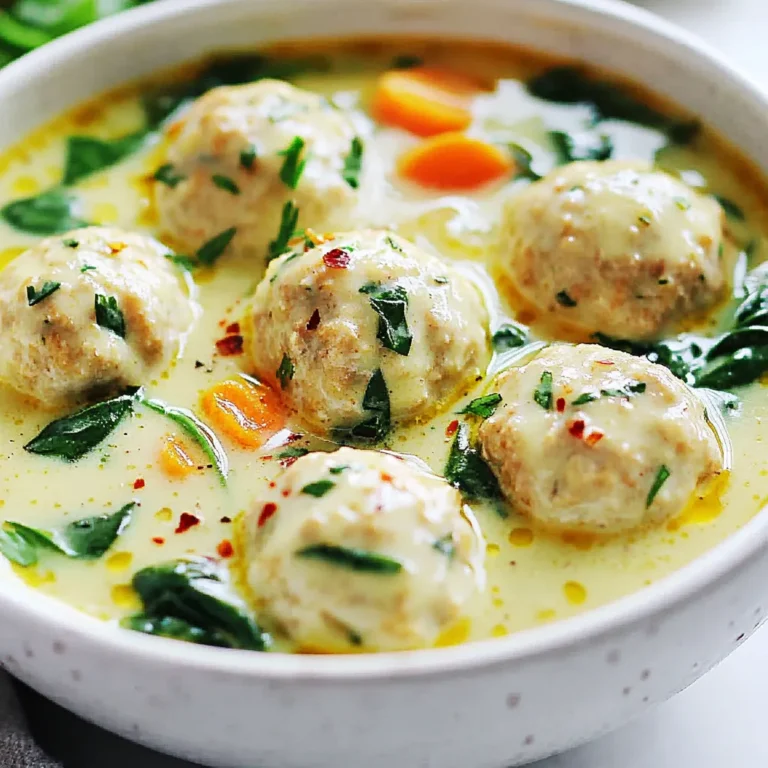
Creamy Garlic Chicken Meatball Soup Satisfying Meal

- 1 lb ground turkey - 2 cups fresh spinach, finely chopped - 1/2 cup crumbled feta cheese - 1/2 cup breadcrumbs - 1 tablespoon olive oil - 3 cloves garlic, minced - 1/4 cup onion, finely chopped - 1 teaspoon dried oregano - 1 teaspoon salt - 1/2 teaspoon black pepper - 1/4 teaspoon red pepper flakes (optional) - Ground turkey alternatives: You can use ground chicken or beef for a different taste. - Gluten-free breadcrumbs: Swap with crushed gluten-free crackers or almond flour. - Dairy-free feta options: Try using tofu or cashew cheese for a dairy-free twist. These ingredients will help you create meatballs that burst with flavor. The spinach adds a fresh touch, and feta gives a nice tang. Don't forget that the spices really bring everything together. If you want to mix it up, try the substitutions listed. They can make this dish fit different diets while keeping it tasty. {{ingredient_image_2}} First, preheat your oven to 400°F (200°C). This step is key for a nice bake. Line a baking sheet with parchment paper for easy cleanup. It saves time and effort later. Next, grab a large mixing bowl. Here, you will blend the ground turkey, finely chopped spinach, crumbled feta cheese, and breadcrumbs. Add one large egg, three minced garlic cloves, and a quarter cup of finely chopped onion. Now, drizzle in one tablespoon of olive oil. Sprinkle one teaspoon of dried oregano, along with one teaspoon of salt and half a teaspoon of black pepper. If you like a little kick, add a quarter teaspoon of red pepper flakes. Mix all these ingredients gently with your hands. Be careful not to overmix. You want tender meatballs, not tough ones. Time to form the meatballs! Take a small amount of the mixture and shape it into a ball about one inch wide. Place the meatballs on the baking sheet. Make sure to space them evenly. This helps them cook well. If they are too close, they might stick together. Now, it's time to bake. Place the meatballs in the oven for 20 to 25 minutes. Keep an eye on them. They need to turn golden brown and reach an internal temperature of 165°F (75°C). To check for doneness, use a meat thermometer. Insert it into the center of a meatball. If it reads 165°F, they are ready! After baking, remove the meatballs from the oven. Let them cool for a few minutes before serving. Enjoy your delicious Spinach Feta Turkey Meatballs! To maximize flavor absorption, chop the spinach finely. This helps it blend well with the turkey. Use fresh ingredients whenever possible. Fresh garlic and onion add depth to your meatballs. Don’t forget to let the mixture rest for a few minutes. This allows the breadcrumbs to soak up moisture and flavors. Mixing ingredients requires a gentle touch. Use your hands to combine, but do not overmix. Overmixing can make the meatballs tough. Just mix until everything is combined. Form the meatballs gently to keep them light and airy. For garnishing, fresh herbs like parsley or basil work well. Sprinkle them over the meatballs right before serving. This adds color and freshness to your dish. Arrange the meatballs on a decorative platter for a nice touch. Serve the meatballs with a warm bowl of marinara sauce. This adds flavor and moisture. You can also place them over whole grain spaghetti. This makes for a hearty meal that is sure to please. If your meatballs fall apart, try adding more breadcrumbs. This helps bind the mixture better. You can also chill the mixture for 30 minutes before forming the balls. This makes them easier to handle. Adjusting seasoning is easy. Taste the mixture before baking. If it needs more salt or spices, add them. Remember, flavors can change after cooking, so don't be shy. Make it your own by tweaking the seasonings to suit your taste. Pro Tips Use Fresh Spinach: Fresh spinach adds more flavor and nutrients compared to frozen. Make sure to chop it finely for better incorporation. Keep Meatballs Moist: Adding a bit of olive oil helps keep the meatballs moist. Avoid overmixing to prevent tough texture. Check for Doneness: Use a meat thermometer to ensure your turkey meatballs reach an internal temperature of 165°F (75°C) for safe eating. Flavor Variations: Experiment with different herbs and spices, such as basil or thyme, to personalize your meatballs to your taste. {{image_4}} You can make these meatballs even more fun by adding extra veggies. Try mixing in some finely chopped bell peppers or zucchini. These add color and nutrition. You can also swap the feta cheese. Use mozzarella or goat cheese for a different taste. Each cheese gives a unique twist and flavor. To change the taste, think about Mediterranean herbs. Adding oregano, thyme, or basil can create a fresh profile. You might want to spice things up too. Add extra red pepper flakes or fresh jalapeños for heat. A spicy version can really wake up your taste buds. You have choices for cooking these meatballs. You can pan-fry them for a crispy outside. Just heat some olive oil in a skillet and cook them until brown. Baking is another great option. It’s simple and cuts down on extra fat. You can also use a slow cooker. Just combine the meatballs with sauce and let them cook all day. Each method gives a different texture and taste. To keep your meatballs fresh, store any leftovers in the fridge. Place them in an airtight container. This helps seal in flavor and moisture. If you have a lot, layer them with parchment paper. This prevents sticking. You can enjoy your meatballs for 3 to 4 days. To save meatballs for later, freezing is a great option. Start by letting them cool completely. Then, place them on a baking sheet in a single layer. Freeze for about an hour until firm. Once set, transfer them to a freezer bag. Remove as much air as possible. You can freeze them for up to 3 months. When ready to eat, thaw them in the fridge overnight. Reheat in the oven or microwave until hot. Cooked meatballs last about 3 to 4 days in the fridge. Always check for signs of spoilage before eating. If they smell off or look discolored, it’s best to toss them. Keeping an eye on your food helps you stay safe and healthy. You can serve these meatballs with many tasty sides. Here are some great options: - Marinara sauce: A classic pairing for dipping. - Whole grain spaghetti: Serve meatballs on top for a filling meal. - Roasted vegetables: Carrots, zucchini, and bell peppers add color and flavor. - Quinoa or rice: These grains make a healthy base. - Salad: A fresh green salad complements the meatballs nicely. Each of these sides adds a different taste and texture to your meal. Feel free to mix and match! Yes, you can make these meatballs gluten-free! Here are some options: - Gluten-free breadcrumbs: These are widely available and work great in this recipe. - Oats: Use finely ground oats as a binder instead of breadcrumbs. - Quinoa: Cooked quinoa can also act as a binding agent. Always check the labels to ensure your ingredients are gluten-free. This way, everyone can enjoy these tasty meatballs! Yes, you can make these meatballs ahead of time! Here are some tips: - Prep ahead: You can mix the ingredients and form the meatballs a day before cooking. - Storage: Keep them in an airtight container in the fridge until you are ready to bake. - Freezing: You can freeze uncooked meatballs. Place them on a baking sheet to freeze, then transfer to a bag. They last up to three months. When ready, bake them straight from the freezer. Just add a few extra minutes to the cooking time. Enjoy your easy meal prep! This blog post covered making tasty spinach feta turkey meatballs. We discussed main ingredients like ground turkey, spinach, and feta cheese. You learned step-by-step preparation, from mixing to baking. We shared tips for cooking and fixing issues. You discovered flavor variations and storage tips to keep meatballs fresh. In conclusion, these meatballs are simple, healthy, and full of flavor. Try them today for a quick meal or prep for the week ahead. Enjoy creating your perfect version!

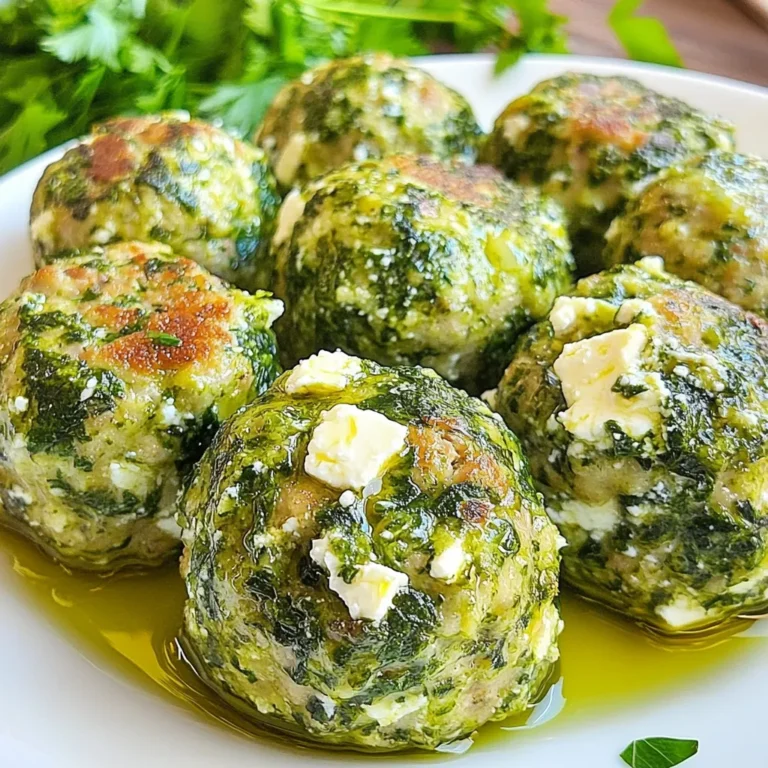
Flavorful Spinach Feta Turkey Meatballs Recipe

- 2 boneless, skinless chicken breasts - 1 ripe mango, diced into small cubes - 1 red bell pepper, thinly sliced - 1 small red onion, thinly sliced - 2 tablespoons olive oil - 2 teaspoons ground cumin - 1 teaspoon chili powder - 1 teaspoon garlic powder - Salt and freshly cracked pepper, to taste - 8 small corn tortillas - Fresh cilantro leaves, for garnish - Lime wedges, for serving The chicken is the main protein, providing a juicy base. Choose boneless and skinless for easy cooking. Mango adds sweetness and freshness to the dish. Make sure it is ripe for the best taste. Red bell pepper and red onion give the tacos color and a nice crunch. Olive oil helps to marinate the chicken, giving it rich flavor. Spices like cumin and chili powder bring warmth and depth to each bite. - Chicken: Look for brands like Perdue or Foster Farms for quality chicken. - Mango: Dole or Del Monte offer sweet, ripe mangoes. - Olive Oil: Extra virgin olive oil from brands like California Olive Ranch is great. - Spices: McCormick or Simply Organic provide fresh spices for the best flavor. - Tortillas: Mission or La Banderita make soft, tasty corn tortillas. - Cilantro: Fresh cilantro from your local market adds a burst of flavor. {{ingredient_image_2}} Start by mixing olive oil, ground cumin, chili powder, garlic powder, salt, and pepper in a bowl. This marinade adds flavor to the chicken. Place the chicken breasts in the bowl, ensuring they get covered well. Let it sit for 15 minutes at room temperature. This helps the chicken soak up the tasty marinade. Heat a grill pan or skillet over medium-high heat. Once hot, add the marinated chicken breasts. Cook them for 6-7 minutes on each side. You can tell they are done when the juices run clear after you poke them. Then, transfer the chicken to a cutting board. Let it rest for 5 minutes. After resting, slice the chicken into thin strips. In the same skillet, add the thinly sliced red bell pepper and onion. Sauté them over medium heat for 3-4 minutes. You want them tender but still crunchy. Season with salt and pepper to bring out their flavors. The aroma will fill your kitchen! Warm the corn tortillas in a dry skillet over medium heat. Heat them for about 30 seconds on each side. They should feel soft and pliable. Stack the tortillas on a plate and cover them with a cloth to keep warm. Now, it’s time to build your tacos! Take a warm tortilla and add sautéed bell peppers and onions. Next, layer the sliced chicken and diced mango on top. The mango adds a sweet touch that pairs well with the savory chicken. Finish your tacos with fresh cilantro leaves for a pop of color and taste. Serve them with lime wedges on the side. Just squeeze the lime over the tacos before you take a bite. This adds a fresh zing that elevates the dish! To marinate chicken well, mix olive oil, cumin, chili powder, garlic powder, salt, and pepper in a bowl. Make sure to cover the chicken fully with this mix. Let it sit for at least 15 minutes. This will help the chicken absorb all the tasty flavors. If you can, let it marinate longer for even better taste. Try to use fresh spices for the best flavor. Cook the chicken on medium-high heat. This helps it get a nice sear while staying juicy. Grill or pan-fry the chicken for about 6-7 minutes on each side. Use a meat thermometer to check the center; it should be 165°F. Remember to let the chicken rest for about 5 minutes after cooking. This step helps keep the juices in, making each bite tender and flavorful. Sauté the bell pepper and onion in the same pan after cooking the chicken. This adds extra flavor. Use medium heat and cook for around 3-4 minutes. Stir often so they cook evenly. You want them soft but still a bit crunchy. Season with salt and pepper as you cook. This will really bring out their natural sweetness. Warm the corn tortillas in a dry skillet over medium heat. Each side should take about 30 seconds. This step makes them soft and easy to fold. Stack the warmed tortillas on a plate and cover them with a clean cloth. This keeps them warm while you finish cooking. Avoid microwaving them; it makes them tough. Pro Tips Marination Magic: Allowing the chicken to marinate for at least 15 minutes enhances the flavor, but for best results, marinate for 1-2 hours in the fridge. This will infuse the chicken with deeper flavors. Perfectly Cooked Chicken: Use a meat thermometer to check that the internal temperature of the chicken reaches 165°F (75°C) for safe consumption, ensuring it's juicy and tender. Veggie Crunch: To maintain the crispness of the sautéed vegetables, avoid overcooking. They should be tender yet still vibrant in color and slightly crunchy. Tortilla Tips: To prevent tearing, warm tortillas individually and keep them covered until ready to serve. You can also lightly brush them with olive oil before warming for added flavor. {{image_4}} If you want to mix things up, try other proteins. Shrimp works great! Its sweet taste pairs well with mango. You can also use tofu for a vegetarian option. Just marinate it the same way as the chicken. For a heartier option, use beef strips. Grill them until they are tender. Each protein brings its own flavor to the tacos. Mango shines in these tacos, but other fruits can shine too. Pineapple adds a nice tangy twist. Just dice it up and toss it in. You can also use peaches for a juicy touch. Try using papaya for a tropical flavor. Each fruit gives a unique taste and makes your tacos fun! Want to spice things up? Add jalapeños or serrano peppers. Slice them thin and mix them in. You can also top your tacos with a spicy salsa. A chipotle sauce adds a smoky kick. If you’re feeling adventurous, try a drizzle of sriracha. These spicy additions will make your tacos exciting! To keep your leftover tacos fresh, store each part separately. Place the chicken, veggies, and tortillas in airtight containers. This method helps maintain their texture and taste. Make sure to cool everything to room temperature before sealing. Store in the fridge for up to three days. You can freeze chicken and toppings for later use. For the chicken, slice it and place it in a freezer bag. Remove as much air as possible before sealing. You can also freeze the sautéed vegetables. Just let them cool first. Store chicken and veggies separately, and they will last up to three months in the freezer. To reheat, start with the chicken. Use a skillet over medium heat. Add a splash of water or broth to keep it moist. Heat for about 5-6 minutes. For the veggies, heat them in the same skillet for about 3-4 minutes. Warm the tortillas in a dry pan for 30 seconds on each side. This method keeps everything tasty and fresh. Enjoy your tacos as if they were just made! Yes, you can make mango chicken tacos in advance. Prepare the chicken and veggies ahead of time. You can store the marinated chicken in the fridge for up to 24 hours. Cook it fresh when you're ready to eat. Sauté the veggies just before serving for the best taste. Pair these tacos with fresh sides. Some great options include: - Black bean salad - Mexican street corn - Cilantro lime rice - Guacamole and tortilla chips These sides will enhance your meal and add more flavor. Yes, many stores sell gluten-free tortillas. Look for corn or rice-based options. They are great for making mango chicken tacos. Always check the label to ensure they are truly gluten-free. These tacos have a mild spice level. The chili powder adds flavor, not heat. If you like more spice, add jalapeños or hot sauce. Adjust the seasonings to match your taste. You learned how to make delicious mango chicken tacos. We covered ingredients, cooking steps, and useful tips. I shared variations to suit your taste and gave storage advice for leftovers. These tacos can please everyone, whether you like them spicy or mild. Keep the ingredient list handy and explore different flavors. Enjoy the joy of cooking, and don’t hesitate to share your taco creations!

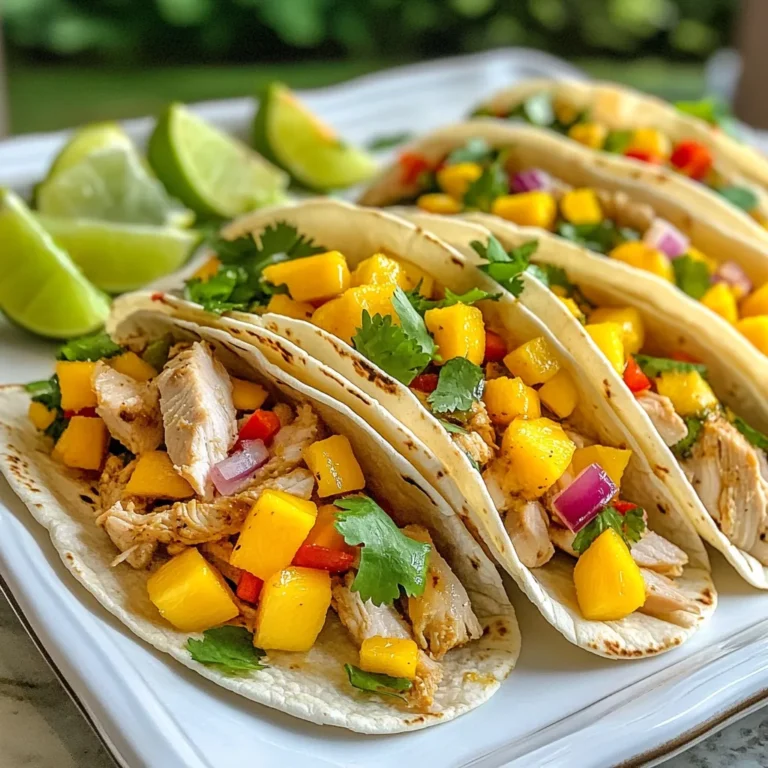
Mouthwatering Mango Chicken Tacos Quick and Easy Meal

- 2 medium zucchinis - 2 cloves of fresh garlic - Optional: Chopped fresh parsley - 1 tablespoon extra virgin olive oil - 1/2 cup freshly grated Parmesan cheese - 1 teaspoon dried oregano - 1 teaspoon smoked paprika - Sea salt and freshly ground black pepper First, preheat your oven to 225°F (110°C). This low heat helps the zucchini chips become crispy. Line a baking sheet with parchment paper to stop sticking. This step is very important for easy removal later. Next, take your two medium zucchinis. Slice them into thin rounds. Thin slices help the chips cook evenly. Put the slices in a mixing bowl. Drizzle the olive oil over the zucchini. Toss gently to coat each slice well. Now, let's add flavor! Mince the garlic and add it to the bowl. Sprinkle in the dried oregano and smoked paprika. Add sea salt and black pepper to taste. Toss everything together until all the slices are well coated. Arrange the seasoned zucchini slices on the lined baking sheet. Make sure they do not overlap. This allows hot air to circulate around each chip. Now, sprinkle the grated Parmesan cheese on top. This will melt and create a golden crust. Place the baking sheet in the oven. Bake the chips for about 2 hours. Halfway through, flip the chips to ensure even crispness. Keep an eye on them as they bake. You want a nice golden brown color for the perfect snack. {{ingredient_image_2}} You’ve learned how to make delicious zucchini chips with fresh and pantry ingredients. We covered each step to prep, season, and bake. Tips for perfect crispiness and storage ideas will help you enjoy your snacks longer. With variations, you can add your personal touch. Whether you like heat or alternative cheeses, there’s a way to make this recipe your own. Now, grab those zucchinis and start baking! Enjoy your healthy, tasty treat.

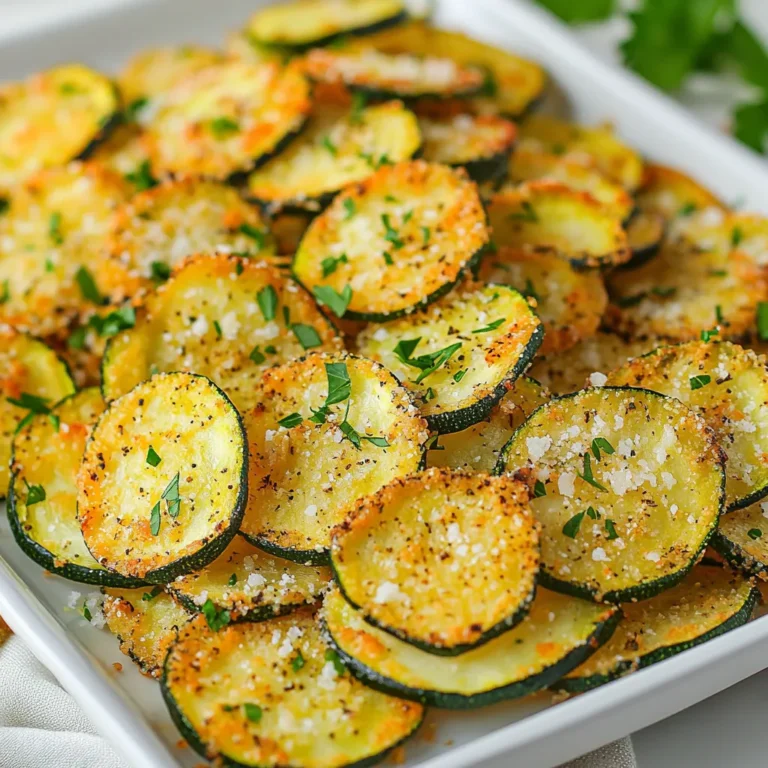
Garlic Parmesan Zucchini Chips Crispy and Flavorful Snack

PREV 1 … 15 16 17 18 NEXT
sweet savory saga

explore

DessertsDinnerAppetizersDrinks

Our Policies

  • Cookie Policy
  • Copyright Policy
  • Disclaimer
  • GDPR Policy
  • Terms Of Use
Back to Top
  • About
  • Contact Us
  • Privacy Policy
© 2025 sweet savory saga