FREE DINNER EBOOK! Get your copy!
  • Cookie Policy
  • GDPR Policy
  • Disclaimer
  • Terms Of Use
  • Visit my other site: Fun Cookie Recipes
sweet savory saga
  • Home
  • Dinner
  • Desserts
  • Drinks
  • Appetizers
  • Contact
  • About
  • Privacy Policy
  • Home
  • Dinner
  • Desserts
  • Drinks
  • Appetizers
  • Contact
  • About
  • Privacy Policy
  • Cookie Policy
  • GDPR Policy
  • Disclaimer
  • Terms Of Use
Visit my other site: Fun Cookie Recipes

HOME / CATEGORIES /

Latest

- 4 boneless, skinless chicken breasts - 1 cup fresh mozzarella cheese, diced - 1 cup cherry tomatoes, halved - 1/4 cup fresh basil leaves, finely chopped - 2 cloves garlic, minced - 1 tablespoon balsamic glaze - 1 teaspoon dried oregano - Salt and freshly ground black pepper to taste - 1 tablespoon olive oil The key to making Caprese stuffed chicken is to use fresh, high-quality ingredients. I always choose ripe cherry tomatoes for their sweetness and vibrant flavor. Fresh mozzarella adds a creamy texture that melts beautifully. You want your chicken breasts to be boneless and skinless. This makes them easy to stuff and cook evenly. For flavor, fresh basil is a must. It gives that classic Caprese taste. Garlic adds a nice kick. Balsamic glaze brings a sweet tang that complements the cheese and tomatoes. To enhance the dish, I add dried oregano. This spice rounds out the flavors. When it comes to seasoning, don’t hold back on salt and pepper. They bring out the taste of the chicken. A drizzle of olive oil helps with cooking and adds richness. Gather these ingredients, and you’re ready to create a juicy and flavorful delight! {{ingredient_image_2}} - Preheat your oven to 375°F (190°C). This temperature is perfect for baking chicken. - In a medium bowl, mix the filling ingredients. Use 1 cup of diced mozzarella cheese, 1 cup of halved cherry tomatoes, 1/4 cup of finely chopped basil, and 2 minced garlic cloves. Add 1 tablespoon of balsamic glaze and 1 teaspoon of oregano. Sprinkle a pinch of salt and pepper. Stir until all flavors blend well. - Take each chicken breast and place it on a cutting board. Use a sharp knife to cut a pocket into the side of each breast. Be careful not to cut through completely. - Stuff each chicken breast pocket with the filling. Fill it well, but avoid overstuffing to prevent spillage during cooking. - Heat 1 tablespoon of olive oil in a large skillet over medium-high heat. Once the oil is hot, place the stuffed chicken in the skillet. Sear each side for 4-5 minutes until they have a nice golden crust. - After searing, transfer the skillet to the preheated oven. Bake for 20-25 minutes. Check that the chicken reaches an internal temperature of 165°F. - Once done, take the skillet out of the oven. Let the chicken rest for a few minutes. This step helps keep the juices inside. Just before serving, drizzle more balsamic glaze on top for extra flavor and a beautiful look. Choosing high-quality ingredients makes your dish shine. For mozzarella, select fresh, soft cheese. It melts well and adds creaminess. Look for mozzarella with a high moisture content. For tomatoes, go for ripe cherry tomatoes. Their sweetness enhances the flavor. Use bright, firm tomatoes for the best results. If possible, buy them at a local market for freshness. Fresh basil is a must. It gives the dish a fragrant, herbal note. Look for bright green leaves with no brown spots. Fresh basil adds that classic Caprese taste. Perfect searing is key to tasty chicken. Heat your skillet over medium-high heat. When the oil shimmers, it’s ready. Place the chicken in the skillet and don’t move it for a few minutes. This helps form a nice crust. To check chicken doneness, use a meat thermometer. Insert it into the thickest part of the chicken. When it reads 165°F, it’s safe to eat. If you don’t have a thermometer, cut into the chicken. The juices should run clear. Plating your dish well is vital for a great meal. Start by placing the stuffed chicken in the center of the plate. This makes it the star of the show. For garnishing, sprinkle fresh basil leaves around the plate. A drizzle of balsamic glaze adds a touch of elegance. This small detail makes the dish more appealing and tasty. Pro Tips Use Fresh Ingredients: Always opt for fresh mozzarella and ripe cherry tomatoes for the best flavor and texture in your Caprese stuffed chicken. Perfectly Seasoned Chicken: Don’t forget to season the exterior of the chicken well to enhance the overall taste; a simple mix of salt and pepper can make a big difference. Let It Rest: Allow the chicken to rest for a few minutes after baking; this helps the juices redistribute, keeping the chicken moist and flavorful. Experiment with Herbs: Feel free to add other herbs like thyme or rosemary to the stuffing for a unique twist on the classic Caprese flavor profile. {{image_4}} You can change the cheese in this dish. Swap mozzarella for provolone or goat cheese. Both will add a unique taste. You can also add spinach or artichokes for a fresh twist. Spinach gives a nice green color and adds nutrients. Artichokes add a lovely earthy flavor. To amp up the flavor, try adding pesto or sun-dried tomatoes. Pesto gives a rich, herby kick. Sun-dried tomatoes add a sweet and tangy touch. You can also use different herbs. Try thyme or rosemary for a twist. A pinch of red pepper flakes can add heat if you like spice. You can grill the stuffed chicken for a smoky flavor. Just preheat your grill and cook it for about 6-7 minutes per side. This method keeps the chicken juicy and adds grill marks. Another fun option is the air fryer. It cooks the chicken quickly and makes the outside crispy. Set it to 375°F and cook for about 15-20 minutes. Both methods give you tasty results! To keep your Caprese stuffed chicken tasty, refrigerate it right away. Place the chicken in an airtight container. This helps keep it fresh. You can store leftovers for up to three days. If you want to enjoy them later, freezing is a great option. To freeze cooked chicken, let it cool completely. Wrap each piece tightly in plastic wrap. Then, place them in a freezer bag. Remove as much air as possible. This helps prevent freezer burn. You can freeze stuffed chicken for up to three months. When you're ready to eat, thaw it in the fridge overnight. To reheat, place it in the oven at 350°F (175°C) until warm. This keeps the chicken juicy and delicious. For meal prep, you can prepare the chicken ahead of time. Stuff and season the chicken, then store it in the fridge. Use it within two days for the best taste. You can also use prepped chicken in salads, pasta, or sandwiches. This adds flavor and protein to your meals. Enjoy the versatility of Caprese stuffed chicken! How do I know when chicken is fully cooked? The best way to check is with a meat thermometer. Insert it into the thickest part of the chicken. It should read 165°F (75°C). If you don’t have a thermometer, cut into the chicken. The juices should run clear, not pink. Can I make this recipe ahead of time? Yes, you can! Prepare the chicken and stuff it a day before. Just keep it covered in the fridge. When ready to cook, let it sit at room temperature for about 30 minutes. This helps it cook evenly. Is Caprese Stuffed Chicken suitable for meal prep? Absolutely! This dish stores well in the fridge. You can easily pack it for lunch or dinner. Just divide it into meal prep containers. It tastes great even after a few days. Can I make it gluten-free? Yes, this recipe is naturally gluten-free. All the ingredients are safe for a gluten-free diet. Just ensure any added sauces or condiments are also gluten-free. What to do if the chicken is dry? If the chicken turns out dry, it might be overcooked. Always check the temperature early. To fix dry chicken, you can add a sauce or broth when serving. This adds moisture and flavor. How to adjust for different oven types? Ovens can vary in heat. If your oven runs hot, reduce the temperature by 25°F (about 15°C). If it runs cool, increase the cooking time. Always check the chicken's internal temperature to ensure it’s safe to eat. In this blog post, we explored how to make Caprese Stuffed Chicken. We covered main ingredients like chicken, mozzarella, and tomatoes. You learned about flavor enhancers like garlic and basil. Step-by-step, I guided you through preparation and cooking. We also discussed tips for ingredient selection and creative variations. Final thoughts: This dish is simple yet delicious. It's perfect for any occasion. Enjoy trying it out and making it your own!

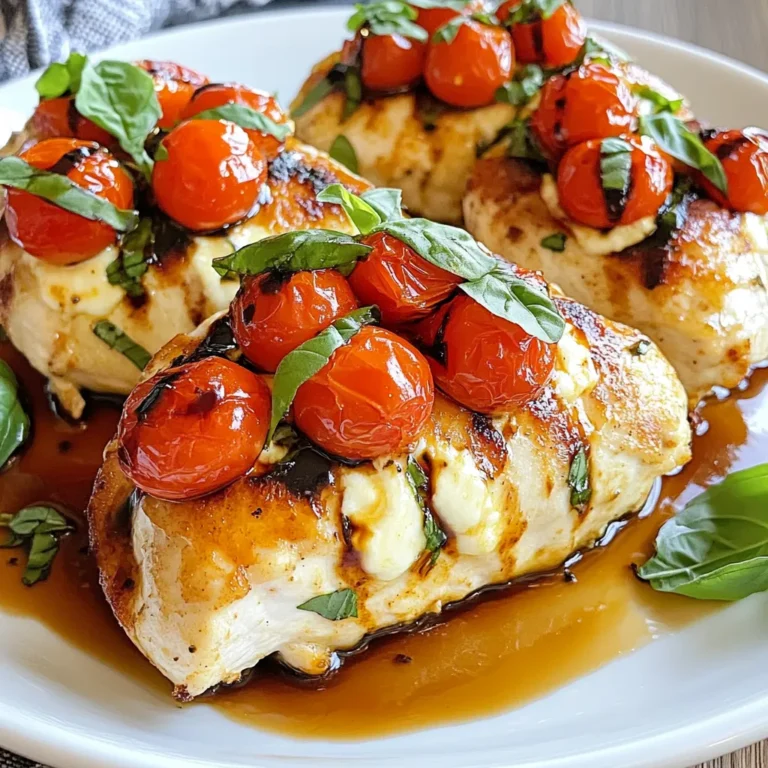
Caprese Stuffed Chicken Juicy and Flavorful Delight

- 2 boneless, skinless chicken breasts - 2 tablespoons Cajun seasoning - 4 large whole wheat tortillas - 1 cup romaine lettuce, chopped - 1/2 cup grated Parmesan cheese - 1/3 cup Caesar dressing - Sliced tomatoes - Creamy avocado - Salt and pepper When you gather your ingredients, you create the base for your meal. The chicken breasts serve as the heart of this dish. Cajun seasoning adds the necessary spice. Whole wheat tortillas provide a healthy wrap for everything. Next, romaine lettuce brings crunch and freshness. Grated Parmesan cheese gives a rich, creamy taste. Caesar dressing binds these flavors together, making each bite enjoyable. Feel free to customize your wrap. Adding sliced tomatoes or creamy avocado can enhance the flavor. A pinch of salt and pepper can elevate the taste even more. Getting creative with your ingredients makes cooking fun and personal. {{ingredient_image_2}} To start, mix the Cajun seasoning and olive oil in a bowl. Whisk them together until smooth. This marinade gives the chicken its bold flavor. Next, coat each chicken breast with the marinade. Make sure to cover every part. Let them sit for about 15 minutes. This time helps the spices soak in. Now, preheat your grill or stovetop grill pan. Heat it over medium-high heat. Once it’s hot, place the marinated chicken on the grill. Cook for 6-7 minutes on each side. The chicken should reach 165°F (75°C). You want it to have a nice char. Once cooked, take the chicken off the grill. Let it rest for a few minutes. This helps keep the juices inside. After resting, slice the chicken into thin strips. In a large bowl, combine the chopped romaine lettuce, sliced chicken, and grated Parmesan cheese. You want a good mix of flavors. Then, pour in the Caesar dressing. Toss everything gently. Make sure all the ingredients are well-coated. The dressing adds creaminess and flavor. Now it’s time to assemble your wraps. Take a large whole wheat tortilla. In the center, lay a generous portion of the chicken Caesar mixture. If you want, add slices of fresh tomatoes and creamy avocado on top. To roll the wrap, fold the sides inward first. Then, roll from one end to the other. This keeps all the fillings secure and makes it easy to eat. Serve your wraps right away for the best taste. If you need to, wrap them in foil. This makes them great for meals on the go. Enjoy! To ensure your chicken is cooked properly, use a meat thermometer. Your chicken should reach 165°F (75°C) to be safe. This will keep your wraps juicy. When grilling, avoid moving the chicken too much. Let it sit on the grill for even cooking and nice grill marks. Use a marinade of Cajun seasoning and olive oil to enhance flavor. Let the chicken soak in the marinade for at least 15 minutes. For serving, slice each wrap diagonally. This makes them look nice and easy to eat. Arrange the wraps on a large platter. Garnish with more chopped romaine and a sprinkle of Parmesan cheese. This adds color and texture to your dish. You can also add sliced tomatoes and creamy avocado for extra freshness. To store leftovers, wrap them tightly in foil or plastic wrap. Keep them in the fridge for up to three days. When you want to reheat, use the oven or a pan. This helps keep the wraps from getting soggy. Avoid using the microwave if you can. It can make the wraps mushy. Pro Tips Marinating Time: Allow the chicken to marinate for at least 15 minutes, or even up to an hour, for maximum flavor absorption. Grill Temperature: Ensure your grill is preheated properly to achieve a nice sear and prevent sticking. Ingredient Freshness: Use fresh romaine lettuce and ripe tomatoes for the best texture and flavor in your wraps. Wrap Storage: If preparing in advance, wrap the tortillas tightly in foil to maintain freshness and prevent sogginess. {{image_4}} You can swap out chicken for shrimp or tofu. Shrimp adds a sweet, juicy bite. Just season it with Cajun spice and grill until pink. Tofu is a great plant-based choice. Press it, then slice, marinate, and grill to get those flavors in. You can make your own Caesar dressing at home. Use Greek yogurt, garlic, lemon juice, and a dash of Worcestershire sauce. This mix is creamy and tangy! If you like other flavors, try ranch or a zesty vinaigrette. Each dressing gives a fun twist to the wraps. Feel free to turn your wrap into a salad. Just chop the wraps and toss everything in a bowl. This lets you enjoy all the flavors without the tortilla. You can also serve the wraps as a platter. Pair them with dips like hummus or salsa for an extra kick. You can store your wraps in the fridge for about 3 days. Keep them in an airtight container to stay fresh. If you use foil, wrap them tightly to avoid dryness. To freeze your wraps, wrap them in plastic wrap. Then, place them in a freezer bag for extra protection. They can last up to 2 months in the freezer. When you're ready to eat, take them out and thaw overnight in the fridge. Reheat your wraps in a skillet over low heat. This keeps them warm without making them soggy. Avoid using a microwave as it can make the wraps wet. Check them often to ensure they heat through but stay crisp. A Cajun Chicken Caesar Wrap is a tasty dish that combines grilled chicken, bold spices, and crisp lettuce. You start with seasoned chicken, grilled to perfection. Then, you add the chicken to a soft tortilla with fresh romaine, Parmesan cheese, and Caesar dressing. This wrap is full of flavor and easy to eat. It’s a perfect meal for lunch or dinner. Yes, you can make this recipe ahead of time. Here are some planning tips: - Grill the chicken earlier and store it in the fridge. - Prepare the salad mixture and keep it separate. - Wraps can be assembled just before serving for fresh taste. - If you want to save time, slice the chicken and store it in an airtight container. Yes, you can easily make this recipe gluten-free. Here are some substitutes: - Use gluten-free tortillas instead of whole wheat. - Check the Caesar dressing for gluten-free options. - Make sure that the Cajun seasoning is gluten-free as well. These swaps let everyone enjoy this great meal without gluten. This blog post covered how to make Cajun Chicken Caesar Wraps. We discussed main ingredients like chicken, seasoning, and tortillas. I provided step-by-step instructions for prepping, grilling, and assembling. You learned tips for cooking, storage, and presentations. Variations included using shrimp or tofu and trying different dressings. With these ideas, you can easily make wraps that taste great. Enjoy making these delicious meals at home!

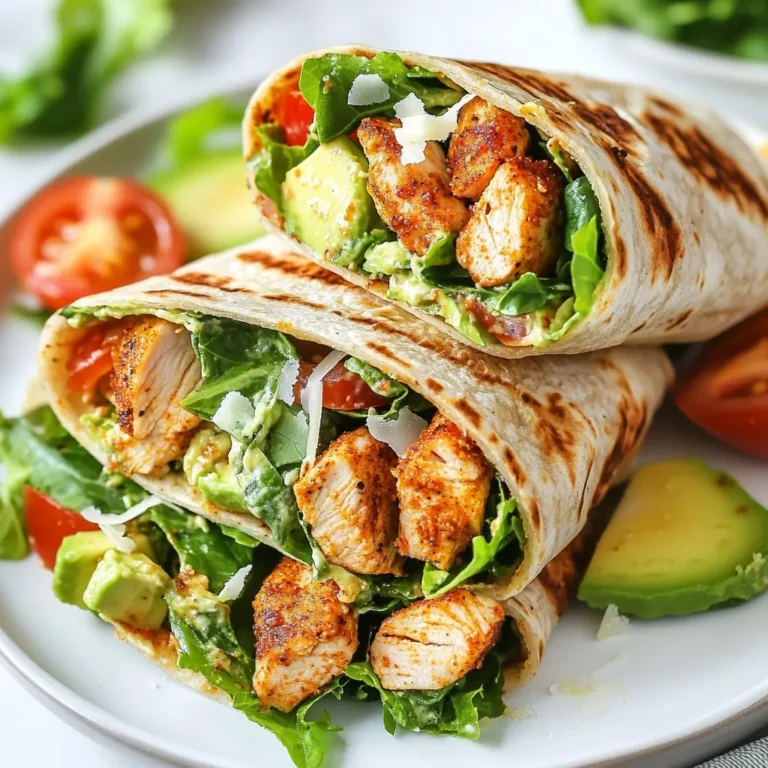
Cajun Chicken Caesar Wraps Flavorful and Easy Meal

To make balsamic glazed chicken, you will need the following ingredients: - 4 boneless, skinless chicken breasts - 1/2 cup balsamic vinegar - 1/4 cup honey - 2 cloves garlic, finely minced - 1 tablespoon Dijon mustard - Salt and freshly cracked black pepper, to taste - 1 tablespoon extra virgin olive oil - Handful of fresh basil leaves, for garnish - 1 cup cherry tomatoes, halved (optional) - 1 teaspoon fresh thyme leaves (optional) These ingredients create a sweet and tangy glaze. The chicken absorbs the rich flavors, making each bite delicious. The balsamic vinegar adds a unique taste that pairs well with honey and garlic. Using fresh basil and tomatoes can elevate the dish’s look and flavor. You can adjust the seasoning to suit your taste. Enjoy the creative process as you prepare this simple yet flavorful meal! {{ingredient_image_2}} Start by making the balsamic glaze. In a small bowl, whisk together: - 1/2 cup balsamic vinegar - 1/4 cup honey - 2 cloves garlic, finely minced - 1 tablespoon Dijon mustard - A pinch of salt and pepper Mix it well until everything blends smoothly. Set this aside for later. Next, heat a large skillet over medium-high heat. Add 1 tablespoon of extra virgin olive oil. While the oil heats, season 4 boneless, skinless chicken breasts with salt and freshly cracked black pepper on both sides. When the oil shimmers, place the chicken in the skillet. Cook for about 5-7 minutes on each side. The chicken should turn golden brown and reach an internal temperature of 165°F. Once the chicken is cooked, reduce the heat to medium. Pour the balsamic glaze over the chicken in the skillet. If you want, add 1 cup of halved cherry tomatoes and 1 teaspoon of fresh thyme. Gently stir to coat the chicken and tomatoes in the glaze. Let it simmer for about 5 minutes. This allows the glaze to thicken. Turn the chicken occasionally to coat it well. After simmering, remove the skillet from heat. Let the dish rest for a few minutes before serving. To get juicy chicken, start with even thickness. You can pound the chicken breasts to about 3/4 inch thick. This helps them cook evenly. Cook them over medium-high heat for 5-7 minutes on each side. Use a meat thermometer to check the internal temperature. It should reach 165°F or 75°C. This ensures your chicken is safe to eat and tender. For a rich glaze, let it simmer longer. Once you pour the balsamic glaze over the chicken, keep the heat on medium. Let it bubble gently for about 5 minutes. This helps the glaze thicken and cling to the chicken. If you want it thicker, whisk in a small amount of cornstarch mixed with water. This will give your glaze a nice, glossy finish. For a stunning plate, use a large white platter. Place the glazed chicken in the center. Scatter fresh basil leaves and halved cherry tomatoes around it. Drizzle any remaining glaze over the chicken. This makes the dish look vibrant and fresh. The colors will pop and impress your guests. Enjoy every bite! Pro Tips Marinate for More Flavor: For an extra burst of flavor, marinate the chicken breasts in the balsamic mixture for at least 30 minutes or up to overnight in the refrigerator before cooking. Use Fresh Ingredients: Fresh garlic and herbs will enhance the dish's overall taste. Whenever possible, opt for fresh basil and thyme instead of dried. Watch the Glaze: Keep an eye on the balsamic glaze as it thickens; it can go from perfect to burnt quickly. Stir occasionally to prevent sticking. Pair with Sides: This dish pairs wonderfully with a side of roasted vegetables or a light salad to balance the richness of the glaze. {{image_4}} You can swap chicken for other meats. Try using pork or turkey. Both cook well with the balsamic glaze. If you prefer fish, salmon is a great choice. Just adjust the cooking time to avoid overcooking. For a twist, use shrimp. They cook quickly and soak up the glaze nicely. Adding herbs can change the flavor profile. Fresh rosemary gives a woodsy taste. Oregano adds a nice Italian flair. You can also use smoked paprika for a hint of smokiness. If you like a little heat, consider adding crushed red pepper flakes. Each herb or spice brings its own unique taste. If you want a vegetarian dish, use portobello mushrooms. They have a meaty texture and absorb flavors well. Another option is to use tofu. Press it to remove moisture before cooking. This helps it soak up the balsamic glaze. For a heartier meal, try chickpeas. They add protein and texture. To keep your balsamic glazed chicken fresh, store it in a covered container. Place it in the fridge within two hours of cooking. This helps prevent bacteria growth. Enjoy the leftovers within three to four days for the best taste. If you want to keep it longer, freezing is a great option. You can freeze the chicken for up to three months. First, let it cool to room temperature. Then, wrap each piece in plastic wrap. Place the wrapped chicken in a freezer bag or airtight container. Remember to label the bag with the date. This way, you’ll know how long it has been frozen. When you’re ready to eat the leftovers, thaw the chicken in the fridge overnight. To reheat, you can use the oven or a skillet. If using the oven, preheat it to 350°F (175°C). Bake the chicken for about 20 minutes or until heated through. If using a skillet, heat it over medium-low. Add a splash of water or broth to keep it moist. Cook until warm, about 5-7 minutes. Enjoy your meal! Yes, you can use other vinegars. Apple cider vinegar or red wine vinegar work well. Each type gives a unique flavor. You might want to adjust the sweetness. Adding extra honey can balance stronger vinegars. Balsamic glazed chicken goes great with many sides. Here are some tasty options: - Roasted vegetables - Garlic mashed potatoes - Steamed green beans - Quinoa salad - Mixed greens with vinaigrette These sides add color and flavor to your meal. To check if chicken is done, use a meat thermometer. The chicken should reach 165°F (75°C) inside. If you don’t have a thermometer, cut into the thickest part. The juices should run clear, not pink. This means your chicken is safe to eat. This blog post covered how to make balsamic glazed chicken. We discussed key ingredients, detailed cooking steps, and tips for more flavor. You learned about variations and storage methods for leftovers. This dish is easy to make and customizable. With these tips, you can impress anyone at dinner. Enjoy your cooking, and don't hesitate to experiment with flavors!

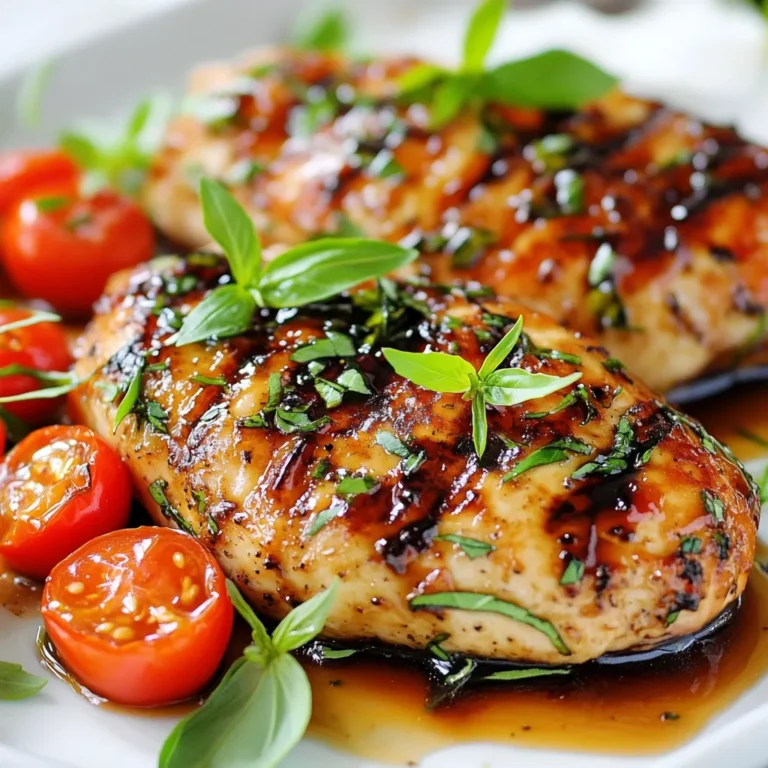
Balsamic Glazed Chicken Simple and Flavorful Dish

- Graham Cracker Crust: - 1 ½ cups graham cracker crumbs - ½ cup unsalted butter, melted - 2 tablespoons granulated sugar - Cheesecake Filling: - 16 oz cream cheese, softened to room temperature - 1 cup granulated sugar - 2 large eggs, at room temperature - 1 teaspoon vanilla extract - Flavor Enhancers: - Zest of 1 lemon - ½ cup fresh lemon juice (about 2-3 lemons) - Fresh Blueberries: - 1 cup fresh blueberries (or frozen, thoroughly thawed) - Thickening Agent: - 1 tablespoon cornstarch These ingredients create a perfect blend of tangy and sweet flavors. The graham cracker crust gives a crisp base, while the filling offers a creamy texture. The lemon zest and juice add bright notes, making this dessert stand out. Fresh blueberries give bursts of flavor in every bite. I love using fresh ingredients. They make a huge difference in taste. If you can, buy local blueberries when in season. Their flavor is unmatched. If you can’t find fresh ones, frozen will work too. Just remember to thaw them completely. Each of these ingredients plays a key role. The cream cheese provides richness. The sugar balances the tartness of the lemon. The eggs help set the filling for a perfect slice. Cornstarch helps keep the blueberries from sinking. Have fun gathering your ingredients. They are simple but come together to create something special. Enjoy the process, and get ready for a delicious treat! {{ingredient_image_2}} 1. First, set your oven to 350°F (175°C). 2. Line a 9x9 inch baking pan with parchment paper, letting some hang over the edges. 3. In a medium bowl, mix together the graham cracker crumbs, melted butter, and 2 tablespoons of sugar until they feel moist. 4. Press this mixture firmly into the bottom of your pan. Make it even. 5. Bake the crust for 10 minutes, then let it cool slightly. 1. In a large bowl, use an electric mixer to beat the cream cheese until it is smooth. 2. Slowly add 1 cup of sugar, mixing until it becomes fluffy and creamy. 3. Add the eggs one at a time, mixing well after each one. 4. Now, stir in the vanilla extract, lemon zest, and lemon juice until everything blends well. 1. In a small bowl, toss the blueberries with the cornstarch. This helps them stay put in the filling. 2. Gently fold the blueberries into the cheesecake mixture. Be careful not to over-mix. 3. Pour this mixture over the cooled graham cracker crust, spreading it evenly with a spatula. 4. Bake the bars for 25 to 30 minutes. The center should be set but still jiggle a bit. 5. Let the bars cool at room temperature for about an hour. Then chill them in the fridge for at least 3 to 4 hours. 6. Once set, lift the cheesecake out of the pan using the parchment paper. Cut it into squares or bars. To get the best texture in your bars, use room temperature ingredients. This makes mixing easy and smooth. Cold cream cheese can lead to lumps in your batter. So, take it out early. Let it sit on the counter for about 30 minutes before mixing. Also, avoid over-mixing your batter. Too much mixing adds air, which can create bubbles. These bubbles will pop during baking, leading to cracks. Mix just until combined and smooth. When it's time to serve, dust your bars with powdered sugar. This adds a nice touch and extra sweetness. You can also place lemon slices on the plate. They look pretty and add a zesty flair. For a delightful pairing, serve with whipped cream. The cream's rich texture balances the tangy lemon and sweet blueberries well. One big mistake is overbaking the bars. Keep an eye on them while they bake. You want them to be set but still slightly jiggly in the center. If they are too firm, they will dry out. Another common error is forgetting to chill them before serving. Chilling is crucial for the right texture. They need at least three hours in the fridge. Overnight is even better for the best flavor and firmness. Pro Tips Use Room Temperature Ingredients: Ensure that your cream cheese and eggs are at room temperature before mixing. This helps create a smoother, creamier batter without lumps. Prevent Sinking Blueberries: Toss the blueberries in cornstarch before folding them into the batter. This will help keep them suspended and prevent them from sinking to the bottom during baking. Watch Baking Time: Keep an eye on the cheesecake bars as they bake. They should be set around the edges but still slightly jiggly in the center for the perfect texture. Overbaking can lead to a dry cheesecake. Chill Overnight: For the best flavor and texture, allow the cheesecake bars to chill in the refrigerator overnight. This will enhance the flavors and help them set up nicely. {{image_4}} You can switch up the fruit in these bars. Raspberries or strawberries make great swaps. They add a new twist while keeping the sweet and tangy taste. You can even swap lemon for lime or orange. Each change gives a fresh flavor and brightens your dessert. If you need a gluten-free option, there are many choices. Look for gluten-free graham crackers. They taste great and work well in the crust. You can also make your own crust using ground nuts or oats. This way, you still enjoy the same tasty dessert without the gluten. Want to skip the oven? You can make a no-bake version. Mix cream cheese, sugar, and lemon juice until smooth. Fold in the blueberries gently. Spread this mixture over a crust made of crushed cookies or nuts. Chill it in the fridge until set. This method is quick and easy, giving you delicious bars without baking. To keep your Blueberry Lemon Cheesecake Bars fresh and tasty, store them in the refrigerator. Use an airtight container to prevent them from drying out. If you don’t have one, wrap the bars tightly in plastic wrap. This keeps them moist and flavorful. Make sure they are completely cool before you store them. For freezing, cut the cheesecake bars into squares. Wrap each square in plastic wrap. Then, place them in a freezer bag or container. Make sure to label them with the date. This way, you can easily find them later. These bars stay fresh for about five days in the fridge. If you freeze them, they can last for about three months. Be on the lookout for signs of spoilage. If you see any mold or if they smell off, it’s best to throw them out. Also, if the texture becomes grainy or watery, that’s a sign they have gone bad. Enjoy these yummy treats while they are fresh! Blueberry Lemon Cheesecake Bars last about 5 to 7 days in the fridge. Make sure to keep them covered to avoid drying out. If you see any changes in color or smell, it’s best to toss them. Yes, you can use frozen blueberries! Just make sure to thaw them first. Drain any extra liquid to keep the bars from becoming soggy. Frozen blueberries work well and are often more convenient. If you want a dairy-free version, try using cashew cream or a vegan cream cheese. Silken tofu can also work well. Blend until smooth to get a creamy texture. These options keep your bars tasty while being plant-based. This blog post covers all the steps to make Blueberry Lemon Cheesecake Bars. You learned about the simple ingredients needed, like graham crackers and cream cheese. I shared tips for perfecting the texture and avoiding common mistakes. You can also explore fun variations and best storage methods. In conclusion, these bars are tasty and easy to make. Experiment with flavors or try the no-bake option. Enjoy your time in the kitchen with this delicious treat!

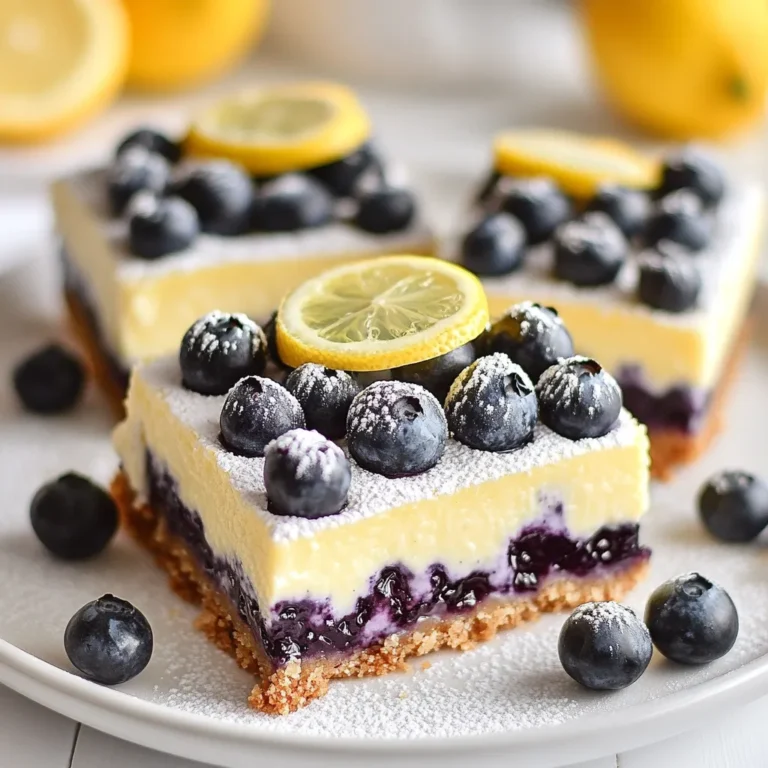
Blueberry Lemon Cheesecake Bars Tangy and Sweet Treat

- 2 cups cooked chicken, shredded - ½ cup basil pesto - 1 cup mozzarella cheese, shredded - ½ cup sun-dried tomatoes, chopped - 4 slices of sourdough bread - 2 tablespoons olive oil - Salt and pepper to taste This sandwich starts with cooked chicken. Use leftover chicken or rotisserie chicken for easy prep. The basil pesto adds a burst of flavor. It pairs well with the sun-dried tomatoes, giving a sweet and tangy taste. Mozzarella cheese melts beautifully, creating a creamy texture. Sourdough bread gives the sandwich a nice crunch when toasted. - Salt - Pepper Seasoning is key. Add salt and pepper to your chicken mixture. This enhances the flavors and makes every bite tasty. Adjust the seasoning based on your taste. You can always add more, but you can’t take it out! - Fresh basil leaves Garnishes add a nice touch. Fresh basil leaves not only look pretty but also add aroma. Place them on top of your sandwich for a pop of green. You can also serve extra basil pesto on the side for dipping. This will take your sandwich to the next level! {{ingredient_image_2}} To start, gather your ingredients. In a medium bowl, mix together 2 cups of cooked, shredded chicken and ½ cup of basil pesto. The pesto adds rich flavor. Then, chop up ½ cup of sun-dried tomatoes and add them to the bowl. Next, include half of your 1 cup of shredded mozzarella cheese. Mix well until everything combines nicely. Season with salt and pepper to fit your taste. Now, heat a non-stick skillet over medium heat. Add 1 tablespoon of olive oil to the pan. Let it coat the bottom evenly. Take 2 slices of sourdough bread and place them in the skillet. Toast them gently in the oil. This step gives the bread a nice crunch and flavor. Once the bread is toasted, spoon the chicken and pesto mixture onto each slice. Spread it out well. Then, sprinkle the remaining mozzarella cheese on top of the mixture. Take the other 2 slices of sourdough bread and place them on top to complete the sandwich. Drizzle the tops with the leftover olive oil to help with browning. Cook the sandwiches for about 3-4 minutes on one side until golden brown. Flip them gently and cook for another 3-4 minutes on the other side, so the cheese melts inside. After cooking, let the sandwiches rest for a minute. This step helps the cheese settle. Lastly, garnish with fresh basil leaves and enjoy your warm, tasty sandwiches! Toasting bread is key for a great sandwich. I like to use sourdough for its flavor. Heat your skillet on medium heat. Add olive oil to coat the pan. This helps the bread brown evenly. Place your bread in the skillet and let it toast for 3-4 minutes. Keep an eye on it to avoid burning. Flip the bread when it looks golden. Perfectly toasted bread makes every bite better. Melted cheese adds a rich taste. I recommend using mozzarella for this sandwich. To ensure it melts well, use shredded cheese. Place it on top of the chicken mixture before closing the sandwich. The heat from the skillet will help it melt. Cook the sandwich for 3-4 minutes on each side. This will give you a gooey, cheesy center that everyone loves. You can easily change the flavors in this sandwich. Try adding some garlic powder or crushed red pepper for a kick. Fresh herbs like thyme or oregano can also add depth. If you want it sweeter, add roasted red peppers. Mixing and matching these ingredients can make each sandwich unique. Don’t be afraid to get creative! Pro Tips Use Fresh Pesto: For the best flavor, use homemade or high-quality store-bought basil pesto. Fresh ingredients make a significant difference in the taste of your sandwich. Toast the Bread: Ensure the bread is well-toasted for a satisfying crunch. You can also use a grill pan for added grill marks and flavor. Experiment with Cheeses: While mozzarella is classic, feel free to mix in other cheeses like provolone or fontina for a unique twist on flavor and texture. Add Greens: For a fresh touch, consider adding arugula or spinach to your sandwich before closing it. This adds a nice peppery flavor and extra nutrients. {{image_4}} You can change the chicken in this recipe. Try shredded turkey for a leaner option. Pulled pork adds a smoky flavor that pairs well with pesto. For a twist, use grilled shrimp. These proteins keep the sandwich juicy and tasty. While mozzarella is great, other cheeses can shine too. Provolone gives a rich, smooth taste. Cheddar adds a sharp bite that many enjoy. For a creamier option, try fontina. Mixing cheeses can create a fun flavor experience. To make this sandwich vegetarian, swap chicken for roasted veggies. Zucchini, bell peppers, and eggplant work well. For a creamy touch, add a spread like hummus. To make it vegan, use a dairy-free cheese and a vegan pesto. This way, everyone can enjoy a delicious meal! After making your Basil Pesto Chicken Sandwich Melt, let it cool down. Wrap each sandwich tightly in plastic wrap or foil. Place them in an airtight container. This keeps them fresh and tasty for later. Store them in the fridge. They can last for up to three days. To reheat the sandwich, use a skillet for the best results. Heat the skillet over medium heat. Add a little olive oil to prevent sticking. Place the sandwich in the skillet. Cook for about 3-4 minutes on each side. This warms it and keeps it crispy. You can also use an oven. Preheat it to 350°F (175°C) and bake for about 10 minutes. If you want to freeze the sandwiches, wrap them well in plastic wrap first. Then, place them in a freezer bag. They can stay in the freezer for up to a month. To enjoy, thaw in the fridge overnight. Then, follow the reheating instructions to warm them up. This way, you have a quick meal ready whenever you want! Yes, you can use store-bought pesto. It saves time and still tastes great. Look for fresh or high-quality options. Many brands offer good flavors. If you want a unique twist, try mixing different store-bought pestos. You can find basil, sun-dried tomato, or even arugula pesto. Each adds a fun twist to your sandwich. This sandwich pairs well with simple sides. Consider serving it with a fresh salad. A mixed green salad or a tomato salad works well. You could also serve it with crispy potato chips. They add a nice crunch. For a heartier meal, try a side of soup. Tomato soup or minestrone complements the flavors nicely. You can prepare the chicken and pesto mix ahead. Store it in the fridge for up to two days. When ready to cook, assemble the sandwich. Toast the bread just before serving. This keeps the bread crispy and the cheese melty. You can also wrap the whole sandwich tightly. Store it in the fridge for a quick meal later. Just remember to reheat it well! In summary, this post detailed how to create a Basil Pesto Chicken Sandwich Melt. We covered ingredients, steps, tips, and variations. You can use different proteins and cheeses to make it your own. Always store leftovers properly and reheat them well. Enjoy trying this simple yet tasty recipe. Your culinary skills will shine, and you'll impress friends and family!

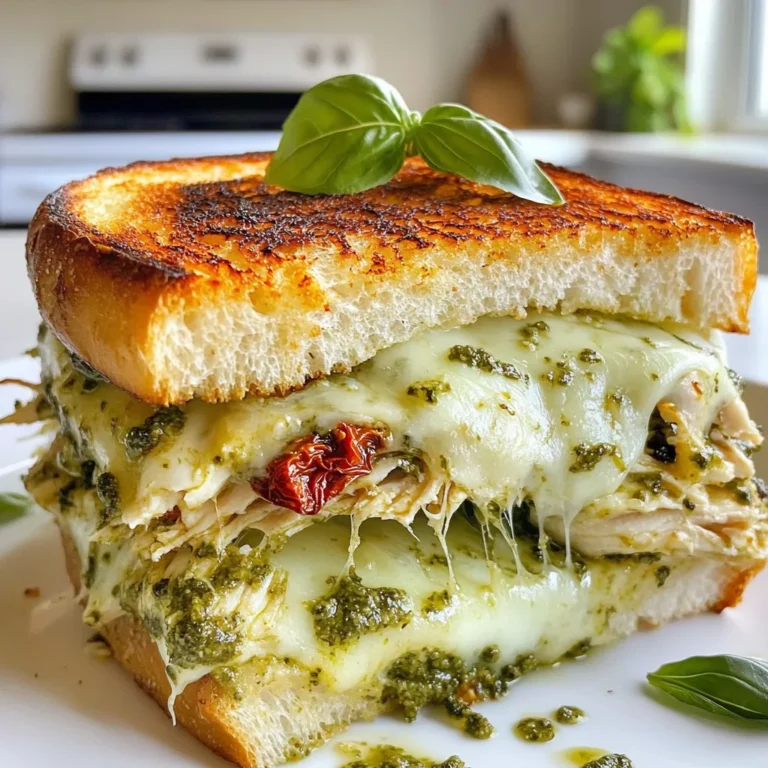
Basil Pesto Chicken Sandwich Melt Flavorful Delight

To make Coconut Mango Overnight Oats, you will need a few key ingredients. Here’s the list: - 1 cup rolled oats - 1 cup coconut milk (canned for creaminess or carton for lightness) - 1 ripe mango, diced into small cubes - 1 tablespoon chia seeds - 1 tablespoon maple syrup (adjust for sweetness) - 1/2 teaspoon vanilla extract - A pinch of salt - Garnishes: unsweetened shredded coconut and fresh mint leaves These ingredients come together to create a tasty and nutritious dish. The rolled oats provide fiber, while the coconut milk adds creaminess. The ripe mango gives a fresh and sweet flavor. Chia seeds help with texture, and maple syrup adds just the right amount of sweetness. The vanilla extract and salt enhance all the flavors, making this dish delightful. Don’t forget the garnishes! Shredded coconut and mint leaves not only make your oats look pretty but also add an extra burst of flavor. Enjoy this easy, healthy breakfast that you can prepare ahead of time. {{ingredient_image_2}} Start by taking a medium bowl. Add 1 cup of rolled oats, 1 tablespoon of chia seeds, and a pinch of salt. Then, pour in 1 tablespoon of maple syrup. Mix these dry items well. This step blends the flavors together. Now, slowly add 1 cup of coconut milk to the dry mix. You can choose canned coconut milk for creaminess or carton milk for a lighter taste. Also, add 1/2 teaspoon of vanilla extract. Stir until everything is well combined. The oats should be coated nicely. Next, fold in half of the diced mango pieces gently. Keep the other half for later. Spoon the mixture into jars or a large container. Seal them tightly and place them in the fridge. Let the oats soak overnight. This makes the oats creamy and delicious. In the morning, stir well. If it's too thick, splash in a bit more coconut milk. Top your oats with the reserved mango, shredded coconut, and fresh mint leaves. Enjoy your tasty breakfast! You can change the sweetness in your overnight oats. Start with one tablespoon of maple syrup. If you like it sweeter, add more syrup. Taste as you go! You can also use honey or agave syrup if you prefer. Each sweetener has a unique flavor, so choose what you like best. Creaminess matters for a great breakfast. Use full-fat coconut milk for a rich taste. If you want it lighter, choose carton coconut milk. Stir well after adding coconut milk to coat all the oats. If it seems too thick, just add a splash more milk before serving. This keeps it smooth and enjoyable. Store your oats in jars or a lidded container. Make sure they are sealed tightly. This keeps them fresh and tasty. Place them in the fridge for at least four hours or overnight. They stay good for up to five days. Just stir them well before you eat! Pro Tips Use Ripe Mangoes: Ensure your mangoes are perfectly ripe for the best flavor and sweetness. A ripe mango should give slightly when pressed and have a fragrant aroma. Adjust Coconut Milk: Depending on your preference for creaminess, you can choose full-fat canned coconut milk for a richer texture or carton coconut milk for a lighter option. Chill Time Matters: Allow the oats to sit overnight for optimal absorption of flavors and achieve a creamy consistency. If you're in a hurry, a minimum of 4 hours will still yield good results. Customizable Toppings: Experiment with various toppings such as nuts, seeds, or different fruits to personalize your overnight oats and enhance their nutritional value. {{image_4}} You can swap coconut milk with almond or oat milk. These options keep it creamy. Almond milk adds a nutty taste, while oat milk is smooth and mild. Both choices work great in this recipe. Feel free to mix in other fruits. Berries, bananas, or peaches all taste great. Dice them small like the mango. You can also add a fruit layer on top for more color and fun. Try different fruits each week for variety! This recipe is already vegan! Use maple syrup for sweetness. It’s a plant-based sweetener. If you want a richer taste, try agave nectar. Both options keep your oats tasty and healthy. To store leftover coconut mango overnight oats, use an airtight container. You can also use individual jars for easy access. Make sure the lids fit snugly. This keeps the oats fresh and prevents any odors from the fridge. Coconut mango overnight oats last up to five days in the fridge. The oats soak up the coconut milk over time. They may get thicker, so feel free to add a splash of coconut milk before enjoying. Always check for any changes in smell or color before eating. You can freeze leftover oats for up to three months. Portion them into freezer-safe containers or bags. When you're ready to eat, thaw them overnight in the fridge. You can heat them up in the microwave or on the stove. Just add a little coconut milk to bring back the creaminess. Yes, you can use quick oats. They will soak up the liquid faster. This will change the texture. Quick oats make the mix mushy. I prefer rolled oats for a chewier bite. Overnight oats stay fresh for up to five days in the fridge. Make sure they are in a sealed container. Check for any changes in smell or texture before eating. If they smell strange, toss them out. Yes, you can skip chia seeds if you want. They add a nice texture and some fiber. If you leave them out, your oats will still taste great. Just adjust the liquid if you want a thicker mix. Absolutely! Fresh mango adds a nice taste and texture. Just make sure it is ripe and sweet. Dice it into small pieces for easy mixing. You’ll get the best flavor this way. Yes, this recipe is already vegan-friendly. Use maple syrup for sweetness and coconut milk for creaminess. Both ingredients fit well in a vegan diet. Enjoy this tasty breakfast knowing it’s plant-based. Definitely! Nuts and seeds add crunch and healthy fats. You could add almonds, walnuts, or sunflower seeds. Just sprinkle a handful on top before serving. This will make your oats even more delicious. If you want sweeter oats, simply add more maple syrup. Start with a little and taste as you go. You can also use honey or agave syrup if you prefer. Just be careful not to overdo it! Yes, you can prepare them up to five days ahead. Just keep them in the fridge in sealed jars. This makes busy mornings easier and faster. Grab a jar, and you are ready to go! You now have a simple way to make delicious overnight oats. We discussed the best ingredients, like oats, coconut milk, and ripe mango. I shared easy steps to prepare and store your oats, plus tips for a creamy texture. You can also change the recipe to fit your taste or lifestyle. Remember to keep any leftovers safe and fresh. With this knowledge, enjoy your breakfasts more and explore new flavors. Make your mornings better one bowl at a time!

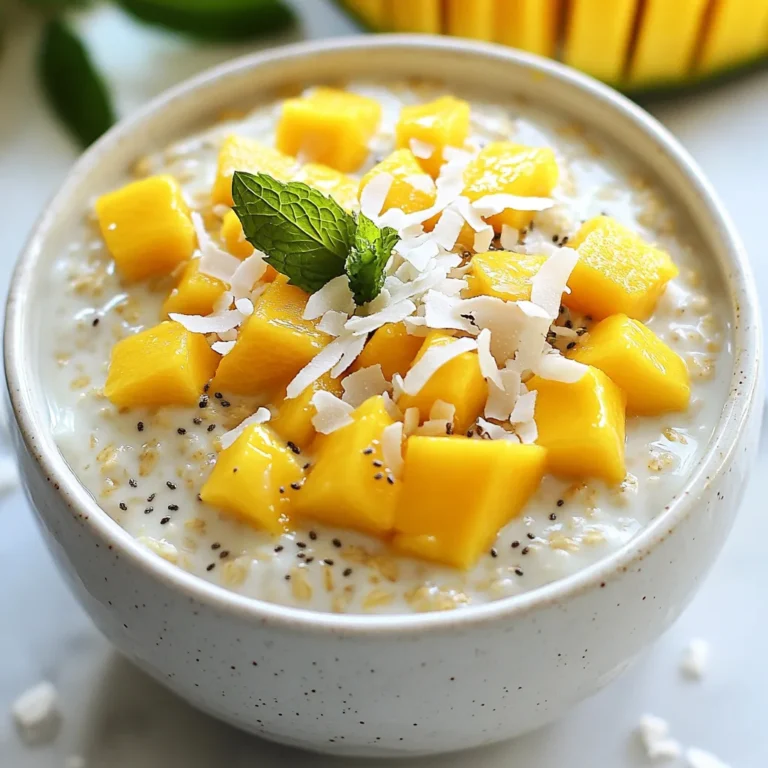
Coconut Mango Overnight Oats Quick and Tasty Recipe

PREV 1 … 17 18
sweet savory saga

explore

DessertsDinnerAppetizersDrinks

Our Policies

  • Cookie Policy
  • Copyright Policy
  • Disclaimer
  • GDPR Policy
  • Terms Of Use
Back to Top
  • About
  • Contact Us
  • Privacy Policy
© 2025 sweet savory saga