FREE DINNER EBOOK! Get your copy!
  • Cookie Policy
  • GDPR Policy
  • Disclaimer
  • Terms Of Use
  • Visit my other site: Fun Cookie Recipes
sweet savory saga
  • Home
  • Dinner
  • Desserts
  • Drinks
  • Appetizers
  • Contact
  • About
  • Privacy Policy
  • Home
  • Dinner
  • Desserts
  • Drinks
  • Appetizers
  • Contact
  • About
  • Privacy Policy
  • Cookie Policy
  • GDPR Policy
  • Disclaimer
  • Terms Of Use
Visit my other site: Fun Cookie Recipes

HOME / CATEGORIES /

Latest

To make your pumpkin spice latte cupcakes, gather these simple ingredients: - 1 ½ cups all-purpose flour - 1 teaspoon baking powder - ½ teaspoon baking soda - ½ teaspoon salt - 1 tablespoon pumpkin spice mix - ½ cup unsalted butter, softened to room temperature - 1 cup packed light brown sugar - 2 large eggs, at room temperature - 1 cup canned pumpkin puree (not pumpkin pie filling) - ½ cup freshly brewed coffee, cooled to room temperature - 1 teaspoon pure vanilla extract - ½ cup frosting of your choice (cream cheese or buttercream) for topping - Lightly whipped cream, for garnish - Additional pumpkin spice for a final sprinkle You can swap some ingredients if needed. Here are a few ideas: - For a dairy-free version, use coconut oil instead of butter. - Replace eggs with flaxseed meal mixed with water for a vegan option. - Use almond flour or coconut flour for a gluten-free treat. - If you prefer a sweeter cupcake, try adding more brown sugar or maple syrup. Fresh ingredients make a big difference in flavor. Using fresh spices, like pumpkin spice mix, gives your cupcakes a warm, rich taste. Fresh butter adds creaminess, while room temperature eggs help with mixing. Always check the expiration date on canned pumpkin. Using fresh coffee boosts the flavor, making these cupcakes taste just like your favorite pumpkin spice latte. First, set your oven to 350°F (175°C). This warm temperature helps the cupcakes rise nicely. Next, grab your muffin tin and line it with cupcake liners. This step makes cleanup easy and keeps the cupcakes from sticking. Take a medium bowl and whisk together the dry ingredients. You need 1 ½ cups of flour, 1 teaspoon of baking powder, ½ teaspoon of baking soda, ½ teaspoon of salt, and 1 tablespoon of pumpkin spice mix. Mixing these well ensures that the flavors blend evenly in your cupcakes. In a large bowl, beat ½ cup of softened unsalted butter and 1 cup of packed light brown sugar. Use an electric mixer for about 3-4 minutes. You want the mixture light and fluffy. This step adds air, making your cupcakes soft and tender. Add 2 large eggs one at a time to the butter-sugar mix. Make sure to mix well after each egg. Then, gently fold in 1 cup of pumpkin puree, ½ cup of cooled coffee, and 1 teaspoon of vanilla extract. This mix gives the cupcakes their moist texture and rich flavor. Now, it’s time to combine the wet and dry mixes. Slowly add the dry ingredients to the wet mixture. Use a spatula or wooden spoon to fold gently. Stop mixing as soon as you see no dry flour. Overmixing will make the cupcakes dense, not light. Fill each cupcake liner about two-thirds full with batter. This gives the cupcakes room to rise. Place the tin in your preheated oven. Bake for 18-20 minutes. To check if they’re done, insert a toothpick into the center. If it comes out clean or with a few crumbs, they’re ready! Let them cool in the tin for 5 minutes, then move them to a wire rack to cool completely. To get soft and fluffy cupcakes, focus on your mixing. Start by mixing the butter and sugar until it's light and fluffy. This step adds air, making your cupcakes rise well. Mix your eggs in one at a time. This helps to create a smooth batter. When adding the dry mix to the wet mix, fold gently. Overmixing can lead to dense cupcakes. Frosting is all about balance. Use a creamy frosting like cream cheese or buttercream. Spread it generously over the cooled cupcakes. For a fun touch, use a piping bag for a fancy look. Top with lightly whipped cream for extra flair. Finish with a sprinkle of pumpkin spice. It adds color and flavor, making your cupcakes even more inviting. One common mistake is using the wrong pumpkin product. Always use canned pumpkin puree, not pumpkin pie filling. It has added sugar and spices that can ruin your cupcakes. Another mistake is not cooling the cupcakes fully before frosting. Warm cupcakes will melt the frosting. Lastly, be careful not to overbake. Always check for doneness a few minutes early to keep them moist. {{image_4}} You can add some fun twists to your pumpkin spice latte cupcakes. Try mixing in cocoa powder for a chocolate version. Use ⅓ cup of cocoa powder with the dry mix. This will give your cupcakes a rich, chocolate flavor. If you love maple, replace the brown sugar with maple syrup. This swap adds a sweet, earthy taste. Frosting can change your cupcake game. For a fun twist, try a maple cream cheese frosting. Just mix cream cheese with maple syrup and a dash of vanilla. If you prefer something lighter, a whipped cream topping works great. Just whip heavy cream with a bit of sugar until soft peaks form. This adds air and a lovely texture. You can easily make these cupcakes gluten-free. Use a 1:1 gluten-free flour blend instead of regular flour. This allows everyone to enjoy the treat. For a vegan option, swap eggs for flax eggs. Mix 1 tablespoon of flaxseed meal with 2.5 tablespoons of water for each egg. Use almond milk instead of regular milk. These swaps keep the cupcakes moist and delicious. To keep your pumpkin spice latte cupcakes fresh, store them in an airtight container. This prevents air from drying them out. You can keep them at room temperature for up to three days. If you live in a warm place, the fridge is better. Just cover them well to avoid drying. You can freeze these cupcakes for later enjoyment. Start by letting them cool completely. Wrap each cupcake in plastic wrap tightly. Then, place them in a freezer-safe bag or container. They can stay frozen for up to three months. When you're ready to eat, thaw them overnight in the fridge. To keep your cupcakes fresh, avoid frosting them until you're ready to serve. Frosting can trap moisture and make them soggy. If you have frosted cupcakes, store them in a single layer. This keeps the frosting intact and prevents any mess. Adding a little extra pumpkin spice on top before serving gives a nice touch too! These cupcakes taste like pumpkin spice latte due to the blend of spices and coffee. I use pumpkin spice mix, which has cinnamon, nutmeg, and ginger. These spices give the cupcakes a warm, cozy flavor. I also add brewed coffee, which enhances the latte taste. The pumpkin puree adds moisture and a subtle sweetness. Together, these elements create a delicious autumn treat. No, I do not recommend using pumpkin pie filling. Pumpkin pie filling has added sugars and spices. This can change the flavor and texture of the cupcakes. Use canned pumpkin puree instead. It has a smooth texture and pure pumpkin flavor. This keeps the cupcakes light and fluffy. You can easily make these cupcakes ahead of time! Bake and cool them completely first. Once cool, store them in an airtight container. Keep them at room temperature for up to three days. For longer storage, you can freeze them. Wrap each cupcake in plastic wrap, then place them in a freezer bag. When ready to enjoy, thaw them at room temperature. You can find Pumpkin Spice Latte Cupcakes at many bakeries in the fall. Many coffee shops also sell these seasonal treats. If you want to make them at home, follow my recipe for the best results. Making them yourself lets you control the flavors and ingredients. If you prefer not to use coffee, you have a few options. You can replace it with milk or a milk alternative. For a stronger flavor, try using brewed chai tea. This adds a unique twist to the cupcakes while keeping them moist and delicious. We explored the key ingredients to make tasty cupcakes, discussed helpful steps, and shared tips for success. Remember, fresh ingredients shine in every bite. You can try fun flavor twists and easy substitutions to make your cupcakes special. Storing them correctly keeps them fresh longer. Enjoy these cupcakes as a treat for any occasion. With these ideas, you can bake delicious pumpkin spice latte cupcakes that everyone loves. Now, it's time to get baking!

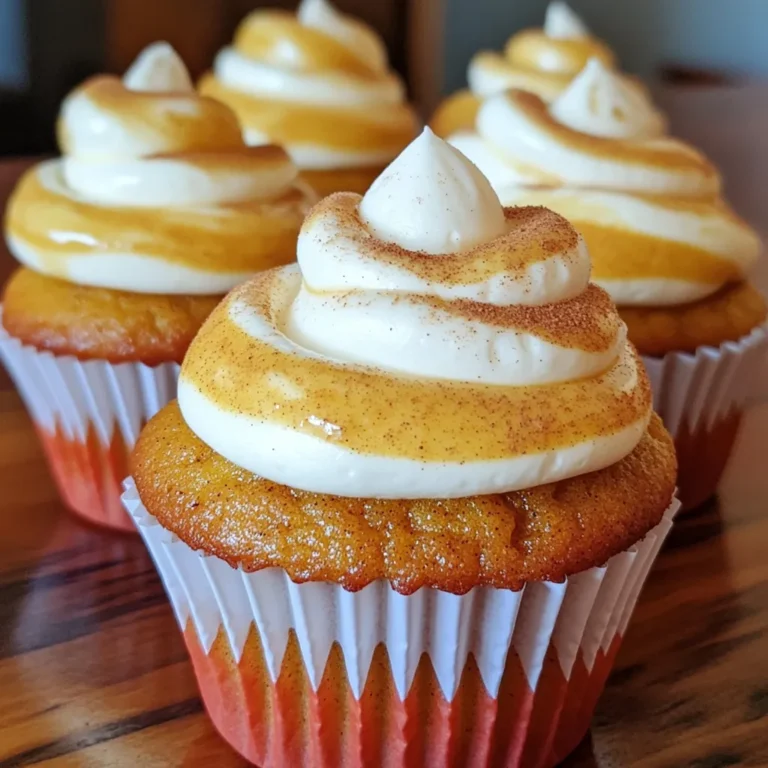
Pumpkin Spice Latte Cupcakes Irresistible Treat

- 12 oz cheese tortellini - 1 cup cherry tomatoes, halved - 1 cup fresh baby spinach - 1/2 cup mozzarella balls, halved - 1/4 cup pine nuts, toasted - 1/2 cup basil pesto - 1/4 cup sour cream - 2 tablespoons extra virgin olive oil - Salt and freshly cracked pepper to taste In this creamy pesto tortellini salad, the main ingredients shine through. First, cheese tortellini brings a rich and hearty base. I love using fresh, al dente tortellini, as it adds great texture. Then, I add cherry tomatoes for a burst of sweetness. Their vibrant color also makes the dish pop. Fresh baby spinach adds a lovely green touch, giving crunch and nutrients. For additional flavor, I include mozzarella balls. These little bites of cheese are soft and creamy. Toasted pine nuts bring a nutty crunch, enhancing the salad's texture. The star of the show is basil pesto. Its fresh, herbaceous flavor ties everything together beautifully. To dress the salad, I mix sour cream and extra virgin olive oil. This creates a creamy base that coats the tortellini well. I season it with salt and freshly cracked pepper for a balanced taste. Together, these ingredients make a quick and tasty dish that’s perfect for any occasion. First, boil water in a large pot. Add the cheese tortellini to the water. Cook them according to the package instructions until they are al dente. This usually takes about 3 to 5 minutes. Once cooked, drain the tortellini in a colander. Rinse them gently under cold water to stop the cooking. Let them cool completely before using. In a big mixing bowl, add the basil pesto, sour cream, and extra virgin olive oil. Use a whisk to blend these ingredients well. Mix until the sauce is smooth and creamy. The goal is to get a nice, thick consistency that will coat the tortellini perfectly. Now, carefully add the cooled tortellini to the bowl with the sauce. Gently toss the tortellini so that each piece is covered in the creamy pesto. Next, add in the halved cherry tomatoes, baby spinach, mozzarella balls, and toasted pine nuts. Stir the mixture gently to combine everything well without breaking the tortellini. Taste the salad and season it with salt and freshly cracked pepper. Make sure to mix the seasoning evenly throughout the dish. Once seasoned, cover the bowl with plastic wrap or a lid. Place the salad in the fridge for at least 30 minutes. This chilling time helps all the flavors come together. Before serving, give the salad a light toss and check the seasoning again. Adjust if needed. Enjoy! - To cook tortellini al dente, boil it according to the package guide. This keeps it firm and chewy. - Chilling the salad for 30 minutes is key. It allows the flavors to blend nicely. - You can choose any pesto you like. Try sun-dried tomato or spinach pesto for a twist. - Add grilled chicken or olives for extra taste and nutrition. These variations make the salad even better. - Serve the salad in pretty bowls or on colorful plates. This makes it look inviting and fun. - Garnish with fresh basil leaves and toasted pine nuts. They’ll add color and crunch to your dish. {{image_4}} If you need gluten-free options, look for gluten-free tortellini. Many brands make great pasta that holds up well. For a vegan twist, you can try chickpea or lentil pasta. This keeps the dish hearty and satisfying. You can also substitute the cheese tortellini with a plant-based version, available in many stores. Boost the salad by adding proteins like grilled chicken or shrimp. This makes it more filling. You can also mix in different vegetables, such as bell peppers or cucumbers. These add crunch and color, making your salad more fun. Fresh herbs like parsley or cilantro can also brighten the dish. While the creamy pesto dressing is delicious, you can switch it up. Try a light vinaigrette for a tangy flavor. A yogurt-based dressing adds creaminess with less fat. Experimenting with different dressings can keep this salad fresh and exciting every time you make it. To store leftover salad, place it in an airtight container. This keeps it fresh and tasty. You can also cover the bowl with plastic wrap. It helps prevent the salad from drying out. For the best taste, eat the salad within three days. I do not recommend freezing tortellini salad. Freezing can change the texture of the tortellini and fresh veggies. If you must freeze it, pack it in a freezer-safe bag. Remove as much air as possible. When you thaw it, do so in the fridge overnight. This will help keep it safe and tasty. Understanding how long ingredients last is key. Fresh veggies like spinach spoil faster than pasta. If the salad starts to smell sour or looks slimy, it’s time to toss it. Always check for mold or any off colors. If you see these signs, do not eat the salad. Creamy Pesto Tortellini Salad can last for about 3 to 5 days in the fridge. To keep it fresh, store it in an airtight container. This helps prevent it from absorbing other smells and flavors in your fridge. Yes, you can make this salad ahead of time. I often prepare it a day in advance. Just mix all the ingredients and chill it. This allows the flavors to blend well. Remember to taste and adjust the seasoning before serving. If you need a substitute for sour cream, several options work well. You can use Greek yogurt for a similar creaminess. Cottage cheese blended until smooth also works. If you want a dairy-free choice, try using cashew cream or a non-dairy yogurt. This Creamy Pesto Tortellini Salad brings together fresh ingredients and simple steps. We explored the main ingredients, tips, and variations to customize your dish. Making the salad is easy, and storage tips help keep it fresh. Remember, you can adapt this recipe to suit your taste. Use different veggies or proteins for fun twists. Enjoy your cooking, and dive into delicious flavors with this quick and tasty salad!

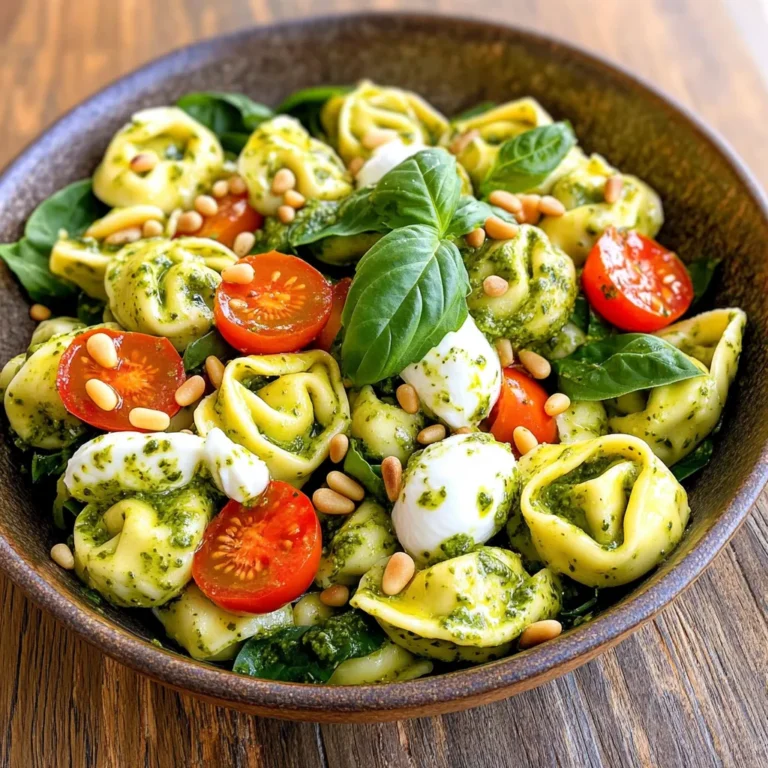
Creamy Pesto Tortellini Salad Quick and Tasty Recipe

To make this tasty dish, gather the following ingredients: - 1 pound gnocchi (store-bought or homemade) - 2 cups broccoli florets - 1 large red bell pepper, chopped into bite-sized pieces - 1 cup cherry tomatoes, halved - 4 cloves of fresh garlic, finely minced - ½ cup freshly grated Parmesan cheese - ¼ cup extra virgin olive oil - 1 teaspoon garlic powder - 1 teaspoon Italian seasoning blend - Salt and freshly cracked black pepper, to taste - Handful of fresh basil leaves, torn, for garnish You can switch out some ingredients based on what you have or prefer: - Gnocchi: Use any pasta shape if you can’t find gnocchi. - Broccoli: Cauliflower works well if you want a different taste. - Red bell pepper: Yellow or orange peppers can add a nice color. - Cherry tomatoes: You can use grape tomatoes or even diced regular tomatoes. - Parmesan: Try Pecorino Romano or nutritional yeast for a vegan option. - Olive oil: Avocado oil is a great alternative for roasting. When picking veggies, keep these tips in mind: - Look for bright colors; they show freshness and flavor. - Choose firm broccoli and peppers without soft spots or blemishes. - For tomatoes, pick ones that are plump and smell fragrant. - Don’t forget to check for freshness; avoid any wilted or yellowed leaves. - Buy seasonal vegetables for the best taste and price. First, preheat your oven to 425°F (220°C). A hot oven helps the gnocchi and veggies cook well. While the oven heats, gather your ingredients. You need gnocchi, broccoli, bell pepper, cherry tomatoes, garlic, Parmesan, olive oil, garlic powder, Italian seasoning, salt, and pepper. In a big bowl, mix the gnocchi, broccoli florets, chopped red bell pepper, and halved cherry tomatoes. Add the olive oil. Then, toss in the minced garlic, garlic powder, and Italian seasoning. Don’t forget the salt and pepper! Mix until everything is coated. This step adds flavor. Line a large baking sheet with parchment paper. Spread the gnocchi and veggie mix evenly on the sheet. Make sure everything lies flat. This helps them get crispy. Sprinkle the grated Parmesan cheese on top. Bake for 20-25 minutes. Toss the mix halfway through to ensure even browning. When done, let it cool for a few minutes. Finally, add torn basil leaves for a fresh touch. Enjoy your crispy sheet-pan delight! You can play with flavors here. Try adding a squeeze of lemon juice for a bright touch. A pinch of red pepper flakes can add heat. You might enjoy using smoked paprika for a unique twist. Fresh herbs like thyme or oregano also work well. Let your taste guide you to fun new flavors! To get crispy gnocchi, space them out on the baking sheet. Don’t crowd them or they may turn soft. Tossing them halfway through cooking helps too. This ensures even browning on all sides. Using a mix of oil and cheese also creates that golden crust. For this recipe, use a large mixing bowl for easy tossing. A baking sheet lined with parchment paper helps prevent sticking. A sturdy spatula is great for tossing and serving. If you have a garlic press, it makes mincing garlic fast. A good set of measuring cups ensures accuracy in your ingredients. {{image_4}} You can easily add protein to your sheet-pan meal. Try cooked chicken, shrimp, or sausage. These options pair well with the garlic and Parmesan flavors. For a plant-based choice, consider adding chickpeas or tofu. They soak up the seasonings and add great texture. Simply toss them in along with the gnocchi and veggies before baking. Feel free to mix up the veggies! Zucchini, bell peppers, or asparagus work well here. You can try adding carrots or cauliflower for extra crunch. Use whatever is in season or your favorite vegetables. Just cut them into similar sizes for even cooking. This way, all the flavors blend beautifully. To make this dish gluten-free, choose gluten-free gnocchi. Many brands offer tasty options that work perfectly. For a vegan twist, skip the Parmesan cheese or use a plant-based alternative. Nutritional yeast can add a cheesy flavor without dairy. Combine these swaps to create a delicious plant-based meal. You won’t miss the cheese! To keep your sheet-pan garlic Parmesan gnocchi and veggies fresh, let them cool first. After cooling, place leftovers in an airtight container. This helps maintain moisture and flavor. Store the container in the fridge for up to three days. For easiest access, label your container with the date. When you're ready to enjoy leftovers, preheat your oven to 350°F (175°C). Spread the gnocchi and veggies on a baking sheet. Heat for about 10-15 minutes until warm and slightly crispy. If you prefer the microwave, use a microwave-safe dish. Heat for 1-2 minutes, stirring halfway through. Be careful not to overheat, as this can make the gnocchi tough. You can freeze this dish too! For best results, freeze it within one day of cooking. First, let it cool completely, then portion it into freezer-safe bags. Remove as much air as possible before sealing. Label and date the bags. When ready to eat, thaw in the fridge overnight. Reheat in the oven for the best texture. Enjoy your delicious meal! Yes, you can make gnocchi from scratch! Start with potatoes. Boil them until soft. Then, mash them and mix with flour and egg. Knead the dough until smooth. Cut it into small pieces and shape them into little pillows. Cook them in boiling water until they float. Fresh gnocchi tastes amazing! To make this recipe vegan, swap out the Parmesan cheese for a vegan alternative. You can use nutritional yeast for a cheesy flavor. Also, check your gnocchi. Some brands include eggs, so choose a vegan version. Lastly, use extra olive oil for a rich taste. You can serve this dish with a crisp green salad. A simple mix of greens, cucumbers, and a light vinaigrette works well. You might also enjoy crusty bread to soak up flavors. For protein, grilled chicken or chickpeas are great choices. This blog post covered everything you need to know about making delicious sheet-pan gnocchi. We explored the complete ingredient list, substitutes, and tips for fresh veggies. The step-by-step instructions guide you in prepping, combining, and baking for a perfect crisp. Plus, I shared seasoning variations, texture tips, and must-have tools. Remember, you can customize this dish with different proteins and veggies. Store it right for later enjoyment. With these tips, you can create a tasty meal every time. Enjoy your cooking adventure!

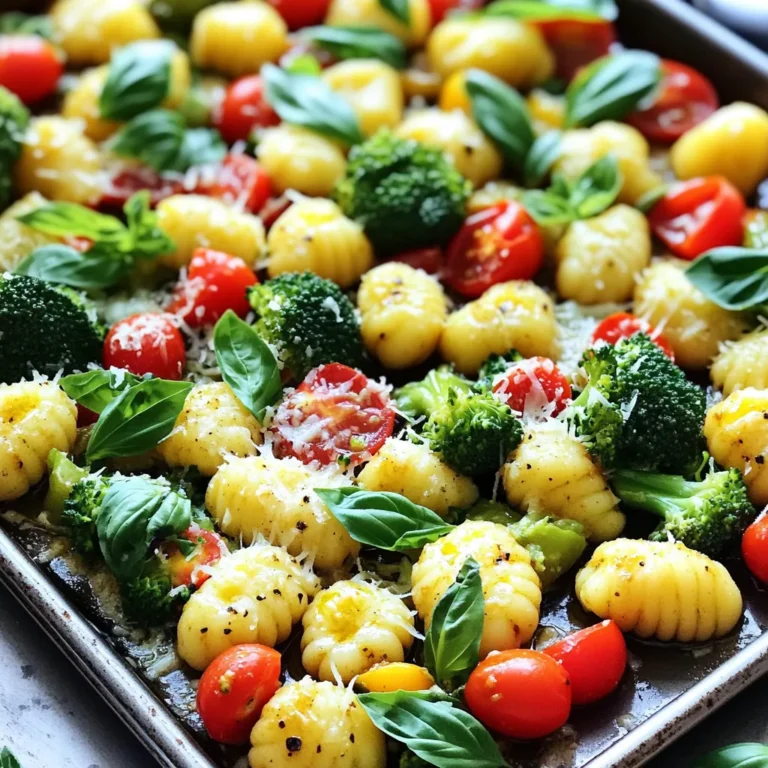
Sheet-Pan Garlic Parmesan Gnocchi & Veggies Delight

- 2 ripe avocados, sliced into wedges - 1 cup panko breadcrumbs - 1/2 cup all-purpose flour - 2 large eggs, beaten - 1 teaspoon garlic powder - 1 teaspoon smoked paprika - 1/2 teaspoon salt - 1/4 teaspoon freshly ground black pepper - Dipping sauces: sriracha mayo, lime aioli, yogurt dip - Garnishes: fresh cilantro, lime wedges To make these tasty avocado fries, you need ripe avocados. Look for ones that yield slightly when you press them. Panko breadcrumbs add a great crunch. All-purpose flour helps the batter stick, while eggs bind everything together. Seasoning is key. Garlic powder and smoked paprika give a nice flavor kick. Salt and pepper round it out. For serving, you can keep it simple or get fancy. Sriracha mayo adds a spicy touch, while lime aioli is fresh and zesty. A yogurt dip cools it down. Garnish with fresh cilantro and lime wedges for a bright finish. These ingredients combine to create a fun snack that is both crispy and creamy! To start, take your ripe avocados and cut them in half. Use a spoon or knife to remove the pit carefully. Make sure not to cut yourself! Next, scoop the flesh out gently to avoid bruising it. Slice each half into wedges, aiming for even pieces. This helps them cook evenly. Next, set up your breading station. Grab three shallow bowls. In the first bowl, add 1/2 cup of all-purpose flour. In the second, beat two large eggs. In the third bowl, mix 1 cup of panko breadcrumbs with 1 teaspoon of garlic powder, 1 teaspoon of smoked paprika, 1/2 teaspoon of salt, and 1/4 teaspoon of black pepper. Using three bowls keeps things organized and makes breading easy. Now it's time to coat the avocado wedges. Take one wedge and dredge it in the flour first. Shake off any extra flour. Next, dip it into the beaten eggs and let any extra egg drip off. Finally, coat the wedge with the seasoned breadcrumb mixture. Make sure it’s covered well. Place the coated wedge on a clean plate and repeat this for all the wedges. Before cooking, preheat your air fryer to 375°F (190°C). This should take about 5 minutes. Preheating is key. It helps the fries become crispy and golden brown. Lightly spray the air fryer basket with cooking spray. Arrange the breaded avocado wedges in a single layer. Don’t overcrowd them, as this can lead to soggy fries. Lightly spray the tops with cooking spray for extra crunch. Air fry the wedges for 8-10 minutes, flipping them halfway through. They should be golden brown when done. After air frying, let the crispy avocado fries cool for a few minutes. Arrange them on a serving platter. Serve with tasty dips like sriracha mayo or lime aioli. For a nice touch, add fresh cilantro leaves and lime wedges as garnishes. Enjoy your snack! To make your avocado fries super crispy, use cooking spray or olive oil spray. These sprays help crisp the outside without much added fat. If you have a different air fryer brand, check your model's settings. Some may cook faster or slower, so keep an eye on the fries. If your fries turn out soggy, check if they were overcrowded in the basket. Overcrowding keeps the hot air from moving freely. Try frying them in smaller batches next time. If your fries are burnt, lower the cooking time by a minute or two. Always flip them halfway through cooking for even browning. Want to kick up the flavor? Add spices like cayenne for heat or cumin for depth. You can also swap panko breadcrumbs for crushed cornflakes for a new texture. This change gives a great crunch while adding a hint of sweetness. Experiment and find what you love! {{image_4}} You can make a few simple swaps for a healthier snack. Try using gluten-free breadcrumbs. They provide the same crunch without gluten. This option works for anyone with gluten sensitivities. Another great choice is to replace eggs with vegan substitutes. You can use a mixture of flaxseed and water. This mix binds the coating well. You can also try unsweetened applesauce. Both options work well and keep the fries tasty. Want to spice things up? Add cayenne or chili powder to your breadcrumb mix. This twist gives your avocado fries a nice kick. Adjust the amount based on your heat level preference. You can also add cheese for a savory crust. Grated parmesan works well, or you can use nutritional yeast for a vegan choice. Both options add rich flavor and make the fries even more delicious. There are many fun ways to serve your avocado fries. Try adding them on top of a fresh salad. They add great taste and a fun crunch. You can also incorporate them into wraps or sandwiches. The creamy avocado pairs nicely with meats or veggies. This makes a quick and filling meal. Enjoy experimenting with these options to find your favorite way to serve avocado fries! To keep your crispy avocado fries fresh, store them in the fridge. Place them in an airtight container. This helps keep the fries crunchy. Make sure to let them cool before sealing the container. If you stack them, use parchment paper to separate layers. The best way to reheat your fries is in the air fryer. Set it to 350°F (175°C) and heat for about 5 minutes. This keeps them crispy. You can also use an oven. Preheat to 350°F and bake for 10-15 minutes. The microwave is not ideal as it can make them soggy. You can freeze both uncooked and cooked avocado fries. To freeze uncooked fries, place them in a single layer on a baking sheet. Once frozen, transfer them to a freezer bag. For cooked fries, let them cool and follow the same steps. When ready to use, thaw them in the fridge overnight. Cook uncooked fries straight from the freezer; just add a couple of extra minutes to the cooking time. Using unripe avocados is not ideal for this recipe. Unripe avocados are hard and lack the creamy texture we want. When you make avocado fries, the ripe ones give a smooth and rich taste. Ripe avocados are soft enough to slice and coat. They will crisp up nicely in the air fryer. Look for a golden-brown color on the outside. The fries should feel crispy and firm to the touch. You can also check the texture by gently squeezing one. If it feels soft inside and crispy outside, it’s done! They usually take about 8-10 minutes to cook. Yes, you can! Just swap out all-purpose flour with gluten-free flour. Use gluten-free breadcrumbs instead of panko. Both substitutes will keep the taste and texture yummy. This way, everyone can enjoy crispy avocado fries. Many sauces go great with avocado fries. Here are a few easy options: - Sriracha mayo: Mix mayo with sriracha for a spicy kick. - Lime aioli: Blend mayo, lime juice, and garlic for a fresh taste. - Cool yogurt dip: Mix yogurt with herbs and a squeeze of lemon. These sauces add flavor and fun to your snack! Avocado fries last about 2-3 days in the fridge. Store them in an airtight container to keep them fresh. If you notice any browning, that's normal but use them quickly for the best taste. Reheat them in the air fryer to bring back some crispiness! To make Air Fryer Crispy Avocado Fries, gather ripe avocados, panko breadcrumbs, flour, and eggs. Season with garlic, paprika, salt, and pepper. Follow the steps to slice, coat, and crisp them perfectly in the air fryer. Experiment with flavors, sauces, and storage methods for your fries. Enjoy crispiness, health, and fun ways to enjoy avocado. Making these fries can be a tasty adventure in your kitchen.

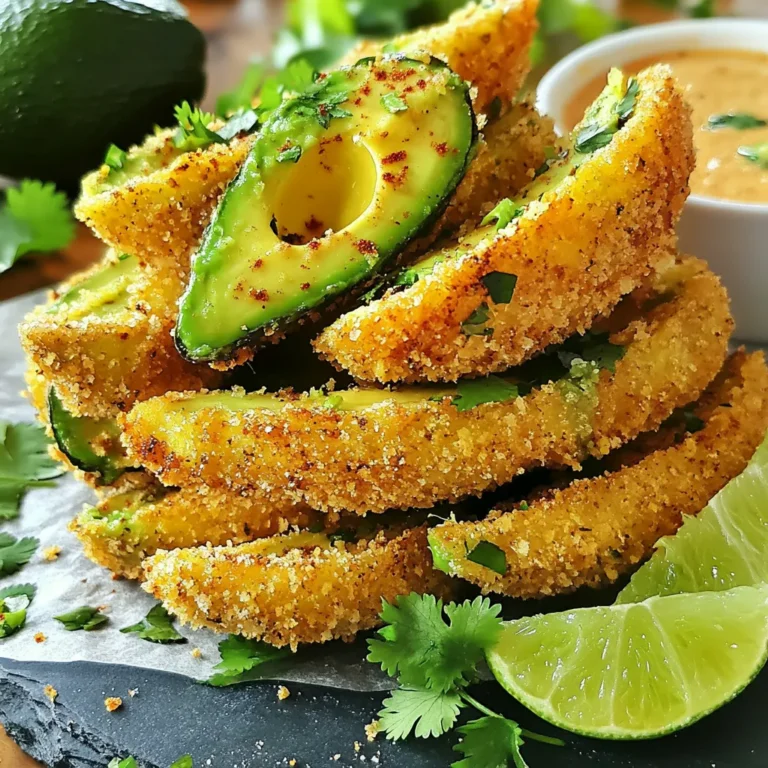
Air Fryer Crispy Avocado Fries Easy and Tasty Snack

- 1 pound rotini pasta: This fun pasta shape holds the creamy sauce well. - 2 cups cooked chicken (shredded): I like using rotisserie chicken for added flavor. - 1 can (15 oz) white beans: Great northern or cannellini work best. Rinse them well! - 1 can (4 oz) diced green chilies: These add a mild kick and depth. - 1 small onion, finely chopped: It brings sweetness when cooked. - 2 cloves garlic, minced: Garlic adds a strong flavor that makes the dish pop. - 4 cups low-sodium chicken broth: This is the base for the creamy sauce. - 1 cup heavy cream: It makes the dish rich and smooth. - 1 tablespoon olive oil: This helps sauté the onion and garlic. - 1 teaspoon ground cumin: Cumin gives a warm, earthy taste. - 1 teaspoon chili powder: It adds a slight heat and depth. - Freshly ground salt and pepper to taste: Adjust these to suit your liking. - 1 cup shredded Monterey Jack cheese: This cheese melts beautifully into the dish. - Fresh cilantro, chopped: Use it as a garnish for a fresh touch. These ingredients come together to create a comforting dish. Each one serves a purpose, adding to the flavor and texture. As you gather these items, think about how they will mix and meld together in your pot. Enjoy the process! {{ingredient_image_2}} To start, bring a large pot of salted water to a rolling boil. The salt adds flavor and helps the pasta cook evenly. Once boiling, add the 1 pound of rotini pasta. Cook it according to the package instructions until it’s al dente, which means it should be firm but not hard. This usually takes 8 to 10 minutes. After cooking, drain the pasta in a colander and set it aside. To achieve the perfect al dente texture, remember to taste the pasta a minute or two before the suggested cooking time. It should have a slight bite when you chew it. In the same pot, lower the heat to medium. Add 1 tablespoon of olive oil and let it warm until it shimmers. Next, toss in the finely chopped onion. Sauté the onion for about 3 to 4 minutes, stirring often, until it becomes translucent and fragrant. Then, add 2 cloves of minced garlic, along with 1 teaspoon of ground cumin and 1 teaspoon of chili powder. Stir continuously for about a minute. This step is key! It lets the spices bloom, which brings out their full flavor. Now, slowly pour in 4 cups of low-sodium chicken broth. Stir well and bring the mixture to a gentle simmer. Then, add 2 cups of shredded chicken, 1 can of drained white beans, and 1 can of diced green chilies. Mix everything together until well combined. After that, lower the heat to low. Introduce 1 cup of heavy cream to the pot, stirring gently until fully blended. Allow the dish to warm for about 3 to 4 minutes, but make sure it doesn’t boil. Carefully fold the cooked rotini into the creamy mixture. Stir until the pasta is evenly coated with the chili sauce. Taste and adjust the seasoning by adding salt and freshly ground pepper to your liking. Finally, remove the pot from heat. Mix in 1 cup of shredded Monterey Jack cheese. Stir until the cheese melts completely, creating a rich and creamy texture. Dish out your creamy chili mac into bowls. For a vibrant touch, garnish each serving with fresh chopped cilantro. Enjoy your creation! - Cooking pasta to perfection: Start with a large pot of salted water. Bring it to a rolling boil. Add your rotini pasta and cook until al dente. This usually takes 8-10 minutes. After cooking, drain it right away to stop the cooking process. This will keep your pasta firm and not mushy. - Ensuring cream doesn’t curdle: Add the heavy cream on low heat. Stir it gently into the pot. Be careful not to let it boil. Boiling can cause the cream to curdle. Keep the heat low and mix well until creamy. - Suggesting additional spices or ingredients: Want to kick it up a notch? Add more chili powder or a dash of cayenne for heat. You can also toss in some cumin seeds for a deeper flavor. Fresh lime juice can add a zesty touch too! - Optional garnishes for presentation: Serve your chili mac with fresh cilantro on top. You could also add a dollop of sour cream for creaminess. A sprinkle of extra cheese adds a nice touch too. For a burst of freshness, try lime wedges on the side. Pro Tips Use Rotisserie Chicken: For a quick and flavorful base, using rotisserie chicken saves time and enhances the dish's overall taste. Adjust Spice Level: Feel free to add more chili powder or a pinch of cayenne pepper if you prefer a spicier chili mac. Cheese Variations: Swap the Monterey Jack cheese for Pepper Jack or even cheddar for a different flavor profile. Garnish Creatively: Try adding diced avocado or a dollop of sour cream for extra creaminess and a fresh touch. {{image_4}} You can change the protein in this dish easily. Instead of chicken, try using turkey. Ground turkey works well and keeps the dish lean. If you want something different, use shredded beef or pork. You can even use tofu for a fun twist. Each swap adds a unique taste to your chili mac. To make a meatless version, skip the chicken entirely. Add more beans for protein. Black beans or pinto beans are great choices. You can also add some veggies, like bell peppers or zucchini. This keeps the dish filling and delicious. You won’t miss the meat at all! Explore different chili or bean styles to liven up your dish. You can use kidney beans for a bolder flavor. Try adding different types of chili peppers for heat. Chipotle peppers add a nice smokiness. For a creamier texture, mix in some cream cheese. Each variation gives you a new way to enjoy this tasty meal! To keep your white chicken chili mac fresh, choose an airtight container. Glass or plastic containers work well. Store in the fridge for up to three days. If you want to keep it longer, place it in the freezer. It can stay good for up to three months. Just remember to label your container with the date. To reheat your chili mac, use the stovetop for the best results. Pour it into a pot over low heat. Stir often to keep it creamy. If it seems too thick, add a splash of chicken broth or cream. You can also use the microwave. Heat in short bursts, stirring in between. This way, you keep the creamy goodness intact. Enjoy your meal warm! You can use several options if you need a substitute for heavy cream. Here are some great choices: - Coconut milk: This adds a nice creaminess and flavor. - Almond milk with cornstarch: Mix 1 cup of almond milk with 2 tablespoons of cornstarch. - Cashew cream: Blend soaked cashews with water until smooth for a rich alternative. - Greek yogurt: Use plain Greek yogurt for a thicker texture, but mix it with a bit of water. - Silken tofu: Blend silken tofu with a little water for a creamy base. These options work well for dairy-free diets and keep your dish creamy. Yes, you can make this dish ahead of time. Here’s how to do it: - Cook and cool: Make the chili mac, then let it cool completely. - Store: Place it in an airtight container in the fridge for up to 3 days. - Reheat: When ready to serve, reheat it on low heat. Add a splash of broth or cream to keep it creamy. Making it in advance can save you time and make dinner easier. If you want to add heat, here are some simple ways: - Add more chili powder: Increase the amount to your liking. - Use fresh jalapeños: Chop them up and stir them in for a fresh kick. - Hot sauce: Drizzle your favorite hot sauce on top just before serving. - Cayenne pepper: Sprinkle a little in while cooking for a strong heat. These tips let you customize the spice level to suit your taste. This article shared easy steps to cook a delicious pasta dish. We covered key ingredients, including pasta, beans, and spices. Then, I provided clear instructions for cooking, combining, and finishing your meal. You learned helpful tips for great results and ways to modify the recipe for your taste. Enjoy experimenting with flavors and variations! Keep practicing these techniques, and you'll create great meals every time. Happy cooking!

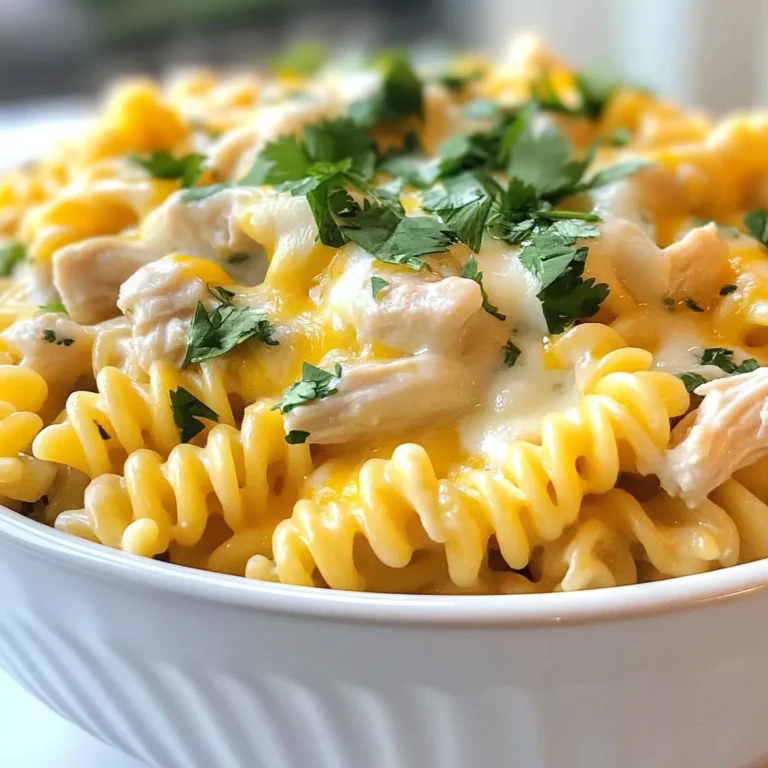
White Chicken Chili Mac Flavorful and Easy Recipe

To make this warm soup, gather these items: - 1 cup wild rice, thoroughly rinsed - 1 medium onion, finely diced - 2 medium carrots, peeled and diced - 2 celery stalks, diced - 3 cloves garlic, minced - 6 cups vegetable broth - 1 teaspoon dried thyme - 1 teaspoon dried rosemary - 1 cup heavy cream - 1 cup frozen peas - Salt and freshly ground black pepper to taste - 2 tablespoons olive oil - Fresh parsley, chopped for garnish If you need swaps, consider these options: - Use coconut cream instead of heavy cream for dairy-free soup. - Swap vegetable broth for chicken broth if you prefer a meaty taste. - Add quinoa or brown rice if wild rice is not available. - For a veggie boost, toss in diced potatoes or spinach. Choose the best ingredients with these tips: - Look for wild rice that is whole and free from cracks. - Pick onions that are firm with a papery skin. - Choose carrots and celery that are crisp and bright in color. - Garlic should feel firm and have a strong aroma. - For herbs, select fresh ones that are vibrant and fragrant. - When buying broth, check for low sodium options for better control over salt. To start, gather all your ingredients. You need wild rice, onion, carrots, celery, and garlic. Rinse the wild rice under cold water until the water runs clear. Dice the onion, carrots, and celery into small pieces. Mince the garlic for a strong flavor. In your slow cooker, mix the wild rice, diced onion, carrots, celery, and minced garlic together. Add dried thyme and rosemary for extra taste. Pour in the vegetable broth to cover everything well. Drizzle olive oil on top and add salt and pepper. Stir everything together until it is mixed well. Cover your slow cooker with the lid. Set it to cook on low for 6-7 hours or on high for 3-4 hours. Check to see if the wild rice is tender. It should soak up the broth’s flavor. This step is important to ensure your soup is creamy and rich. Once the rice is cooked, stir in heavy cream or coconut cream for a dairy-free version. Add the frozen peas to the pot and mix everything well. Let the soup cook on low for another 30 minutes. This step warms the cream and blends the flavors nicely. Before you serve, taste the soup. Adjust the salt and pepper if needed. Ladle the warm soup into bowls. Sprinkle freshly chopped parsley on top for a fresh look. Enjoy your comforting dish! When making this soup, avoid using non-rinsed wild rice. Rinsing removes excess starch. This keeps your soup from becoming too thick. Also, don’t skip the slow cooking time. The longer cook time lets the flavors blend well. Lastly, taste the soup before serving. You might need more salt or pepper. To boost the flavor, add herbs like fresh parsley or dill at the end. You can also use smoked paprika for a deeper flavor. If you want more richness, try adding a splash of white wine before cooking. This adds a lovely depth to the soup. For extra heartiness, sauté the veggies in olive oil before adding them to the slow cooker. A good slow cooker is key for this recipe. I recommend one with a timer to help you manage cook times. A sharp knife makes chopping vegetables quick and easy. Use a large spoon for stirring and serving. Finally, a ladle helps with portioning the soup into bowls. Having these tools makes the process smooth and enjoyable. {{image_4}} If you want a dairy-free soup, try using coconut cream instead of heavy cream. It adds a nice, rich flavor without dairy. You can find coconut cream in most grocery stores. Just be sure to stir it in at the end, just like you would with heavy cream. This simple swap keeps the soup creamy and delicious. Feel free to get creative with your soup! You can add chopped spinach, kale, or bell peppers. These give your soup more color and nutrition. If you want more protein, consider adding cooked chicken, turkey, or beans. Stir them in during the last hour of cooking so they stay tender. You can change the soup's flavor with different herbs and spices. For a warm, spicy kick, add a pinch of cayenne pepper. If you love a fresh taste, try adding lemon zest or fresh dill. A dash of soy sauce or a splash of Worcestershire sauce can add umami flavor. Adjust to your taste to make it your own! After enjoying your soup, let it cool first. Transfer the soup to an airtight container. Seal it tightly to keep it fresh. Store it in the fridge for up to five days. Make sure to label it with the date. This way, you know when to use it by. When you're ready to enjoy your leftovers, heat them gently. You can use a pot on the stove or the microwave. If using the stove, warm it over medium heat. Stir often until hot. If using the microwave, heat in short bursts. Stir in between to ensure even heating. You may want to add a splash of broth or water if the soup is too thick. For long-term storage, freezing is a great option. Let the soup cool completely before freezing. Pour it into freezer-safe containers or freezer bags. Leave some space at the top for expansion. Seal the bags tightly and label them with the date. You can freeze it for up to three months. When you're ready to eat, thaw it in the fridge overnight. Reheat as mentioned above for a cozy meal anytime. This soup lasts about 3 to 5 days in the fridge. Make sure to store it in an airtight container. Before eating, check for any signs of spoilage. If it smells off or looks strange, it's best to throw it away. Yes, you can use brown rice, but it changes the texture a bit. Brown rice takes longer to cook, so you may need to adjust the cooking time. It usually needs about 8 hours on low heat in the slow cooker. The flavor will also be different since wild rice has a nuttier taste. This soup goes great with many sides. Here are some ideas: - Warm, crusty bread - Simple green salad - Grilled cheese sandwiches - Roasted vegetables - Garlic bread Each of these sides brings something special to the meal and complements the soup nicely. Enjoy experimenting! In this post, we covered everything about making Slow Cooker Creamy Wild Rice Soup. You learned about key ingredients, with alternatives for various diets. I shared steps for cooking and tips for flavor. We discussed how to store leftovers and answered your common questions. Remember, small changes can boost this recipe. Keep experimenting to find new flavors. Enjoy making this soup and share it with friends!

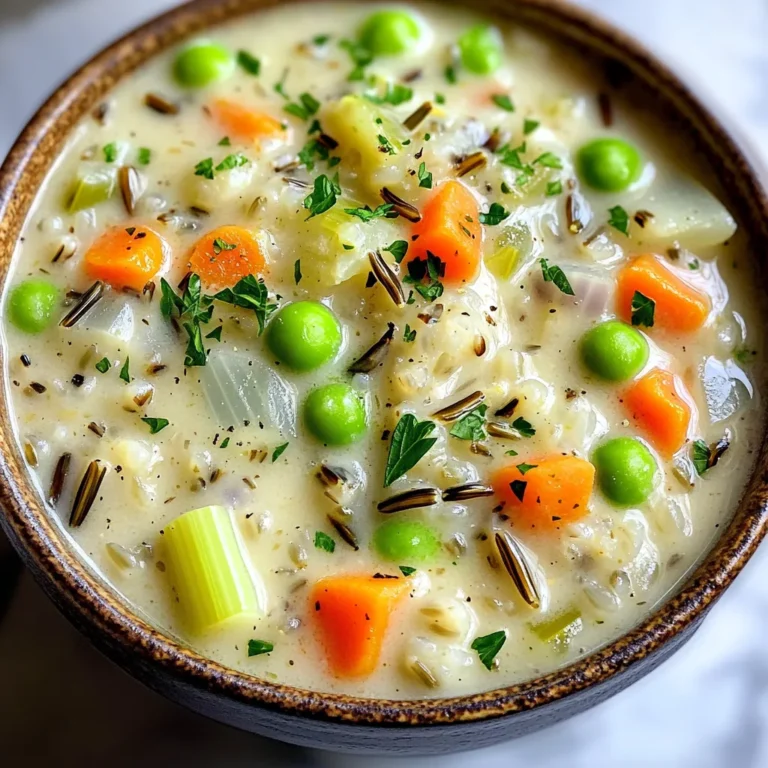
Slow Cooker Creamy Wild Rice Soup Comforting Dish

- 1 cup rolled oats - 1 ½ cups almond milk (or your preferred milk variety) - 1 apple, diced (select a sweet variety such as Fuji or Honeycrisp for best flavor) - 1 teaspoon chai spice blend (or a mix of ground cinnamon, cardamom, ginger, and cloves) - 2 tablespoons maple syrup (taste and adjust according to your sweetness preference) - ½ teaspoon vanilla extract - ¼ cup Greek yogurt (optional, for a creamier texture) - A pinch of salt - Chopped nuts or seeds for garnish (optional) - Additional apple slices for decoration Choosing the right apple makes a big difference. I recommend using sweet apples like Fuji or Honeycrisp. These apples add a nice balance to the spice in the oats. When picking apples, look for ones that feel firm and have no soft spots. They should smell sweet too! Store them in a cool place to keep them fresh longer. You can also mix different apple varieties for added depth. If you want a dairy-free option, almond milk works great. But there are many choices! You can use oat milk, coconut milk, or soy milk. Each brings a unique taste to the dish. For a creamier texture, try using full-fat coconut milk. Whichever milk you choose, just make sure it’s unsweetened if you want to control the sweetness. Start by gathering all your ingredients. You need rolled oats, almond milk, diced apples, chai spice, maple syrup, vanilla extract, Greek yogurt (if using), salt, and optional toppings. This makes the process smooth and quick. In a medium bowl, combine 1 cup of rolled oats, 1 teaspoon of chai spice blend, and a pinch of salt. Mix these dry ingredients well. This step ensures the flavors blend nicely when mixed with the wet ingredients. Now, take a separate bowl or a large mason jar. Pour in 1 ½ cups of almond milk, 2 tablespoons of maple syrup, and ½ teaspoon of vanilla extract. Whisk these together until the mix is smooth. This makes your base creamy and sweet. Next, add the dry oat mix to the wet ingredients. Stir thoroughly. You want every oat coated in the creamy mixture. Then, gently fold in 1 diced apple. Save a few apple pieces for topping later. If you like creaminess, add ¼ cup of Greek yogurt now and mix well. Cover your bowl with plastic wrap or seal the mason jar tightly. Place it in the refrigerator overnight or for at least 6 hours. This soaking time lets the oats absorb all the tasty flavors. In the morning, stir the oats to mix everything again. If the mix seems too thick, add a splash of milk to achieve your desired texture. Now, serve the oats in bowls. Top each with the reserved apple pieces, chopped nuts, or seeds. A drizzle of maple syrup adds extra sweetness if you like it! You can easily change how sweet your Apple Chai Overnight Oats are. Start with 2 tablespoons of maple syrup. Taste it after mixing. If you want it sweeter, add more syrup. You can also play with the spice. If you love cinnamon, add a bit more. Not a fan of ginger? Use less. Find the right balance for you. Meal prepping is key for busy mornings. Make a big batch to last a few days. Use jars for easy storage. Layer your oats, milk, and toppings. This keeps the flavors fresh. Seal the jars tightly and store them in the fridge. You can grab one and go! Presentation matters! Serve your oats in clear jars to show off the layers. Top with apple slices for color. Add a sprinkle of nuts or seeds for crunch. A drizzle of maple syrup also adds shine. This makes your breakfast look as good as it tastes! {{image_4}} Using Greek yogurt in your overnight oats adds a creamy texture. It makes the oats rich and smooth. If you skip the yogurt, the oats will be more chewy. The oats will still taste great, but the creaminess is missing. I love using yogurt for a great mouthfeel, especially with the sweet apples and chai spices. You can switch up the flavor by adding seasonal fruit. In fall, try pears or figs for a warm taste. In summer, berries like strawberries or blueberries give a fresh twist. Each fruit brings its unique flavor. You can mix and match to keep breakfast exciting. Just remember to adjust the sweetness if the fruits are tart. While chai spices are wonderful, you can explore other blends. Try adding pumpkin spice for a cozy vibe. Or, use a pinch of cocoa powder for a chocolatey touch. Each spice mix can change the whole feel of the dish. Experimenting keeps your breakfast fun and tasty! To keep your Apple Chai Overnight Oats fresh, store them in an airtight container. A mason jar works great. Make sure the lid is tight. This keeps out air and moisture. You can also cover a bowl with plastic wrap. Store them in the fridge right after making them. This helps the oats absorb the flavors overnight. Apple Chai Overnight Oats can last for up to five days in the fridge. After that, check for signs of spoilage. If you see any mold or an off smell, throw them away. The oats may also become dry or hard. If that happens, add a splash of milk before eating. Always trust your senses to decide if they are still good. You can freeze Apple Chai Overnight Oats for up to three months. Use freezer-safe containers or jars. Make sure to leave some space at the top. The oats expand when frozen. To thaw, move them to the fridge overnight. You can also heat them in the microwave. Just add a little milk to bring back the creamy texture. Enjoy your tasty breakfast even when stored! Yes, you can use quick oats. Quick oats cook faster and absorb liquids well. This may change the texture. Your overnight oats will be softer and creamier. If you prefer a chewier bite, stick with rolled oats. To make this recipe vegan, simply use plant-based yogurt. Replace Greek yogurt with a dairy-free option. Almond milk is already vegan, but you may also choose oat or soy milk. Use maple syrup to sweeten your oats, which is vegan-friendly. Chai spices like cinnamon and ginger are good for digestion. They can help with inflammation and boost your immune system. Oats are full of fiber, which aids in digestion and keeps you full longer. They can help lower cholesterol and improve heart health. Together, they make a nutritious breakfast. In this post, we explored Apple Chai Overnight Oats. We covered ingredients, preparation, and storage tips. You learned how to choose apples for the best taste and the right milk for a dairy-free option. I shared ways to adjust sweetness and spice levels and offered fun variations. These oats are easy to make and great for breakfast. Enjoy experimenting with flavors and see what you like best. With simple storage tips, these oats stay fresh longer, making meal prep a breeze. Now, grab your ingredients and start creating your perfect bowl!

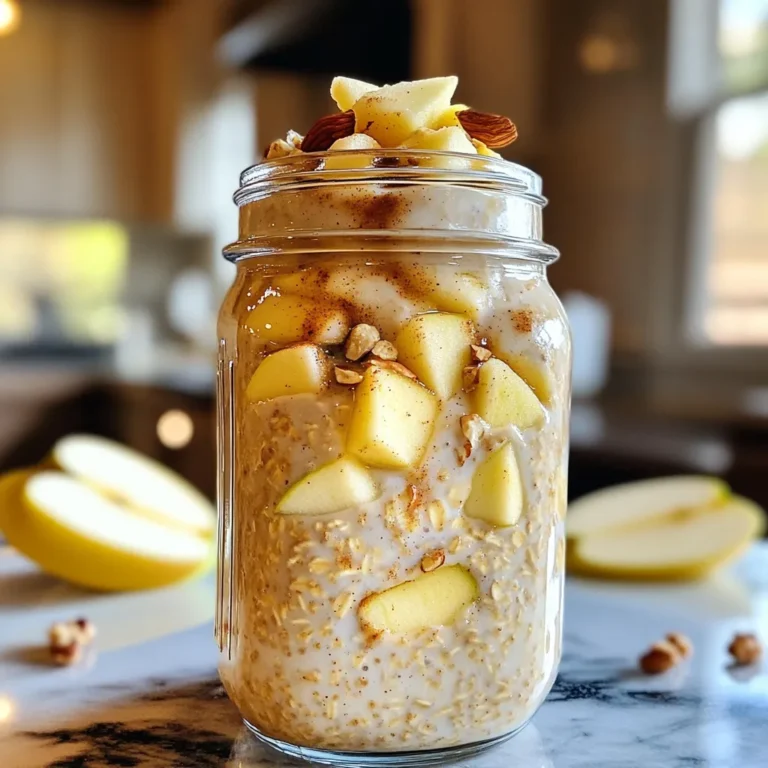
Apple Chai Overnight Oats Nutritious Easy Breakfast

- 2 boneless, skinless chicken breasts - 1 tablespoon extra virgin olive oil - 2 teaspoons dried oregano - 1 teaspoon garlic powder - Sea salt and freshly ground black pepper, to taste - 4 whole wheat pitas - 1 cup cherry tomatoes, halved - 1 cucumber, diced - ½ red onion, thinly sliced - ½ cup feta cheese, crumbled - 1 cup plain Greek yogurt - 2 tablespoons fresh lemon juice - Fresh parsley, finely chopped, for garnish When I make Greek chicken stuffed pitas, I love to use fresh and simple ingredients. The chicken is the star, flavorful and juicy. I season it with olive oil, oregano, garlic powder, salt, and pepper. This mix adds a nice taste. The fillings are just as important. Whole wheat pitas give a healthy touch. I add halved cherry tomatoes, diced cucumber, and thinly sliced red onion. Each bite packs a crunch. Crumbled feta cheese adds a creamy and salty flavor. I finish with a simple sauce made of Greek yogurt and lemon juice. This sauce is bright and creamy. A sprinkle of fresh parsley brightens the whole dish. These ingredients come together to create a meal that is both easy and full of flavor. {{ingredient_image_2}} - Preheat your grill or grill pan over medium-high heat. - In a bowl, mix olive oil, oregano, garlic powder, salt, and pepper. - Rub this marinade all over the chicken breasts. - Place the chicken on the grill, cooking for 6-7 minutes per side. - Ensure the chicken is no longer pink and juices run clear. - Transfer the chicken to a board and let it rest for 5 minutes. - In a small bowl, combine Greek yogurt and lemon juice. - Add a pinch of salt and mix until smooth and creamy. - Slice the rested chicken into thin strips. - Warm the pitas in a dry skillet or microwave for 10 seconds. - Gently open each pita and layer in the sliced chicken. - Add halved cherry tomatoes, diced cucumber, and thinly sliced red onion. - Sprinkle crumbled feta cheese on top. - Drizzle the tzatziki sauce over the fillings. - Finish with a sprinkle of fresh parsley for garnish. - Serve warm with extra lemon wedges on the side. To check if your chicken is done, cut into it. The center should be white, not pink. You can also use a meat thermometer. It should read 165°F. For flavorful chicken, marinate it well. Use olive oil, oregano, and garlic powder. Let it sit for at least 30 minutes. This helps the flavors soak in. You can add fresh herbs to your tzatziki. Dill or mint works great. For a stronger taste, add minced garlic. This will make your sauce pop. If you want a creamier texture, try different yogurts. Greek yogurt is thick, but you can use regular yogurt too. Each option gives a unique taste. To warm your pitas, use a dry skillet on low heat. This keeps them soft. You can also microwave them for about 10 seconds. This warms them quickly. Store pitas in a clean bag before serving. This keeps them fresh and soft until you are ready to eat. Pro Tips Marinate for Flavor: Allow the chicken to marinate for at least 30 minutes (or up to overnight) in the refrigerator for enhanced flavor. Grill Marks Matter: For beautiful grill marks, avoid moving the chicken too much while cooking; let it sit for the recommended time on each side. Warm Pitas Properly: If using the microwave, cover the pitas with a damp paper towel to keep them moist and prevent them from drying out. Customize Your Fillings: Feel free to add additional toppings like olives or bell peppers for a personalized touch to your Greek chicken stuffed pitas. {{image_4}} You can make Greek chicken stuffed pitas your own by adding different veggies. Try bell peppers, spinach, or even sliced olives. Each adds a unique taste and crunch. For protein, you can swap the chicken for grilled shrimp, beef, or even turkey. This keeps meals exciting and gives you options. If you want a meat-free meal, use falafel or grilled veggies. Falafel brings a nice crunch and flavor. Grilled zucchini, eggplant, or bell peppers can also shine in this dish. They match perfectly with the tzatziki sauce. You won’t miss the chicken! For a gluten-free meal, use lettuce wraps instead of pitas. Butter lettuce or romaine works best. Just fill the leaves with the chicken and toppings. This option is fresh and light. Plus, it’s great for those avoiding gluten but still wanting all the flavors. To keep leftover chicken fresh, place it in an airtight container. Store it in the fridge for up to three days. When you want to eat it, reheat the chicken in a skillet over low heat. You can also use a microwave for quick reheating. Ensure it’s hot all the way through before serving. To keep your prepared pitas fresh, wrap them in plastic wrap or foil. Store them in a cool, dry place if you plan to eat them within a day. For longer storage, place them in a zip-top bag in the fridge. This helps maintain their softness. When ready to eat, warm them gently to restore their texture. For tzatziki sauce, store it in a sealed container in the fridge. It stays fresh for about four days. If you want to enhance its flavor, let it sit for a bit before serving. You can also stir in fresh herbs right before use to keep it vibrant. Yes, you can use other meats. Chicken works well, but turkey or pork can also shine. Just adjust the cooking time based on the meat you choose. For example, turkey breasts may need a bit longer on the grill. To boost garlic flavor, add fresh minced garlic to the marinade. You can also mix in some roasted garlic into the tzatziki sauce. This will give you a rich, deep flavor that garlic lovers will enjoy. Yes, you can prep most parts ahead. Marinate the chicken the night before and store it in the fridge. You can even chop veggies and make the tzatziki sauce ahead of time. Just assemble the pitas right before serving for the best taste. Freezing is an option, but it's best to freeze the chicken and sauce separately. The pitas can become soggy when frozen. Wrap the chicken tightly and store it in an airtight container. You can reheat it on the grill or in the oven. Many sides work well! You can serve a simple Greek salad, roasted vegetables, or a light couscous. If you want something warm, try lemon rice or a nice bowl of soup. These options will complement your pitas wonderfully. Greek Chicken Stuffed Pitas are tasty and easy to make. We covered the main ingredients, from chicken to fresh toppings. I shared steps for preparing the chicken and making a smooth tzatziki sauce. I also provided tips to grill chicken well and suggested pitta alternatives. Remember, you can customize this dish to fit your tastes. Enjoy trying new fillings or sauces. With these tips, you can create a meal everyone will love. Now, get cooking and savor every bite of your delicious Greek Chicken Stuffed Pitas!

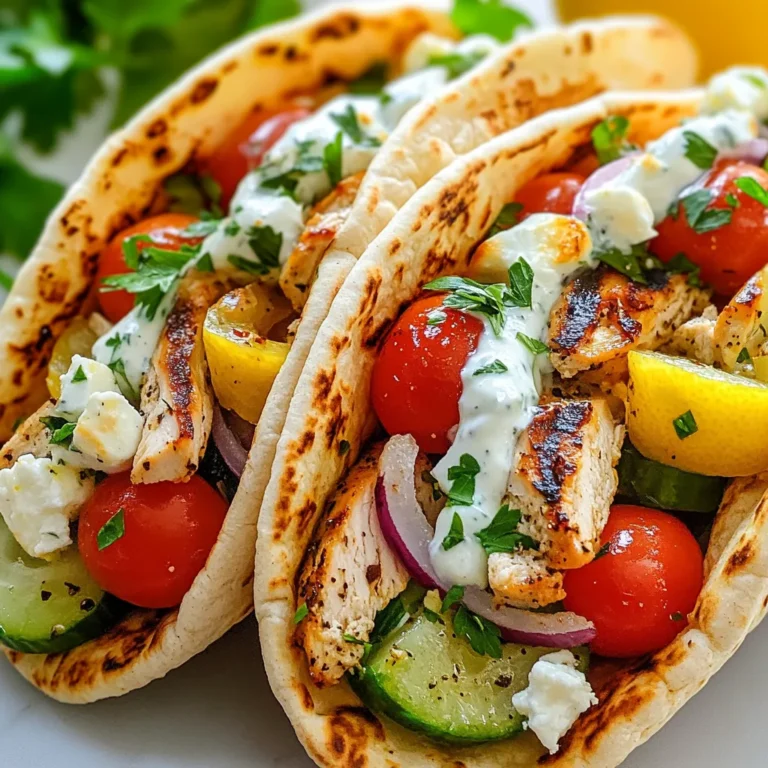
Greek Chicken Stuffed Pitas Flavorful and Simple Meal

- 1 loaf of brioche or challah bread, cut into 1-inch cubes - 6 large eggs - 2 cups whole milk - 1/2 cup pure maple syrup (plus extra for drizzling) - 1 teaspoon vanilla extract - 1 teaspoon ground cinnamon - 1/4 teaspoon salt - 1 cup pecans, roughly chopped - 1/2 cup brown sugar - 1 tablespoon unsalted butter, melted - Powdered sugar for dusting (optional) To make the Maple Pecan French Toast Bake, you need simple, fresh ingredients. Start with a loaf of brioche or challah bread. This bread is soft and holds moisture well. Cut the bread into 1-inch cubes. Next, gather your wet ingredients. You’ll need six large eggs and two cups of whole milk. The eggs give richness, while the milk adds creaminess. For sweetness, use half a cup of pure maple syrup. It gives a lovely flavor that pairs well with the pecans. Don’t forget the flavorings! Add one teaspoon of vanilla extract, one teaspoon of ground cinnamon, and a quarter teaspoon of salt. These enhance the taste and add warmth to the dish. For the pecan topping, grab one cup of roughly chopped pecans. They add crunch and a nutty taste. Mix this with half a cup of brown sugar and one tablespoon of melted unsalted butter. This topping will caramelize and create a sweet crust on top. Optionally, you can dust the finished dish with powdered sugar for a nice touch. Each ingredient plays a key role in making this dish delightful and satisfying. Enjoy gathering these items, as they all come together to create a delicious breakfast treat! - Preheat Oven and Grease Baking Dish Start by preheating your oven to 350°F (175°C). This step is key for even cooking. Next, grease a 9x13 inch baking dish. You can use non-stick spray or butter. This helps the bake come out easily after it's done. - Prepare Custard Mixture In a large bowl, whisk together 6 eggs, 2 cups of whole milk, and 1/2 cup of pure maple syrup. Add 1 teaspoon of vanilla extract, 1 teaspoon of ground cinnamon, and 1/4 teaspoon of salt. Mix until smooth. This will be the custard that flavors the bread. - Soak Bread Cubes Cut 1 loaf of brioche or challah bread into 1-inch cubes. Add the bread cubes to your custard mixture. Gently fold until each piece is coated. Let this sit for about 10 minutes. This soaking time helps the bread absorb all those yummy flavors. In a separate bowl, combine 1 cup of roughly chopped pecans with 1/2 cup of brown sugar and 1 tablespoon of melted unsalted butter. Mix well until the pecans are coated. This topping adds a nice crunch and sweetness. - Transfer Mixture to Dish Once the bread has soaked, pour the entire mixture into the greased baking dish. Spread it evenly. Sprinkle the pecan topping over the top. This creates a delicious crust when it bakes. - Bake and Check for Doneness Place the baking dish in the preheated oven. Bake for 35 to 40 minutes. Check for doneness by looking for a golden brown top. The center should feel firm to the touch. This tells you it’s ready to enjoy! Soaking the bread is key to a tasty bake. You want your bread to soak long enough to absorb all the flavors. I suggest soaking the bread cubes for at least 10 minutes. This gives them time to soak up the egg and milk mixture. If you have time, you can soak them overnight in the fridge. This way, the flavors become even richer! - Enhancements like Fresh Fruit or Whipped Cream Serving this bake with fresh fruit adds a nice touch. Think about berries, bananas, or even slices of peach. You can also add a dollop of whipped cream. It makes the dish feel extra special! - Use of Maple Syrup and Powdered Sugar Drizzling more maple syrup on top is a must. It brings out the sweet maple flavor. A light dusting of powdered sugar also looks lovely and adds sweetness. To get the best texture, bake at 350°F (175°C). This temperature helps the top become golden and crunchy while keeping the inside soft. Make sure to check the bake after 35 minutes. If the top is golden and the center feels firm, it’s ready! Avoid opening the oven too often, as it can change the bake time. {{image_4}} You can use many types of bread for this recipe. Brioche and challah are great choices. They soak up flavor well. If you want something healthier, try whole wheat bread. It adds a nice texture and taste. For those who need gluten-free options, use gluten-free bread. This will keep the dish tasty for everyone. Adding flavors makes this dish even better. You can mix in chocolate chips for a sweet twist. Dark or milk chocolate works well. Dried fruits like raisins or cranberries add a fruity touch. They bring a burst of sweetness and chewiness. Just remember to adjust the amount of maple syrup if you add more sweet stuff. While pecans are great, you can switch them for other nuts. Walnuts are a good choice and give a rich flavor. Almonds also work well and add a nice crunch. Just chop them up like you would with pecans. This way, you can enjoy a new taste each time you make it. If you have leftovers, let the Maple Pecan French Toast Bake cool first. Cover it tightly with plastic wrap or foil. You can store it in the fridge for up to three days. Make sure it’s sealed well to keep it fresh. To reheat, preheat your oven to 350°F (175°C). Place the leftover French toast bake in an oven-safe dish. Cover it with foil to prevent it from drying out. Heat for about 15 to 20 minutes. You can also microwave individual portions on a plate for about 1 to 2 minutes. If you want to freeze it, cut the bake into portions. Wrap each piece in plastic wrap and then in foil. This will keep it safe from freezer burn. You can freeze it for up to three months. When you’re ready to eat, thaw it in the fridge overnight before reheating. Yes, you can make this dish a day before. Just prepare the custard and soak the bread. Then, cover and refrigerate it overnight. In the morning, add the pecan topping and bake it. This method saves time and makes for an easy breakfast. If you don’t have maple syrup, try honey or agave nectar. Both will give a sweet flavor. You can also use brown sugar mixed with water. This will mimic the syrup's taste but may not have the same rich flavor. Your French toast bake is done when the top is golden brown. The center should feel firm when touched. You can also insert a knife into the middle. If it comes out clean, it is ready to serve. Enjoy the warm, sweet goodness! This blog post covered how to make Maple Pecan French Toast Bake. We discussed ingredients, step-by-step prep, and baking tips for a tasty dish. Remember to soak your bread for great flavor. Adding fresh fruit or whipped cream can enhance your serving. Explore different bread options and flavor additions for variety. Store leftovers properly to keep them fresh. By following these tips, you can create a delicious meal. Enjoy making this dish that is fun and easy for anyone!

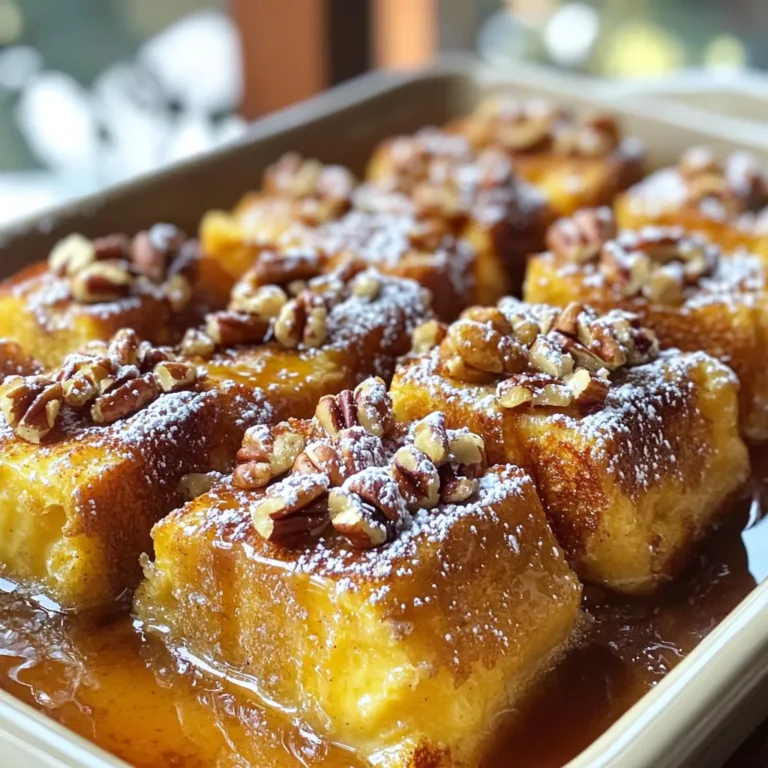
Maple Pecan French Toast Bake Easy and Tasty Recipe

To make these delightful mousse cups, you need the following ingredients: - 1 cup heavy whipping cream - 1/2 cup canned pumpkin puree - 1/3 cup powdered sugar - 1 teaspoon pure vanilla extract - 1 teaspoon pumpkin pie spice - 1/2 cup strong brewed coffee, cooled to room temperature - 1 tablespoon gelatin powder - 3 tablespoons cold water - Whipped cream for topping - Ground cinnamon for garnish - Mini chocolate chips (optional) You can swap some ingredients if needed. Instead of heavy cream, use coconut cream for a dairy-free option. For a lower sugar option, try using a sugar substitute like stevia. If you can't find pumpkin pie spice, mix cinnamon, nutmeg, and ginger for a similar flavor. If you want a caffeine-free version, use decaf coffee instead. Toppings add flair to your mousse cups. I recommend using whipped cream to give a fluffy touch. A sprinkle of ground cinnamon enhances the pumpkin spice flavor. Mini chocolate chips add a fun crunch. For a festive look, you might even add a mini cinnamon stick as a stirrer. Enjoy mixing and matching these options! To start, we need to bloom the gelatin. In a small bowl, sprinkle 1 tablespoon of gelatin powder over 3 tablespoons of cold water. Let it sit for about 5 minutes. This helps the gelatin absorb the water and become gelatinous. While the gelatin blooms, we will prepare the whipped cream. In a medium mixing bowl, use an electric mixer. Beat 1 cup of heavy whipping cream on medium speed. Stop when soft peaks form. Gradually add 1/3 cup of powdered sugar. Keep mixing until stiff peaks form. Set this whipped cream aside. Next, in another bowl, mix together 1/2 cup of canned pumpkin puree, 1 teaspoon of pure vanilla extract, and 1 teaspoon of pumpkin pie spice. Stir these ingredients until you have a smooth mixture. Now, we will dissolve the bloomed gelatin. In a small saucepan, gently stir the bloomed gelatin into 1/2 cup of cooled strong brewed coffee. Use low heat and stir until the gelatin is fully dissolved. Remove the pan from heat and let it cool slightly. Now it's time to combine the mixtures. Take the coffee-gelatin mixture and fold it into the pumpkin mixture. Be gentle to keep the mixture airy. Then, fold in the whipped cream until no white streaks remain. Spoon or pipe this fluffy mousse into individual cups, filling them about three-quarters full. This leaves room for toppings. When you fold, do it carefully. Use a spatula to lift from the bottom of the bowl. Turn the bowl as you go. This helps mix without losing air. If you mix too hard, your mousse will be flat. Make sure to stop folding as soon as you don’t see any white streaks. Overmixing can ruin the light and fluffy texture we want in our mousse. Cover the mousse cups with plastic wrap or lids. Place them in the fridge for at least 2 hours. This time allows the mousse to set properly. The texture will become creamy and smooth. When ready to serve, remove the cups from the fridge. Top each one with whipped cream, a sprinkle of ground cinnamon, and mini chocolate chips if you like. Enjoy your pumpkin spice latte mousse cups! To make the best whipped cream, start with cold equipment. Chill your bowl and beaters in the fridge for 10 minutes. This helps the cream whip better. When you beat the cream, use medium speed. Watch for soft peaks first. Then slowly add the powdered sugar. Keep mixing until you see stiff peaks. Don’t overbeat, or it may turn buttery. One big mistake is not blooming the gelatin properly. If you skip the blooming step, your mousse may not set right. Another mistake is overmixing the whipped cream into the pumpkin mix. This can deflate the air you just whipped in. Finally, don’t forget to chill the mousse. It needs at least two hours in the fridge to set. For a fun touch, use clear cups to show off the layers. You can add mini chocolate chips on top for extra sweetness. A light sprinkle of cinnamon adds flavor and looks pretty. For a festive twist, place a mini cinnamon stick in each cup. This makes each bite even better and adds a nice aroma. {{image_4}} You can change the flavor of your mousse cups easily. Instead of pumpkin puree, try using sweet potato puree for a different taste. You can also mix in chocolate or caramel for a rich twist. Adding a splash of maple syrup can enhance the sweetness. For an extra kick, consider a sprinkle of nutmeg or ginger. These flavors can make your mousse exciting and unique. To make a vegan version, swap heavy cream for coconut cream. Use maple syrup instead of powdered sugar for sweetness. Replace gelatin with agar-agar, a plant-based thickener that works well in desserts. Use almond milk or any other dairy-free milk instead of coffee. This way, everyone can enjoy a creamy dessert. For Halloween, add some orange food coloring to make the mousse more festive. For Christmas, try adding crushed peppermint to the mousse or as a topping. You can also include gingerbread cookies as a base layer. For Easter, consider a lighter flavor, like lemon, using lemon zest and juice instead of coffee. These ideas help your mousse fit any celebration. Store your mousse cups in the fridge. Place them in an airtight container. This keeps them fresh and tasty. You can also cover them with plastic wrap. Avoid any contact with air. This helps prevent drying out. Your mousse will stay good for about 3 to 5 days in the fridge. Check for any changes in smell or texture. If it looks or smells off, it’s best to toss it. Always trust your senses when it comes to food. You can freeze mousse cups, but with care. First, let them chill in the fridge for a few hours. Then, cover each cup tightly with plastic wrap. You can also use a freezer-safe container. They can last up to 2 months in the freezer. When ready to eat, thaw them in the fridge overnight. Do not refreeze once thawed. Enjoy your tasty treat! Yes, you can make these mousse cups ahead of time. They set well in the fridge. I recommend making them a day before serving. This way, the flavors blend and deepen. Just cover them tightly with plastic wrap to keep them fresh. When ready to serve, add the whipped cream and cinnamon on top. If you want a gelatin-free version, use agar-agar. It is a plant-based thickener. Use 1 tablespoon of agar-agar powder instead of gelatin. Mix it with water and heat it until it dissolves. Follow the same steps in the recipe after that. This will help your mousse set nicely. You can easily make this mousse without coffee. Replace the coffee with an equal amount of milk or almond milk. You can also use brewed chai tea for a tasty twist. Just make sure the replacement is at room temperature, like the coffee. This keeps the mousse creamy and flavorful. The Pumpkin Spice Latte Mousse Cups offer a simple, fun dessert. We explored the ingredients, preparation steps, and tips to create this treat. I shared ideas for variations and storage advice. Remember to avoid common mistakes for the best results. Whether you stick to the classic recipe or try a new twist, these mousse cups will shine at any gathering. Enjoy every creamy bite and impress your guests with this easy dessert!

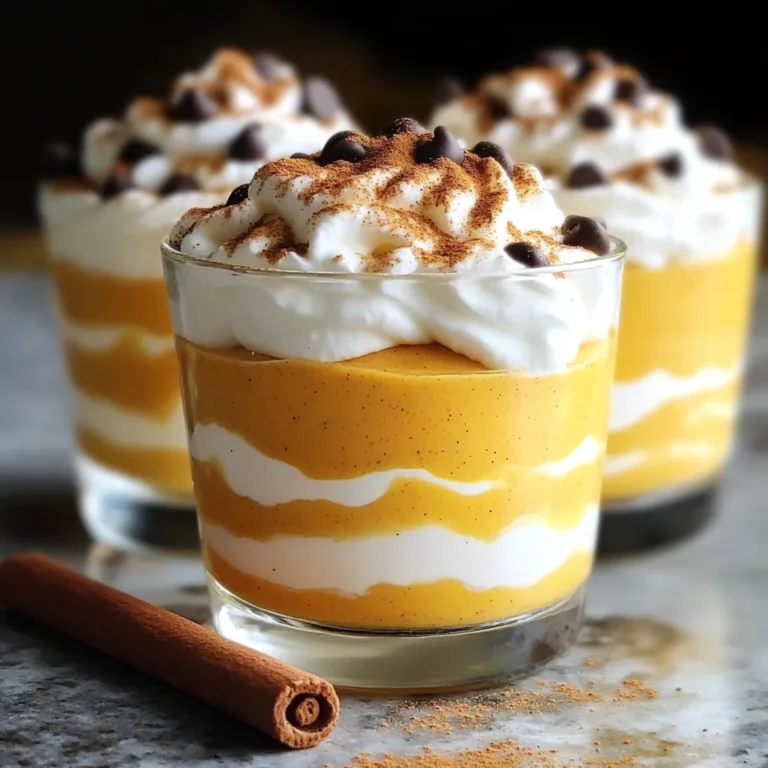
Pumpkin Spice Latte Mousse Cups Irresistible Dessert

PREV 1 2 3 4 … 18 NEXT
sweet savory saga

explore

DessertsDinnerAppetizersDrinks

Our Policies

  • Cookie Policy
  • Copyright Policy
  • Disclaimer
  • GDPR Policy
  • Terms Of Use
Back to Top
  • About
  • Contact Us
  • Privacy Policy
© 2025 sweet savory saga