FREE DINNER EBOOK! Get your copy!
  • Cookie Policy
  • GDPR Policy
  • Disclaimer
  • Terms Of Use
  • Visit my other site: Fun Cookie Recipes
sweet savory saga
  • Home
  • Dinner
  • Desserts
  • Drinks
  • Appetizers
  • Contact
  • About
  • Privacy Policy
  • Home
  • Dinner
  • Desserts
  • Drinks
  • Appetizers
  • Contact
  • About
  • Privacy Policy
  • Cookie Policy
  • GDPR Policy
  • Disclaimer
  • Terms Of Use
Visit my other site: Fun Cookie Recipes

HOME / CATEGORIES /

Latest

- 1 pound gnocchi (store-bought or homemade) - 1 cup fresh basil pesto - 1 cup heavy cream - 1 cup cherry tomatoes, halved - 1 cup fresh spinach, roughly chopped - 1/2 cup grated Parmesan cheese - 2 cloves garlic, minced - 1 tablespoon olive oil - Salt and pepper to taste - Toasted pine nuts for garnish This dish is all about fresh flavors and easy steps. Each ingredient plays a role in making One Pot Creamy Pesto Gnocchi a delight. The gnocchi serves as a soft base, while the pesto brings a bright green taste. Heavy cream gives the dish its lush texture, making every bite feel special. Cherry tomatoes add a sweet burst, and spinach gives a pop of color. Parmesan cheese ties it all together, adding a savory note. Garlic and olive oil create a fragrant start. You can even sprinkle toasted pine nuts on top for added crunch if you like. Using fresh ingredients makes a big difference. They provide bold flavors that store-bought versions can’t match. I always choose high-quality pesto and ripe tomatoes for the best taste. You can find these at local markets or make them at home for a personal touch. Each ingredient enhances the dish's overall charm. Together, they create a creamy and vibrant meal that’s simple and satisfying. To start, I heat olive oil in a large pot over medium heat. Once the oil is hot, I add minced garlic. I sauté the garlic for about one minute. It should smell good but not turn brown. Next, I toss in halved cherry tomatoes. I cook them for two to three minutes. This helps them soften and release their juices. After the tomatoes soften, I slowly pour in heavy cream. I stir well to mix it with the garlic and tomatoes. Then, I let this mixture simmer for a few minutes. This step allows the flavors to blend together nicely. Now, it’s time to add the gnocchi. I carefully place it in the pot. I gently stir to coat each piece in the creamy sauce. I follow the package instructions for cooking, which usually takes about two to three minutes. The gnocchi should be tender and cooked through. Once cooked, I stir in the fresh basil pesto and chopped spinach. I mix everything until the spinach wilts and is fully combined. Finally, I sprinkle in grated Parmesan cheese. I stir continuously until it melts and blends into the creamy mixture. I taste and adjust the seasoning with salt and pepper. If I want a thicker sauce, I let it simmer for one more minute. This dish is now ready to serve! To cook gnocchi well, follow these steps: - Boil water: Use a large pot with plenty of water. This helps keep the gnocchi from sticking. - Salt the water: Add a good amount of salt to the boiling water. This adds flavor to the gnocchi. - Cook in batches: If you have a lot of gnocchi, cook it in smaller amounts. This helps it cook evenly. To avoid mushy gnocchi: - Don't overcook: Follow the package instructions closely. Gnocchi usually cooks in just 2-3 minutes. - Use fresh gnocchi: Fresh gnocchi tends to hold its shape better than frozen types. You can boost the flavor of your gnocchi with these tips: - Add spices: Consider adding red pepper flakes for heat. A pinch of nutmeg can also add warmth. - Use different pesto: Try sun-dried tomato pesto or arugula pesto for a twist on the classic flavor. For a lovely presentation, here’s what I suggest: - Choose shallow bowls: These make it easy to see all the colors in your dish. - Garnish well: Top with extra halved cherry tomatoes and fresh basil leaves. This adds color and freshness. By following these tips, your One Pot Creamy Pesto Gnocchi will not only taste great, but it will also look stunning on the plate! {{image_4}} You can add protein to your One Pot Creamy Pesto Gnocchi for a heartier meal. Chicken, shrimp, or tofu all work well. - Chicken: Use boneless, skinless chicken breast. Cut it into bite-sized pieces. Cook it in the oil before adding garlic. This gives great flavor. - Shrimp: Use peeled and deveined shrimp. Add them after the tomatoes. Cook until they turn pink, about 2-3 minutes. - Tofu: Use firm tofu, cut into cubes. Sauté it until golden brown before adding garlic. This adds nice texture and flavor. You can easily make a vegan version of this dish. Simply swap out dairy ingredients for plant-based options. - Cream: Use coconut cream or cashew cream instead of heavy cream. Both options provide creaminess without dairy. - Cheese: Replace Parmesan cheese with nutritional yeast or a vegan cheese. This keeps the cheesy flavor without animal products. Feel free to add or swap vegetables in your dish. This makes the recipe more colorful and nutritious. - Other Vegetables: You can use zucchini, bell peppers, or mushrooms. Just chop them into small pieces. - Cooking Times: Add firmer veggies like zucchini earlier, about 2-3 minutes before the tomatoes. Softer veggies, like spinach, should go in last to wilt. These variations make the dish your own. Enjoy experimenting with proteins and veggies! To keep your creamy pesto gnocchi fresh, store it in the fridge. First, let it cool down to room temperature. Then, place it in an airtight container. This helps prevent moisture loss and keeps flavors intact. Ideally, consume leftovers within three days for the best taste. When reheating, aim for gentle warmth. Use the stovetop for even heating. Add a splash of cream or water to maintain creaminess. Heat over low to medium heat, stirring often. This avoids overcooking the gnocchi. Reheat until it’s warm but not boiling. This usually takes about 5 to 7 minutes. To freeze your dish, ensure it’s completely cool. Transfer the gnocchi to a freezer-safe container. Leave some space at the top, as it may expand. Seal tightly and label it with the date. For best quality, use within two months. To thaw, move it to the fridge overnight. For reheating, use a saucepan with a little water or cream. Heat gently until warmed through. This keeps the texture nice and creamy. Making One Pot Creamy Pesto Gnocchi takes about 20 minutes. You can prep the ingredients in 10 minutes. The cooking time is around 10 minutes. It’s quick and perfect for busy nights. Yes, you can use both types. Refrigerated gnocchi cooks faster than frozen gnocchi. If you use frozen gnocchi, add an extra minute to the cooking time. Both options give good results, so choose what you have on hand. Yes, you can make this dish gluten-free. Look for gluten-free gnocchi made from potato or rice flour. Many brands offer gluten-free options. Just check the package to ensure it fits your needs. This dish pairs well with a simple side salad. A green salad with vinaigrette is a great choice. You can also serve garlic bread or roasted vegetables. These sides balance the meal and add extra flavor. In this blog post, we explored the tasty world of One Pot Creamy Pesto Gnocchi. We covered key ingredients, step-by-step instructions, helpful tips, and fun variations. Cooking this dish is easy and quick, making it perfect for busy nights or special meals. You can customize it with proteins or veggies, too. With proper storage, leftovers stay fresh and delicious. Dive into this comforting meal and enjoy your culinary creation!

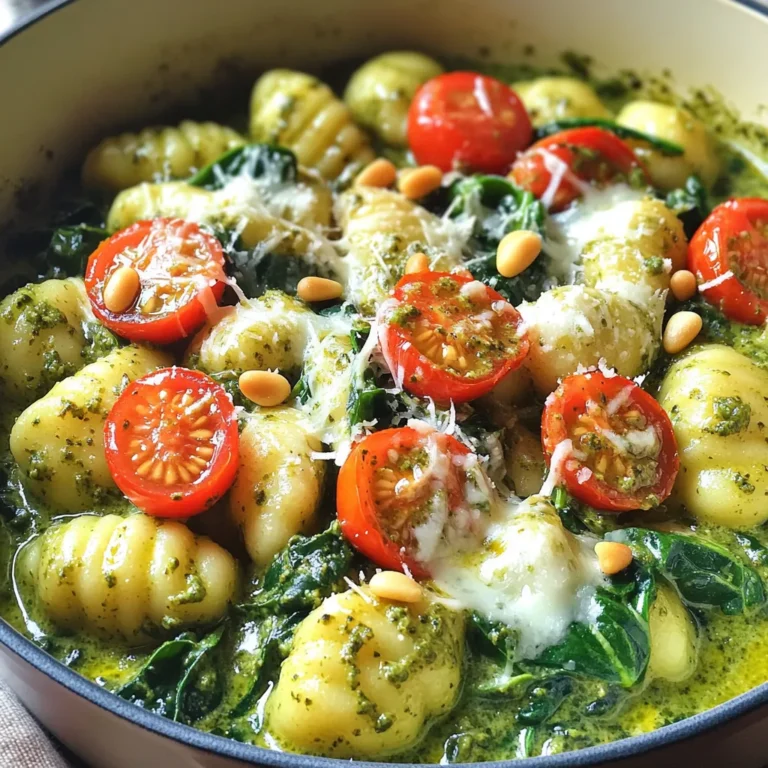
One Pot Creamy Pesto Gnocchi Flavorful Delight

- 1 cup creamy peanut butter - 1 cup brown sugar, firmly packed - ½ cup granulated sugar - 2 large eggs - 1 teaspoon vanilla extract - 1 ½ cups all-purpose flour - 1 teaspoon baking powder - ½ teaspoon salt - 1 cup semi-sweet chocolate chips - ½ cup chopped peanuts (optional for an added crunch) You need a mix of key ingredients for perfect blondies. The creamy peanut butter gives a rich, nutty flavor. Brown sugar adds moisture and a hint of caramel. Granulated sugar adds sweetness and balance. Eggs help bind the mix together. Vanilla extract enhances the overall taste. The flour creates the base, while baking powder helps the blondies rise. Salt brings out the flavors in your treat. Add chocolate chips for sweetness and texture. If you want a crunch, chopped peanuts work well. You can adjust the ingredients to match your taste, but this mix is a great start. 1. Preheat your oven to 350°F (175°C). This step warms the oven for even baking. 2. Prepare an 8x8-inch baking pan. Grease it lightly and line it with parchment paper. Let some parchment hang over the edges. This helps with easy removal later. 3. In a large bowl, mix 1 cup of creamy peanut butter, 1 cup of brown sugar, and ½ cup of granulated sugar. Use a whisk or electric mixer for a smooth blend. 4. Add 2 large eggs, one at a time. Mix well after each addition. Then stir in 1 teaspoon of vanilla extract until it’s even throughout. 5. In another bowl, whisk together 1 ½ cups of all-purpose flour, 1 teaspoon of baking powder, and ½ teaspoon of salt. 6. Gradually add the dry mixture to the peanut butter mix. Stir gently until just combined. Avoid overmixing; the batter should be thick and smooth. 7. Fold in 1 cup of semi-sweet chocolate chips. If you like crunch, add ½ cup of chopped peanuts. 1. Pour the batter into the prepared pan. Use a spatula to spread it evenly. 2. Bake for 25-30 minutes. Watch the edges turn golden brown. Check doneness by inserting a toothpick into the center. It should come out clean or with a few moist crumbs. 1. After baking, take the pan out of the oven. Let the blondies cool in the pan for about 10 minutes. 2. Use the overhanging parchment to lift the blondies out of the pan. Place them on a wire rack to cool completely. 3. Once cooled, slice the blondies into squares. Serve and enjoy your tasty treat! To achieve the best texture in your blondies, avoid overmixing. When you add the dry ingredients, stir just until combined. Overmixing can make the blondies dense. The batter should be thick and smooth, not runny. - Mix the wet ingredients until smooth. - Gradually fold in dry ingredients without vigorous stirring. - Stop mixing as soon as no dry flour is visible. For the right texture, focus on the baking time. Check your blondies at 25 minutes. If the edges turn golden brown, they are close to done. A toothpick inserted in the center should come out clean or have a few moist crumbs. Serving blondies can be fun and creative! Arrange squares on a decorative platter. This makes them look inviting. You can dust them lightly with powdered sugar for an elegant touch. Another idea is to scatter whole peanuts on top. This adds visual appeal and a nice crunch. Consider serving with a scoop of ice cream or a drizzle of chocolate sauce. This makes for a delightful treat everyone will love! {{image_4}} You can easily switch up some ingredients in these blondies. For nut butter, try almond or cashew butter. Each one adds a unique taste. If you want a nut-free option, sunflower seed butter works great too. For sweeteners, brown sugar gives a rich flavor, but you can use coconut sugar. Maple syrup is another fun choice. Just adjust the amount of flour if the batter gets too wet. Adding spices can change the flavor in a big way. Try mixing in a teaspoon of cinnamon for warmth. A pinch of nutmeg can also bring a cozy touch. You can play with chocolate too. Use dark chocolate chips for a richer taste. Or try white chocolate for a sweeter twist. Swapping in peanut butter chips can elevate the peanut flavor. Get creative with your favorite mix-ins! To keep your peanut butter chocolate chip blondies fresh, store them in an airtight container. This helps keep them moist and flavorful. Line the container with parchment paper for easy removal. Place a layer of blondies in the container. You can add a piece of bread in the container to help keep them soft. You can freeze blondies for later use. First, let them cool completely. Cut them into squares and wrap each piece in plastic wrap. Place the wrapped squares in a freezer bag or container. Make sure to label the bag with the date. When you're ready to enjoy them, take out a blondie. Let it thaw at room temperature for about an hour. For a warm treat, you can heat it in the microwave for a few seconds. This will bring back the gooey goodness of the chocolate chips. Yes, you can use crunchy peanut butter! It adds texture and a fun crunch. Just swap it in for creamy peanut butter in the recipe. The flavor will still be rich and delicious. If you don’t have chocolate chips, try using chopped chocolate bars or cocoa nibs. You can also skip the chocolate altogether and add dried fruit, like cranberries or raisins, for a sweet twist. Blondies last about 3 to 5 days at room temperature. Keep them in an airtight container. This helps them stay fresh and soft for longer. Yes, you can make these blondies gluten-free! Just use a gluten-free flour blend instead of all-purpose flour. Make sure the baking powder is also gluten-free to keep everything safe and tasty. You learned how to make delicious blondies from scratch. We covered essential ingredients, mixing steps, and baking tips. You now know how to store and freeze them safely. With fun variations, you can try different tastes and textures. Blondies are easy to make and perfect for sharing. Enjoy your baking journey, and don’t forget to experiment with flavors!

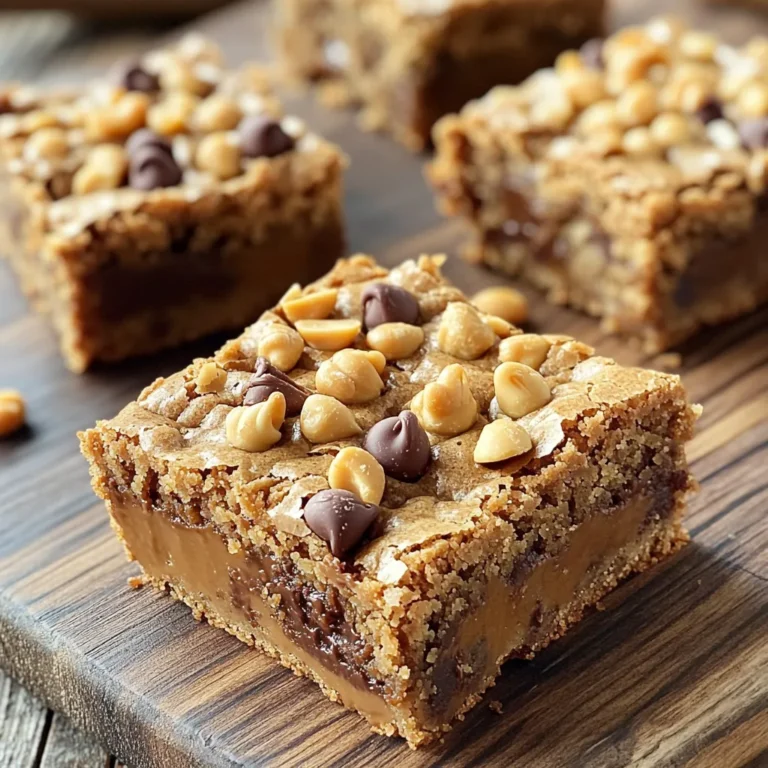
Peanut Butter Chocolate Chip Blondies Irresistible Treat

- 14 oz firm tofu, drained and pressed - 1 tablespoon fresh ginger, grated - 1 bell pepper, sliced (any color) - 1 cup snap peas, trimmed - 1 carrot, julienned The main ingredients create the base of our Minute Sesame Ginger Tofu Stir-Fry. Firm tofu gives a nice texture and absorbs flavors well. Fresh ginger adds a warm, spicy kick. The vegetables bring color and crunch, making every bite exciting. - 2 tablespoons sesame oil - 2 tablespoons soy sauce (or tamari for gluten-free) - 2 cloves garlic, minced - 1 tablespoon sesame seeds The seasonings and oils are key to flavor. Sesame oil adds a rich, nutty taste. Soy sauce or tamari brings saltiness and depth. Garlic offers aroma and warmth, while sesame seeds give a delightful crunch and nutty finish. - Cooked brown rice - Quinoa Serving this stir-fry over brown rice or quinoa enhances the meal. Both options provide a hearty base. They soak up the tasty sauce, adding more flavor to each bite. Plus, rice and quinoa are nutritious, making your dish even better. - Draining and Pressing First, drain the firm tofu. Wrap it in a clean kitchen towel. Place a heavy pan on top. Let it sit for about 10 minutes. This step removes excess water and helps the tofu crisp up. - Cutting into Bite-Sized Cubes After pressing, cut the tofu into small cubes. Aim for even sizes. This ensures they cook evenly and get that nice golden crust. - Heating the Sesame Oil Next, heat the sesame oil in a large skillet over medium-high heat. Wait until it shimmers. This means it’s hot enough for the tofu. - Achieving a Golden Brown Tofu Crust Add the tofu cubes to the hot oil. Let them cook without stirring for about 5 minutes. Turn them gently with a spatula. You want all sides to be golden brown and crispy. - Incorporating Ginger and Garlic Once the tofu is golden, add the grated ginger and minced garlic. Stir continuously for about a minute. This releases amazing aromas that boost the flavor. - Stir-Frying Vegetables to Perfection Now, add the sliced bell pepper, snap peas, and julienned carrot. Stir-fry for 3 to 4 minutes. You want the veggies bright and just tender. They should still have a nice crunch. After adding soy sauce, finish with green onions and sesame seeds. Enjoy the lovely balance of flavors! Best Method to Achieve Crispiness To get crispy tofu, use firm or extra-firm tofu. Start with draining and pressing it to remove excess water. This step is key for texture. Next, cut the tofu into bite-sized cubes. Heat sesame oil in a hot skillet. Add the tofu and cook until golden brown on all sides. This method gives a nice crunch. Avoiding Common Mistakes Avoid overcrowding the pan. If you add too much tofu at once, it will steam instead of fry. Turn the tofu only when it forms a crust. This helps it stay intact and crispy. Adding Extra Seasonings Boost flavor with extra seasonings. A splash of soy sauce or tamari enhances umami. Consider adding chili flakes for heat or a dash of rice vinegar for tang. These small tweaks can elevate your dish. Using Fresh Herbs for Garnish Fresh herbs add brightness. Use chopped green onions or cilantro as a garnish. They provide a fresh taste and vibrant color. Just sprinkle them on top before serving for a pop of flavor. Serving Suggestions Serve the stir-fry in shallow bowls. This highlights the colorful mix of veggies and tofu. Place a lemon wedge on the side. When squeezed, it adds a fresh burst of flavor. Decorative Garnishes Garnish with extra sesame seeds for a nutty touch. You can also add more green onion for a splash of color. These small details make your dish look appetizing and inviting. {{image_4}} Tempeh as an Alternative Using tempeh can add a different texture. Tempeh is fermented soy. It has a nutty taste. Cut it like tofu and cook it the same way. This change boosts protein and adds flavor. Adding Edamame or Chickpeas Edamame or chickpeas can be great add-ins. They bring more protein and fiber. Add a cup of either to your stir-fry. Mix them in when you add the veggies. This provides a nice crunch and health boost. Seasonal Vegetable Ideas You can swap in seasonal vegetables. Use zucchini in summer or squash in fall. Broccoli or bok choy work well, too. This keeps your dish fresh and exciting. Customizing Based on Preferences Feel free to customize based on your likes. If you love mushrooms, toss those in. Prefer leafy greens? Add spinach or kale. The stir-fry is all about your taste. Incorporating Spices or Chili Flakes Want more heat? Add chili flakes or sriracha. This gives your dish a spicy kick. You can also try adding cumin or coriander for extra depth. Using Different Oils or Sauces Try different oils like avocado or peanut oil. Each oil brings its own taste. You can also switch the soy sauce for teriyaki or coconut aminos. This makes each stir-fry unique. To keep your Minute Sesame Ginger Tofu Stir-Fry fresh, store it in an airtight container. This method helps retain flavor and texture. You can keep it in the fridge for up to three days. Just make sure it cools down before sealing. This prevents condensation and sogginess. If you want to save some for later, freezing works well. Let the stir-fry cool completely before packing it in freezer-safe bags. Squeeze out as much air as possible to prevent freezer burn. It can last in the freezer for up to three months. When you're ready to enjoy it, thaw it overnight in the fridge. Reheat in a skillet over medium heat until warmed through, or use a microwave. Preparing ingredients ahead of time can make cooking easier. Chop the vegetables and store them in separate containers. You can even cube the tofu and marinate it with sesame oil and soy sauce for extra flavor. For leftovers, pack them in single-serving containers. This makes it simple to grab a meal anytime, keeping your meals quick and tasty. This dish takes about 20 minutes to cook. You will spend 10 minutes preparing the ingredients. The cooking time is just 10 minutes. This quick recipe is great for busy days. Yes, Minute Sesame Ginger Tofu Stir-Fry is vegan. All the ingredients are plant-based. Tofu is a great source of protein. Use soy sauce or tamari for flavor. Both options are vegan-friendly. You can serve this stir-fry with brown rice or quinoa. Both add a nice texture. You can also pair it with a salad. A fresh side salad can balance the meal. Try adding extra vegetables for a colorful plate. Enjoy your delicious and healthy meal! This blog covered how to make a tasty sesame ginger tofu stir-fry. You learned about the key ingredients, step-by-step cooking instructions, and tips for perfecting the dish. We also explored variations to keep it fresh and fun. Store your stir-fry well for later meals. Remember, cooking can be easy and enjoyable, so don’t hesitate to experiment. Enjoy your stir-fry journey, and share your creations with others!

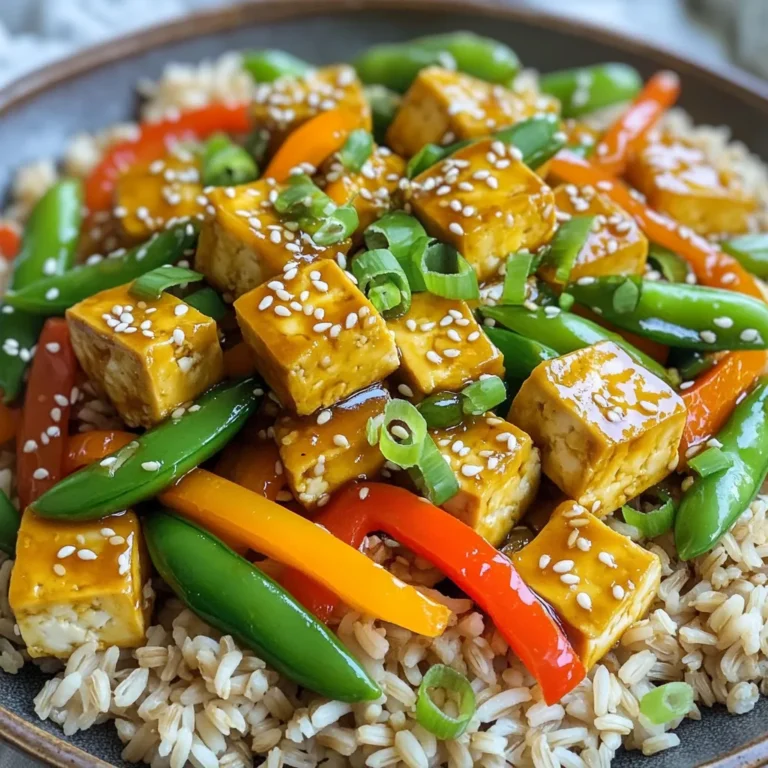
Minute Sesame Ginger Tofu Stir-Fry Flavor Boost

- 1 loaf of challah bread, cut into 1-inch cubes - 2 cups milk (use whole or almond based on preference) - 4 large eggs - 1 cup pure pumpkin puree (not pumpkin pie filling) For this casserole, I love using challah bread. Its soft, airy texture soaks up the egg mixture well. You can choose between whole milk or almond milk based on your taste. Eggs provide structure and richness, while pumpkin puree gives it that classic fall flavor. - 1/2 cup packed brown sugar - 1 tablespoon pure vanilla extract - 2 teaspoons pumpkin pie spice - 1/2 teaspoon ground cinnamon - 1/4 teaspoon sea salt Brown sugar adds a rich sweetness. I use pure vanilla extract for a deeper flavor. Pumpkin pie spice and ground cinnamon bring warmth and aroma, while sea salt balances the sweetness. - 1/2 cup chopped pecans (optional, for extra crunch) - Powdered sugar for a finishing dusting (optional) - Maple syrup for serving Chopped pecans add a nice crunch, making each bite even more enjoyable. A sprinkle of powdered sugar gives a lovely visual touch, and warm maple syrup makes it feel like a special treat. 1. Preheat your oven to 350°F (175°C). 2. Grease a 9x13-inch baking dish with butter or cooking spray. This helps keep the casserole from sticking. 3. In a large bowl, whisk together the milk, eggs, pumpkin puree, brown sugar, and vanilla. Add the pumpkin pie spice, ground cinnamon, and sea salt. Mix until smooth. 1. Carefully add the cubed challah bread to the bowl. 2. Use a spatula to fold the bread into the mixture. Make sure every piece is coated well. 3. If you like, fold in the chopped pecans for extra crunch. 4. Transfer the mixture into the greased baking dish. Spread it evenly. 1. Cover the dish tightly with aluminum foil. Let it rest at room temperature for at least 20 minutes. You can also refrigerate it overnight for more flavor. 2. Bake the casserole covered for 25 minutes. 3. After this, remove the foil and bake for another 15-20 minutes. The top should be golden brown, and a knife should come out clean from the center. 4. Let the casserole cool for 5-10 minutes before serving. For a tasty finish, dust with powdered sugar and drizzle with maple syrup. Overnight soaking benefits Letting your casserole sit overnight transforms the flavors. The bread absorbs the pumpkin and spices better. This makes each bite rich and tasty. You can prepare it the night before, saving time for the morning. Adjusting spice levels Not a fan of strong spices? You can change the amount of pumpkin pie spice. Start by adding a little less. You can always add more if you want a stronger flavor. This way, you make the dish fit your taste. Best bread types to use Challah bread is my favorite because it is soft and sweet. Other good choices are brioche or French bread. These breads soak up the mix well and create a nice, fluffy texture. Tips for achieving the perfect crust To get a crispy crust, bake the casserole uncovered for the last 15-20 minutes. This helps the top turn golden brown. You can also add a sprinkle of sugar on top before baking for an extra crunch. Ideal accompaniments Serve your casserole with maple syrup for sweetness. Fresh fruit like bananas or berries add color and freshness. You might also try whipped cream for a fun twist. Presentation ideas for guests Slice the casserole and place pieces on plates. Top each slice with extra pecans and a sprinkle of cinnamon. A dusting of powdered sugar adds a lovely touch. This makes your dish look as good as it tastes. {{image_4}} You can switch up your Pumpkin Spice French Toast Casserole with different bread types. Try brioche for a richer taste or sourdough for a tangy kick. Each choice gives a unique flavor and texture. You can also add nuts. Chopped walnuts or almonds give crunch and flavor. You can mix in dried fruits like cranberries or raisins too. These options create a fun twist on the classic dish. For a dairy-free version, use almond milk or oat milk. These options work well with the recipe and do not change the taste much. You can also choose dairy-free eggs if needed. If you need gluten-free options, look for gluten-free bread. Many brands offer tasty choices that work perfectly. Just make sure to check the ingredients for the best results. Add seasonal fruits for a fresh touch. Sliced apples or pears can enhance the flavor of the casserole. You can even mix in berries for a burst of color and taste. Incorporating chocolate chips can make this dish extra special. Use dark or semi-sweet chips for a richer flavor. They melt and create a gooey, delicious surprise in each bite. To store your Pumpkin Spice French Toast Casserole, cool it first. Once cool, cover it tightly with plastic wrap or foil. Place it in the fridge for up to three days. This keeps it fresh and tasty. When reheating, I suggest cutting a slice. Place it on a microwave-safe plate. Heat for about 30 to 45 seconds. Check if it's warm throughout. If not, heat in short bursts until ready. You can also reheat in the oven. Preheat to 350°F (175°C). Bake for 10 to 15 minutes until heated through. For long-term storage, you can freeze this casserole. First, cool it completely. Then, wrap it tightly in plastic wrap. Place it in a freezer-safe bag or container. It can last up to three months in the freezer. To thaw, move the casserole to the fridge overnight. Once thawed, reheat as mentioned before. You can bake it straight from frozen, but it will take longer. About 30 to 40 minutes should do the trick. The shelf life of your casserole is about three days in the fridge. After that, it may not taste as fresh. Signs of spoilage include an off smell or mold. If you notice either, it’s best to throw it away. Always trust your senses. Enjoy your casserole while it’s still at its best! Yes, you can. To prepare it ahead, follow these steps: - Prepare the casserole as directed. - Cover it tightly with foil. - Place it in the fridge overnight. - Bake it in the morning. This allows the flavors to blend better. If you want to bake it later, let it sit at room temperature for about 20 minutes before putting it in the oven. If you don’t have pumpkin puree, here are some options: - Use butternut squash puree. - Try sweet potato puree. - Applesauce can work in a pinch. These alternatives will still give your casserole a nice flavor and texture. To check if it’s done, use these techniques: - Insert a knife into the center. - If it comes out clean, the casserole is ready. - Look for a golden brown top. Let it cool for a few minutes before serving. This helps it set better and enhances the flavors. This blog post covered all the key steps to make a delicious pumpkin bread casserole. You learned about the main ingredients like challah bread cubes, milk options, and spices. We explored preparation, baking tips, and storage methods to keep it fresh. Finally, I shared ways to customize your dish, ensuring it fits your tastes. Try these tips to bring your pumpkin casserole to the next level. Enjoy every bite of this autumn treat!

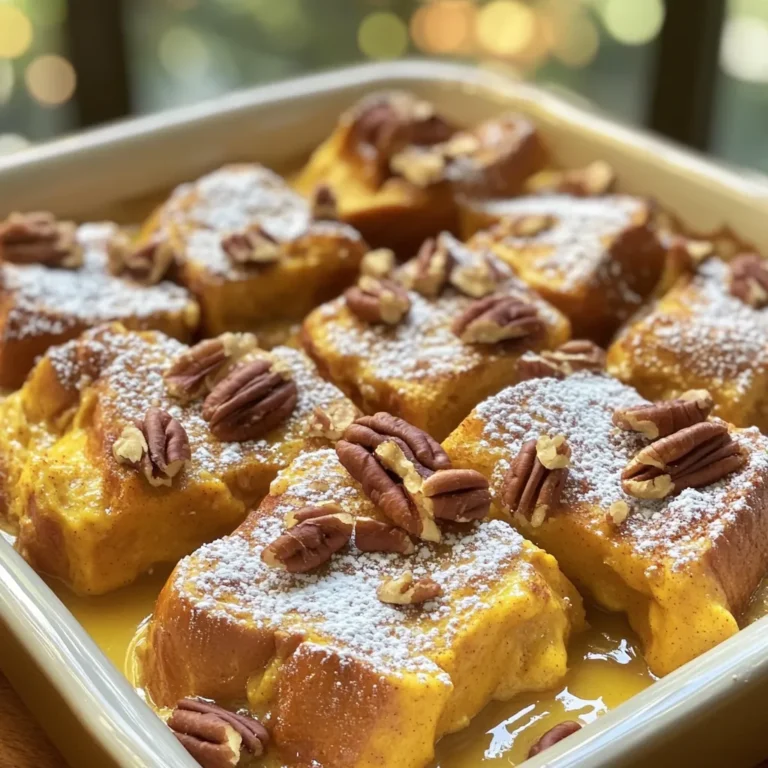
Pumpkin Spice French Toast Casserole Easy and Flavorful

To make Gluten-Free Almond Flour Banana Pancakes, you need simple and healthy ingredients. Here’s what you will need: - 1 cup almond flour - 2 ripe bananas, well-mashed - 2 large eggs - 1/4 cup almond milk (or alternative milk) - 1 teaspoon pure vanilla extract - 1 teaspoon baking powder - 1/2 teaspoon ground cinnamon - A pinch of sea salt - Cooking fat options: coconut oil or butter These ingredients come together to create a tasty breakfast. Almond flour gives the pancakes a nice nutty flavor. Ripe bananas add natural sweetness, and they keep the pancakes moist. Eggs bind everything while adding protein. Almond milk makes the batter smooth and creamy. Baking powder helps the pancakes rise, making them fluffy. Ground cinnamon adds warmth and spice. A pinch of sea salt balances the sweetness. You can choose coconut oil or butter for cooking, depending on your taste. Each ingredient plays its part. When you mix them right, you’ll enjoy pancakes that are light and flavorful. This recipe is perfect for anyone avoiding gluten or looking for a healthy breakfast option. Enjoy making these delightful pancakes! Start by combining the bananas, eggs, almond milk, and vanilla extract in a bowl. Use a fork or whisk to mix them well. You want a smooth consistency. This mix is the base for your pancakes. The bananas give sweetness and moisture. The eggs add structure and richness. In a separate bowl, whisk together almond flour, baking powder, cinnamon, and salt. Make sure everything blends well. This step ensures even flavor and rise. Almond flour is gluten-free and gives a nutty taste. Baking powder helps the pancakes puff up. Now, fold the dry ingredients into the wet mixture gently. Stir until just combined; it's okay if there are small lumps. Overmixing can make the pancakes tough. You want them light and fluffy. Preheat a non-stick skillet over medium heat. Add a small amount of coconut oil or butter. Let it melt and coat the skillet. Pour 1/4 cup of batter for each pancake. Cook for about 2-3 minutes. Look for bubbles forming on the surface. Gently flip the pancakes using a spatula. Cook for another 2-3 minutes until golden brown. Continue with the rest of the batter, adding more oil or butter as needed. Enjoy the smell of cooking pancakes! To make your pancakes fluffy, avoid overmixing the batter. When you combine the wet and dry ingredients, stir gently. It’s okay if you see small lumps; they help keep the pancakes light. The cooking temperature matters too. Preheat your skillet on medium heat. A hot pan helps the pancakes rise and cook evenly. If the pan is too hot, the pancakes may burn on the outside and stay raw inside. Stack your pancakes high on a nice plate. This not only looks great but makes them feel special. Drizzle pure maple syrup or honey on top for sweetness. You can also add fresh berries like strawberries, blueberries, or raspberries for color and flavor. For a fun touch, sprinkle ground cinnamon on top. These pancakes offer great health benefits. Almond flour is high in protein and healthy fats. Bananas add natural sweetness and fiber. Together, they make a filling breakfast option. Each serving has about 250 calories. This count depends on the amount of syrup or toppings you use. Enjoy these pancakes as a treat that feels good to eat! {{image_4}} You can boost your pancake flavor in fun ways. Adding chocolate chips makes them sweet and rich. You can also mix in nuts for crunch. Walnuts or pecans work great here. Fresh fruits like blueberries or strawberries add a bright taste. Try spices, too! A pinch of nutmeg or ginger can add warmth. If you want a vegan version, you can swap eggs for flaxseed meal. Mix 1 tablespoon of flaxseed meal with 2.5 tablespoons of water. Let it sit until it thickens. You can use other flours, too. If you’re not strict about gluten, try whole wheat or oat flour. These options change the flavor and texture a bit. To keep your pancakes fresh, store any leftovers in the refrigerator. Use an airtight container to prevent them from drying out. They will last about 3 to 5 days. For long-term storage, you can freeze your pancakes. Stack them with parchment paper between each pancake. This way, they won’t stick together. Place the stack in a freezer bag or an airtight container. They will stay good for up to 2 months. When you're ready to enjoy your pancakes again, reheating them is simple. The best method is using a toaster or oven. Preheat your oven to 350°F (175°C) and place the pancakes on a baking sheet. Heat them for about 5 to 10 minutes. You can also use a microwave. Place the pancakes on a microwave-safe plate and cover them with a damp paper towel. Heat in short bursts of 20 seconds until warm. Make sure to check the texture and flavor. You want them to taste just as good as the first time! No, regular flour contains gluten. Gluten can cause issues for some people. Almond flour is a great gluten-free option. It adds a nice flavor and texture. You can also try other gluten-free flours, like coconut flour or oat flour. Each flour has its own taste and texture. Adjust the recipe if you switch flours. To make these pancakes vegan, swap out the eggs. You can use flaxseed meal or chia seeds. Mix 1 tablespoon of either seed with 2.5 tablespoons of water. Let it sit for a few minutes. For the milk, use almond milk or any plant-based milk you like. This makes the recipe vegan-friendly. Toppings can make your pancakes even better. Here are some tasty ideas: - Fresh berries like strawberries, blueberries, or raspberries - Sliced bananas for extra banana flavor - Pure maple syrup or honey for sweetness - A dollop of yogurt or dairy-free yogurt for creaminess - Chopped nuts for crunch - A sprinkle of cinnamon for warmth Feel free to mix and match these toppings! This post covers delicious almond flour banana pancakes. You learned about the key ingredients, step-by-step instructions, and helpful tips. Remember, avoiding overmixing keeps pancakes fluffy. Feel free to try variations, like adding chocolate chips or fresh fruit. Store leftovers properly to enjoy later. Making these pancakes can be fun and tasty. Your breakfast can be healthier with this easy recipe. Dive into the world of creative cooking today!

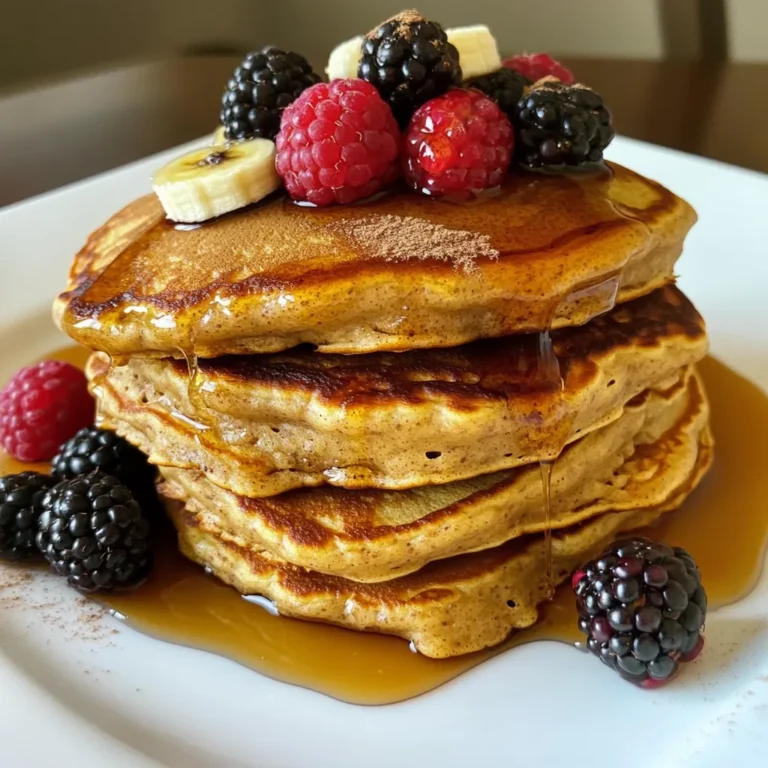
Gluten-Free Almond Flour Banana Pancakes Delight

To make Vegan Coconut Curry Chickpea Soup, gather these ingredients: - 1 tablespoon coconut oil - 1 medium onion, finely diced - 3 cloves garlic, minced - 1 tablespoon fresh ginger, finely grated - 1 tablespoon curry powder - 1 teaspoon ground turmeric - 1 can (14 oz) coconut milk - 4 cups vegetable broth - 1 can (15 oz) chickpeas, thoroughly drained and rinsed - 1 cup diced tomatoes (fresh or canned) - 2 cups fresh spinach or kale, roughly chopped - Salt and freshly cracked black pepper to taste - Juice of 1 juicy lime - Fresh cilantro leaves, roughly chopped for garnish This soup is packed with nutrition. The chickpeas give you protein and fiber. They help keep you full. Coconut milk adds healthy fats and gives the soup a creamy texture. Spinach and kale are loaded with vitamins and minerals. They boost your immune system and support overall health. Garlic and ginger help fight inflammation and promote good digestion. Using fresh ingredients helps maximize these benefits. When shopping for your ingredients, look for these tips: - Choose onions that are firm and have no soft spots. - Garlic should be hard and dry. Avoid any that feel soft or sprout. - Pick fresh ginger that feels heavy and has smooth skin. - For greens, look for vibrant colors. They should be crisp, not wilted. - If using tomatoes, go for ones that are firm and fragrant. - Always check the expiration date on canned goods. Start by heating a large pot on medium heat. Add the coconut oil. When it melts, toss in the diced onion. Sauté this for about 5 minutes. You want the onion soft and clear. Next, add minced garlic and grated ginger. Cook for 1 to 2 minutes until you smell their lovely aroma. Now, sprinkle in the curry powder and ground turmeric. This brings out their full taste. Sauté the spices for another minute. Then, pour in the creamy coconut milk and the vegetable broth. Stir well to mix everything together. Increase the heat a little and let it simmer gently. Once the soup simmers, add the drained chickpeas and diced tomatoes. Stir to combine, then let this simmer for 15 minutes. This allows the flavors to blend nicely. After 15 minutes, add the chopped spinach or kale. Cook for another 5 minutes until the greens are wilted and tender. Finally, taste your soup. Add salt and pepper to your liking. Squeeze in the lime juice for a zesty kick. Your soup is now ready to serve! - Large pot - Wooden spoon or spatula - Measuring spoons - Knife and cutting board - Can opener - Prep time: 10 minutes - Cooking time: 20 minutes - Total time: 30 minutes This soup serves 4. You can enjoy it as a light meal or pair it with crusty bread for a hearty dish. To make your vegan coconut curry chickpea soup even tastier, try these tips: - Use fresh herbs: Fresh cilantro adds a bright taste. - Add spice: If you like heat, add red pepper flakes or fresh chili. - Citrus zest: Grate some lime zest for extra zing. - Toast spices: Before adding liquids, toast curry powder and turmeric in coconut oil for more depth. Many people make mistakes when cooking this soup. Here are some to watch out for: - Skipping the sauté: Don’t rush! Sautéing onion, garlic, and ginger builds flavor. - Not draining chickpeas: Always rinse and drain canned chickpeas to avoid a gritty texture. - Overcooking greens: Add spinach or kale near the end. This keeps them bright and tender. - Ignoring seasoning: Taste your soup before serving. Adjust salt and pepper to your liking. Serve your soup in deep bowls for a cozy feel. Here are some great pairings: - Rice or Quinoa: Serve it over rice or quinoa for a hearty meal. - Crusty Bread: Pair with crusty bread for dipping. - Salad: A fresh salad with lime dressing complements the soup well. - Coconut Rice: For a tropical twist, try coconut rice on the side. These tips and tricks will help you enjoy a delicious and satisfying vegan coconut curry chickpea soup. Happy cooking! {{image_4}} If you have dietary needs, you can still enjoy this soup. Here are some easy swaps: - Oil: Use olive oil or avocado oil instead of coconut oil for a different flavor. - Chickpeas: Swap chickpeas for lentils if you prefer. They cook faster and add protein. - Vegetable Broth: If you're low-sodium, choose a low-sodium broth for a healthier option. - Greens: Kale works well, but you can use Swiss chard or collard greens too. Adjust the flavor to fit your taste. Here’s how: - Spice Levels: Want it spicy? Add chili flakes or diced jalapeños. Start with a small amount and taste. - Curry Powder: Try different curry powders for unique flavors. You can use Thai red curry paste for a kick. - Herbs: Add fresh basil or mint for a fresh twist. They brighten the soup nicely. Make this soup your own with these swaps: - Coconut Milk: For a lighter soup, use almond milk or oat milk. It changes the texture but keeps it creamy. - Tomatoes: Fresh, canned, or even roasted tomatoes work great. Roasted adds a nice depth of flavor. - Add-ins: Consider adding sweet potatoes or carrots for sweetness and texture. Simply chop and cook them with the onions. Feel free to mix and match these ideas. Personalizing this soup makes it even more fun and tasty! After enjoying your Vegan Coconut Curry Chickpea Soup, you’ll likely have some left. Let the soup cool down to room temperature first. Then, transfer it to an airtight container. This keeps the soup fresh and tasty. You can store it in the fridge for up to five days. If you want to keep it longer, freezing is a great option. To freeze your soup, use freezer-safe containers or bags. Make sure to leave some space at the top for expansion. This soup can last in the freezer for about three months. When you're ready to eat it, just take it out and let it thaw in the fridge overnight. When you’re ready to enjoy your soup again, reheat it on the stove over medium heat. Stir it often to ensure even heating. If it seems a bit thick, add a splash of vegetable broth or water. You can also reheat it in the microwave. Just heat in short bursts, stirring in between. This method keeps the flavors fresh and delicious. Yes, you can make this soup ahead of time. In fact, the flavors get better when it sits. Store it in an airtight container in the fridge. It will stay fresh for about four days. Just reheat it on the stove before serving. If you find it too thick, add a splash of vegetable broth. If you need a substitute for coconut milk, try using almond milk or cashew cream. Both add creaminess but change the flavor a bit. You can also use soy milk, but it won't be as rich. Another option is to blend silken tofu with some water for a creamy texture. Yes, this soup is gluten-free. All the ingredients used are naturally gluten-free. Just ensure that your vegetable broth is gluten-free too. This makes it a great option for those with gluten sensitivities. Enjoy it without worry! This blog post covered the essential ingredients, cooking steps, and tips for making a great soup. You learned how to enhance flavors and avoid common mistakes. I shared ways to store leftovers and personalize your dish with variations. Keep these points in mind as you cook. With the right ingredients and tips, you'll make a delicious soup every time. Enjoy your cooking journey!

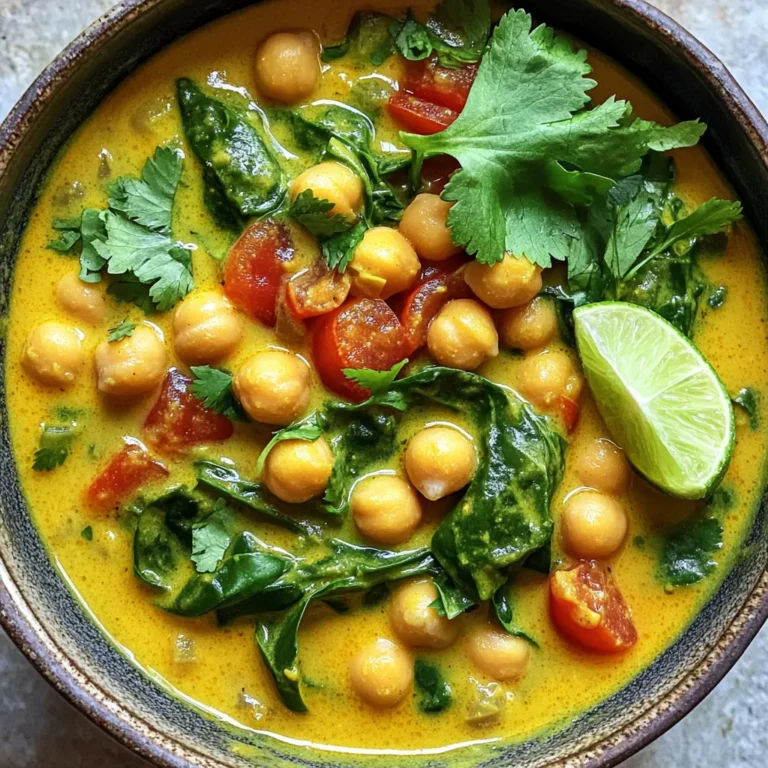
Vegan Coconut Curry Chickpea Soup Simple and Tasty

- 8 oz. rice noodles - 1 lb. large shrimp, peeled and deveined - 2 tablespoons soy sauce - 2 tablespoons teriyaki sauce - 1 cup broccoli florets - 1 bell pepper, thinly sliced (any color will do) - 1 medium carrot, julienned - 1 tablespoon fresh ginger, minced - 1 clove garlic, minced - 2 green onions, finely chopped - Sesame seeds for garnish The main ingredients in this dish create a strong base. The rice noodles bring a soft texture. Large shrimp add a great protein source and flavor. Soy sauce and teriyaki sauce give the dish its sweet and salty taste. Next, we have the vegetables. Broccoli florets add crunch and color. Bell pepper adds sweetness and brightness. Carrot brings a nice bite and even more color. For the aromatics and garnish, fresh ginger gives warmth and spice. Garlic adds a savory depth. Green onions bring freshness, while sesame seeds give a delightful crunch. These ingredients come together in a quick and easy way. You can enjoy a tasty meal in just 15 minutes! To start, boil water in a large pot. When the water is bubbling, add 8 oz. of rice noodles. Cook them for 3-5 minutes, or as the package says. Once they are soft, drain the noodles in a colander and set them aside. This step is simple but key for a great meal. Next, heat a large skillet over medium heat. Add 1 tablespoon of sesame oil and wait for it to get hot. Then, toss in 1 clove of minced garlic and 1 tablespoon of minced ginger. Stir them for about 30 seconds. You want them to smell great, but don’t let them burn. This mix brings a lovely flavor to your dish. Now, it’s time to add some color! Add 1 cup of broccoli florets, 1 sliced bell pepper, and 1 medium carrot, julienned. Stir-fry these for 3-4 minutes. Keep an eye on them to maintain their bright colors and crispness. This is where your dish starts to come alive. Add 1 lb. of large, peeled, and deveined shrimp to the skillet. Pour in 2 tablespoons of soy sauce and 2 tablespoons of teriyaki sauce. Stir everything well. Cook until the shrimp turn pink and opaque, which should take about 3-4 minutes. This step makes the shrimp tasty and blends all the flavors. Gently fold the cooked rice noodles into the shrimp and veggie mix. Toss everything together until the noodles are well-coated with sauce. This ensures each bite is packed with flavor. Make sure the noodles are heated through too. Finally, divide the noodle mixture into bowls. For a nice touch, top with chopped green onions and a sprinkle of sesame seeds. This adds a fresh crunch. You can also add a lime wedge on the side for a zesty kick. Serve in deep bowls for a cozy feel. To keep your Teriyaki Shrimp Noodle Bowls under 15 minutes, start with the noodles. Boil water first for the rice noodles. While it heats, prep your veggies and shrimp. Cook the noodles as soon as the water boils. This way, you save time and keep things moving. Once the noodles cook, drain and set them aside. Next, heat your skillet or wok. Sauté the garlic and ginger while the noodles cook. This multitasking helps you stay on track. Aim to finish everything at the same time for a hot meal. To make your noodle bowls even better, consider adding toppings. Try chopped cilantro, crushed peanuts, or sliced radishes for a fresh twist. You can also mix in other vegetables like snap peas or zucchini for extra crunch. If you want to customize the sauce, think about adding a splash of lime juice. This will give your dish a zesty kick. You can also add a bit of honey or chili paste to adjust the flavor to your liking. When sautéing, always heat the skillet before adding oil. This helps the oil glide smoothly. Use medium heat to avoid burning the garlic and ginger. Stir constantly to keep them fragrant but not charred. For perfect shrimp, watch their color closely. They should turn pink and opaque. This usually takes about 3-4 minutes. Don’t overcrowd the pan; cook in batches if needed. This way, each shrimp gets the heat it needs for that perfect bite. {{image_4}} You can swap shrimp for chicken or tofu. If you choose chicken, cut it into small pieces. Cook the chicken for about 5-7 minutes until it's no longer pink. For tofu, press it to remove water, then cube it. Cook tofu for about 4-5 minutes until golden brown. Adjusting cooking times helps you get the best texture. You can use many vegetables in this dish. Snap peas, zucchini, or mushrooms work well too. Feel free to mix and match based on what you have. Seasonal veggies like asparagus or bell peppers can add great flavor. Using fresh, in-season produce will enhance your meal. To make this dish gluten-free, choose gluten-free soy sauce. Many brands offer gluten-free options that taste great. If you cannot find rice noodles, use quinoa or zucchini noodles. These substitutes keep the dish tasty and safe for gluten-sensitive diets. To store leftover teriyaki shrimp noodle bowls, let them cool first. Place the leftovers in an airtight container. This keeps them fresh. You can store them in the fridge for up to 3 days. After that, they may lose flavor and texture. When you are ready to eat, you can reheat the noodles. The best method is to use a skillet. Heat it over medium heat. Add a splash of water or teriyaki sauce. This helps keep the noodles moist. Stir often to heat evenly. You can also use a microwave. Just cover the bowl to keep moisture in. Heat in short bursts, stirring in between. If you want to freeze leftovers, it is best to separate the shrimp and noodles. Place them in freezer-safe bags. Squeeze out the air to prevent freezer burn. You can freeze them for up to 2 months. When you want to eat them, thaw in the fridge overnight. After thawing, reheat using the methods mentioned above. This keeps the flavor and texture nice. Making teriyaki shrimp noodle bowls takes just 15 minutes. You can split this time into 10 minutes for prep and 5 minutes for cooking. This quick meal is perfect for busy nights when you want something tasty without long waits. Yes, you can use frozen shrimp! Just thaw them before cooking. Place the shrimp in cold water for about 15 minutes. This method will help you save time. Frozen shrimp can work well, but fresh shrimp often taste better. You can serve teriyaki shrimp noodle bowls with a side of edamame or a fresh salad. These sides add nice texture and flavor. Steamed dumplings or a light miso soup also pair well. They enhance your meal and make it more filling. Yes, you can make this dish vegetarian! Substitute shrimp with tofu or tempeh. Use the same cooking method for these proteins. You might also want to add more veggies like bell peppers or snap peas to keep it hearty and satisfying. To add heat, you can include red pepper flakes or sriracha sauce. Toss a small amount in while cooking the shrimp. You can also serve with sliced jalapeños on the side for extra spice. Adjust the amount based on your heat preference. This blog covered how to make tasty teriyaki shrimp noodle bowls. You learned about key ingredients like rice noodles, shrimp, and veggies. We went through the steps to cook everything perfectly and shared tips to save time. Variations let you swap proteins or add veggies. Lastly, we discussed storage and reheating options. Enjoy your cooking adventure and make these bowls your own! With a few simple tweaks, you can create a dish just for you.

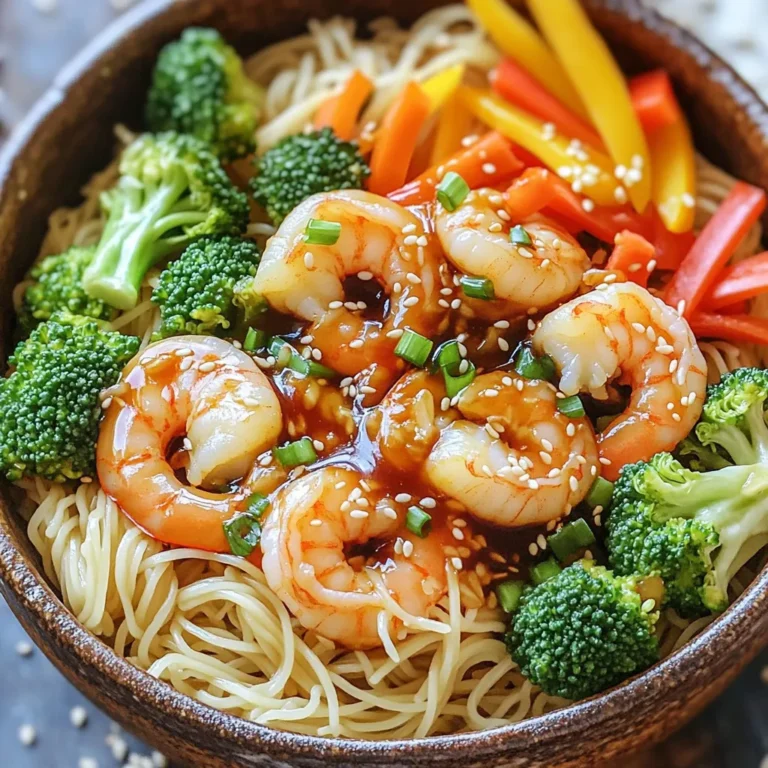
Teriyaki Shrimp Noodle Bowls Quick and Tasty Meal

For this Apple Cider Hot Toddy Mocktail, you need 2 cups of fresh apple cider. Fresh cider gives the drink a rich and sweet flavor. You can find it at local farms or markets in the fall. Always choose cider that has no added sugars or preservatives. It makes a big difference in taste. Next, you will add 1 tablespoon of freshly squeezed lemon juice. The lemon juice brightens the drink and adds a nice zing. It balances the sweetness of the cider. Freshly squeezed juice is best, as bottled juice can taste dull. To sweeten your mocktail, use 1 tablespoon of honey. If you prefer a vegan option, maple syrup works great too. For added warmth, include 1/4 teaspoon of ground cinnamon, 1/4 teaspoon of ground ginger, and 1/4 teaspoon of ground nutmeg. These spices add depth and comfort to your drink. Finally, mix in 1/2 cup of hot water to make the drink cozy and easy to sip. For garnish, use cinnamon sticks and lemon slices. They not only look pretty but also enhance the aroma. Enjoy the warmth and flavor of this delightful winter drink! To start, pour 2 cups of fresh apple cider into a medium saucepan. I like to use a nice, tart cider for the best flavor. Warm it over medium heat. Stir it gently now and then. You want it to get warm but not boil. It should feel cozy to the touch. Once the cider feels warm, it's time to add the fun stuff. Squeeze in 1 tablespoon of fresh lemon juice. This will brighten the drink. Next, add 1 tablespoon of honey or maple syrup if you want a vegan option. Now, sprinkle in 1/4 teaspoon of ground cinnamon, ginger, and nutmeg. Stir everything well so the flavors mix together. This step is key for a balanced taste. After mixing, remove the saucepan from the heat. Carefully stir in 1/2 cup of hot water. This makes the drink easier to sip while keeping its rich taste. Pour the mocktail into heatproof mugs. For a festive touch, garnish each mug with a cinnamon stick and a slice of lemon. This adds color and a lovely aroma to your drink. Enjoy your Apple Cider Hot Toddy Mocktail! To make your Apple Cider Hot Toddy Mocktail shine, focus on balance. Start with fresh apple cider. The taste should be sweet yet tangy. Add lemon juice for brightness. Cinnamon, ginger, and nutmeg give warmth. Stir well to mix all flavors. Taste and adjust as needed. A little tweak can make a big difference. Sweetness is key in this drink. Honey adds a nice touch, but feel free to swap it for maple syrup. This change keeps it vegan and adds depth. If it’s too sweet, add more lemon juice. For spice fans, increase cinnamon or ginger slightly. Just remember, a little goes a long way. Always taste as you go. Garnish adds flair and aroma. A cinnamon stick gives a classic touch. It also enhances the spice flavor. Lemon slices brighten the drink visually and taste-wise. You can even add apple slices for extra fun. Choose garnishes based on what you enjoy most. They make your drink look and feel special. {{image_4}} You can easily make this drink vegan. Just swap honey with maple syrup. This change keeps the sweetness and adds a new flavor twist. Both options taste great, but maple syrup gives the drink a rich, earthy touch. Feel free to get creative with flavors. Try adding fresh cranberries for a tart kick. You can also use pear juice in place of some apple cider. It brings a unique twist, perfect for holiday gatherings. For a minty taste, toss in a few fresh mint leaves. This will refresh your drink and make it even more inviting. Want to make it special? Add a splash of vanilla extract for warmth. You could also include a pinch of clove for a spicier profile. Some people love adding a touch of orange zest. This brightens the drink and adds a lovely aroma. Experiment with these ideas to find your favorite mix! After enjoying your Apple Cider Hot Toddy Mocktail, you might have some left. Keep the leftovers in an airtight container. Store it in the fridge. It stays fresh for up to three days. Make sure to label the container with the date. This helps you remember when you made it. When you're ready to enjoy your mocktail again, reheating is easy. Pour the leftover mocktail into a saucepan. Heat it over medium-low heat. Stir it gently until it warms up. Do not let it boil, as boiling can change the flavor. You can also use the microwave. Heat it in a microwave-safe cup for 30 seconds. Stir, then heat for another 30 seconds if needed. If you want to save your mocktail for later, freezing works well. Pour the cooled mocktail into ice cube trays. Once frozen, transfer the cubes to a freezer bag. This can keep them fresh for up to three months. When you're ready to use them, thaw the cubes in the fridge or add them directly to hot water for a quick warm-up. Yes, you can use store-bought apple cider. It saves time and still tastes great. Just look for a brand with no added sugars. This keeps the drink natural and simple. Fresh cider adds a nice touch, but store-bought works well too. Honey is not required but adds sweetness. You can substitute honey with maple syrup. This keeps it vegan and delicious. If you want less sweetness, feel free to skip it. The spices and apple cider will still shine. Hot toddy mocktails can offer several health benefits. Apple cider is rich in vitamins and antioxidants. Lemon juice boosts your immune system and adds vitamin C. The spices like ginger and cinnamon have anti-inflammatory properties. This drink can be soothing and comforting, especially in cold weather. This blog post covered how to make a delicious hot toddy mocktail. We explored fresh apple cider, bright citrus, and the right spices. You learned to mix these flavors and serve them perfectly. Tips on adjusting taste and adding unique garnishes helped enhance your drink. We also discussed helpful variations and smart storage options. Now, you can enjoy this warm beverage anytime. Get creative and make it yours!

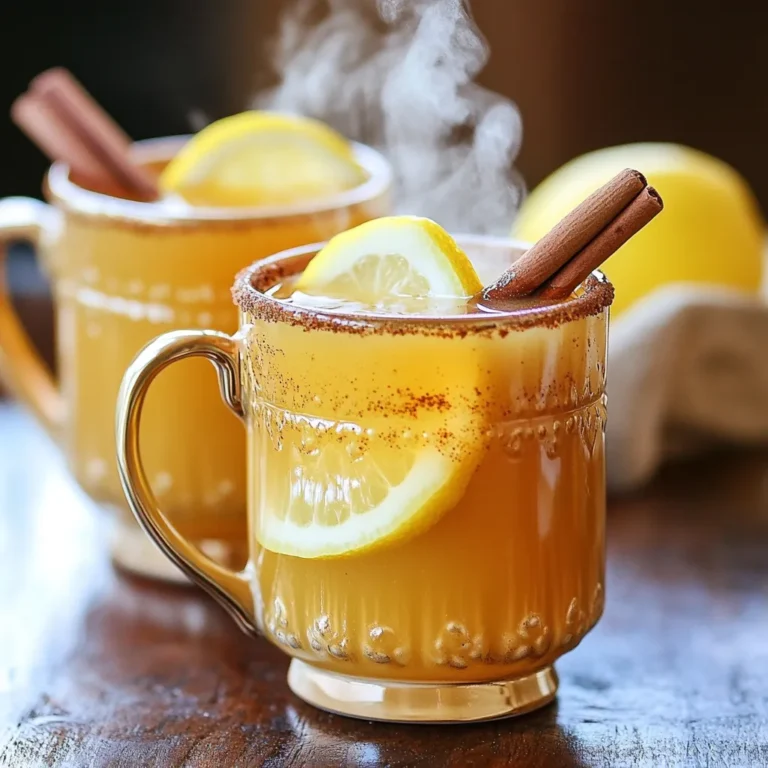
Apple Cider Hot Toddy Mocktail Refreshing Winter Drink

- 1 medium head of cauliflower, cut into bite-sized florets - 1/4 cup teriyaki sauce (store-bought or homemade) - 2 tablespoons cornstarch - 1 tablespoon olive oil - 1/2 teaspoon garlic powder - 1/2 teaspoon onion powder - 1/4 teaspoon freshly ground black pepper - 1/4 teaspoon sea salt - Sesame seeds - Sliced green onions Gather these ingredients to create a crunchy and tasty dish. The cauliflower serves as the base and can soak up the teriyaki sauce well. You can choose between store-bought or homemade sauce. Using cornstarch helps make the cauliflower crispy. Olive oil adds moisture and flavor. Seasonings like garlic and onion powder boost the taste. Don't forget the optional garnishes! They add a nice touch to your dish. The sesame seeds and green onions give a pop of color and extra flavor. - Preheat the air fryer to 400°F (200°C) for 5 minutes. - Cut the cauliflower into bite-sized florets. - In a large bowl, combine cauliflower, olive oil, and teriyaki sauce. - Add garlic powder, onion powder, black pepper, and sea salt. Toss well to coat. - Sprinkle cornstarch over the cauliflower and mix until evenly coated. - Place the cauliflower in the air fryer basket in a single layer. - Set the air fryer to 400°F (200°C). - Cook for 10-12 minutes, shaking the basket halfway through for even crispness. - Remove the cauliflower from the air fryer when golden brown. - Garnish with sesame seeds and sliced green onions before serving. Cornstarch is key for crispy cauliflower. It absorbs moisture and creates a crunchy crust. When you sprinkle it on, make sure every piece is coated. This small step makes a big difference in texture. Avoid overcrowding the air fryer. If you pack too much in, hot air can't circulate properly. This can lead to soggy pieces instead of crisp ones. Cook in batches if needed to keep everything evenly cooked. Set your air fryer to 400°F (200°C). This high heat helps brown the cauliflower. Cook for 10-12 minutes. Don’t forget to shake the basket halfway through. This ensures even cooking and a golden finish. Different air fryer models may need slight adjustments. Some may cook faster than others. Check the cauliflower a couple of minutes before the time is up. You want it crispy but not burnt. Using homemade teriyaki sauce can elevate your dish. It allows you to control the sweetness and saltiness. Plus, it adds a unique touch. Simple recipes often include soy sauce, honey, and ginger. Feel free to explore additional seasonings. Try adding chili flakes for heat or sesame oil for depth. These small changes can create a flavor explosion in your dish. Don't be afraid to experiment! {{image_4}} You can add spices to create a new taste. Try a pinch of cayenne for heat. If you want a sweet twist, mix in honey or maple syrup with the teriyaki sauce. For a vegan option, use tamari instead of regular teriyaki sauce. This keeps it tasty and plant-based. You can swap cauliflower for other veggies. Broccoli, Brussels sprouts, or bell peppers also work well. For a gluten-free choice, ensure your teriyaki sauce is gluten-free. You could even try using coconut aminos instead. They add a nice flavor without gluten. This dish makes a great side. Pair it with rice or quinoa for a full meal. You can also enjoy it with a fresh salad on the side. If you have leftovers, toss them into a stir-fry or wrap them in a tortilla. This will make any meal exciting! To keep your crispy teriyaki cauliflower fresh, follow these tips: - Let the cauliflower cool completely before storing. - Place it in an airtight container. - Store in the fridge for up to three days. - If you have a lot, consider using multiple containers. Using clear containers helps you see what's inside. This way, you can use the leftovers quickly. When it's time to enjoy your leftovers, reheating is key to maintaining that crispy texture. Here are your options: - Air Fryer: Preheat the air fryer to 350°F (175°C). Place the cauliflower in a single layer and heat for about 5 minutes. This helps keep it crispy. - Oven: Preheat your oven to 375°F (190°C). Spread the cauliflower on a baking sheet and heat for about 10 minutes. Make sure to check it often. Both methods work well, but the air fryer gives you the best crunch. Enjoy your tasty meal again! Yes, you can use frozen cauliflower. However, it may not be as crispy. Frozen cauliflower has more water. This extra moisture can make it softer. If you use frozen, cook it a bit longer. You can also thaw it first for better results. Making homemade teriyaki sauce is simple! You need just a few ingredients. Here’s a quick recipe: - 1/4 cup soy sauce - 1 tablespoon honey or brown sugar - 1 tablespoon rice vinegar - 1 teaspoon sesame oil - 1 clove garlic, minced - 1 teaspoon ginger, grated Just mix these ingredients in a bowl. Heat it in a pan for a minute. It thickens slightly and adds great flavor! The air fryer is very versatile! Here are some tasty ideas: - Crispy Brussels sprouts - Sweet potato fries - Chicken wings - Veggie chips - Stuffed peppers These recipes work well and are easy to make. You can explore even more air fryer ideas to enjoy! This air fryer crispy teriyaki cauliflower is simple to make and full of flavor. You learned what ingredients you need, how to prepare them, and tips to ensure each bite is crispy. I shared ways to customize your dish and how to store leftovers for later. Try these methods for a tasty side or snack anytime. Enjoy your cooking and the yummy results!

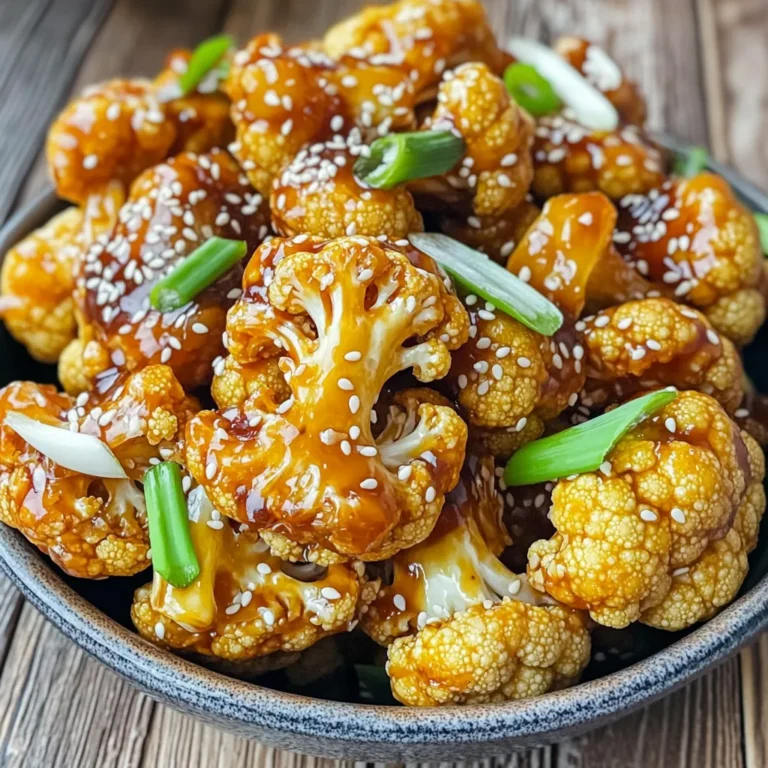
Air Fryer Crispy Teriyaki Cauliflower Delight

- 1 cup rolled oats - 1 ripe banana, mashed - 1 cup pumpkin puree - 2 scoops vanilla protein powder - 1 teaspoon baking powder - ½ teaspoon ground cinnamon - ¼ teaspoon ground nutmeg - ¼ teaspoon ground ginger - 1 cup almond milk - 1 tablespoon maple syrup (optional) - Cooking spray or coconut oil The ingredients for pumpkin spice protein pancakes are simple and clean. I love using rolled oats as the base. They add fiber and nutrients. The ripe banana gives natural sweetness and creaminess. Pumpkin puree is loaded with vitamins and adds a rich flavor. I use vanilla protein powder to boost the protein content. This makes the pancakes filling and satisfying. Baking powder helps them rise. The spices—cinnamon, nutmeg, and ginger—bring that cozy autumn vibe. Almond milk keeps the batter light. You can add maple syrup for extra sweetness, but it’s not a must. These pancakes are not just tasty; they are good for you, too. Each serving has a good amount of protein from the protein powder and oats. This helps build muscles and keeps you full longer. Pumpkin, the star of the dish, is full of nutrients. It has vitamin A, which is great for your eyes. It also has fiber, which aids digestion. Each serving of these pancakes has about 250 calories. This makes them a smart choice for breakfast. You get a balanced meal that is high in protein and low in empty calories. Enjoying these pancakes helps you start your day right. Start by placing 1 cup of rolled oats in a blender. Blend them at medium speed. You want a fine, flour-like consistency. This oat flour will be the base for your pancakes. It’s simple and healthy, making them perfect for breakfast. Add the following ingredients to your blender: - 1 ripe banana, mashed - 1 cup pumpkin puree - 2 scoops vanilla protein powder - 1 teaspoon baking powder - ½ teaspoon ground cinnamon - ¼ teaspoon ground nutmeg - ¼ teaspoon ground ginger - 1 cup almond milk - 1 tablespoon maple syrup (optional) Blend on high until everything is smooth and creamy. This step ensures the flavors mix well. If the batter feels too thick after resting, add a little more almond milk to reach your desired texture. Preheat a non-stick skillet over medium heat. Lightly grease the skillet with cooking spray or coconut oil. Pour about ¼ cup of batter for each pancake. Leave space between them so they can spread. Cook the pancakes for 3-4 minutes. Look for bubbles to form on the surface. Once you see them, flip the pancakes over. Cook for another 2-3 minutes until they are a lovely golden brown. Repeat this with the remaining batter, adding more oil if needed. Enjoy your warm pancakes stacked high on a plate! To make fluffy pancakes, resting the batter is key. After mixing, let it sit for about 5 minutes. This helps the oats soak up moisture and puff up. If the batter feels too thick when resting, add a splash of almond milk. This will help reach the right consistency for perfect pancakes. To avoid pancakes sticking, use a non-stick skillet and coat it lightly. Cooking spray or coconut oil works great. For pancake size, aim for about ¼ cup of batter per pancake. This size cooks evenly and makes flipping easier. Top your pancakes with delicious flavors. A drizzle of maple syrup or a dollop of whipped cream adds sweetness. You can also sprinkle chopped nuts for a nice crunch. Pair these pancakes with fresh fruit or yogurt for a balanced breakfast. Enjoy the mix of flavors and textures! {{image_4}} You can easily change the protein powder in this recipe. Different types can alter taste and texture. For example, try chocolate protein powder for a dessert vibe. You can also use plant-based protein powder for a vegan option. When it comes to milk, almond milk works great, but you can switch it up. Try oat milk, soy milk, or even coconut milk. Each option adds its own flavor and creaminess. Want to jazz up your pancakes? You can add spices! Consider a pinch of cloves or allspice for extra warmth. You could also try a dash of vanilla extract for a sweet touch. Mix-ins can make these pancakes even more fun. Toss in some chocolate chips or chopped nuts. Walnuts or pecans add a nice crunch. Dried fruit like cranberries or raisins also works well. If you need gluten-free pancakes, use gluten-free rolled oats. They provide the same great taste without the gluten. For a vegan twist, swap the eggs with flaxseed meal or applesauce. You can also omit the protein powder or use a plant-based version. This makes the pancakes light and fluffy while keeping them delicious. To keep your pumpkin spice protein pancakes fresh, store them in the fridge. Place the pancakes in an airtight container. They can last for about three days. If you want to save them for longer, freeze them. Stack the pancakes with parchment paper in between. This will stop them from sticking together. Then, place the stack in a freezer-safe bag. They can stay good for up to three months. When you're ready to enjoy leftover pancakes, reheating them is easy. You can use a microwave, oven, or skillet. For the microwave, heat them for about 30 seconds. Check if they're warm enough. If not, heat in 15-second bursts. For the oven, preheat to 350°F (175°C). Place pancakes on a baking sheet and cover with foil. Heat for about 10-15 minutes. This keeps them warm and fluffy. If you prefer a skillet, use medium heat. Add a little cooking spray or oil to the pan. Heat each pancake for about 1-2 minutes on each side. This method helps keep them crisp. Avoid sogginess by not using too much moisture when reheating. Yes, you can use quick oats. They will work but may change the texture. Quick oats can make the pancakes softer and less chewy. If you choose quick oats, blend them until fine, just like rolled oats. To make these pancakes vegan, simply swap the protein powder. Use a plant-based protein powder. Replace the almond milk with any non-dairy milk. Use a flax egg instead of the banana if you want a different binding agent. You can use other purees like butternut squash or sweet potato. These options will give you a similar flavor and texture. - Butternut squash puree - Sweet potato puree - Applesauce (for a sweeter taste) To make homemade pumpkin puree, roast a small pumpkin. Cut it in half, remove the seeds, and bake it face down at 350°F for about 45 minutes. Once soft, scoop the flesh and blend until smooth. Look for bubbles forming on the surface. This shows that the batter is cooking well. - Bubbles forming on the pancake surface - Edges look set and slightly dry Well-cooked pancakes should be golden brown. They should feel firm but soft to the touch. If they are too dark, reduce the heat. If they are too light, cook a bit longer. This post covers delicious pumpkin pancakes made from simple ingredients. We reviewed each step, from preparing the oat flour to cooking the pancakes. You learned tips to keep pancakes fluffy and flavorful. We also discussed storage methods to enjoy leftovers later. In the end, these pancakes offer nutrition and great taste. Enjoying them can help you eat well while having fun in the kitchen. Happy cooking!

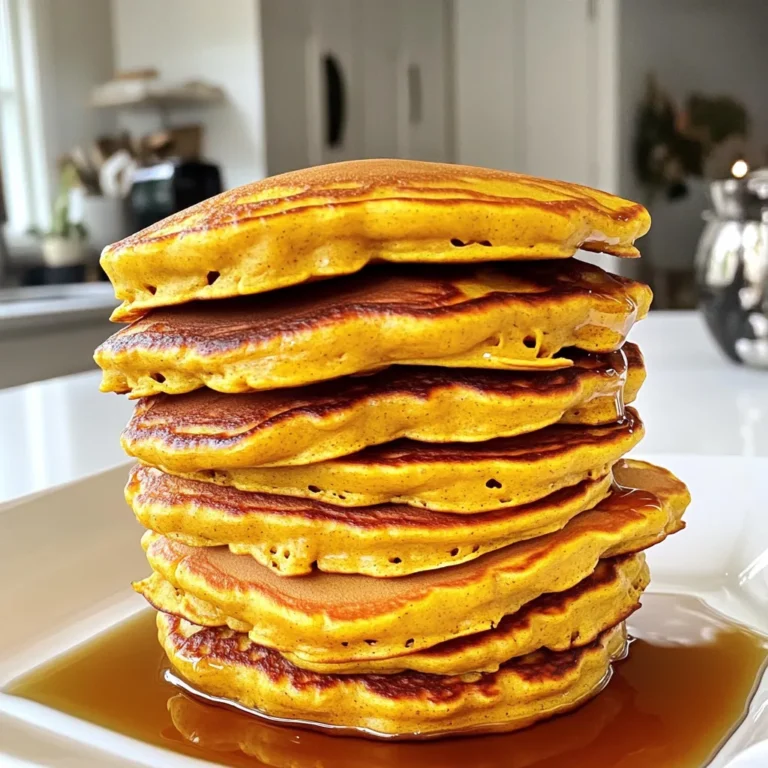
Pumpkin Spice Protein Pancakes Easy Healthy Breakfast

PREV 1 … 3 4 5 … 18 NEXT
sweet savory saga

explore

DessertsDinnerAppetizersDrinks

Our Policies

  • Cookie Policy
  • Copyright Policy
  • Disclaimer
  • GDPR Policy
  • Terms Of Use
Back to Top
  • About
  • Contact Us
  • Privacy Policy
© 2025 sweet savory saga