FREE DINNER EBOOK! Get your copy!
  • Cookie Policy
  • GDPR Policy
  • Disclaimer
  • Terms Of Use
  • Visit my other site: Fun Cookie Recipes
sweet savory saga
  • Home
  • Dinner
  • Desserts
  • Drinks
  • Appetizers
  • Contact
  • About
  • Privacy Policy
  • Home
  • Dinner
  • Desserts
  • Drinks
  • Appetizers
  • Contact
  • About
  • Privacy Policy
  • Cookie Policy
  • GDPR Policy
  • Disclaimer
  • Terms Of Use
Visit my other site: Fun Cookie Recipes

HOME / CATEGORIES /

Latest

- 1 cup canned pumpkin puree - 1/2 cup packed brown sugar - 1/4 cup granulated sugar - 1/2 cup unsweetened applesauce - 1/2 cup creamy peanut butter or nut-free alternative - 1 teaspoon pure vanilla extract - 1 1/2 cups rolled oats - 1 cup all-purpose flour or gluten-free substitute - 1 teaspoon baking soda - 1 teaspoon pumpkin pie spice - 1/2 teaspoon fine salt - 1 cup chocolate chips (dark or semi-sweet) - 1/2 cup chopped walnuts (optional) Gathering the right ingredients is key to making these cookies shine. I love using canned pumpkin puree because it gives a rich flavor and a great texture. You can find it in most grocery stores. Brown sugar adds moisture and a deep sweetness. Granulated sugar balances it out. Unsweetened applesauce is a fun way to keep cookies moist and healthy. I often use creamy peanut butter for richness, but you can swap it for a nut-free option if needed. Don’t forget the pure vanilla extract! It adds a warm flavor that makes these cookies special. Rolled oats bring a nice chewiness, while flour gives them structure. Baking soda helps cookies rise, and pumpkin pie spice gives a cozy fall flavor. Fine salt enhances all the sweet notes. Lastly, I always add chocolate chips. You can choose dark or semi-sweet, depending on your taste. If you want some extra crunch, toss in chopped walnuts! With these ingredients, you are set for a delightful baking adventure. - Preheat the oven to 350°F (175°C). - Line a baking sheet with parchment paper to prevent sticking. - In a large bowl, mix together: - 1 cup canned pumpkin puree - 1/2 cup packed brown sugar - 1/4 cup granulated sugar - 1/2 cup unsweetened applesauce - 1/2 cup creamy peanut butter (or almond butter) - 1 teaspoon pure vanilla extract - Blend these ingredients until smooth. - In another bowl, whisk together: - 1 1/2 cups rolled oats - 1 cup all-purpose flour (or gluten-free flour) - 1 teaspoon baking soda - 1 teaspoon pumpkin pie spice - 1/2 teaspoon fine salt - Ensure all dry ingredients mix well. - Gradually stir the dry mix into the wet mixture. - Be gentle; overmixing can make the cookies dense. - Carefully fold in: - 1 cup chocolate chips - 1/2 cup chopped walnuts (if using) - Make sure everything is evenly mixed without overworking the dough. - Use a spoon or cookie scoop to drop rounded tablespoons of dough onto the baking sheet. - Space them about 2 inches apart for even baking. - Place the baking sheet in the preheated oven. - Bake for 12-15 minutes. - Check for doneness: the edges should be golden, but centers should be soft. - Remove the sheet from the oven and let the cookies cool for about 5 minutes. - Then, transfer them to a wire rack to cool completely. To make great cookies, do not overmix the dough. Mix until just combined to keep them soft and chewy. For the best chewiness, bake your cookies for 12 to 15 minutes. They should have golden edges but soft centers. For a lovely look, serve cookies with a dusting of powdered sugar. Stack them on a nice plate or in a cute tin. Pair your cookies with warm tea or coffee. This adds to the cozy experience of enjoying your treat. Use parchment paper to line your baking sheet. This prevents cookies from sticking and makes cleanup easy. Space each cookie about 2 inches apart on the sheet. This allows them to spread and stay soft while baking. {{image_4}} You can make these cookies gluten-free easily. Just swap the all-purpose flour for gluten-free flour. Many options exist, like almond or coconut flour. Make sure it is a 1:1 ratio. This keeps the dough soft and chewy. If you need nut-free cookies, use sun butter instead of peanut or almond butter. Sun butter works well and has a similar texture. This keeps the cookies creamy and tasty without nuts. Feel free to play with the flavors in your cookies! You can change the spices if you want. More cinnamon or nutmeg can add warmth. You can also add coconut flakes for a tropical twist. Just make sure to balance the flavors for the best taste. To keep your cookies fresh, store them in an airtight container. Place parchment paper between layers to prevent sticking. This method keeps them soft and tasty. You can store them at room temperature for about four to five days. If you want to keep them longer, the fridge is a good option. They stay fresh there for up to a week. Freezing cookies is easy and great for long-term storage. First, let the cookies cool completely. Then, place them in a single layer on a baking sheet. Freeze them for about an hour. Once frozen, transfer the cookies to a freezer-safe bag or container. Be sure to squeeze out as much air as possible. This helps prevent freezer burn. They can last up to three months in the freezer. When you're ready to enjoy a cookie, take it out and let it thaw at room temperature. For the best texture, you can warm it in the oven at 350°F for a few minutes. This brings back the soft, gooey goodness of your cookies. Enjoy your delicious treat anytime! Yes, you can use fresh pumpkin. To make fresh pumpkin puree, start with a small pumpkin. Cut it in half, remove the seeds, and roast it until soft. Once cool, scoop out the flesh and blend it until smooth. This method gives you a rich flavor. Fresh puree may be a bit watery, so drain any excess liquid before adding it to your mix. Look for golden edges and soft centers. The cookies should puff up a little. If you press gently, they should spring back. They will continue to cook slightly after you take them out. This gives you a chewy texture. Absolutely! You can add different chocolate chips like white or milk chocolate. Dried fruit, like cranberries or raisins, works well too. For a nutty touch, try hazelnuts or pecans. Get creative and make them your own! If you need a substitute, use mashed banana or yogurt. Both add moisture and sweetness. You can also try pureed prunes for a rich taste. These options keep the cookies soft and tasty. We covered a simple and delicious pumpkin cookie recipe, from ingredients to baking tips. You learned how to prep, combine, and bake for amazing results. I shared ways to make them gluten-free or nut-free. With the right storage methods, these cookies will stay fresh. Remember, each bite can shine with your personal touch. Enjoy your baking journey and make these cookies your own!

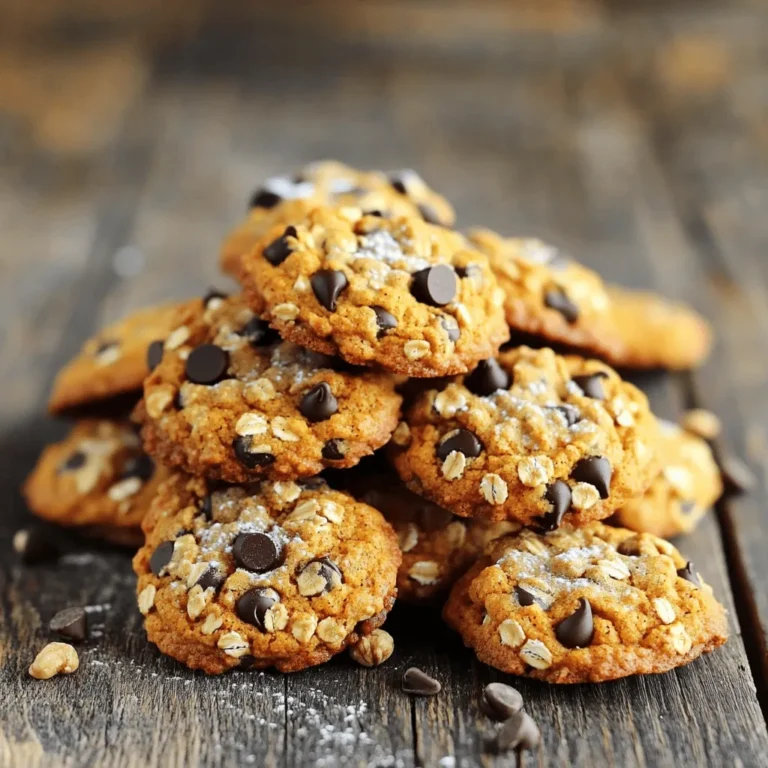
Chocolate Chip Pumpkin Oat Cookies Delightful Treat

- 1 medium head of cauliflower, cut into bite-sized florets - 2 tablespoons extra-virgin olive oil - 1 teaspoon smoked paprika - 1 teaspoon ground cumin - 1 teaspoon garlic powder - Sea salt and freshly ground black pepper, to taste - 8 small corn tortillas - 1 cup shredded red cabbage - 1 ripe avocado, sliced - Fresh cilantro leaves, for garnish To make these tacos, I start with a fresh head of cauliflower. Cauliflower is hearty and takes on flavors well. Olive oil helps the spices stick to the florets. I use smoked paprika for a rich taste and color. Ground cumin adds warmth, while garlic powder gives a savory kick. Season with sea salt and black pepper to enhance the flavors. Next, I warm corn tortillas. They are soft and perfect for holding the filling. I top each taco with shredded red cabbage for crunch. Sliced avocado adds creaminess and richness. Finally, I sprinkle fresh cilantro for a burst of flavor. - 1/2 cup Greek yogurt - 1 to 2 tablespoons chipotle peppers in adobo sauce (adjust based on preferred heat level) - 1 tablespoon freshly squeezed lime juice - A pinch of salt, to taste For the chipotle crema, I mix Greek yogurt with chipotle peppers. This gives it a smoky and spicy flavor. Adding lime juice brightens the sauce. A pinch of salt enhances the taste. I like to adjust the heat based on my mood, so you can add more or less chipotle. This crema adds a creamy, zesty touch to the tacos. These ingredients work together to create delicious roasted cauliflower tacos with chipotle crema. Enjoy the blend of flavors in every bite! - Preheat your oven to 425°F (220°C). This heat will help the cauliflower roast well. - In a large bowl, mix the cauliflower florets with 2 tablespoons of olive oil. - Add 1 teaspoon of smoked paprika, 1 teaspoon of ground cumin, and 1 teaspoon of garlic powder. - Sprinkle in sea salt and black pepper to taste. Toss until all the florets are coated. - Spread the seasoned cauliflower in a single layer on a baking sheet. - Roast it in the preheated oven for 25 to 30 minutes. - Flip the florets halfway through cooking. This helps them brown evenly. - While the cauliflower roasts, make the chipotle crema. - In a small bowl, whisk together ½ cup of Greek yogurt and 1 to 2 tablespoons of chipotle peppers in adobo sauce. - Add 1 tablespoon of lime juice and a pinch of salt. Stir until smooth. Adjust the heat by adding more chipotle as needed. - To warm the tortillas, heat a dry skillet over medium heat. - Place the corn tortillas in the skillet for about 30 seconds on each side. - Look for a slight char and pliability. - On each warm tortilla, layer several roasted cauliflower florets. - Top with shredded red cabbage and avocado slices. - Drizzle on the chipotle crema. - Garnish with fresh cilantro leaves. Enjoy your tacos! To get the best roasted cauliflower, you need an even coating. When you mix the florets with olive oil and spices, make sure every piece gets covered. This helps them roast evenly. Flipping the florets halfway through cooking is also key. It ensures all sides get that nice golden color. Set a timer to remind yourself to turn them, so they cook perfectly. You can easily adjust the heat of your chipotle crema. Start with one tablespoon of chipotle peppers. If you want more spice, add another tablespoon. Taste as you go to find your perfect level. Adding other flavors is fun too. You can mix in minced garlic or a bit of lime zest for extra zing. These small changes can make a big difference in taste. Pair your tacos with tasty side dishes. Seasoned black beans are a great match. A light salad adds freshness and crunch. Present your tacos on a colorful platter. Add lime wedges for a pop of color. This makes the meal look inviting and delicious. Enjoy the fun of sharing and savoring every bite! {{image_4}} You can switch out cauliflower for other roasted veggies. Try sweet potatoes, bell peppers, or zucchini. Each veggie gives a unique taste and texture. You can mix different toppings too. Add black beans, corn, or fresh tomatoes for more flavor and crunch. These swaps keep your tacos fresh and exciting. Corn tortillas are classic, but flour tortillas are also tasty. If you want a gluten-free option, look for brown rice tortillas or corn tortillas made from 100% corn. These choices keep your tacos soft and delicious. The right tortilla pairs well with the roasted veggies and crema. For a vegan option, swap Greek yogurt with silken tofu or cashew cream. Blend these with chipotle peppers and lime juice for a creamy texture. You can also use almond yogurt for a lighter flavor. Adjust the ingredients to suit your taste. This way, everyone can enjoy the spicy chipotle crema. To keep your roasted cauliflower tacos fresh, follow these tips: - Cool before storing: Let the tacos cool down to room temperature. - Use airtight containers: Place the tacos in a container. Seal it well to avoid air. - Separate the components: Store the cauliflower, tortillas, and toppings in different containers. This keeps everything fresh. When it comes to reheating the cauliflower, here’s how to do it right: - Oven method: Preheat your oven to 350°F (175°C). Spread the cauliflower on a baking sheet. Heat for about 10-15 minutes until warm. - Microwave option: Place the cauliflower on a microwave-safe plate. Heat in short bursts of 30 seconds, stirring in between. To keep your chipotle crema tasty, use these storage tips: - Choose the right container: Use a clean, airtight jar for storage. Glass jars work well. - Check the shelf life: Store the crema in the fridge for up to one week. If you want to save it longer, consider freezing: - Freezing option: Pour the crema into ice cube trays. Once frozen, transfer the cubes to a freezer bag. This way, you can use small amounts later. To make roasted cauliflower tacos gluten-free, use corn tortillas. Corn tortillas are naturally gluten-free, making them a great choice. Always check the labels to ensure there are no added gluten ingredients. You can also use lettuce wraps for a low-carb option. Yes, you can prepare the chipotle crema in advance. Mix all the ingredients and store it in an airtight container in the fridge. It stays fresh for up to three days. This saves time when you are ready to enjoy your tacos. Cauliflower offers many health benefits. It is low in calories but high in fiber. It is a great source of vitamins C and K. Cauliflower also has antioxidants, which help fight inflammation. Eating cauliflower may support heart health and improve digestion. The spiciness of the chipotle crema depends on how many chipotle peppers you use. Start with one tablespoon for mild heat. If you like it spicier, add more to taste. Remember, the heat can build, so adjust it slowly. Yes, you can use frozen cauliflower for this recipe. Just make sure to thaw and drain it well before seasoning. Frozen cauliflower may take a little longer to roast. Keep an eye on it to ensure it gets golden and tender. Roasted cauliflower tacos are simple and delicious. We covered the main ingredients and steps, from roasting cauliflower to making chipotle crema. I shared tips for perfecting your tacos, along with storage advice and fun variations. Remember, you can mix up the toppings or try different tortillas. These tacos are not only easy to make but also tasty and customizable. Enjoy your cooking and let the flavors shine in every bite.

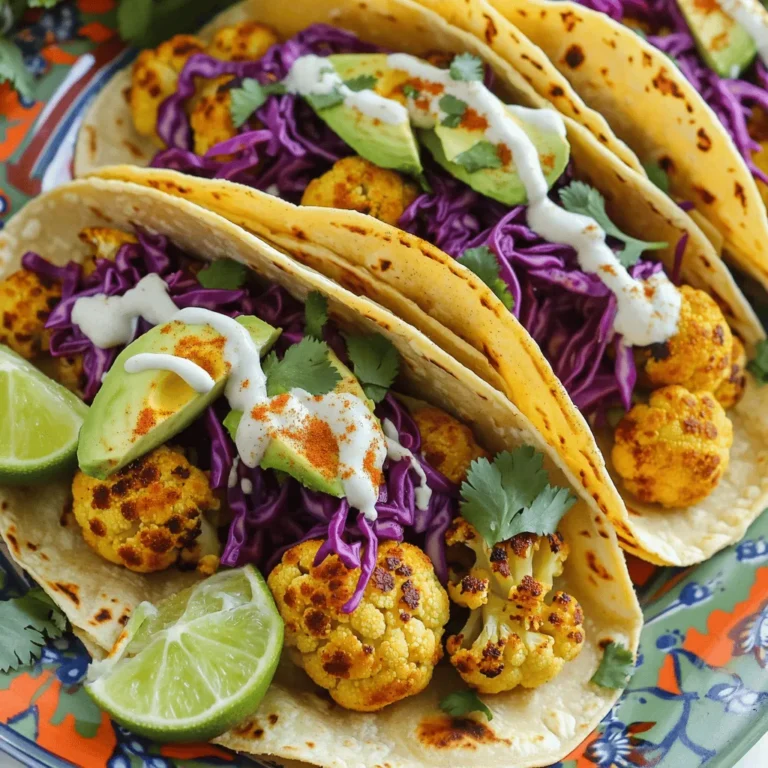
Roasted Cauliflower Tacos with Chipotle Crema Delight

For these delightful Chocolate Chip Cookie Dough Truffles, you will need: - 1 cup all-purpose flour (heat-treated) - 1/2 cup unsalted butter, softened to room temperature - 1/3 cup brown sugar, packed tightly - 1/3 cup granulated sugar - 1/2 teaspoon vanilla extract - 1/4 teaspoon sea salt - 1/2 cup mini chocolate chips - 8 oz. milk chocolate, for coating - Sea salt flakes, for garnish Each ingredient plays a key role in creating the perfect truffle. The heat-treated flour ensures safety while giving that classic cookie dough taste. Softened butter helps create a creamy texture. Brown and granulated sugars add sweetness and depth. Vanilla extract gives a lovely aroma, while sea salt balances the sweetness. Mini chocolate chips bring bursts of chocolate joy in every bite. Finally, the milk chocolate coating makes these truffles irresistible. The sea salt flakes on top provide a gourmet touch. Gathering the right ingredients is the first step to making these treats. Remember, using high-quality chocolate and fresh ingredients will enhance the flavor. Enjoy the process of combining these items to create a delicious snack! - Heat-treat the flour: Start with 1 cup of all-purpose flour. Place it in a microwave-safe bowl. Heat it on high for 1 minute. This step makes it safe to eat. Let it cool before using. - Cream the butter and sugars: Take 1/2 cup of softened unsalted butter. Add it to a large mixing bowl. Mix it with 1/3 cup of packed brown sugar and 1/3 cup of granulated sugar. Use an electric mixer on medium speed. Beat until the mixture is fluffy, about 2-3 minutes. - Incorporate flavoring and flour: Add 1/2 teaspoon of vanilla extract and 1/4 teaspoon of sea salt. Mix until fully combined. Gradually add your cooled flour. Mix on low speed until just combined. Be careful not to overmix. - Fold in chocolate chips: Take 1/2 cup of mini chocolate chips. Gently fold them into your dough. Make sure they are evenly spread throughout the mix. - Shape the truffles: Scoop small portions of the dough. Roll them into 1-inch balls using your hands. Place the balls on a parchment-lined baking sheet. Space them out to avoid sticking. - Chill the dough balls: Cover the baking sheet with plastic wrap. Chill the dough balls in the fridge for about 30 minutes. This helps them hold their shape. - Melt the chocolate: While the dough balls chill, prepare the coating. In a microwave-safe bowl, melt 8 oz. of milk chocolate. Do this in 30-second intervals. Stir in between until smooth. - Dip the truffles: Remove the dough balls from the fridge. Using a fork, dip each ball into the melted chocolate. Make sure they are fully coated. Let excess chocolate drip off before placing them back on the sheet. - Garnish with sea salt: While the chocolate is still wet, sprinkle a pinch of sea salt flakes on each truffle. This adds a nice flavor contrast. - Set the truffles: Return the truffles to the fridge for 15-20 minutes. This lets the chocolate set completely. Enjoy your tasty treats! - Ensure the flour is heat-treated properly: Heat-treat the flour to kill any germs. Just microwave it for one minute. Stir and let it cool before use. - Avoid overmixing the dough: Mix the dough just until combined. Overmixing can make the truffles tough. You want a soft and tender texture. - Achieve smooth chocolate coating: Melt the chocolate slowly in short bursts. Stir it well to keep it smooth. This will help the coating look perfect. - Decorative serving suggestions: Arrange the truffles on a pretty plate. You can even use a cake stand for added height. This makes them look fancy. - How to use garnishes effectively: Sprinkle mini chocolate chips or sea salt flakes around the truffles. This adds color and flair. It also highlights the yummy flavors you created. {{image_4}} You can switch up the chocolate type for the coating. Use dark chocolate for a richer taste. White chocolate gives a sweet twist. Each choice adds a new layer of flavor. Try adding flavor extracts to your dough. A few drops of almond extract can boost the taste. Mint extract gives a fresh zing. Experiment with what you love most. If you need a dairy-free version, use vegan butter instead of regular butter. This keeps the texture while making it suitable for everyone. For a gluten-free treat, swap all-purpose flour with a gluten-free blend. Just ensure it works well for baking. This way, everyone can enjoy these truffles without worry. To keep your chocolate chip cookie dough truffles fresh, store them in an airtight container. Place parchment paper between layers to prevent sticking. You can keep them in the fridge for up to a week. For longer storage, freeze the truffles. Just place them on a baking sheet first. Once frozen, transfer them to a freezer bag. This way, you can enjoy them later. Homemade truffles last about one week in the fridge. In the freezer, they can last for up to three months. Always check for signs of spoilage. If you see any discoloration or an odd smell, it’s best to toss them. Enjoy your sweet treats while they’re fresh! Can I eat raw cookie dough? Yes, you can eat this raw cookie dough! I use heat-treated flour, which makes it safe. This method kills any harmful bacteria. Enjoy the sweet, creamy goodness without worry. How do I know when the chocolate is melted properly? Melt the chocolate in 30-second bursts. Stir after each burst. The chocolate should be smooth and glossy. If you see lumps, keep melting. Stop when you have a silky texture. Can these truffles be made ahead of time? Absolutely! You can make these truffles a day in advance. Just store them in the fridge. They will stay fresh and tasty, ready for your next treat! This blog post covered how to make delicious cookie dough truffles. We discussed ingredients, step-by-step instructions, tips for success, and fun variations. Remember to heat-treat your flour for safety, and don't skip the chill time for better shapes. You can also play with flavors and storage options. Enjoy these treats at home or share them with friends. Making truffles is simple and rewarding. Happy cooking!

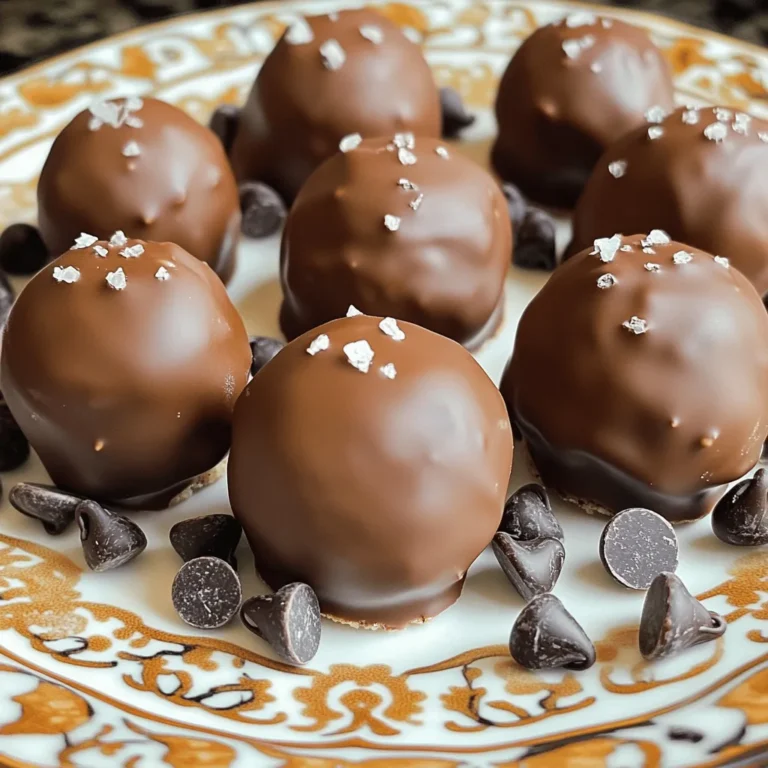
Chocolate Chip Cookie Dough Truffles Easy Treat Delight

- 1 cup unsweetened almond milk - 1 ripe banana - 1 scoop chocolate protein powder (whey or plant-based) - 1 tablespoon unsweetened cocoa powder - 1 tablespoon instant coffee granules - 1 tablespoon almond butter - 1 tablespoon chia seeds - 1 teaspoon honey or maple syrup (optional) - Ice cubes (as needed) - Unsweetened almond milk: Low in calories and dairy-free. It helps keep the smoothie light. - Ripe banana: Adds natural sweetness and provides potassium for muscle health. - Chocolate protein powder: Boosts protein intake for muscle repair and growth. - Unsweetened cocoa powder: Rich in antioxidants and offers a deep chocolate flavor. - Instant coffee granules: Provides caffeine for energy and focus to kickstart your day. - Almond butter: Adds healthy fats and protein, making the smoothie creamy. - Chia seeds: Packed with fiber and omega-3 fatty acids, they aid digestion and heart health. - Honey or maple syrup: Optional sweeteners that enhance flavor while adding nutrients. - Ice cubes: Adjusts the thickness and keeps the drink cold and refreshing. - You can use soy or oat milk if you want different flavors. - Swap the ripe banana for avocado for a creamier texture. - Use vanilla protein powder for a lighter chocolate taste. - If you don't like almond butter, try peanut or sunflower seed butter. - Replace chia seeds with ground flaxseeds for similar benefits. - If you avoid sugar, skip the sweetener and let the banana shine. - For a caffeine-free option, use carob powder instead of cocoa powder and coffee. Start by pouring 1 cup of unsweetened almond milk into your blender. Next, take a ripe banana, peel it, and break it into chunks. Add the banana to the blender with the milk. Blend these two ingredients on high speed until you have a smooth and creamy mix. Now, it’s time to add more flavor and protein. Add 1 scoop of chocolate protein powder, 1 tablespoon of unsweetened cocoa powder, and 1 tablespoon of instant coffee granules. Include 1 tablespoon of almond butter and 1 tablespoon of chia seeds for a nutrient boost. If you like it sweet, add 1 teaspoon of honey or maple syrup. Blend again on high until everything combines into a rich mixture. Check the thickness of your smoothie. If you want it frostier, add a few ice cubes. Blend again until the smoothie reaches your desired thickness. Finally, taste it. If you want it sweeter, add a bit more honey or maple syrup. Once it's perfect, pour it into a tall glass and enjoy! To get the best taste from your High-Protein Mocha Smoothie, use ripe bananas. Ripe bananas bring sweet notes that blend well with cocoa. Choose quality chocolate protein powder, too. It adds richness and depth to the smoothie. If you want more coffee flavor, add extra instant coffee granules. You can also try different nut butters for a unique twist. Boost the nutrition of your smoothie by adding more seeds. Flaxseeds or hemp seeds can add healthy fats and fiber. You can also toss in some spinach or kale. These greens blend well and add vitamins without changing the taste. For added protein, consider mixing in Greek yogurt. It's creamy and gives you extra protein without much effort. When serving your smoothie, make it look good! Pour it into a tall glass to show off the rich color. Try garnishing with a sprinkle of chia seeds. A slice of banana on the rim adds a nice touch. If you want, dust some cocoa powder on top for extra flair. These small details make your smoothie more inviting and fun to enjoy! {{image_4}} You can choose different protein powders for your smoothie. Chocolate protein powder works well, but you can also try vanilla or unflavored. If you focus on plant-based options, look for pea or hemp protein. These options blend smoothly and keep your drink tasty. Each type adds a unique twist to your mocha smoothie. Want to spice things up? You can add vanilla extract for a sweet touch. A dash of cinnamon or nutmeg can warm up the flavor, too. For a fun twist, try adding a small amount of peppermint extract. Each of these flavors can make your smoothie feel fresh and exciting. If you follow a vegan diet, use plant-based protein powder and unsweetened almond milk. For a keto-friendly version, swap the banana for avocado. This change keeps the creaminess while cutting carbs. You can also skip the honey or maple syrup to reduce sugar. These simple swaps make the smoothie fit your diet while still being delicious. If you have leftover smoothie, pour it into a sealed container. Keep it in the fridge. It stays fresh for up to 24 hours. Smoothies can separate, so shake or stir before drinking. This helps mix everything back together. You can freeze your smoothie for later. Pour it into ice cube trays or freezer bags. Fill the bags about three-quarters full to allow for expansion. When you're ready to drink it, just blend the frozen cubes with a bit of almond milk. This makes a quick and easy breakfast. When re-blending, add a splash of almond milk. This helps loosen the mix. If it seems too thick, keep adding a little milk until it's smooth. Blend until you reach your desired consistency. Enjoy your energizing treat! A high-protein smoothie is a drink packed with protein. You can make it with protein powder, Greek yogurt, or nut butters. The protein helps build muscles and keeps you full longer. This means you feel energized and ready for the day. My high-protein mocha smoothie uses chocolate protein powder and almond butter for that extra boost. It’s tasty and healthy! To make this smoothie dairy-free, simply use unsweetened almond milk. Almond milk is a great option that tastes good. You can also try oat milk or coconut milk. Just make sure any protein powder you choose is dairy-free too. This way, you can enjoy a creamy smoothie without any dairy. Yes, you can use fresh coffee instead of instant coffee. Brew a strong cup of coffee and let it cool first. Use about 1/4 cup of brewed coffee for each tablespoon of instant coffee. This adds a rich flavor to your smoothie. Just remember to blend it well with the other ingredients for the best taste. In this post, we covered how to make a tasty high-protein smoothie. We explored key ingredients and their health benefits. I shared tips for blending and adjusting your smoothie’s texture. You learned about flavor tricks and key variations, including vegan options. Lastly, we discussed how to store your smoothie properly. Keep experimenting with flavors and ingredients. Your smoothie can be a fun and healthy treat! Enjoy every sip while knowing you're fueling your body well.

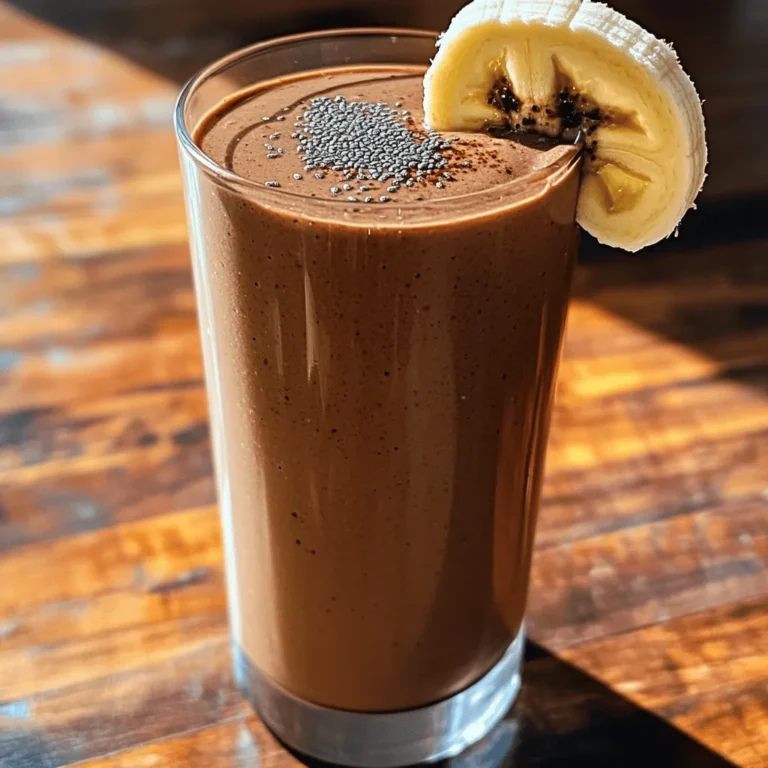
High-Protein Mocha Smoothie Energizing Breakfast Treat

To make this dish, you need a few key items: - 1 cup Arborio rice - 4 cups vegetable broth - 1 medium onion, finely chopped - 3 cloves garlic, minced - 1 tablespoon olive oil - 1 tablespoon butter - Zest of 1 lemon - 1/4 cup fresh lemon juice - 1 cup grated Parmesan cheese - 1/2 teaspoon salt - 1/4 teaspoon black pepper - Fresh parsley, chopped (for garnish) These ingredients create a simple yet flavorful risotto. The Arborio rice gives it a creamy texture. The lemon zest and juice add a bright taste. For the best results, I suggest using these brands: - Arborio rice: Look for brands like Riso Scotti or Lundberg. - Vegetable broth: Swanson or Pacific Foods offer great options. - Parmesan cheese: Freshly grated Parmigiano-Reggiano is ideal for flavor. Using high-quality ingredients helps elevate your dish’s taste. If you have dietary needs, here are some easy swaps: - Arborio rice: You can use Carnaroli rice for a similar texture. - Vegetable broth: Use chicken broth if you prefer a non-vegetarian option. - Parmesan cheese: Nutritional yeast works well for a vegan choice. These substitutes keep the dish tasty while meeting your needs. To start, gather your ingredients. You will need: - 1 cup Arborio rice - 4 cups vegetable broth - 1 medium onion, finely chopped - 3 cloves garlic, minced - 1 tablespoon olive oil - 1 tablespoon butter - Zest of 1 lemon - 1/4 cup fresh lemon juice - 1 cup grated Parmesan cheese - 1/2 teaspoon salt - 1/4 teaspoon black pepper - Fresh parsley, chopped (for garnish) Begin by heating olive oil and butter in a large pan over medium heat. Wait until they melt and bubble gently. Add the chopped onion and cook for 4-5 minutes. You want it soft and clear. Next, add the minced garlic and stir for one more minute. This step brings out the garlic's great flavor. Now, add the Arborio rice. Stir it well to coat each grain in the oil and butter. Toast the rice for 2-3 minutes. This step helps the rice absorb the flavors. Then, slowly add the vegetable broth one scoop at a time. Stir constantly and wait until each scoop is fully absorbed before adding the next. This process will take about 18-20 minutes. Your goal is a creamy texture with rice still firm. To prevent clumps, stir often. Continuous stirring keeps the rice grains separate. This also helps release the rice's starch, which makes the risotto creamy. Remember to use a wooden spoon; it’s gentle on the rice. If the mixture looks too thick, add a splash of broth. This keeps it loose and creamy. Timing is key. Start stirring as soon as you add the first scoop of broth. Keep your eye on the texture. The rice should be al dente, or firm to the bite. When the rice is almost done, taste it. Adjust the seasoning if needed. Once cooked, remove the pan from heat. Stir in the lemon zest, lemon juice, and Parmesan cheese. Mix until smooth. Your risotto should be creamy and full of flavor. For the best taste, use fresh lemon juice and zest. The zest gives a bright, zesty flavor. Sauté your onions and garlic until soft. This step builds a tasty base. Use high-quality Parmesan cheese for a rich finish. Grate it fresh for the best melt and flavor. Stir in the cheese off the heat for creaminess. This helps keep the risotto smooth and rich. Do not rush the broth. Adding it too fast can lead to uneven cooking. Stir often, but not constantly. This lets the rice release starch, which makes it creamy. Avoid cooking the risotto on high heat; it should simmer gently. This method helps the rice cook evenly. Lastly, don’t skip the seasoning. Taste as you go to balance the flavors. Serve your risotto in warm, shallow bowls for a nice look. Top it with fresh parsley for color. A sprinkle of extra lemon zest adds brightness. Consider adding a few more shavings of cheese on top. You can also pair it with grilled chicken or shrimp for a complete meal. This adds protein and makes it even heartier. Enjoy with a crisp salad on the side for a balanced dinner. {{image_4}} You can easily boost the flavor of your risotto. Here are a few great ideas: - Mushrooms: Sauté sliced mushrooms with the onion for a rich taste. - Peas: Stir in fresh or frozen peas near the end. They add sweetness and color. - Spinach: Toss in fresh spinach just before serving. It wilts quickly and adds nutrition. - Shrimp or Chicken: Cook shrimp or diced chicken in the pan before adding onions. This adds protein. - Herbs: Fresh herbs like basil or thyme can offer a lovely twist. Using seasonal ingredients makes this dish even better. Try these ideas: - Spring: Add asparagus or young zucchini for a fresh crunch. - Summer: Mix in fresh tomatoes or corn for sweetness. - Fall: Stir in roasted pumpkin or butternut squash for warmth. - Winter: Use hearty greens like kale or Swiss chard for a robust flavor. You can easily make this risotto vegan and gluten-free. Here’s how: - Vegan: Replace butter with more olive oil. Use nutritional yeast instead of Parmesan for a cheesy flavor. - Gluten-Free: Arborio rice is naturally gluten-free, so you’re safe with this dish. Just check your broth to ensure it’s gluten-free. These variations keep your One-Pot Lemon Parmesan Risotto exciting and fresh. Enjoy experimenting! To store leftover risotto, first cool it to room temperature. This step helps avoid bacteria growth. Next, transfer the risotto to an airtight container. Seal it tightly and place it in the fridge. It can last up to three days. If you're worried about it drying out, drizzle a little olive oil on top before sealing. When reheating risotto, add a splash of broth or water to keep it creamy. Use a pan over low heat for best results. Stir often to help it heat evenly. If you use the microwave, cover it loosely. This method keeps the moisture in. Heat in short intervals, stirring in between. You can freeze risotto for later use. First, cool it completely and place it in freezer-safe bags. Squeeze out air before sealing. Label the bags with the date. Frozen risotto stays good for about two months. When you're ready to enjoy it, thaw in the fridge overnight. Reheat with some broth to bring back the creaminess. It takes about 30 minutes to make this risotto. The prep time is around 10 minutes, while cooking takes about 20 minutes. You will enjoy a warm, creamy dish in no time. Yes, you can make this risotto ahead of time. Cook it and let it cool. Store it in the fridge for up to three days. When ready to eat, reheat with a splash of broth or water for creaminess. You can serve this risotto with many dishes. Grilled chicken or shrimp pair well. A fresh salad adds a nice crunch. Roasted vegetables can also enhance the meal. Enjoy experimenting with your favorite sides! This blog post showed you how to make One-Pot Lemon Parmesan Risotto. We covered the key ingredients, needed steps, and tips to avoid mistakes. You learned how to enhance flavors and explore variations. Proper storage and reheating tips help keep your dish great for later meals. Enjoy this creamy, delicious dish today, and impress your friends with your skills. Your cooking journey starts here, so mix, match, and make it your own!

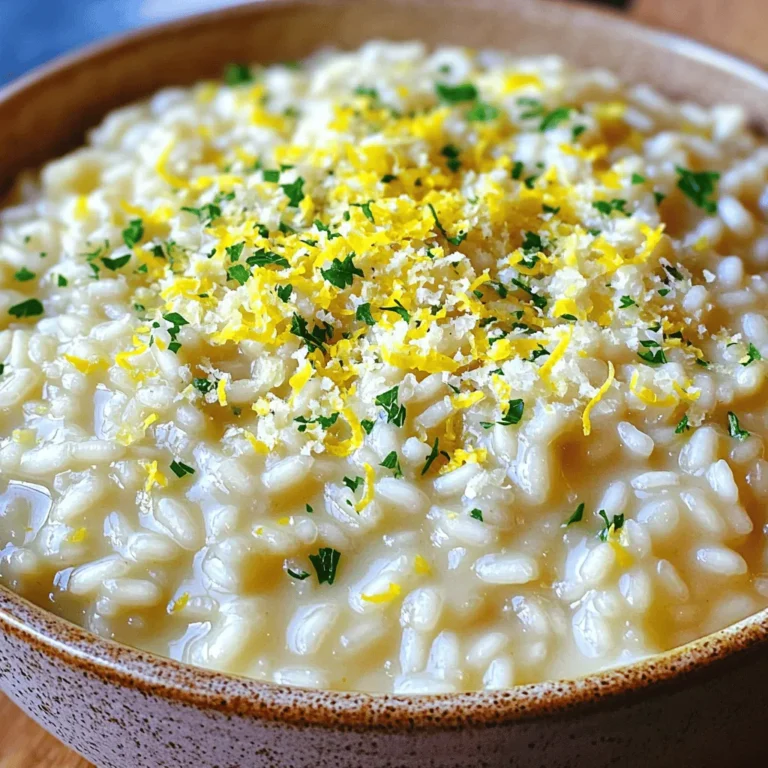
One-Pot Lemon Parmesan Risotto Simple and Flavorful

- 1 medium pumpkin - 1 whole head of garlic - 1 medium onion - 2 tablespoons olive oil - 4 cups vegetable broth - 1 cup coconut milk (or heavy cream) The main ingredients for this creamy roasted garlic pumpkin soup are simple yet rich. The medium pumpkin offers a sweet base. The garlic adds a deep, roasted flavor that makes each bite special. The onion brings sweetness and depth, creating a flavorful base. Olive oil helps with roasting and adds smoothness. Vegetable broth enriches the soup, while coconut milk or heavy cream gives it that creamy texture we all love. - Ground cumin - Ground nutmeg - Salt and freshly ground black pepper Spices play a key role in this soup. Ground cumin adds warmth and earthiness. Ground nutmeg gives a hint of sweetness and a cozy aroma. Salt and freshly ground black pepper are essential for bringing out the flavors. - Fresh parsley - Toasted pumpkin seeds Garnishes make your soup look pretty and add fun textures. Fresh parsley adds a pop of color and freshness. Toasted pumpkin seeds give a nice crunch and nutty flavor. You can choose one or both to elevate your soup. 1. Preheating the oven: Start by setting your oven to 400°F (200°C). This high heat will help roast the pumpkin and garlic perfectly. 2. How to prepare the pumpkin for roasting: Take your medium pumpkin and slice it in half. Scoop out the seeds and stringy bits. Place the pumpkin cut side up on a baking sheet. Drizzle with olive oil, and sprinkle salt and pepper on top. 3. Wrapping and preparing the garlic: For the garlic, take a whole head and cut off the top to show the cloves. Drizzle with olive oil, then wrap it in aluminum foil. This keeps it moist while roasting. - Optimal roasting conditions: Place both the pumpkin and garlic in the preheated oven. The high heat will caramelize the natural sugars, bringing out sweet flavors. - Timing and doneness of pumpkin and garlic: Roast for about 40-50 minutes. The pumpkin should feel soft when you pierce it with a fork. Garlic should be golden and tender. 1. Cooking the onion and adding ingredients: Once your pumpkin and garlic cool, heat 2 tablespoons of olive oil in a large pot over medium heat. Add the finely chopped onion and cook it until soft, about 5-7 minutes. 2. Blending techniques for a creamy texture: Next, scoop out the soft pumpkin flesh and squeeze the garlic into the pot. Pour in the vegetable broth and add ground cumin and nutmeg. Bring this mix to a gentle simmer and let it cook for about 10 minutes. 3. Adjusting consistency with broth and seasoning: After cooking, blend the soup until smooth. You can use an immersion blender or a countertop blender. Stir in coconut milk or heavy cream. If the soup is too thick, add more broth until you reach the right consistency. Season with salt and black pepper to taste. To make your soup creamy, you can choose between coconut milk and heavy cream. Coconut milk adds a nice flavor and keeps it dairy-free. Heavy cream gives a rich texture. Use whichever you prefer. Blending properly is key for a smooth soup. I use an immersion blender, but a countertop blender works too. Blend until no lumps remain. This step makes a big difference in how creamy your soup is. To boost the flavor, think about adding spices or herbs. A pinch of cayenne pepper adds heat. Fresh thyme or rosemary can give an earthy touch. Try to find what works best for your taste. Balancing flavors is also important. A splash of lemon juice can brighten the soup. If it feels too tangy, add a bit of brown sugar or maple syrup for sweetness. Finding the right balance makes your soup shine. Presentation can make your dish even more appealing. Serve the soup in warm bowls. A swirl of coconut milk or cream on top looks great. It adds a nice touch. Garnishes can enhance the visual appeal. Fresh parsley adds color and freshness. Toasted pumpkin seeds give a nice crunch. These small details elevate your creamy roasted garlic pumpkin soup. {{image_4}} You can easily switch up the pumpkin for other squashes. Butternut squash or acorn squash works well. They give a nice sweet flavor and creamy texture. You can also try using sweet potatoes. This gives a different taste but keeps it delicious. If you want a dairy-free option, coconut milk is great. It adds a rich creaminess without dairy. Almond milk can work too, but it is thinner. You can also use cashew cream for extra flavor. This soup is simple to make vegan. Just use vegetable broth and coconut milk. It stays creamy and tasty without any animal products. For gluten-free, check your broth and spices. Most are naturally free from gluten. If you want a low-carb twist, skip the potatoes and use more pumpkin. You can also add cauliflower for a thicker texture. It is a great way to cut carbs while keeping it filling. Adding seasonal vegetables makes the soup more vibrant. In fall, try adding carrots or parsnips. They add sweetness and depth. In winter, kale or spinach can boost the nutrition. You can also adjust flavors based on the season. In fall, add cinnamon for warmth. In spring, fresh herbs like basil can brighten the soup. Each season brings a new twist to this classic dish. You can store the creamy roasted garlic pumpkin soup in the fridge for up to five days. Keep it in an airtight container to lock in flavor and freshness. Glass jars or plastic containers work well. To freeze the soup, let it cool completely. Pour the soup into freezer-safe bags or containers. Leave some space at the top for expansion. Label the bags with the date. Freeze for up to three months. When you are ready to enjoy it, thaw the soup overnight in the fridge. The best way to reheat the soup is on the stove. Pour the soup into a pot over medium heat. Stir often to get an even temperature. If the soup is too thick, add a little vegetable broth. You can also use a microwave. Heat in short bursts, stirring in between, until hot. To add heat to your soup, try these ideas: - Mix in a pinch of cayenne pepper. - Add diced jalapeños or serrano peppers. - Stir in some red pepper flakes. - Use a spicy vegetable broth instead of regular broth. - Add a splash of hot sauce just before blending. These options will boost the spice while keeping the rich flavors intact. Yes, you can prepare this soup ahead of time. Here’s how: - Make the soup and let it cool completely. - Store it in an airtight container in the fridge for up to three days. - For longer storage, freeze the soup in portions. - Thaw it overnight in the fridge before reheating. When ready to serve, gently heat it on the stove. Stir well to restore its creamy texture. This soup pairs well with a variety of dishes. You can serve: - Crusty bread or breadsticks for dipping. - A fresh side salad with a light vinaigrette. - Grilled cheese sandwiches for a comforting combo. - Roasted vegetables to complement the flavors. - A sprinkle of croutons for added crunch. These options enhance your meal and make it even more enjoyable. You now have a clear plan to make a delicious pumpkin soup. We covered the main ingredients, steps to prepare, and tips to enhance your dish. You can explore variations based on your taste or dietary needs. Remember, storage is key to keeping your soup fresh. Enjoy making this soup, and don’t hesitate to add your own twist. Happy cooking!

Creamy Roasted Garlic Pumpkin Soup Flavorful Delight

When making Air Fryer Everything Bagel Chicken Tenders, gather these simple ingredients: - 1 lb chicken tenders - 1 cup buttermilk (or substitute with milk and a splash of vinegar) - 1 cup all-purpose flour - 2 large eggs - 1 ½ cups panko breadcrumbs - 3 tablespoons everything bagel seasoning - Salt and pepper, to taste - Cooking spray Each ingredient plays a key role in creating tasty chicken tenders. The chicken tenders provide a juicy base. The buttermilk adds flavor and makes the chicken tender. Flour helps the coating stick. Eggs bind everything together. Panko breadcrumbs give a nice crunch. Everything bagel seasoning adds a mix of flavors. Salt and pepper enhance the taste. Cooking spray helps achieve a crispy finish without extra oil. Using fresh ingredients ensures great taste. If you cannot find buttermilk, mix regular milk with vinegar. This easy swap works well. For a fun twist, try different seasonings in the panko breadcrumbs. Have fun and get creative with your flavors! Marinating chicken in buttermilk is key. It makes the meat tender and juicy. The buttermilk adds a nice flavor. You should marinate the chicken for at least 30 minutes. If you have more time, letting it sit longer is even better. This helps the flavors soak in well. Set up three bowls for the breading. In the first bowl, mix all-purpose flour with salt and pepper. This gives a good base flavor. In the second bowl, crack and beat two large eggs. Make sure the eggs are well mixed. In the third bowl, combine panko breadcrumbs with everything bagel seasoning. This will give that tasty crunch. When breading, take each chicken tender out of the buttermilk. Let excess liquid drip off. First, coat it in the flour mix. Make sure it’s fully covered. Next, dip it in the beaten eggs. Again, let the extra egg drip off. Finally, roll it in the panko mix. Press gently to ensure an even coating. Repeat this for all the chicken tenders. Preheat your air fryer to 380°F (193°C) for about 5 minutes. After preheating, lightly spray the basket with cooking spray. This helps prevent sticking. Place the breaded chicken tenders in a single layer. Don’t overcrowd them. To get them extra crispy, spray the tops with cooking spray. Cook for about 10-12 minutes. Flip them halfway through to brown evenly. They are ready when golden brown and reach 165°F (74°C). To ensure your chicken tenders are cooked just right, check the internal temperature. Use a meat thermometer to confirm it hits 165°F (74°C). This step is key to safe, juicy chicken. For that beautiful golden color, mist the chicken tenders with cooking spray before cooking. This small trick gives you that crispy finish. Want to mix things up? You can try different seasonings. Add garlic powder or smoked paprika for a twist. Fresh herbs also make a big difference. Try adding chopped parsley or dill to the breadcrumbs for extra flavor and freshness. For a great presentation, pile the chicken tenders on a wooden board with parchment. This gives a rustic look. Offer a few dipping sauces like honey mustard or spicy mayo. They pair perfectly with the tenders. To add a pop of color, garnish with fresh parsley or chopped chives. This makes your dish not just tasty, but also attractive! {{image_4}} You can switch up the chicken cuts for this recipe. Chicken breasts are a great choice. They are lean and cook well. Just remember to slice them into strips for even cooking. If you prefer dark meat, chicken thighs work nicely too. They are juicier and add rich flavor. Cut them into similar-sized pieces as the tenders. This way, they will cook at the same rate. For a gluten-free version, you can swap the breadcrumbs. Use gluten-free panko instead. This keeps the crunch you love without the gluten. You can also use almond flour or coconut flour. These options work well as flour substitutes. They may change the flavor slightly, but they provide a nice texture. Want a bit of heat? You can make a spicy version of everything bagel seasoning. Add cayenne pepper or chili flakes to the mix. This will give your chicken tenders a kick. You can also explore other seasoning blends. Try Italian herbs or BBQ rubs for different tastes. This adds variety to your meals and keeps things interesting. To keep your chicken tenders fresh, place them in an airtight container. This helps prevent moisture loss. You can store them in the fridge for up to three days. Make sure the container is sealed tight to keep out air and bacteria. The best way to reheat your chicken tenders is in the air fryer. Set it to 350°F (175°C) and cook for about 5-7 minutes. This method keeps them crispy. If you don’t have an air fryer, you can use the oven. Preheat it to 350°F (175°C) and bake for about 10-15 minutes. A microwave is faster but may make the chicken soggy. So, I recommend using the air fryer or oven for the best results. Yes, you can use regular breadcrumbs. However, panko breadcrumbs give a lighter, crispier texture. Regular breadcrumbs are finer and can result in a denser coating. If you want a crunchy bite, stick with panko. I recommend marinating the chicken for at least 30 minutes. This time allows the buttermilk to tenderize the meat. You can marinate for up to 2 hours for more flavor. Just don’t go too long, or the chicken may become mushy. Some great dipping sauces include honey mustard, ranch, or spicy mayo. These sauces enhance the savory flavors of the chicken. You can also try a sweet chili sauce for a fun twist. Feel free to mix and match to find your favorite! Yes, you can freeze the chicken tenders. Make sure they cool completely before placing them in a freezer bag. For best results, eat them within three months. To thaw, move the tenders to the fridge overnight. Then, reheat them in the air fryer for a crispy finish. To make crispy and tasty chicken tenders, use chicken, buttermilk, and panko. We explored marination and the breading process to ensure great flavor. I shared tips for cooking and achieving that golden color. You learned how to store leftovers and reheat them for the best taste. These simple steps and variations let you adapt this dish to your liking. Enjoy crafting delicious chicken tenders that everyone will love!

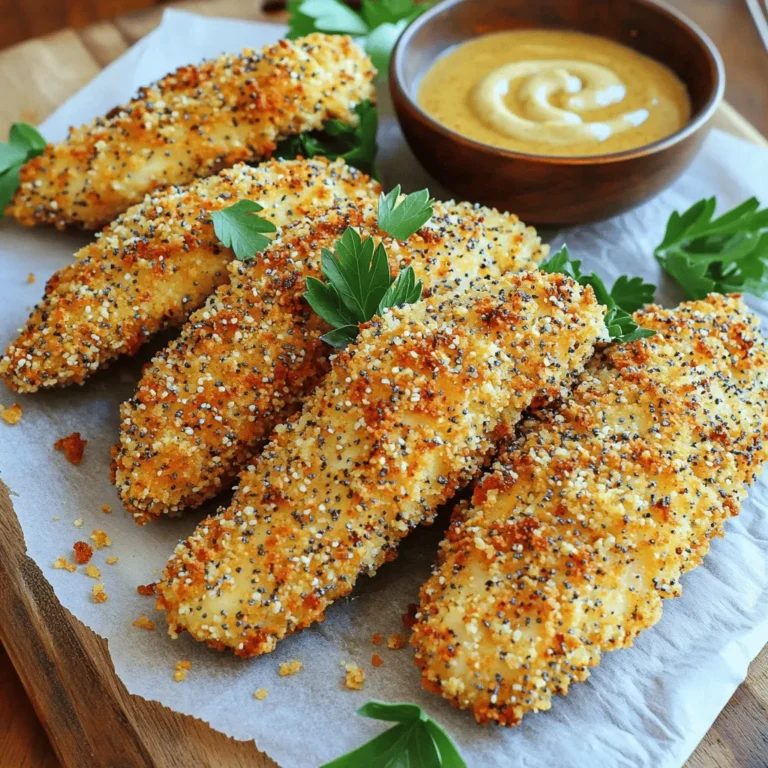
Air Fryer Everything Bagel Chicken Tenders Recipe

To make Salted Caramel Pumpkin Blondie Bars, gather these ingredients: - 1 cup unsalted butter, melted - 1 ½ cups packed brown sugar - 1 cup granulated sugar - 1 cup pumpkin puree (canned or fresh) - 2 large eggs, at room temperature - 2 teaspoons pure vanilla extract - 2 cups all-purpose flour - 1 teaspoon baking powder - 1 teaspoon baking soda - 1 teaspoon pumpkin pie spice - ½ teaspoon fine sea salt - 1 cup semi-sweet chocolate chips - ¾ cup salted caramel sauce (store-bought or homemade) - Flaky sea salt for topping You can swap some ingredients if needed. Here are a few ideas: - Use coconut oil instead of butter for a dairy-free version. - Try brown sugar alone if you prefer less sweetness. - Applesauce can replace eggs for a vegan option. - Choose gluten-free flour if you want gluten-free blondies. - Maple syrup works as a sweetener in place of sugar. Using good-quality ingredients makes a big difference. Here are my tips: - Use real pure vanilla extract, not imitation. It enhances flavor. - Fresh pumpkin puree offers a richer taste than canned. - Choose semi-sweet chocolate chips for a balanced sweetness. - Look for high-quality salted caramel sauce to elevate your bars. - Flaky sea salt adds a nice touch. It brings out the sweet flavor. These choices will ensure your blondies are the best they can be! Enjoy making them! To make these salted caramel pumpkin blondie bars, first, gather your ingredients. You need simple items, like butter and sugar. These blondies will take about 15 minutes to prep and 30 minutes to bake. Let’s get started! 1. Preheat the Oven: Start by setting your oven to 350°F (175°C). Grease a 9x13 inch baking pan with cooking spray or butter. You can also line it with parchment paper. This makes it easy to lift the blondies out later. 2. Mix the Sugars: In a large bowl, add 1 cup of melted unsalted butter, 1 ½ cups of brown sugar, and 1 cup of granulated sugar. Whisk until it is smooth and creamy. Make sure there are no sugar granules left. 3. Add Wet Ingredients: Now, stir in 1 cup of pumpkin puree, 2 large eggs, and 2 teaspoons of pure vanilla extract. Mix until just combined. The batter should have some lumps. 4. Combine Dry Ingredients: In another bowl, whisk together 2 cups of all-purpose flour, 1 teaspoon of baking powder, 1 teaspoon of baking soda, 1 teaspoon of pumpkin pie spice, and ½ teaspoon of fine sea salt until mixed well. 5. Mix Wet and Dry: Gradually add the dry mix to the wet mix. Fold gently until just combined. Avoid overmixing to keep the blondies light. 6. Add Chocolate Chips: Carefully fold in 1 cup of semi-sweet chocolate chips until they are evenly spread throughout the batter. 7. Layer the Batter: Pour half of the blondie batter into your prepared pan. Spread it evenly. 8. Add Caramel Sauce: Drizzle about ½ cup of salted caramel sauce over the batter. Spread the remaining batter on top, without disturbing the caramel too much. 9. Swirl the Caramel: Use a butter knife or skewer to swirl the caramel into the batter. Do this gently to create a nice marbled look. 10. Bake: Place the pan in the oven and bake for 25-30 minutes. Use a toothpick to check. It should come out clean, with a few moist crumbs. 11. Cool and Finish: Once baked, take the blondies out and let them cool for about 10 minutes. Drizzle the rest of the salted caramel sauce on top and sprinkle with flaky sea salt. 12. Cut and Serve: Let the blondies cool completely in the pan. Use the parchment paper to lift them out, then cut into squares. For perfect blondies, do not overmix your batter. This keeps them soft and chewy. Baking time is key too. Keep an eye on them in the oven. If they bake too long, they will turn dry. The ideal blondie is moist, with a golden top and a rich, sweet center. Enjoy your baking! When making salted caramel pumpkin blondie bars, some mistakes can ruin the fun. Here are a few to watch out for: - Overmixing the batter: This can make your blondies tough. Mix just until combined. - Not measuring ingredients accurately: Use a kitchen scale or measuring cups for best results. - Skipping the cooling time: Allow the bars to cool before cutting. This helps them hold their shape. You’ll need a few handy tools to make your baking smooth and easy: - Mixing bowls: A large bowl for the wet mix and a medium bowl for the dry mix. - Whisk: This helps you blend the butter and sugars well. - Rubber spatula: Great for folding in the dry ingredients and chocolate chips. - 9x13 inch baking pan: This is the perfect size for your blondies. - Parchment paper: Use this for easy removal of the baked bars. These blondie bars shine on their own, but you can make them even better: - Whipped cream: A dollop of fresh whipped cream adds a nice touch. - Vanilla ice cream: Serve warm blondies with a scoop for a delightful dessert. - Coffee or tea: A warm drink pairs well with the sweet flavors. - Nuts: Add walnuts or pecans for a crunchy bite. Enjoy these tips to make your salted caramel pumpkin blondie bars a hit at your next gathering! {{image_4}} You can add nuts to your blondies for a nice crunch. Chopped walnuts or pecans work well. Mix in about one cup of nuts after folding in the chocolate chips. This gives your bars a great texture. You can also try adding spices like cinnamon or nutmeg for more warmth. If you need a gluten-free option, swap the all-purpose flour with a gluten-free blend. Make sure the blend has a 1:1 ratio for best results. For a vegan version, use flax eggs instead of regular eggs. Mix one tablespoon of ground flaxseed with three tablespoons of water for each egg. You can also use a plant-based butter to replace regular butter. To celebrate fall, consider adding diced apples or cranberries to your batter. These fruits give a fresh twist that pairs well with pumpkin. For a holiday treat, stir in some white chocolate chips alongside the semi-sweet ones. This adds a fun pop of sweetness and color to your blondies. To keep your salted caramel pumpkin blondie bars fresh, store them in an airtight container. You can keep them at room temperature for up to three days. If you want them to last longer, place them in the fridge. They will stay good for up to a week when chilled. Make sure to layer parchment paper between the bars to prevent sticking. If you want to freeze these bars, cut them into squares first. Place them in a single layer on a baking sheet and freeze for about an hour. Once they are firm, wrap each bar in plastic wrap. Then, place them in a freezer-safe bag. You can freeze them for up to three months. When you're ready to eat them, just thaw them overnight in the fridge. To enjoy your blondies warm, heat them in the microwave. Place one bar on a plate and heat it for about 10-15 seconds. For a crispy edge, you can also warm them in the oven. Preheat the oven to 350°F and bake them for 5-10 minutes. This will bring back the soft, gooey texture and enhance the flavor of the caramel. You can tell when blondies are done by using a toothpick. Insert the toothpick into the center of the blondies. If it comes out clean or with a few moist crumbs, they are ready. If the toothpick has wet batter on it, they need more time. Typically, blondies take about 25 to 30 minutes to bake. The edges should be firm while the center remains slightly soft. Yes, you can make these blondies ahead of time. They taste great when made a day or two in advance. Just store them in an airtight container at room temperature. This allows the flavors to blend nicely. If you want to enjoy them warm, you can reheat them in the oven for a few minutes before serving. If you don't have pumpkin puree, you can use butternut squash puree or sweet potato puree as a substitute. Both options work well and give a similar flavor and texture. You can also make your own pumpkin puree by roasting and blending fresh pumpkin. Just make sure to strain out any excess water for the best results. This blog post covered essential ingredients and cooking steps for delicious blondies. I shared tips to avoid common mistakes and tools to help you succeed. We explored fun variations and smart storage practices to keep your treats fresh. Remember, quality ingredients make a difference. With these insights, you can create blondies that please everyone. Now, get in the kitchen and enjoy your baking adventure!

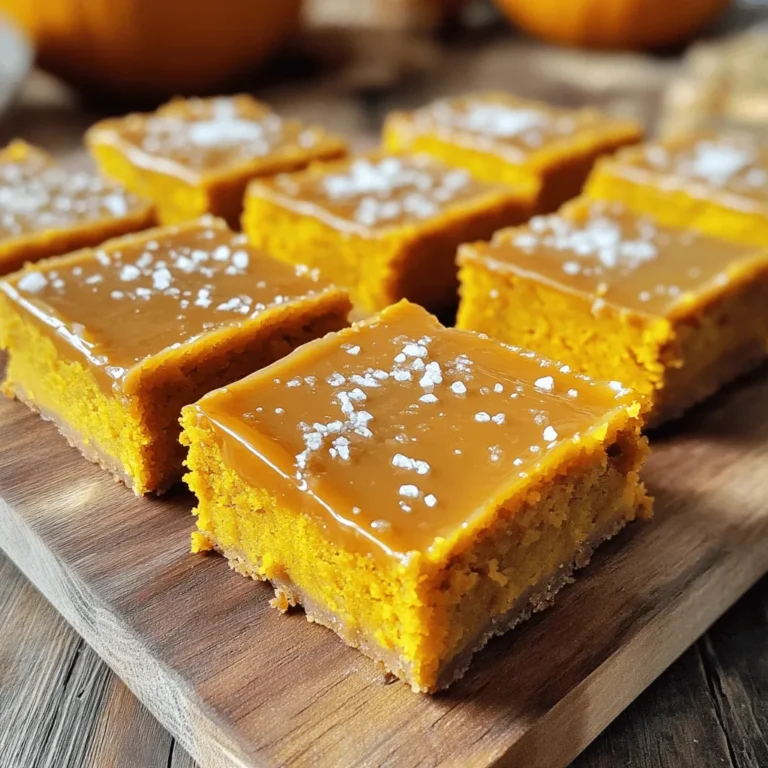
Salted Caramel Pumpkin Blondie Bars Irresistibly Sweet

To make Spicy Sesame Chili Noodles, gather these key ingredients: - 200g noodles (egg, rice, or soba) - 2 tablespoons sesame oil - 1 tablespoon vegetable oil - 3 cloves garlic, finely minced - 1-inch piece of ginger, freshly grated - 1 red chili, finely chopped - 2 tablespoons soy sauce - 1 tablespoon rice vinegar - 1 tablespoon chili paste (like sambal oelek) - 2 tablespoons tahini (or peanut butter) - 1 cup mixed vegetables (like bell peppers, broccoli, and carrots) - 2 green onions, sliced - Sesame seeds for garnish - Fresh cilantro for garnish (optional) These ingredients create bold flavors that make the dish stand out. The garlic and ginger form a fragrant base, while the chili adds heat. You can customize your noodles with these optional ingredients: - Crushed peanuts for crunch - Additional vegetables like snap peas or bok choy - A squeeze of lime for brightness - A splash of sesame oil for extra flavor Feel free to swap or add ingredients based on your taste. This allows you to create a dish that feels personal. I recommend these noodle types for the best results: - Egg noodles for a rich taste - Rice noodles for a gluten-free option - Soba noodles for a nutty flavor Each type brings a unique texture and taste. Experiment with them to find your favorite! To start, you need to cook the noodles. First, fill a large pot with water and add salt. Bring this to a rolling boil. Next, add your choice of noodles—egg, rice, or soba. Cook them according to the package instructions until they are al dente. Once done, drain the noodles in a colander. Rinse them under cold water to stop cooking and prevent sticking. This step ensures you have the best texture for your dish. Now, let’s make the sauce. In a medium bowl, gather the soy sauce, rice vinegar, chili paste, and tahini or peanut butter. Whisk these ingredients together until they blend into a smooth mixture. This sauce adds great flavor to your noodles. Set this bowl aside for later use, as it will be key to bringing everything together. For the vegetables, heat vegetable oil in a skillet or wok over medium-high heat. Once the oil shimmers, add minced garlic, grated ginger, and chopped red chili. Sauté these for about one minute. You want them to become fragrant without burning. Then, toss in your mixed vegetables. Stir-fry these for 3-4 minutes. They should be cooked but still crisp. This keeps the dish fresh and colorful. To get the best sauce, use equal parts tahini and soy sauce. This mix gives a nice, thick base. If it feels too thick, add a splash of water or more rice vinegar. Whisk until it's smooth and creamy. The sauce should cling to the noodles well. Start with one red chili for mild heat. If you want more spice, add more chopped chili or extra chili paste. Taste the sauce before adding it to the noodles. You can always add more spice, but it’s hard to take it away. Balance the heat with a little more tahini or sugar if it’s too hot. For a great look, serve the noodles in a deep bowl. Sprinkle sesame seeds on top for crunch. Add sliced green onions for color. A sprig of fresh cilantro adds a nice touch. If you like crunch, add crushed peanuts on top. Make it colorful and fun to eat! {{image_4}} You can easily make this dish vegetarian or vegan. For a vegetarian twist, keep the original recipe unchanged. You can simply skip any meat. To make it vegan, replace the tahini with peanut butter. This keeps the flavor rich and creamy. You can also add more vegetables like mushrooms or spinach for extra nutrition. If you want to add protein, consider chicken, tofu, or shrimp. Cook diced chicken in the skillet before adding garlic and ginger. For tofu, use firm tofu and sauté it until golden. Shrimp cooks quickly, so add it right after the garlic and ginger. Each protein choice adds flavor and makes the dish filling. Feel free to switch up the sauce for new flavors. Instead of tahini, try using cashew butter for a nutty taste. You can also mix in hoisin sauce for a sweet twist. A splash of sriracha can add more heat if you want. Experimenting with sauces keeps this dish exciting and fresh. To store leftover noodles, let them cool first. Place them in an airtight container. Make sure to separate the noodles from the sauce to keep them fresh. You can store them in the fridge for up to three days. If you leave the sauce on, the noodles may get too soft. When you’re ready to enjoy leftovers, reheat the noodles gently. Use a microwave or a skillet on low heat. If using a microwave, cover the bowl and add a splash of water. This helps keep the noodles moist. Stir often to heat evenly. In a skillet, add a little oil and reheat slowly, stirring frequently. Freezing is a great option for longer storage. Place the cooled noodles in a freezer-safe bag. Remove as much air as possible before sealing. They can last up to a month in the freezer. To thaw, move them to the fridge overnight. Reheat them as mentioned above for the best taste. For Spicy Sesame Chili Noodles, I recommend using egg, rice, or soba noodles. Each type offers a unique texture and flavor. Egg noodles are rich and chewy, while rice noodles are light and gluten-free. Soba noodles bring a nutty taste and are full of nutrients. Choose what you have on hand or what you like best! Yes, you can! Make the noodles and sauce ahead of time. Cook and cool the noodles, then store them in the fridge. Keep the sauce in a separate container. When you are ready to eat, simply stir-fry the noodles and add the sauce. This saves time and makes for a quick meal. If you need a tahini substitute, peanut butter works great! It adds a creamy texture and a hint of sweetness. You can also try almond butter or sunflower seed butter. These options keep the dish rich and tasty, while still providing that nutty flavor. Spicy Sesame Chili Noodles are simple yet packed with flavor. By using fresh ingredients, you can customize the dish to fit your taste. Cooking the noodles perfectly and stir-frying the veggies keeps everything crisp and delicious. Don't forget to store leftovers properly for the next meal. You can also try different proteins or sauces for variety. Enjoy exploring this fun dish, and make it your own!

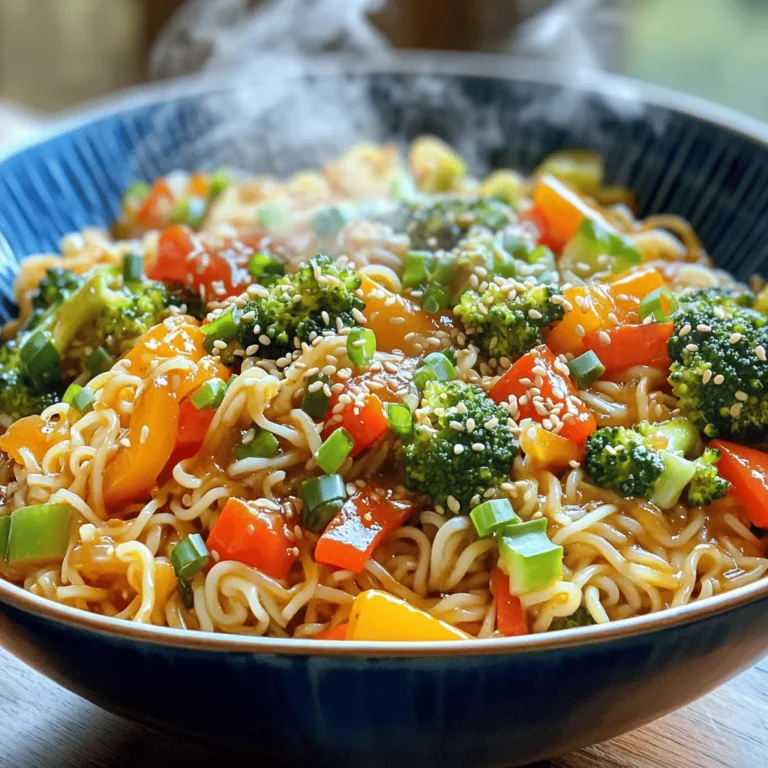
Spicy Sesame Chili Noodles Flavorful and Quick Recipe

- 1 cup ricotta cheese - 1 cup all-purpose flour - 2 tablespoons granulated sugar - 1 teaspoon baking powder - ½ teaspoon baking soda - ¼ teaspoon sea salt - 1 cup whole milk - Zest of 1 large lemon - 2 tablespoons freshly squeezed lemon juice - 1 teaspoon pure vanilla extract These ingredients come together to create a delightful pancake. The ricotta cheese makes them fluffy and rich. The lemon zest and juice add a bright flavor that wakes up your taste buds. You can use fresh ricotta for the best taste. Sifting the flour helps keep the batter light. You’ll also need baking powder and baking soda for fluffiness. Sea salt enhances the flavors without overpowering them. Whole milk brings everything together and adds creaminess. When you mix in the vanilla extract, it adds a depth of flavor. The lemon zest gives those pancakes a fresh aroma. The right balance of these ingredients is key. Each bite should be a perfect blend of sweet and tangy goodness. Gather these items before you start. This will make the cooking process smooth and enjoyable. Start by taking a large bowl. In this bowl, combine 1 cup of ricotta cheese, 1 cup of whole milk, and 2 large beaten eggs. Next, add the zest of 1 large lemon, 2 tablespoons of freshly squeezed lemon juice, and 1 teaspoon of pure vanilla extract. Whisk everything together until smooth. Make sure there are no lumps of ricotta left. This mix creates a creamy base for the pancakes. In a separate bowl, whisk together 1 cup of sifted all-purpose flour, 2 tablespoons of granulated sugar, 1 teaspoon of baking powder, ½ teaspoon of baking soda, and ¼ teaspoon of sea salt. Mixing these dry ingredients well ensures that your pancakes rise nicely. Make sure there are no clumps so the pancakes turn out fluffy. Now, it’s time to combine the two mixtures. Gently fold the dry ingredients into the wet mix. Use a spatula or wooden spoon for this. Be careful not to over-mix; stop when you no longer see any flour streaks. It’s okay if the batter is a bit lumpy. This texture helps the pancakes stay light and airy when cooked. Preheat your non-stick skillet or griddle over medium heat. Add a small pat of butter or a splash of oil to coat the surface lightly. For each pancake, pour about ¼ cup of batter onto the hot skillet. Let them cook without moving them for about 2-3 minutes. You’ll know they are ready to flip when bubbles form on the surface and the edges look set. Carefully flip the pancakes and cook for another 2-3 minutes until golden brown. Remove them from the skillet and keep warm while cooking the rest. Enjoy your fluffy lemon ricotta pancakes! To make your pancakes fluffy, do not over-mix the batter. When you fold the dry ingredients into the wet mix, stop as soon as no flour streaks show. It's okay if the batter looks a bit lumpy. Over-mixing will make the pancakes tough, not soft and airy. Control the temperature of your skillet for perfect pancakes. Preheat it to medium heat. If it’s too hot, the outside cooks too fast, leaving the inside raw. If it’s too cool, the pancakes will spread and become flat. A light layer of butter or oil will help the pancakes cook evenly and not stick. Serve your pancakes warm with delicious toppings. Drizzle with maple syrup for sweetness. Add fresh berries like blueberries, strawberries, or raspberries for color and flavor. Stack them high on a plate, and sprinkle a bit of powdered sugar on top for a lovely touch. This makes for a pretty and tasty presentation. {{image_4}} You can change the flavor of your pancakes easily. Try adding zests from other citrus fruits. Orange zest adds a sweet and bright note. Lime zest brings a fresh twist that is lively and fun. Experimenting with these zests will make your pancakes unique! If you want a healthier option, use whole wheat flour instead of all-purpose flour. This swap gives your pancakes more fiber and nutrients. For gluten-free pancakes, use a gluten-free flour blend. Look for blends that have xanthan gum, as it helps with texture. Toppings can make your pancakes shine! In summer, fresh berries like strawberries, blueberries, or raspberries are perfect. You can mix them for a burst of flavor. In winter, consider warm sauces made from apples or pears. They add sweetness and warmth to every bite. After a delicious breakfast, you might have leftover pancakes. To store them, let them cool completely. Place the pancakes in an airtight container. Make sure to separate layers with parchment paper. This prevents them from sticking together. Store in the fridge for up to three days. When you want to eat them, just take them out. Freezing pancakes is easy and great for busy mornings. To freeze, first cool the pancakes as mentioned. Then, stack them with parchment paper in between each one. Place the stack in a freezer-safe bag or container. Seal it tightly to avoid air. You can keep frozen pancakes for up to two months. When you want some, just take out as many as you need. To keep pancakes fluffy when reheating, use the oven or microwave. For the oven, preheat it to 350°F (175°C). Place pancakes on a baking sheet and cover with foil. Heat for about 10 minutes. For the microwave, place a pancake on a plate. Cover it with a damp paper towel. Heat for about 20-30 seconds. This keeps them moist and fluffy. Enjoy your fluffy lemon ricotta pancakes anytime! Yes, you can prepare the batter ahead of time. Mix your wet ingredients, like ricotta, milk, eggs, lemon zest, lemon juice, and vanilla. Store this mixture in the fridge for up to 24 hours. When you're ready to cook, just whisk in the dry ingredients. This saves time on busy mornings. To make gluten-free pancakes, swap all-purpose flour for a gluten-free blend. Look for blends labeled as 1:1 substitutes. You can also use almond flour or oat flour. Both options provide a tasty pancake. Just check your labels for any extra ingredients. If you don’t have ricotta, you can use cottage cheese. Blend it until smooth for a similar texture. Cream cheese also works well, but it may alter the flavor. For a dairy-free option, use silken tofu. Blend it with a bit of lemon juice to mimic the taste of ricotta. You learned how to make fluffy lemon ricotta pancakes using simple ingredients. We mixed wet and dry items to create a delicious batter. Tips on cooking and serving will help you impress anyone. You can make fun variations by swapping ingredients or adding toppings. Whether you store or freeze leftovers, we covered it all. Remember, cooking is about enjoying the process. Try these pancakes and share them with friends for a tasty treat!

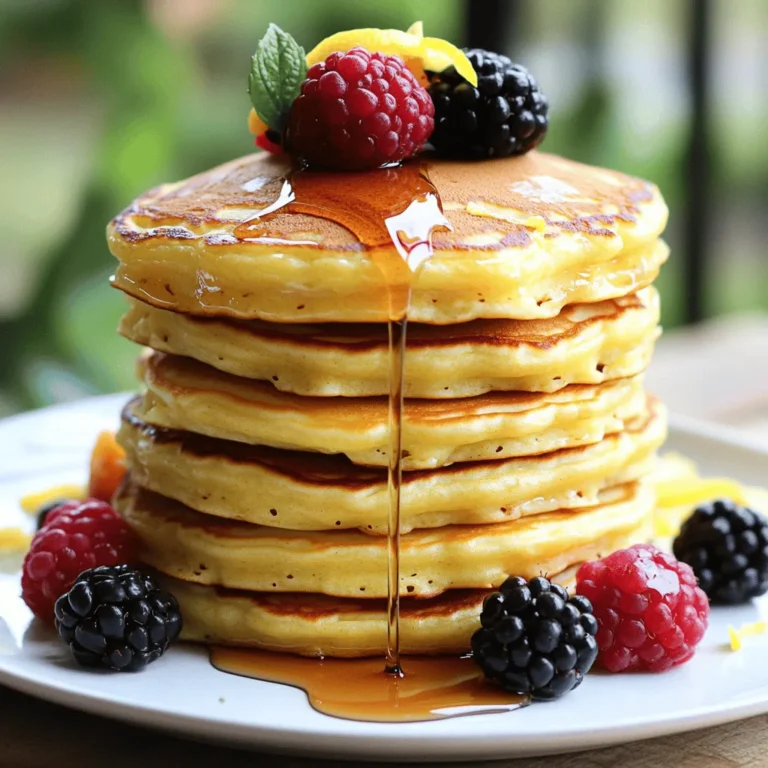
Fluffy Lemon Ricotta Pancakes Delightful Morning Treat

PREV 1 … 5 6 7 … 18 NEXT
sweet savory saga

explore

DessertsDinnerAppetizersDrinks

Our Policies

  • Cookie Policy
  • Copyright Policy
  • Disclaimer
  • GDPR Policy
  • Terms Of Use
Back to Top
  • About
  • Contact Us
  • Privacy Policy
© 2025 sweet savory saga