FREE DINNER EBOOK! Get your copy!
  • Cookie Policy
  • GDPR Policy
  • Disclaimer
  • Terms Of Use
  • Visit my other site: Fun Cookie Recipes
sweet savory saga
  • Home
  • Dinner
  • Desserts
  • Drinks
  • Appetizers
  • Contact
  • About
  • Privacy Policy
  • Home
  • Dinner
  • Desserts
  • Drinks
  • Appetizers
  • Contact
  • About
  • Privacy Policy
  • Cookie Policy
  • GDPR Policy
  • Disclaimer
  • Terms Of Use
Visit my other site: Fun Cookie Recipes

HOME / CATEGORIES /

Latest

For this recipe, you need: - 1 lb ground chicken - 1/2 cup breadcrumbs - 1/4 cup grated Parmesan cheese - 1 large egg Ground chicken gives the meatballs a soft texture. The breadcrumbs help bind them. Parmesan adds a nice flavor boost. The egg keeps everything together, making the meatballs juicy. You will also need: - 2 cloves garlic, minced - 1 tablespoon fresh ginger, grated - 1/4 cup sweet chili sauce - 1 teaspoon soy sauce - 1 teaspoon sesame oil - Salt and black pepper to taste Garlic and ginger bring fresh flavors. Sweet chili sauce adds sweetness and a bit of heat. Soy sauce gives a savory note. Sesame oil adds depth and richness. Don't forget to season with salt and pepper for balance. For the veggies, gather: - 2 cups broccoli florets - 1 red bell pepper, sliced into strips - 1 medium zucchini, sliced into half-moons - 2 tablespoons olive oil - 1 teaspoon garlic powder - 1 teaspoon onion powder Broccoli adds crunch and nutrients. Red bell pepper brings vibrant color and sweetness. Zucchini offers a mild flavor and great texture. Olive oil helps roast the veggies perfectly. Garlic and onion powders enhance the overall taste. Each ingredient plays a vital role in making this dish flavorful and satisfying. Enjoy the process of gathering and preparing these ingredients! First, gather all your ingredients. You need ground chicken, breadcrumbs, Parmesan cheese, and an egg. Add minced garlic and fresh ginger for flavor. Pour in sweet chili sauce, soy sauce, and sesame oil. Don’t forget to season with salt and black pepper. Mix everything well in a large bowl. Use your hands or a spatula to combine. This helps ensure every bite is full of flavor. Now it’s time to shape the meatballs. Grab a handful of the mixture and roll it into a ball about 1.5 inches wide. Place each meatball on one side of your baking sheet. Make sure to leave space between them. This allows them to cook evenly and get that nice brown color. Let’s move on to the veggies. In another bowl, combine broccoli florets, sliced red bell pepper, and zucchini half-moons. Drizzle with olive oil and sprinkle garlic powder, onion powder, salt, and black pepper. Toss everything until the veggies are well coated. Spread them out on the other side of the baking sheet, away from the meatballs. Preheat your oven to 400°F (200°C). Place the baking sheet in the oven and bake for 20-25 minutes. Check that the meatballs reach an internal temperature of 165°F (74°C). The veggies should be tender but still bright. Once done, take it out and sprinkle sesame seeds on top. This adds a nice crunch and a pop of color. Enjoy your meal hot! To make juicy meatballs, use ground chicken that has some fat. This will keep them moist. Mix your meat with breadcrumbs and egg to add texture. Adding grated Parmesan also helps with flavor and moisture. Do not overmix the meat; this can make them tough. Shape them gently into balls, about 1.5 inches wide. For even cooking, place them apart on the baking sheet. Choosing the right vegetables is key. Broccoli, bell peppers, and zucchini work well together. Cut them into similar sizes to ensure even cooking. Toss them with olive oil and seasonings before baking. This helps them roast nicely and keeps them tender. Avoid overcrowding the pan; this prevents steaming. Spread them out to get a good char on the edges. To boost flavor, add fresh herbs or spices. Consider using cilantro or green onions as a topping. A drizzle of extra sweet chili sauce can brighten the dish. You can also sprinkle sesame seeds on top for crunch. Experiment with different sauces or marinades. Each adds a unique twist to this dish. Enjoy the process and let your taste guide you! {{image_4}} You can swap ground chicken for other proteins. Try ground turkey for a leaner option. Pork adds a rich flavor, while beef gives a hearty bite. If you prefer plant-based meals, use lentils or chickpeas. Form the mixture into meatballs the same way. Each protein offers a unique taste and texture, so experiment to find your favorite! Switch up the veggies for a new twist. Carrots, snap peas, or cauliflower all work well. You can mix in asparagus for a spring vibe. Use sweet potatoes for a hearty feel, or add eggplant for a Mediterranean touch. The key is to choose colorful, fresh vegetables. They not only boost nutrition but also make the dish look vibrant! To make this dish gluten-free, replace breadcrumbs with almond flour or gluten-free oats. This keeps the meatballs tender while fitting your dietary needs. For a low-carb twist, skip the breadcrumbs entirely. You can also use zucchini noodles instead of traditional pasta. This adds flavor while keeping carbs low. Enjoy guilt-free without missing out on taste! After cooking your sheet-pan sweet chili chicken meatballs, let them cool. Place the meatballs and veggies in an airtight container. Store them in the fridge for up to three days. This keeps them fresh and tasty. When you want to eat them, just take them out and reheat. If you want to save some for later, freezing works great. First, let the meatballs and veggies cool completely. Then, place them in a freezer-safe bag or container. Make sure to remove as much air as possible. You can freeze them for up to three months. When ready, you can thaw them in the fridge overnight before reheating. To reheat your meatballs and veggies, you have a few options. You can use the oven for best results. Preheat the oven to 350°F (175°C). Place the meatballs and veggies on a baking sheet. Heat for about 15-20 minutes or until hot. You can also use a microwave. Just microwave in short bursts, stirring in between, until heated through. Always check that the meatballs are warm in the center. Enjoy your leftovers! The meatballs need to bake for 20 to 25 minutes. You should aim for an internal temperature of 165°F. This ensures they are fully cooked and safe to eat. Keep an eye on the veggies, too. They should be tender but still bright. Yes, you can use frozen vegetables. They make cooking easier and still taste great. Just make sure to thaw and drain them before adding them to the pan. This way, they won’t release too much water while baking. You can substitute ground turkey, beef, or pork for ground chicken. Each option brings a different flavor. If you want something lighter, turkey is a great choice. Choosing a different meat can change the dish, so feel free to experiment. Sweet chili sauce is not very spicy. It has a nice balance of sweet and mild heat. If you prefer more spice, you can add some red pepper flakes. This way, you can adjust the heat to your liking while enjoying the sweet flavor. In this blog post, we explored how to make delicious meatballs with ground chicken and fresh veggies. You learned about the key ingredients, step-by-step instructions, and ways to enhance flavors. We covered tips for juicy meatballs and storage methods, too. Overall, I hope you feel ready to try these tasty recipes. Simple changes can make your meals amazing and fun. Enjoy your cooking journey!

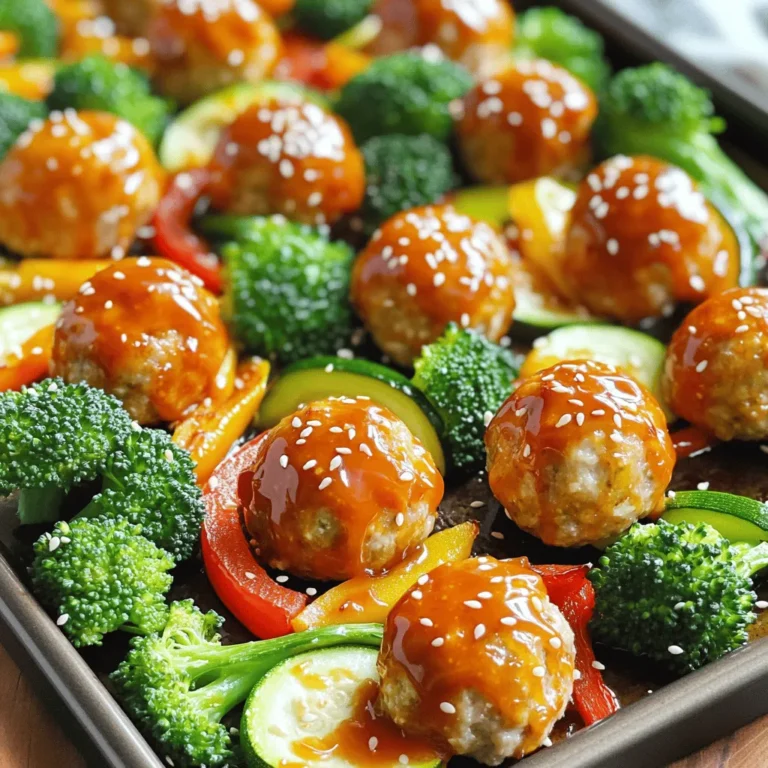
Sheet-Pan Sweet Chili Chicken Meatballs and Veggies Delight

- 1 pound large shrimp, peeled and deveined - 2 fresh jalapeños, finely chopped - Zest and juice from 2 limes - 4 cloves garlic, minced - 3 tablespoons olive oil - 1 teaspoon honey - 1 teaspoon smoked paprika - Salt and pepper to taste - Fresh cilantro, chopped (for garnish) - Lime wedges (for serving) When making Jalapeño Lime Grilled Shrimp, you start with fresh, large shrimp. They need peeling and deveining, which is simple. Just remove the shells and the dark vein. Next, chop two fresh jalapeños. If you want less heat, remove the seeds. Zest and juice two limes to add a bright and zesty flavor. The zest gives you a strong lime punch without extra liquid. Mince four cloves of garlic for a nice aromatic touch. For the marinade, mix in three tablespoons of olive oil. It helps blend the flavors and keeps the shrimp moist. Add one teaspoon of honey to balance the heat from the jalapeños. One teaspoon of smoked paprika adds a rich, smoky taste. Season with salt and pepper to your liking. Finally, for a pop of color and taste, use fresh cilantro as a garnish. Serve with lime wedges for an extra zing on the plate. {{ingredient_image_2}} - Combine 2 chopped jalapeños, lime zest, lime juice, 4 minced garlic cloves, 3 tablespoons olive oil, 1 teaspoon honey, 1 teaspoon smoked paprika, and a pinch of salt and pepper. - Stir well to create a flavorful marinade. This blend gives the shrimp a spicy kick and bright flavor. - Coat 1 pound of peeled and deveined shrimp thoroughly with the marinade. - Cover the bowl and refrigerate for 30 minutes to 2 hours. The longer you marinate, the more flavor the shrimp will absorb. - Preheat your grill to medium-high heat. Make sure it’s nice and hot for the best results. - Thread the marinated shrimp onto skewers, placing about 4-6 shrimp per skewer for easy handling. - Grill the shrimp for 2-3 minutes on each side. Look for the shrimp to turn pink and opaque. - Remove the skewers from the grill and let them rest for a couple of minutes. This step helps keep them juicy. Serving this dish garnished with fresh cilantro and lime wedges adds a nice touch. Enjoy your flavorful creation! For the best grilled shrimp, aim for medium-high heat on your grill. This heat cooks shrimp evenly and gives them a nice char. Avoid cooking at low temperatures, as this can lead to steaming instead of grilling. To prevent overcooking, watch the shrimp closely. Grill them for just 2 to 3 minutes on each side. When they turn pink and opaque, they are done. If you cook them too long, they can get tough and chewy. You can adjust the spice level based on your taste. If you want less heat, remove the seeds from the jalapeños before chopping them. For more heat, leave the seeds in or add a pinch of crushed red pepper to the marinade. To add depth to the flavor, consider mixing in herbs like oregano or thyme. Fresh cilantro works well as a garnish and adds brightness, too. For a stunning plate, arrange the shrimp skewers on a colorful platter. Drizzle some fresh lime juice over the top. This not only looks great but also adds extra flavor. Pair your shrimp with vibrant sides like grilled vegetables or a fresh salad. This creates a colorful meal that is as pleasing to the eye as it is to the taste buds. Pro Tips Marinate for Maximum Flavor: Allow the shrimp to marinate for at least 30 minutes, but for the best flavor, let them sit for up to 2 hours in the refrigerator. Skewer Smart: If using wooden skewers, soak them in water for 20 minutes to prevent burning on the grill. Watch the Cook Time: Grill shrimp for 2-3 minutes on each side until they turn pink and opaque; overcooking can make them tough. Garnish for Appeal: Enhance presentation by garnishing with fresh cilantro and serving with lime wedges for a vibrant, fresh look. {{image_4}} You can change the heat level by swapping jalapeños. Use bell peppers for no heat, or serrano peppers for more spice. You can also add fruits and veggies to the skewers. Try cherry tomatoes, zucchini, or pineapple for a sweet twist. These additions not only taste good but make your dish colorful and fun. If you want to cook inside, use your oven. Preheat the oven to 400°F. Place the shrimp on a baking sheet and bake for 8-10 minutes. If you prefer broiling, set the oven to broil and cook the shrimp for about 2-3 minutes on each side. You can also use a stovetop grill pan. Heat the pan, add a bit of oil, and cook the shrimp for 2-3 minutes per side until they are pink and cooked through. To give your shrimp a world twist, try adding spices from other cuisines. Use cumin for a Mexican touch or curry powder for an Indian flair. You can also serve these shrimp with sides from different places. Pair them with a fresh tabbouleh salad for a Middle Eastern vibe or serve with rice from Asia for a cozy meal. Mixing flavors makes cooking exciting and brings new tastes to your table. To keep your Jalapeño Lime Grilled Shrimp fresh, store any leftovers right away. Place the shrimp in a shallow container. This helps cool them quickly. Use an airtight container to keep out air. You can also wrap them tightly in plastic wrap. Refrigerate them within two hours of cooking. Leftover shrimp can last in the fridge for 3 days. If you want to keep them longer, freeze them. Place the shrimp in a freezer-safe bag. Remove as much air as possible before sealing. Frozen shrimp are best used within three months. When it's time to eat your leftovers, reheating is key. Use the oven for best results. Preheat it to 350°F (175°C). Place the shrimp on a baking sheet. Heat for about 10 minutes, just until warm. Avoid cooking them too long, as shrimp can turn tough. You can also reheat shrimp in a skillet. Use low heat and add a splash of water. Cover the pan to steam the shrimp. This keeps them juicy. Enjoy your tasty shrimp again without losing flavor! For this recipe, I recommend using large shrimp. They hold up well on the grill. Large shrimp are easy to thread onto skewers. They cook quickly and stay juicy. Look for shrimp that are fresh, firm, and have a mild scent. Avoid shrimp that smell strong or have a slimy texture. You can also use jumbo shrimp if you like a bigger bite. Marinate the shrimp for at least 30 minutes for good flavor. This gives the shrimp time to soak up the marinade. If you want a more intense taste, marinate for up to 2 hours. Just remember, don't marinate too long. The acid from the lime juice can make the shrimp tough. Always keep marinated shrimp in the fridge. Yes, you can use frozen shrimp for this dish. Just be sure to thaw them first. The best way to thaw shrimp is to place them in the fridge overnight. If you need them fast, place them in cold water for about 20-30 minutes. Pat them dry before marinating. Frozen shrimp can still be tasty, but fresh shrimp usually taste better. You now have a complete guide to making Jalapeño Lime Grilled Shrimp. We covered all you need, from ingredients to cooking methods. Remember to marinate well and not to overcook the shrimp for the best taste. Feel free to explore variations for added flavor and creativity. With practice, you can impress everyone at your next meal. Enjoy your grilling adventure!

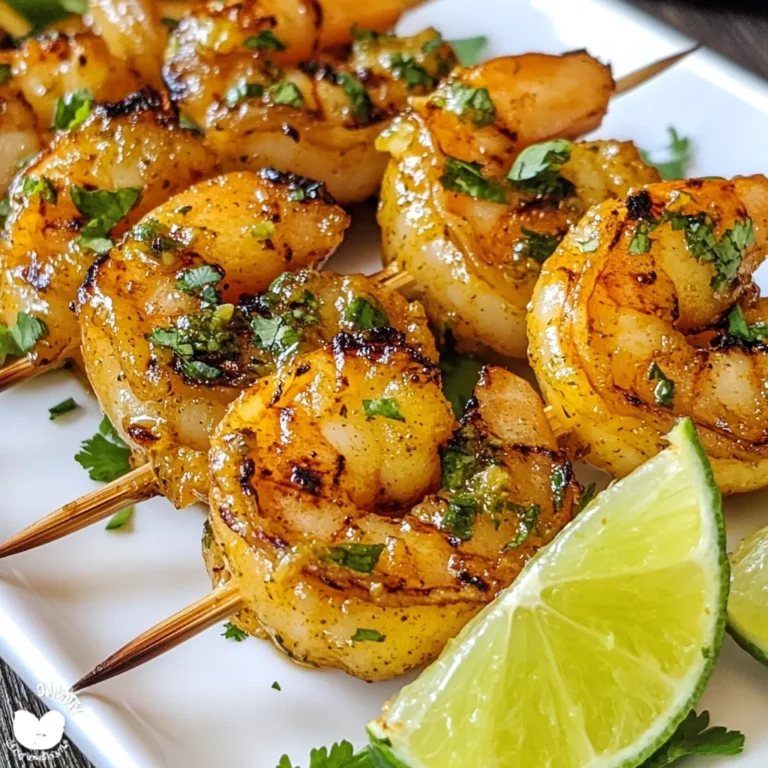
Jalapeño Lime Grilled Shrimp Simple and Flavorful Dish

- 2 large ripe bananas - 2 tablespoons creamy peanut butter - 2 tablespoons dark chocolate spread - 1 large whole wheat tortilla or flatbread - 1 tablespoon chopped nuts (e.g., almonds or walnuts) - 1 tablespoon shredded coconut (optional) - A drizzle of honey (optional) To make Chocolate Peanut Butter Banana Sushi, gather these tasty ingredients. Start with ripe bananas. They should be soft but not brown. The creamy peanut butter brings a rich flavor. Dark chocolate spread adds sweetness and depth. You need a whole wheat tortilla or flatbread as the base. This keeps everything together. For crunch, use chopped nuts like almonds or walnuts. Shredded coconut adds a fun texture but is optional. If you like it sweeter, drizzle honey on top. This mix of flavors creates a delicious treat. Each ingredient plays a part in making this sushi delightful. - Start by placing the tortilla or flatbread on a clean surface. - Spread the creamy peanut butter evenly across the tortilla. - Drizzle the dark chocolate spread and create a marbled effect. - Place the bananas at one edge of the tortilla and roll tightly. - Cut the rolled tortilla into bite-sized pieces (about 1 inch thick). - Serve the pieces on a plate and optionally top with nuts and coconut. - Drizzle honey for added sweetness, if desired. Making Chocolate Peanut Butter Banana Sushi is fun and easy. The first step is to lay your tortilla flat. This helps you spread the peanut butter well. Use a spatula to cover the tortilla with a nice layer of peanut butter. Make sure it is even and smooth. Next, grab the dark chocolate spread. Drizzle it on top of the peanut butter. This gives your sushi a beautiful look. Use the spatula to mix the two spreads slightly. You want a marbled pattern, not a full mix. Now, it’s banana time! Place the bananas on one edge of the tortilla. Start rolling it up tightly. This step is key to keeping everything inside. Once rolled, take a sharp knife and slice the sushi into small pieces. Aim for about 1-inch thick slices. Finally, you can make it extra special. Arrange the pieces on a plate. If you like, sprinkle chopped nuts and coconut on top for a crunch. Drizzle honey over the pieces if you want more sweetness. Enjoy this delightful treat! To make your chocolate peanut butter banana sushi great, start with a fresh tortilla. A fresh tortilla rolls better and holds the filling well. When cutting, use a sharp knife for clean slices. This helps keep the sushi looking nice. For a fun touch, serve it on colorful plates. Bright plates make the dish pop and look more inviting. You can add more flavor by including fruit slices. Try strawberries or apples for a tasty twist. If you want to mix things up, use different nut butters. Almond butter or cashew butter can change the taste. For an extra special treat, swap the chocolate spread with Nutella or even a flavored almond butter. These small changes can make your sushi unique and fun to eat. {{image_4}} You can change the recipe for more fun. Here are some ideas: - Swap whole wheat tortillas for gluten-free options. - Try different types of bananas, like plantains. - Use flavored yogurt as a tasty drizzle on top. These changes keep your treat fresh and exciting. You can enjoy the same great taste while exploring new flavors. Get creative with themes for your sushi. Here are some fun versions: - Make a tropical version by adding pineapple and coconut. - Turn it into a breakfast roll by adding oats or granola. These ideas make your chocolate peanut butter banana sushi special. You can match it to any occasion or craving! Keep any leftovers in an airtight container in the fridge. This helps keep the sushi fresh. I recommend eating it within 1-2 days for the best taste. The bananas can brown quickly, so enjoy it soon! If you want to save some for later, you can freeze individual pieces. They stay good for up to a month in the freezer. When you’re ready to eat, thaw them first. After thawing, you can reassemble the pieces for a nice presentation. Chocolate peanut butter banana sushi is a fun dessert roll. It combines banana, creamy peanut butter, and rich chocolate spread. This dish looks like sushi but tastes sweet and delightful. You can make it in just ten minutes. It's a tasty way to enjoy fruits and spreads together. Yes, you can make this recipe vegan! Just choose a vegan chocolate spread. Also, make sure your tortillas are dairy-free. This way, everyone can enjoy this tasty treat. To make this dish healthier, swap the chocolate spread for yogurt. Greek yogurt adds creaminess and protein. You can also add more fruits, like strawberries or blueberries, for added nutrition. Absolutely! This recipe is a fun and healthy treat for kids. They will love rolling their sushi and eating it. Plus, it allows them to enjoy fruits in a unique way. This blog post shared a fun recipe for Chocolate Peanut Butter Banana Sushi. You learned how to roll ingredients, customize flavors, and store leftovers. This treat is tasty and good for kids. You can make it in many ways for your family. Try different fruits and nut butters to find your favorite. So grab your ingredients and start rolling! Enjoy this simple, creative snack that everyone will love.

Chocolate Peanut Butter Banana Sushi Delightful Treat

- 1 lb boneless, skinless chicken breasts - 4 cups chicken broth - 1 can (10 oz) diced tomatoes with green chilies - 1 cup cream cheese, softened - 1 cup shredded cheddar cheese - 1 cup corn (frozen or fresh) - 2 jalapeños, seeds removed and finely diced - 1 small onion, diced - 2 cloves garlic, minced - 1 teaspoon ground cumin - 1 teaspoon smoked paprika - Salt and freshly ground black pepper, to taste The main ingredients create a rich and tasty soup. The chicken is the star, providing protein and texture. The broth adds depth, while tomatoes bring a nice tang. Cream cheese and cheddar make it creamy and comforting. Jalapeños give it a spicy kick. Corn adds sweetness, and spices round out the flavors. - Fresh cilantro, finely chopped - Tortilla chips, for serving Garnishing your soup makes it look beautiful and adds fresh flavor. Fresh cilantro brightens the dish and adds a nice crunch with tortilla chips. You can also sprinkle extra cheese on top if you love cheese. - Slow cooker - Cutting board - Sharp knife - Measuring cups and spoons - Large spoon for stirring Using the right tools makes cooking easy and fun. A slow cooker is key for this recipe, as it lets flavors blend slowly. A good knife helps you chop veggies quickly. Measuring cups ensure you use just the right amounts. A large spoon makes mixing simple and keeps things tidy. Start by gathering all your ingredients. You will need chicken breasts, broth, tomatoes, corn, jalapeños, onion, garlic, cream cheese, and cheddar cheese. Cut the jalapeños, onion, and garlic into small pieces. This helps release their flavors. Place the chicken breasts in the slow cooker first. They should make a flat layer at the bottom. Next, pour the chicken broth over the chicken. Add the diced tomatoes, corn, jalapeños, onion, and garlic. Now, it’s time to spice things up. Sprinkle ground cumin, smoked paprika, salt, and black pepper on top. Mix everything gently so the spices spread well. Cover the slow cooker with the lid. Set it to cook on low for 6 hours or high for 3 hours. The chicken will become tender and soak up all the flavors. After cooking, remove the chicken from the slow cooker. Use two forks to shred it into bite-sized pieces. Return the shredded chicken to the pot. Next, add the softened cream cheese and shredded cheddar cheese. Stir well until the cheeses melt into a creamy soup. Taste it. Adjust the salt or pepper if needed. Let the soup simmer on low for another 30 minutes. This step helps the flavors blend nicely. When ready, serve the soup in warm bowls. Top with fresh cilantro and enjoy with crunchy tortilla chips. To make this soup shine, focus on fresh ingredients. Use ripe tomatoes for a rich taste. Fresh jalapeños add a bright kick. I recommend using low-sodium broth for more control over salt. Don't skip the spices! Cumin and smoked paprika create a warm depth. Mix well to ensure every bite is full of flavor. You can easily tweak the spice to fit your taste. For a milder soup, remove all the seeds from the jalapeños. If you want more heat, add a few extra jalapeños or even a pinch of cayenne pepper. Taste as you go to find your perfect balance. Remember, the cheese cools the heat a bit, so adjust accordingly! Serving this soup is just as fun as making it. Ladle the warm soup into bowls and sprinkle with chopped cilantro. For crunch, add tortilla chips on the side. You can also top it with more cheese or sour cream. This soup pairs well with a simple salad or crusty bread. Enjoy it with family or friends for a cozy meal! {{image_4}} To make this soup vegetarian, swap the chicken for hearty vegetables. You can use beans, like black beans or chickpeas, for protein. Add extra veggies, such as bell peppers or zucchini, to boost flavor and texture. Replace chicken broth with vegetable broth for a rich base. This keeps the soup filling and tasty without meat. If you crave heat, add more jalapeños or use spicy diced tomatoes. You can also mix in some hot sauce or cayenne pepper for an extra kick. For a different flavor, consider adding a diced serrano pepper. This will make your soup a true spicy delight! For a creamier soup, stir in more cream cheese or add heavy cream. You might also try sour cream or Greek yogurt for a tangy twist. If you like a cheesy flavor, toss in more shredded cheddar cheese. These options will make your soup rich and smooth, perfect for cozy nights. You can store your soup in the fridge. Let it cool down first. Place it in an airtight container. It stays fresh for about 3 to 4 days. Always label the container with the date. This helps you keep track of freshness. Freezing this soup is easy. Pour the cooled soup into freezer-safe bags. Remove as much air as possible before sealing. You can freeze it for up to 3 months. When you're ready to eat, thaw it in the fridge overnight. Reheat the soup on the stove or in the microwave. For the stove, pour it into a pot. Warm it over medium heat until hot. Stir often to avoid sticking. In the microwave, use a microwave-safe bowl. Heat in short bursts, stirring in between. Check the temperature to ensure it's hot all the way through. Yes, you can use frozen chicken breasts. Just add them directly to the slow cooker. You might need to cook the soup a bit longer. Aim for about 7 hours on low or 4 hours on high. The chicken will still become tender and shred easily after cooking. To make this soup dairy-free, replace the cream cheese and cheddar with dairy-free alternatives. Look for cream cheese made from nuts or tofu. For cheddar, use a dairy-free shredded cheese. You can also add a splash of coconut milk for creaminess. Serve this soup with crunchy tortilla chips. They add a nice texture. You can also pair it with a fresh side salad. A simple green salad with lime dressing works well. For extra flavor, top the soup with chopped cilantro and a squeeze of lime. This blog post explored how to make Jalapeño Popper Chicken Soup. We covered the main ingredients, optional garnishes, and needed equipment. You learned step-by-step instructions for preparing and cooking. We shared tips to perfect the flavor and adjust spices. You also saw variations, like vegetarian options and creamy versions. Finally, we explained storage methods to keep your soup fresh. Enjoy the process and get creative with your soup. Happy cooking!

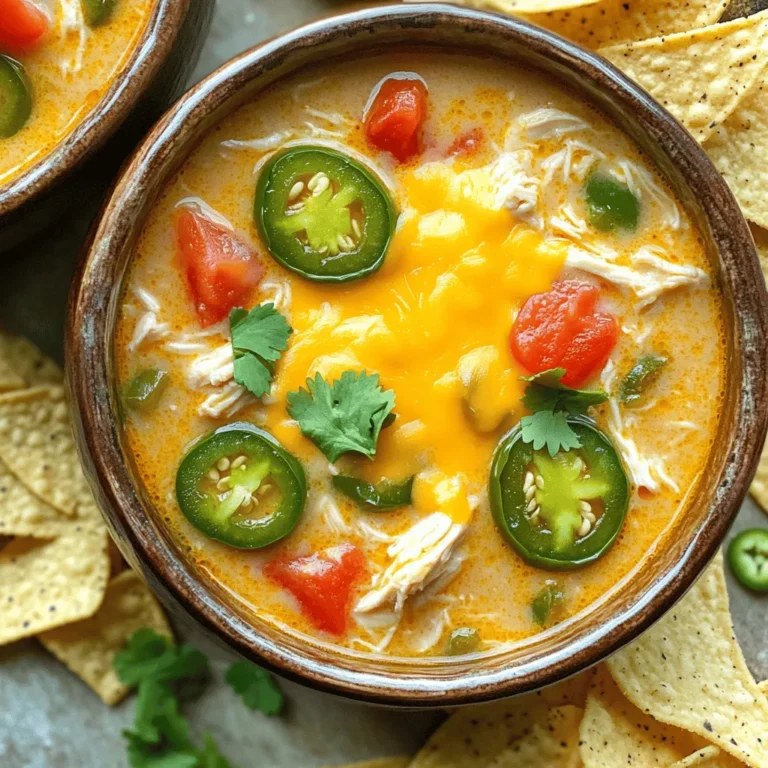
Slow Cooker Jalapeño Popper Chicken Soup Delight

- 1 lb boneless, skinless chicken thighs - 4 cups chicken broth - 1 medium onion, finely chopped - 2 cloves garlic, minced - 2 medium carrots, diced - 2 celery stalks, diced - 3 tablespoons fresh dill, chopped - 3 tablespoons fresh parsley, chopped - 1/2 cup orzo pasta - Juice of 2 lemons - 2 large eggs - 2 tablespoons olive oil - Salt and freshly cracked pepper to taste The right mix of ingredients makes this soup special. First, chicken thighs give a rich flavor. They stay juicy and tender in the broth. The chicken broth is key, too. It adds depth and warmth, making the soup feel cozy. Next, we have the vegetables. Onions, garlic, carrots, and celery bring color and taste. They also add texture, making each bite fun. Fresh dill and parsley add a lovely herb taste. They brighten the soup and make it smell amazing. Orzo pasta adds a nice shape and chews well. It soaks up the broth and makes the soup filling. The lemon juice brings a zesty kick. It balances the rich flavors and makes the soup refreshing. Finally, the eggs give a creamy texture. They help thicken the soup without heavy cream. Salt and pepper enhance all these flavors. Each ingredient plays a part in making Greek Lemon Chicken Soup a dish you will love. {{ingredient_image_2}} - Heating the Oil and Sautéing Vegetables Start by heating 2 tablespoons of olive oil in a large pot over medium heat. Once hot, add the finely chopped onion. Sauté it for about 5 minutes until soft and see-through. Then, stir in the minced garlic, diced carrots, and diced celery. Keep sautéing for another 3-4 minutes until these veggies become tender and fragrant. - Cooking the Chicken and Shredding Pour in 4 cups of chicken broth and raise the heat a bit to bring the soup to a simmer. Carefully add 1 pound of boneless, skinless chicken thighs to the pot. Let the chicken cook for about 20 minutes until fully cooked. Remove the chicken, let it cool a bit, then shred it using two forks. - Making the Broth Creamy Add 1/2 cup of orzo pasta to the simmering broth. Cook it according to the package instructions, which takes about 8-10 minutes. While the orzo cooks, whisk together 2 large eggs, the juice of 2 lemons, and 3 tablespoons of chopped dill in a medium bowl. After the orzo is tender, reduce the heat to low. To temper the egg mixture, whisk in one ladleful of the hot broth slowly. This keeps the eggs from curdling. Then, pour the egg mixture back into the pot while stirring. This will give the soup a creamy touch. Add the shredded chicken and 3 tablespoons of chopped parsley. Season with salt and cracked pepper. Heat for another 5 minutes but don’t let it boil. Enjoy your Greek Lemon Chicken Soup! Achieving Flavorful Broth Start with quality chicken broth. Use homemade broth if possible. If not, choose a low-sodium option. Sauté the onions and garlic before adding broth. This step builds a strong base for flavor. Let the broth simmer gently. This allows all the ingredients to meld. Perfecting Orzo Texture Cook orzo separately for the best texture. Add it to the broth only when you are ready to serve. This keeps the pasta firm and prevents it from getting mushy. Always check the package instructions for timing. Stir often to ensure even cooking. Egg Tempering Tips To avoid curdling, temper the eggs first. Whisk hot broth into the egg mixture slowly. This warms up the eggs without cooking them. Once tempered, pour the egg mixture back into the pot slowly. Stir constantly for a creamy texture. This method makes your soup rich and smooth. Garnishes for Presentation Garnish your soup with fresh herbs. Use extra sprigs of dill or parsley. You can also add lemon slices for a pop of color. This makes the dish look appealing and fresh. A sprinkle of cracked pepper adds a nice touch too. Pairing with Bread or Salads Serve Greek lemon chicken soup with crusty bread. The bread is perfect for dipping. You can also serve it alongside a simple salad. A light cucumber or Greek salad complements the soup well. This combination makes a full, hearty meal. Pro Tips Use Fresh Ingredients: Using fresh herbs and high-quality chicken can significantly enhance the flavor of your soup. Control the Temperature: When adding the egg and lemon mixture, make sure to temper the eggs to avoid curdling, and keep the soup on low heat afterward. Customize Your Soup: Feel free to add other vegetables like spinach or peas for added nutrition and color. Storage Tips: This soup can be stored in the refrigerator for up to 3 days; however, the orzo may absorb some broth, so consider adding more broth when reheating. {{image_4}} You can change some key ingredients for Greek lemon chicken soup. If you want to swap the chicken, try turkey or even tofu. Both work well and still taste great. For the pasta, orzo is often used, but you can substitute it with rice or quinoa. These options make the soup gluten-free. If you prefer a vegetarian version, just leave out the chicken and use vegetable broth. Add more vegetables like zucchini or bell peppers. This way, you still get a hearty soup packed with flavor. Spices can really change the taste of your soup. Try adding a pinch of cumin or coriander. These spices bring warmth and depth to the dish. Fresh herbs like basil or mint also add a bright flavor. For those who like a bit of heat, add some red pepper flakes or diced jalapeños. This gives the soup a spicy kick. Just remember to add a little at a time, so you control the spice level. Enjoy experimenting with these variations! To store Greek lemon chicken soup properly, let it cool first. Pour it into an airtight container. Seal it tight to keep the flavors fresh. Place the container in the fridge. The soup will last for about 3 to 4 days. If you want to save some soup for later, freezing is a great option. Cool the soup completely before filling freezer-safe containers. Leave some space at the top for expansion. The soup can stay frozen for up to 3 months. To reheat, take it out of the freezer and let it thaw overnight in the fridge. Heat it on the stove over medium heat. Stir often until it’s hot. If the soup seems thick, add a splash of chicken broth or water to get it back to the right texture. Yes, you can make Greek lemon chicken soup ahead of time. This soup tastes even better the next day. If you plan to make it early, store it in the fridge after it cools down. When you reheat it, the flavors will blend nicely. If you can't find orzo, don't worry! You can use small pasta shapes instead. Try ditalini or even rice if that’s what you have. Just keep an eye on cooking times, as they may vary. Absolutely! Leftover chicken works great in this soup. Just shred it and add it when you mix in the orzo. This is a smart way to use up extra chicken and save time! This blog post covered a tasty chicken soup recipe from ingredients to serving suggestions. You learned how to make a creamy broth, perfect orzo, and even spice things up. Remember, you can switch ingredients for your taste and store any leftovers. Cooking is about enjoying the process and sharing with others. Whether you try a new variation or stick to the classic, your soup is sure to please. So grab your ingredients and start cooking up something warm and delightful!

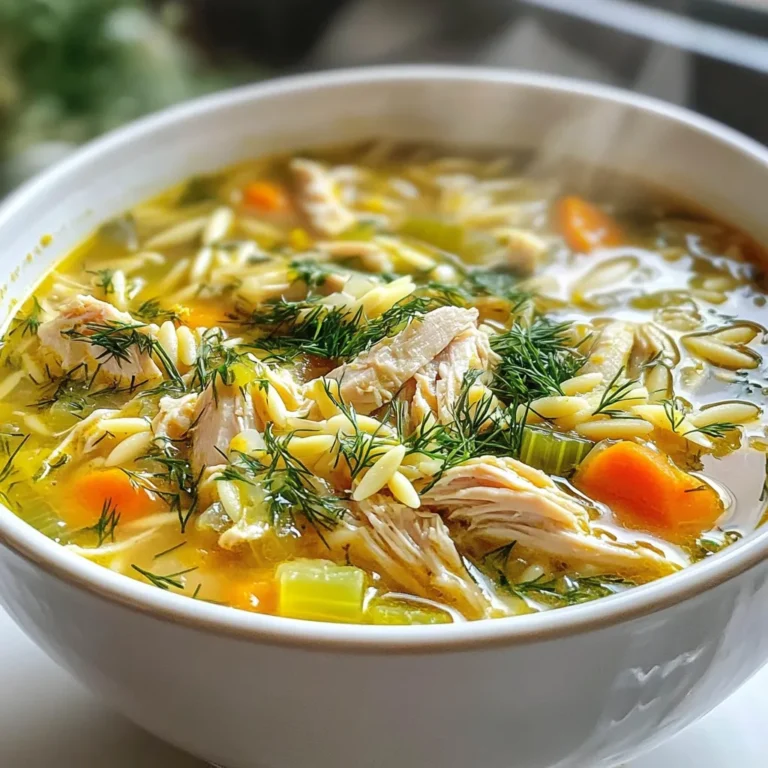
Greek Lemon Chicken Soup Flavorful and Nourishing Dish

To make a delicious honey garlic glazed meatloaf, gather these ingredients: - 1 lb ground beef (or a blend of beef and turkey for added flavor) - 1 cup breadcrumbs (plain or seasoned) - 1/2 cup finely diced onion - 1/2 cup grated carrots (fresh for sweetness) - 2 cloves garlic, minced (adjust to taste) - 1/4 cup milk (whole or your preference) - 1 large egg, beaten (for binding) - 1 tsp dried oregano (or Italian seasoning for a twist) - 1 tsp salt (to enhance flavor) - 1/2 tsp black pepper (freshly cracked for best taste) - 1/4 cup honey (for sweetness and glaze) - 1/4 cup ketchup (for a tangy kick) - 2 tbsp soy sauce (adds umami flavor) - 1 tbsp apple cider vinegar (for brightness) - Optional: Chopped flat-leaf parsley for garnish These ingredients blend well together to create a flavorful and satisfying meal. The honey adds a touch of sweetness, while the garlic brings a robust flavor. The combination of beef and turkey gives the meatloaf a nice texture. Feel free to adjust the garlic and seasonings to suit your taste. Adding fresh herbs can also enhance the flavor. This recipe is flexible and allows you to experiment with what you have on hand. Enjoy the process of creating a dish that your family will love! {{ingredient_image_2}} First, you need to preheat your oven to 350°F (175°C). This step helps the meatloaf cook evenly. While the oven warms up, grease your baking dish lightly. You can also use parchment paper for easy cleanup later. This ensures the meatloaf won't stick. In a large mixing bowl, combine your main ingredients. Use 1 lb of ground beef or a mix of beef and turkey for added flavor. Add in 1 cup of breadcrumbs, 1/2 cup of finely diced onion, and 1/2 cup of grated carrots. Don't forget to include 2 cloves of minced garlic, 1/4 cup of milk, and 1 large beaten egg. Season with 1 tsp of dried oregano, 1 tsp of salt, and 1/2 tsp of black pepper. Use your hands or a wooden spoon to mix everything well. Make sure the flavors blend evenly. Now, transfer the meat mixture to your prepared baking dish. Shape it into a loaf, keeping the thickness even. Next, prepare the glaze. In a small bowl, whisk together 1/4 cup of honey, 1/4 cup of ketchup, 2 tbsp of soy sauce, and 1 tbsp of apple cider vinegar until smooth. Pour half of this glaze over the meatloaf, spreading it evenly across the top. Set the rest aside for later. Place the baking dish in your preheated oven. Bake the meatloaf for about 50 to 60 minutes. Use an instant-read thermometer and check for 160°F (70°C) in the center. This ensures it's fully cooked. In the last 10 minutes, pull the meatloaf out and brush the reserved glaze over the top. This adds more flavor and creates a nice caramelized finish. You can switch the ground beef with a beef and turkey blend. This mix adds more flavor. If you prefer a lighter option, use ground turkey or chicken. For breadcrumbs, feel free to use crushed crackers or oats. Both will work well in this recipe. You can also use gluten-free breadcrumbs if needed. Mix all your ingredients well. This helps the meatloaf hold together. Use your hands or a spoon to combine. After mixing, let the meatloaf rest for about 10 minutes. This helps flavors blend. It also makes the meatloaf easier to handle. For doneness, use an instant-read thermometer. It should read 160°F (70°C) in the center. Consider adding spices like smoked paprika or cumin for extra depth. Fresh herbs like thyme or rosemary can also boost taste. For glaze variations, try BBQ sauce or a mix of mustard and honey. These will give your meatloaf a unique twist. Pro Tips Choose Your Meat Wisely: For a richer flavor, consider using a blend of beef and turkey. This combination adds moisture and depth to your meatloaf. Don't Overmix: When combining the ingredients, mix just until combined. Overmixing can lead to a dense meatloaf instead of a tender one. Rest Before Slicing: Allow the meatloaf to rest for about 10 minutes after baking. This helps retain the juices, making for a more flavorful and moist slice. Glaze Variations: Feel free to experiment with the glaze by adding spices like smoked paprika or a dash of hot sauce for an extra kick! {{image_4}} You can switch up the meat in your meatloaf. Ground turkey or chicken works well. These lean meats create a lighter dish. They also absorb flavors nicely. Just follow the same recipe but use turkey or chicken. For a vegetarian option, try lentils or chickpeas. Mash them up and mix with breadcrumbs and spices. This gives a hearty texture without meat. Add in some diced veggies too. It makes for a colorful and healthy meal. To change the taste of your meatloaf, consider adding cheese. A cup of shredded cheddar or mozzarella can add richness. You can also mix in spices like paprika or cumin for a kick. These small changes can make a big difference. You can experiment with different glazes too. Instead of honey and ketchup, try BBQ sauce. It gives a smoky flavor. Teriyaki sauce is another great option. It adds a sweet and tangy taste that is hard to resist. Serve your honey garlic glazed meatloaf with sides that balance the flavors. Mashed potatoes are always a hit. They pair well with the sweet glaze. Steamed green beans or a fresh salad add color and crunch. Roasted vegetables also make a great side. Think carrots, broccoli, or Brussels sprouts. Their natural sweetness complements the meatloaf. Enjoy your meal with some crusty bread to soak up extra glaze. Let your meatloaf rest for about 10 minutes after cooking. This step helps keep it juicy. Once it cools, wrap it tightly in plastic wrap or foil. You can also use an airtight container. These methods keep the meatloaf fresh and tasty. For refrigeration, place the wrapped meatloaf in the fridge. It should be stored at a temperature below 40°F (4°C). Make sure to eat it within a few days for the best flavor. You can freeze meatloaf before or after cooking. If you freeze it raw, shape it into a loaf and wrap it. Use plastic wrap followed by foil for best results. This method prevents freezer burn. If you cook it first, let it cool completely. Then wrap it in plastic wrap and foil. To thaw, place it in the fridge overnight. You can reheat it in the oven at 350°F (175°C) until warmed through. This usually takes about 20-30 minutes. In the fridge, cooked meatloaf lasts about 3-4 days. If you freeze it, it can last up to 3 months. Always check for signs of spoilage before eating. Look for changes in color or texture. If it smells off, it’s best to throw it away. These steps help you enjoy your honey garlic glazed meatloaf safely. You can serve honey garlic glazed meatloaf with many sides. Mashed potatoes are a classic. Roasted vegetables add color and flavor. A fresh salad brings a nice crunch. You might also enjoy it with rice or noodles for a filling meal. Yes, you can make meatloaf ahead of time. Prepare the meat mixture and shape it into a loaf. Wrap it well and store it in the fridge for up to 24 hours. You can also freeze it for later use. Just thaw it in the fridge before baking. To reheat leftover meatloaf, preheat the oven to 350°F (175°C). Slice the meatloaf and place it in a baking dish. Cover it with foil to keep it moist. Heat for about 20 minutes or until warm. You can also use a microwave for quicker reheating. Absolutely! Adding vegetables boosts flavor and nutrition. Grated carrots, diced bell peppers, or chopped spinach work well. Just make sure to chop them finely so they mix in well. This adds moisture and keeps the meatloaf tender. To check if your meatloaf is done, use an instant-read thermometer. The center should reach 160°F (70°C). You can also cut into it. The meat should be firm and juices should run clear. If it's pink in the middle, it needs more time. This blog post covered everything you need to make a delicious meatloaf. You learned about key ingredients, step-by-step cooking instructions, and handy tips for the best texture and flavor. We also discussed variations and storage tips to help you enjoy it later. With all this knowledge, you can create your perfect meatloaf. Experiment with flavors and share your results! Meatloaf can be satisfying for any meal, so have fun with it.

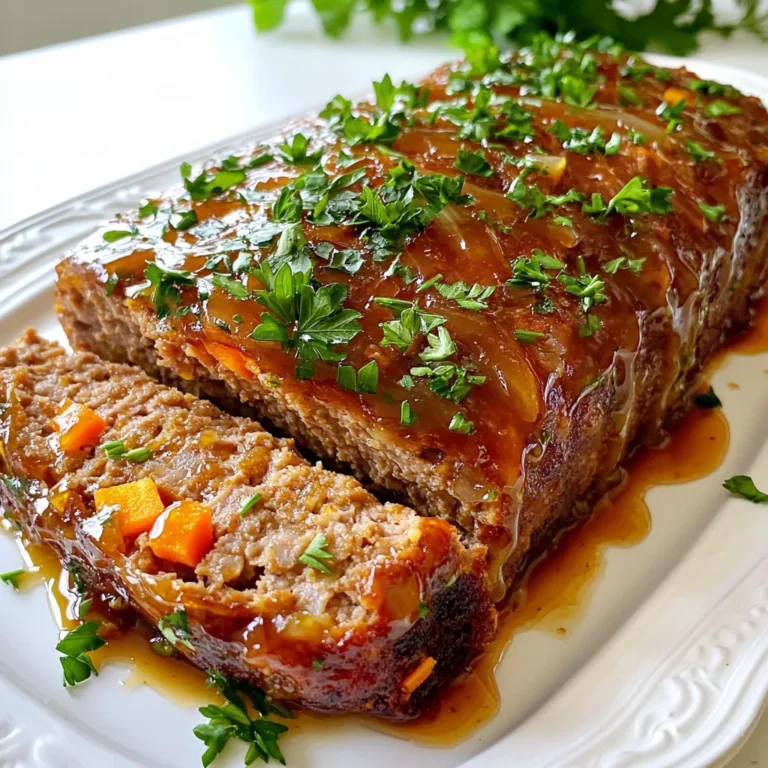
Honey Garlic Glazed Meatloaf Flavorful Family Dinner

- 2 cups plain Greek yogurt - 1 cup fresh blueberries (plus extra for garnish) - 1 tablespoon honey (or maple syrup for a vegan option) - 1 teaspoon pure vanilla extract - 1 cup granola (choose your favorite blend) - 1/2 teaspoon ground cinnamon - 1 tablespoon almond slivers (optional) - Fresh mint leaves for garnish You can add almond slivers to boost the nutty taste. Fresh mint leaves add a nice touch. A dash of lemon zest can brighten the flavor too. If you like, swap honey for maple syrup to make this recipe vegan. To make this dish vegan, use maple syrup instead of honey. For gluten-free options, pick gluten-free granola. You can also use coconut yogurt as a dairy-free swap. This way, everyone can enjoy this tasty treat! Start by making the creamy yogurt base. In a medium bowl, add 2 cups of plain Greek yogurt. Next, pour in 1 tablespoon of honey or maple syrup. This sweetener brings out the yogurt's flavor. Then, add 1 teaspoon of pure vanilla extract for a nice aroma. Mix these ingredients well with a whisk or spatula until everything is smooth. This will give your parfait a rich base. Now, let’s focus on the blueberries. Take 1 cup of fresh blueberries and place them in a small bowl. Add 1/2 teaspoon of ground cinnamon. Gently toss the blueberries in the cinnamon. This step enhances their sweetness and adds warmth. The blueberries will now be ready to bring a burst of flavor to your parfait. Time to build your parfait! Choose clear glasses or jars for a pretty look. Start with a generous layer of the Greek yogurt mixture at the bottom of each glass. Next, add a layer of your cinnamon-dusted blueberries. Spread them evenly for the best taste. Now, sprinkle a layer of granola on top for a nice crunch. Repeat this process: more yogurt, then blueberries, and more granola. Do this until you fill the glass, finishing with the yogurt on top. For the final touch, add more granola on top. Place a few extra blueberries for decoration. If you like, sprinkle almond slivers for extra flavor and crunch. Enjoy your beautiful Blueberry Crumble Greek Yogurt Parfaits! To make your parfaits pop, use clear glasses. This way, you can see the colorful layers. Chill the glasses beforehand for a fresh touch. Use bright blueberries and mint leaves to add color and flair. A sprinkle of granola on top creates a nice texture contrast. Remember, people eat with their eyes first! Layering is key to a great parfait. Start with a thick layer of Greek yogurt at the bottom. Next, add the cinnamon blueberries, spreading them evenly. Then, sprinkle a layer of granola. Repeat until you reach the top. Finish with yogurt and a generous layer of granola. This method keeps the layers distinct and appealing. If you have leftover ingredients, don’t waste them! You can mix any remaining yogurt with more honey and vanilla for a quick dip. Extra blueberries can go into smoothies or salads. Granola makes a great snack on its own. You can also add it to yogurt bowls or oatmeal. This way, you enjoy every last bit of your ingredients! {{image_4}} You can mix up the fruits in your parfaits. Try strawberries, raspberries, or peaches. Each fruit adds its own flavor. I love using a mix for a colorful look. Just remember, choose fruits that are in season for the best taste. You can also use frozen fruits if fresh ones are not available. Just thaw them before adding to your parfait. If you want to change the sweetener, there are great options. Maple syrup is a tasty choice for vegans. You can also try agave nectar or stevia for a low-calorie option. These sweeteners work well with the yogurt and fruits. Adjust the amount to fit your taste. Remember, a little goes a long way! Granola adds crunch, but you can switch it up! Use nutty granola for extra texture. You can also try a gluten-free granola mix if needed. For a fun twist, add crushed cookies or nuts. Just be careful not to overpower the other flavors. Experiment and find what you like best! To keep your Blueberry Crumble Greek Yogurt Parfaits fresh, store them in the fridge. Use airtight containers or cover your glasses with plastic wrap. This way, they stay tasty and safe. Enjoy your parfaits within two days for the best flavor. If you made a big batch, consider keeping the layers separate. Store the yogurt, blueberries, and granola in different containers. This will prevent the granola from getting soggy. You can freeze some of the parfait components for later use. Freeze the blueberries by washing and drying them first. Place them in a single layer on a baking sheet. Once frozen, transfer them to a freezer bag. Granola can also freeze well. Just store it in an airtight container. Avoid freezing the yogurt, as it changes texture when thawed. - Greek Yogurt: Lasts about 1-2 weeks in the fridge. Always check the expiration date. - Fresh Blueberries: Best if used within 1 week. Look for firm and plump berries. - Granola: Can last 2-3 weeks if stored properly. Keep it in a cool, dry place. - Honey/Maple Syrup: These can last indefinitely in your pantry. Just keep them sealed. Proper storage helps you enjoy your parfaits longer. Yes, you can make these parfaits ahead of time. Layer them in jars or glasses. Cover them and store them in the fridge. They can stay fresh for up to two days. Just add granola right before serving. This keeps it crunchy. If you need a substitute for Greek yogurt, try regular yogurt. You can also use dairy-free yogurt made from almond or coconut. These options still give you a nice creamy base. Just make sure they are plain. Sweetened yogurts may change the taste. To lower the calories in this recipe, use low-fat Greek yogurt. You can skip the honey or maple syrup. Instead, try adding a splash of vanilla extract for flavor. Use less granola and add more fruit for sweetness. This way, you keep the taste while cutting calories. This blog post showed you how to create delicious Blueberry Crumble Greek Yogurt Parfaits. We explored the main ingredients, optional flavors, and dietary choices. Next, we walked through easy step-by-step instructions for making the parfaits. I shared tips for presentation and storing leftovers. Lastly, we discussed variations to keep things fun. In closing, these parfaits are not only tasty but also simple to adapt. Enjoy making them in your kitchen!

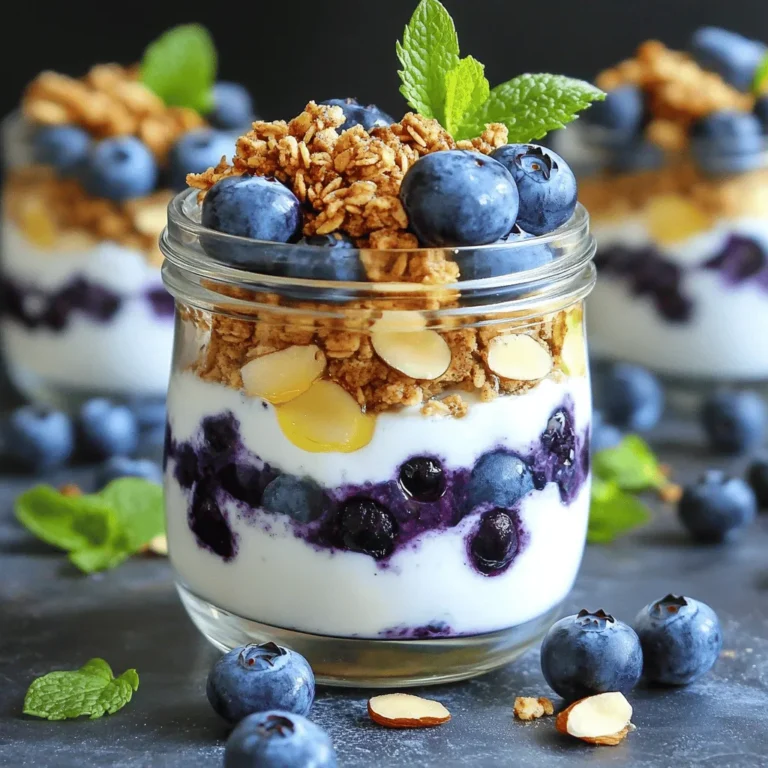
Blueberry Crumble Greek Yogurt Parfaits Delightful Treat

- 2 cups cooked chicken breast - 1 ripe avocado - 1 cup cherry tomatoes - 1 cup fresh mozzarella balls - 1/4 cup fresh basil leaves - 2 tablespoons balsamic glaze - 2 tablespoons extra virgin olive oil - Salt and freshly cracked pepper - Mixed greens for serving - Additional herbs or toppings Let's break down the ingredients for this Caprese Avocado Chicken Salad. The main ingredients form the heart of the dish. You need cooked chicken breast for protein. Shredding it makes it easy to mix. A ripe avocado adds creaminess. The cherry tomatoes bring a sweet burst. The fresh mozzarella balls offer a chewy texture. Lastly, torn basil leaves add a fragrant touch. Next, we have the dressing components. A balsamic glaze gives a sweet tang. Extra virgin olive oil adds richness and depth. Season with salt and freshly cracked pepper to taste. This simple dressing ties all the flavors together. For optional ingredients, consider adding mixed greens for a fresh base. You can also sprinkle in more herbs or toppings to elevate the dish. This salad is flexible and allows for personal touches. 1. In a large mixing bowl, combine the shredded chicken, diced avocado, halved cherry tomatoes, and fresh mozzarella balls. 2. Add the torn basil leaves. Mix everything well to combine. 3. In a separate small bowl, whisk together the balsamic glaze and olive oil. 4. Season the dressing with salt and freshly cracked pepper to your taste. 5. Pour the dressing over the chicken salad mixture. Toss gently to coat all the ingredients. - For a beautiful presentation, serve the salad over mixed greens. - You can also use individual bowls for serving. This adds a personal touch. - To make the salad eye-catching, arrange the ingredients in colorful layers. - Add a sprinkle of fresh basil on top for a bright touch. - A drizzle of balsamic glaze over the salad adds an appealing shine. You can easily swap out chicken or mozzarella in this salad. Use turkey or tofu for a new twist. If you prefer a different cheese, try feta or goat cheese. You can add more veggies, too. Bell peppers, cucumbers, or even corn can boost the crunch. To make the salad pop, add fresh herbs like parsley or cilantro. A pinch of garlic powder can also elevate the taste. For a zesty kick, red pepper flakes work wonders. Feel free to adjust the dressing as well. You can add more balsamic glaze for sweetness or olive oil for richness. Personal taste is key! Want to save time? Prep your ingredients ahead. Cook chicken and chop veggies in advance. Store them in the fridge. This makes assembly super quick. Use clear containers to keep everything fresh. You can also mix the dressing ahead of time and keep it in a jar. Just shake it before using! {{image_4}} You can add a Mediterranean flair to your Caprese Avocado Chicken Salad. Start by mixing in some olives and feta cheese. The briny flavor of olives pairs well with the creamy avocado. Feta adds a nice tang. For more color and taste, toss in roasted red peppers. They bring a sweet and smoky flavor, making your salad even more exciting. If you want a low-carb version, skip the mixed greens. Use shredded lettuce as your base. It gives a nice crunch without the carbs. You can also explore dressing options with fewer calories. Try a simple squeeze of lemon juice or a light vinaigrette for a fresh taste. Make your salad special by using seasonal fruits or vegetables. In summer, add fresh peaches or nectarines for sweetness. In fall, sliced apples or pears work great. You can also adapt the herbs based on what’s fresh. Swap basil for dill or mint to give your salad a new twist. To keep your Caprese avocado chicken salad fresh, store it in an airtight container. This helps prevent it from drying out. Place it in the fridge right after serving. The salad stays fresh for about three days. However, the avocado may brown over time. To slow this, squeeze fresh lemon juice over the avocado. You can freeze the cooked chicken separately. This keeps the chicken fresh for up to three months. Avoid freezing the whole salad, as the veggies will not taste good after thawing. If you want to freeze the dressing, pour it into a small container. To thaw, place it in the fridge overnight. Use the chicken within 24 hours of thawing for the best taste. For meal prep, portion the salad into grab-and-go containers. This makes it easy to take for lunch. Use clear, airtight containers to see what you have. You can also layer the salad with dressing at the bottom. This keeps the greens fresh and crisp until you're ready to eat. Yes, rotisserie chicken works great for this salad. It saves you time and effort. You can shred it quickly and add it to your bowl. This chicken is often seasoned, which gives your salad an extra flavor boost. Plus, it cuts down on your cooking time. You can have your salad ready in minutes! Yes, this salad is perfect for meal prep. It stays fresh for up to three days in the fridge. Just keep the dressing separate until you are ready to eat. This way, your salad stays crisp and tasty. You can make several servings at once and grab it for lunch or dinner. You can easily make this salad vegan. Swap the chicken for chickpeas or tofu. Both options add protein and texture. For a creamy touch, use avocado as your base. You can also replace mozzarella with vegan cheese or skip it altogether. This way, you keep all the fresh flavors while making it plant-based. This salad is easy, healthy, and tasty. You learned about the key ingredients, including chicken and avocado, and how to make a simple dressing. We shared tips for customizing your salad and various ways to serve it. Remember to store leftovers properly to keep them fresh. You can make fun variations for every season. Whether you want a quick lunch or a meal prep option, this salad checks all the boxes. Enjoy experimenting with your favorite flavors to create the perfect dish!

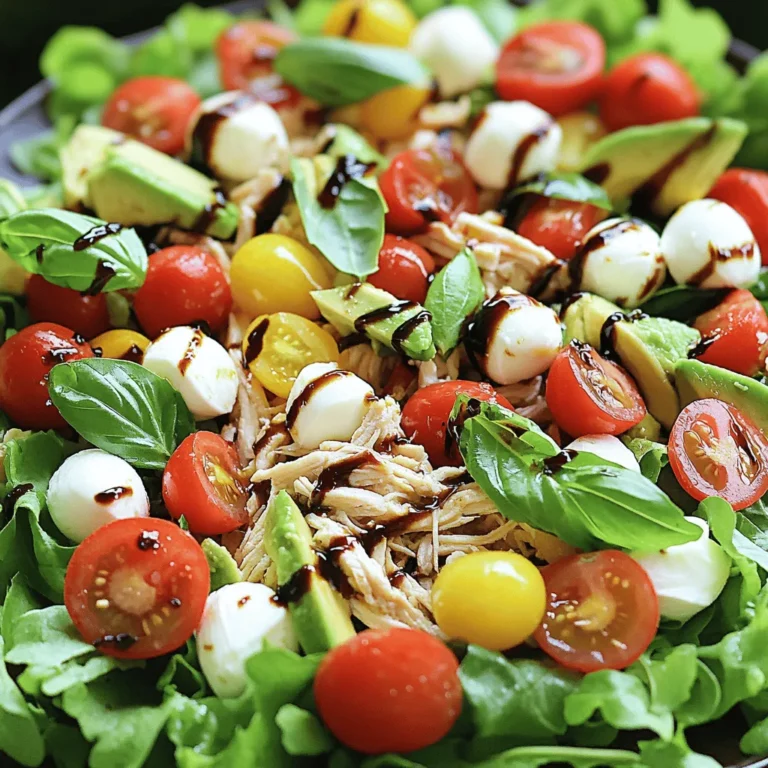
Caprese Avocado Chicken Salad Fresh and Flavorful Recipe

- 1 cup finely grated zucchini (about 1 medium zucchini) - 1 cup all-purpose flour - ½ cup unsweetened cocoa powder - 1 teaspoon baking soda - ½ teaspoon baking powder - ¼ teaspoon salt - ½ cup granulated sugar - ½ cup packed brown sugar - 2 large eggs, at room temperature - ½ cup vegetable oil - 1 teaspoon pure vanilla extract - 1 cup semi-sweet chocolate chips - Optional: ¼ cup chopped walnuts or pecans, lightly toasted To make double chocolate zucchini bread, gather these simple ingredients. Grated zucchini adds moisture and hidden veggies. Flour and cocoa powder create a rich base. Two types of sugar provide sweetness. Eggs help bind the mix. Oil keeps the bread soft. Chocolate chips offer bursts of flavor. Feel free to add nuts for crunch. This list ensures you have everything to make a delicious treat. Happy baking! - Preheat the Oven: Set your oven to 350°F (175°C). This heat helps the bread rise and cook well. - Prepare the Loaf Pan: Grease a 9x5 inch loaf pan with butter or spray. You can also line it with parchment paper for easy removal. - Combine and Whisk Flour, Cocoa, Baking Soda, and Salt: In a bowl, mix 1 cup flour, ½ cup cocoa powder, 1 teaspoon baking soda, ½ teaspoon baking powder, and ¼ teaspoon salt. Whisk until everything blends well. Set this aside for later. - Creaming Sugars, Eggs, Oil, and Vanilla: In a large bowl, combine ½ cup granulated sugar, ½ cup brown sugar, 2 eggs, ½ cup vegetable oil, and 1 teaspoon vanilla. Use a whisk or mixer to blend until smooth and creamy. - Incorporate Dry Mixture into Wet Mixture: Gradually add the dry mix to the wet mix. Fold gently until just combined. Avoid overmixing. This will keep your bread light and fluffy. - Adding Zucchini and Chocolate Chips: Carefully fold in 1 cup grated zucchini and 1 cup chocolate chips. Make sure they are evenly spread throughout the batter. - Pouring Batter into the Pan: Pour your batter into the prepared loaf pan. Use a spatula to smooth out the top for an even bake. - Baking Time and Testing for Doneness: Bake for 50-60 minutes. To check if it’s done, insert a toothpick into the center. It should come out clean or with a few moist crumbs. - Letting it Cool in the Pan: After baking, let the loaf cool in the pan for about 10 minutes. This helps it firm up. - Transferring to Wire Rack: Carefully move the bread to a wire rack to cool completely. This keeps it from getting soggy. - Avoid Overmixing: Mix the batter just until the dry and wet ingredients blend. If you mix too much, the bread can turn dense. You want it light and fluffy. - How to Achieve a Moist Texture: The grated zucchini keeps your bread moist. Make sure to squeeze out extra water from the zucchini. This helps balance the moisture level. - Adding Spices or Extracts: You can boost flavor with spices like cinnamon or nutmeg. A splash of almond extract also adds a nice depth. - Best Chocolate Chip Options: Semi-sweet chocolate chips work well, but dark chocolate chips can add a richer taste. You can even mix in white chocolate chips for a fun twist. - Serving Suggestions: Slice the bread after it cools. Serve it on a rustic wooden board for a homey feel. A dollop of whipped cream adds a nice touch. - Garnishing Ideas: Dust the top with powdered sugar for a sweet finish. Add a few extra chocolate chips on top for a tempting look. {{image_4}} To make this bread gluten-free, swap the all-purpose flour for gluten-free flour. Look for blends that include rice flour, almond flour, or oat flour. These flours work well and keep the bread moist. Make sure the blend has a binding agent like xanthan gum to help the bread rise. For a vegan version, you can replace the eggs. Use flaxseed meal mixed with water in place of each egg. Mix 1 tablespoon of flaxseed with 2.5 tablespoons of water and let it sit until it thickens. Instead of vegetable oil, use applesauce or mashed banana. These swaps keep the bread moist and tasty. You can add a crunchy twist by mixing in nuts like walnuts or pecans. Just ¼ cup of chopped nuts adds nice texture. For a fruity touch, try adding dried fruits like cranberries or raisins. You can also brighten the flavor by adding zest from oranges or lemons. A dash of cinnamon or nutmeg will give it a warm, cozy taste. You can store your Double Chocolate Zucchini Bread at room temperature or in the fridge. If you plan to eat it within a few days, keep it at room temperature. Wrap it in plastic wrap or foil to keep it moist. If you want it to last longer, refrigerate it. Just remember, refrigeration can make the bread a bit drier. Freezing is a great option for longer storage. First, let the bread cool completely. Then, wrap it tightly in plastic wrap. After that, place it in a freezer-safe bag or container. This helps to avoid freezer burn. When you want to enjoy it, thaw it in the fridge overnight. You can also warm it in the oven for a fresh-baked taste. Double Chocolate Zucchini Bread stays fresh for about a week at room temperature. In the fridge, it can last up to two weeks. Look for signs of spoilage. If you see mold or an off smell, it’s best to toss it. Enjoy your bread while it’s still soft and tasty! Yes, you can use frozen zucchini. Just make sure to thaw and drain it first. Frozen zucchini may have a bit more water. This can make the bread extra moist. Squeeze out the excess water with a clean cloth before adding it to the batter. To check if your bread is done, insert a toothpick into the middle. If it comes out clean or with a few moist crumbs, the bread is ready. If there’s wet batter on the toothpick, bake it a bit longer. Keep an eye on it as it gets close to the end time. Yes, you can substitute chocolate chips. Try using dark chocolate or white chocolate chips for a different taste. You can even use chopped chocolate bars for a fun texture. If you prefer fewer sweets, opt for unsweetened chocolate and add a bit more sugar to balance. Each slice has about 200 calories, depending on your ingredients. It has carbs from flour and sugars. Zucchini adds fiber and moisture, while chocolate provides antioxidants. Adding nuts can increase protein and healthy fats. If you want specific numbers, check the labels on your ingredients. To lower sugar, reduce the granulated and brown sugar by one-third. You can also use unsweetened applesauce or mashed bananas for natural sweetness. This change keeps the bread moist and tasty. You might also want to use sugar substitutes like stevia or erythritol. Double Chocolate Zucchini Bread is a delicious treat you can master easily. You learned about the key ingredients, simple steps, and helpful tips for the best result. Remember to store it right for freshness. With variations for gluten-free and vegan diets, anyone can enjoy this recipe. Bake with confidence and share your creations. Enjoy your baking journey!

Delectable Double Chocolate Zucchini Bread Recipe

For these tasty bowls, you will need: - 2 boneless, skinless chicken breasts - 2 tablespoons extra virgin olive oil - 2 tablespoons thick Greek yogurt - 2 cloves garlic, finely minced - 1 teaspoon dried oregano - 1 teaspoon smoked paprika - Salt and pepper to taste - 2 cups cooked quinoa, fluffily prepared - 1 cucumber, finely diced - 1 cup cherry tomatoes, halved for freshness - 1/2 red onion, paper-thin sliced - 1/2 cup feta cheese, crumbled into pieces - A handful of fresh parsley, roughly chopped for garnish - Lemon wedges, to brighten up the dish The marinade is key for flavor. Use these items: - 2 tablespoons extra virgin olive oil - 2 tablespoons thick Greek yogurt - 2 cloves garlic, finely minced - 1 teaspoon dried oregano - 1 teaspoon smoked paprika - Salt and pepper to taste This mix gives the chicken a rich taste. It makes each bite juicy and full of flavor. To finish your bowls, add these garnishes: - A handful of fresh parsley, roughly chopped - Lemon wedges Fresh parsley adds color and zest. Lemon wedges give a bright finish, enhancing the flavors. Start by gathering your ingredients. In a medium bowl, mix the extra virgin olive oil, Greek yogurt, minced garlic, dried oregano, smoked paprika, salt, and pepper. Whisk until the marinade is smooth. This mix adds depth to the chicken. You want all flavors to blend well. Place the chicken breasts in the marinade. Make sure each piece gets a good coat. Cover the bowl and put it in the fridge. Let it sit for at least 30 minutes. If you have more time, let it marinate for up to 2 hours. This step will make your chicken more flavorful and juicy. Preheat your grill or a heavy skillet over medium-high heat. Once hot, take the chicken out of the marinade. Let the extra marinade drip off. Grill the chicken for about 6-7 minutes on each side. You want it to reach an internal temperature of 165°F (75°C). Check that the juices run clear when you cut into it. After grilling, let the chicken rest for about 5 minutes. This helps keep it juicy. Slice the chicken into long strips. Now, it's time to build your bowls. Start with a base of fluffy cooked quinoa. Then, layer on the sliced chicken. Add the diced cucumber, halved cherry tomatoes, and thinly sliced red onion. Top it with crumbled feta cheese for a nice salty kick. Finally, sprinkle fresh parsley over the bowls. Serve with lemon wedges for a bright touch. To make the best marinade, you want the right balance. Start with extra virgin olive oil and thick Greek yogurt. This mix keeps the chicken moist. Add minced garlic for aroma. Dried oregano gives it that classic Greek flavor. Smoked paprika adds a nice twist. Season with salt and pepper to taste. Whisk until smooth. Let the chicken soak in the marinade for at least 30 minutes. If you can, let it sit for two hours. This extra time makes the flavors deeper. Heat your grill or skillet to medium-high. This helps sear the chicken, locking in juices. Remove the chicken from the marinade. Let excess marinade drip off. Grill each side for 6-7 minutes. Use a meat thermometer to check the temperature. It should reach 165°F (75°C). When done, let the chicken rest for about 5 minutes. This step allows the juices to settle. Then, slice it into long strips for the bowls. Begin with cooked quinoa as your base. Fluff it well for a light texture. Next, layer your grilled chicken on top. Follow with diced cucumber and halved cherry tomatoes. The fresh veggies add crunch and color. Thinly sliced red onion gives a nice bite. Don’t forget crumbled feta cheese for creaminess. Finally, sprinkle fresh parsley on top. Serve with lemon wedges for a zesty finish. {{image_4}} You can easily make a vegetarian version of Greek chicken gyro bowls. Swap out the chicken for grilled halloumi cheese or marinated tofu. Both options absorb flavors well and add a nice texture. Use the same marinade from the chicken for the halloumi or tofu. Grill until golden brown and crispy. This gives a tasty, savory bite to your bowls. For a healthy twist, try using farro or barley instead of quinoa. These grains have a chewy texture and nutty flavor. They also boost fiber content, making your meal more filling. Cook them in vegetable broth for extra flavor. This change adds variety and nutrients to your gyro bowls. To elevate the taste of your gyro bowls, consider adding more herbs or spices. Fresh dill or mint can brighten the dish. You can also mix in some spicy harissa or a dash of hot sauce for heat. For a sweet touch, add pomegranate seeds or sliced olives. These additions make your gyro bowls vibrant and full of life. To store your Greek chicken gyro bowl leftovers, use airtight containers. Place the chicken, quinoa, and veggies in separate sections to keep them fresh. Store them in the fridge for up to three days. If you want to keep them longer, you can freeze the chicken. Just make sure to wrap it well to avoid freezer burn. When it's time to eat your leftovers, you can reheat them easily. For the chicken, use a microwave or a skillet on low heat. If using a microwave, heat for 30-second bursts until hot. For the quinoa and veggies, the microwave works well too. Add a splash of water to keep them moist while reheating. Meal prep makes your week easier. Start by cooking a larger batch of chicken and quinoa. You can marinate the chicken and grill it in advance. Store the cooked chicken and quinoa in separate containers. Chop the veggies and store them in the fridge. This way, you can quickly assemble your bowls for lunch or dinner any day of the week. Remember, fresh lemon wedges add a zesty touch when serving! Yes, you can use skin-on chicken for Greek Chicken Gyro Bowls. The skin adds extra flavor and moisture. Just keep in mind, it may take longer to cook. You need to ensure the internal temperature reaches 165°F (75°C) for safety. If you want to substitute quinoa, try brown rice or couscous. Both options provide a nice texture. You can also use farro for a chewier bite. Choose what you enjoy most or have on hand. To make a low-carb version, skip the quinoa. Instead, use cauliflower rice or leafy greens like spinach. You can also add more veggies for crunch and flavor. This keeps the dish light but still tasty. Yes, you can prepare Greek Chicken Gyro Bowls ahead of time. Cook the chicken and vegetables, then cool them down. Store everything in separate containers. When you are ready to enjoy, just assemble the bowls. This makes meal prep easy and convenient. This blog post covered how to make Greek Chicken Gyro Bowls from start to finish. You learned about key ingredients, marination, grilling, and bowl assembly. I shared tips for juicy chicken and creative variations. Proper storage and reheating methods help keep your meals fresh. In short, this dish is tasty, flexible, and easy to prepare. Enjoy making these gyro bowls that bring Greek flavors to your kitchen!

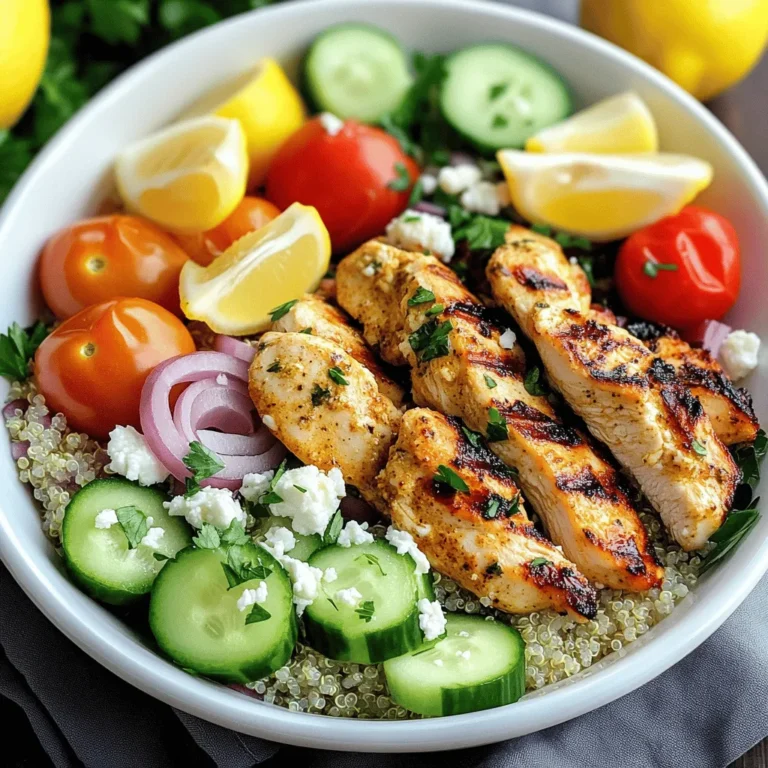
Greek Chicken Gyro Bowls Flavorful and Fresh Delight

PREV 1 … 8 9 10 … 18 NEXT
sweet savory saga

explore

DessertsDinnerAppetizersDrinks

Our Policies

  • Cookie Policy
  • Copyright Policy
  • Disclaimer
  • GDPR Policy
  • Terms Of Use
Back to Top
  • About
  • Contact Us
  • Privacy Policy
© 2025 sweet savory saga