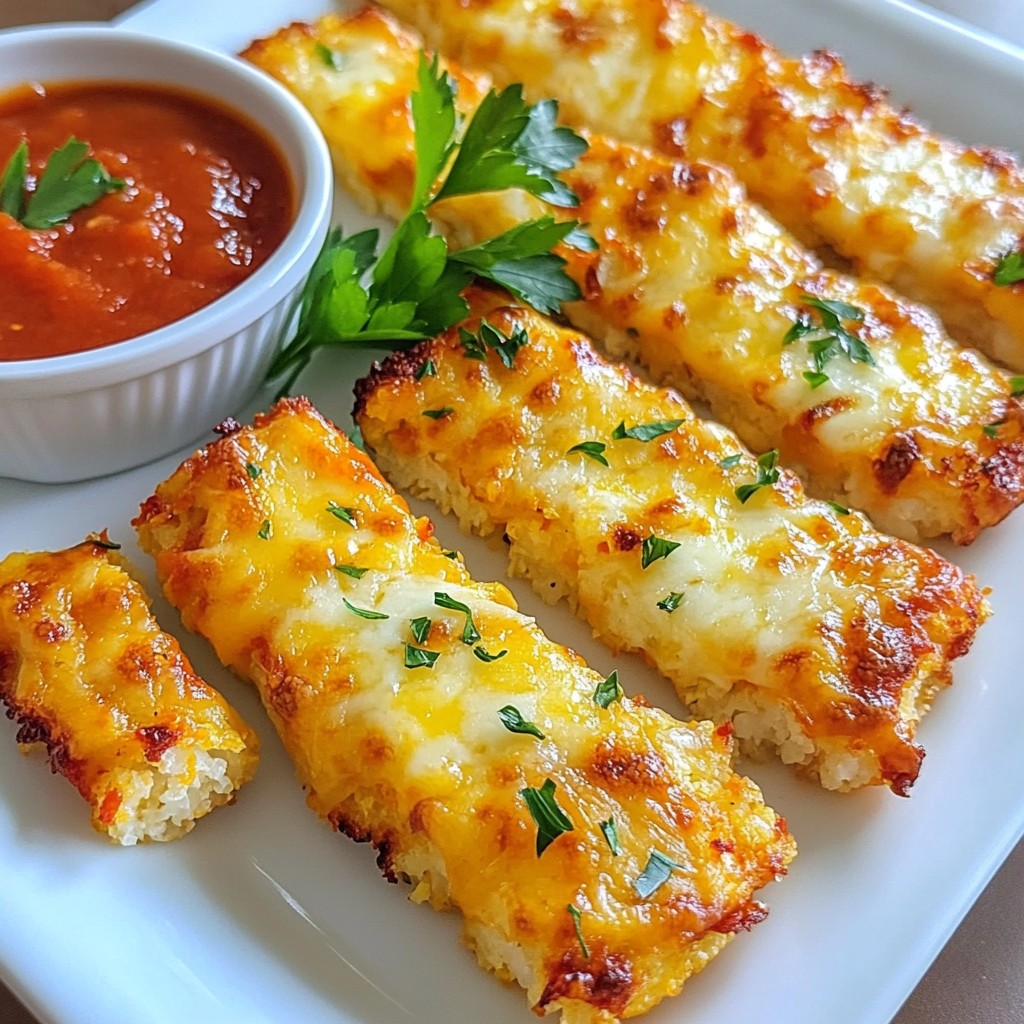
Craving a snack that's both tasty and healthy? Let me introduce you to Cheesy Cauliflower Breadsticks! These easy-to-make treats bring all the flavors you love without the carbs. With a perfect crunch and gooey cheese, they’re great for any gathering or a cozy night in. I'll guide you through each step, so you can whip these up and impress your friends and family. Ready to get cooking? Let's dive in!
Why I Love This Recipe
- Healthy Alternative: These breadsticks are a fantastic low-carb option, making them perfect for those following a keto or gluten-free diet.
- Cheesy Goodness: With a delightful blend of mozzarella and Parmesan, these breadsticks are packed with flavor that cheese lovers will adore.
- Easy to Make: This recipe is straightforward and requires minimal ingredients, making it accessible for cooks of all skill levels.
- Perfect for Dipping: Served with marinara sauce, these breadsticks are an excellent appetizer or snack for any gathering.
Ingredients
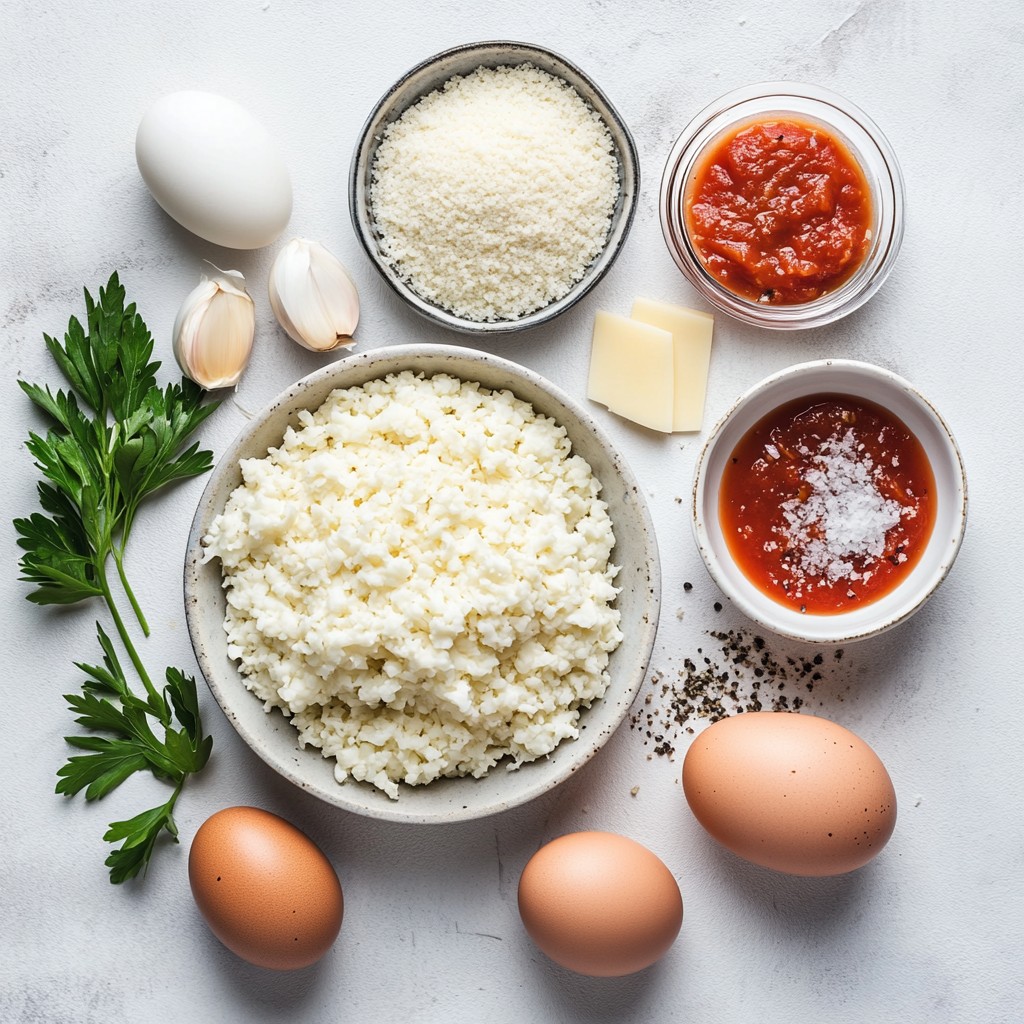
List of Ingredients
- 1 medium head of cauliflower, riced
- 1 cup shredded mozzarella cheese
- 1/2 cup grated Parmesan cheese
- 2 large eggs
- 1 teaspoon garlic powder
- 1 teaspoon onion powder
- 1/2 teaspoon dried oregano
- 1/2 teaspoon salt
- 1/4 teaspoon black pepper
- 1/2 cup marinara sauce (for dipping)
- Fresh parsley, finely chopped (for garnish, optional)
To make these cheesy cauliflower breadsticks, I use simple yet tasty ingredients that you may already have at home. The star of the show is the cauliflower. It gives the breadsticks their unique texture and a healthy twist.
I choose riced cauliflower to make this dish easy. You can buy it pre-riced or do it yourself. Just chop the cauliflower into small pieces and pulse in a food processor. This method makes it quick and simple!
The mozzarella cheese adds the gooey, melty goodness we all love. Parmesan cheese brings a nice salty flavor. Together, they make these breadsticks cheesy and delicious.
Two large eggs help bind everything together. They ensure the mixture holds its shape when baked.
The seasonings are key to enhancing the flavor. Garlic powder and onion powder add depth. Dried oregano gives a hint of earthiness. Salt and black pepper finish it off perfectly.
For dipping, I use marinara sauce. It complements the breadsticks well and adds a nice zing. You can also sprinkle fresh parsley for a pop of color and freshness.
This combination of ingredients makes cheesy cauliflower breadsticks simple and scrumptious!
Step-by-Step Instructions
Preparation Steps
1. Preheat and prepare the baking sheet:
First, heat your oven to 425°F (220°C). Line a baking sheet with parchment paper. This will help the breadsticks not stick.
2. Ricing the cauliflower:
Take a medium head of cauliflower. Remove the leaves and core. Chop it into small florets. Use a food processor to pulse these florets until they look like rice. This should take about 10-15 pulses.
3. Microwaving the cauliflower:
Put the riced cauliflower in a microwave-safe bowl. Cover it with a lid or plate. Microwave on high for 5-6 minutes. This softens the cauliflower, making it easier to work with later.
Mixing and Shaping
1. Squeezing out moisture:
Let the cooked cauliflower cool for a few minutes. Then, place it in a clean kitchen towel. Gather the edges of the towel and twist it to form a pouch. Squeeze it firmly to remove as much moisture as you can. This step is key for crispy breadsticks.
2. Combining ingredients:
In a big mixing bowl, add the riced cauliflower, 1 cup of shredded mozzarella, 1/2 cup of grated Parmesan, 2 large eggs, 1 teaspoon of garlic powder, 1 teaspoon of onion powder, 1/2 teaspoon of dried oregano, 1/2 teaspoon of salt, and 1/4 teaspoon of black pepper. Mix everything until it’s well combined.
3. Spreading the mixture on the baking sheet:
Transfer the mixture to your prepared baking sheet. Use a spatula or your hands to spread it out evenly. Aim for a thickness of about 1/4 inch. This helps the breadsticks cook evenly.
Baking and Serving
1. Baking time and monitoring:
Place the baking sheet in your preheated oven. Bake for 20-25 minutes. Look for golden brown edges and a firm center.
2. Cooling and slicing:
Once baked, take it out and let it cool for a couple of minutes. While still warm, slice it into your desired sizes. Return the breadsticks to the oven for another 5 minutes. This helps crisp up the edges.
3. Serving suggestions:
Serve the warm breadsticks with marinara sauce for dipping. If you like, sprinkle with freshly chopped parsley for a pop of color. Enjoy this tasty treat!
Tips & Tricks
Achieving Crispy Breadsticks
To get the best crispy breadsticks, moisture removal is key. When you cook the riced cauliflower, it holds a lot of water. After microwaving, I use a clean kitchen towel to squeeze out as much moisture as I can. This step helps the breadsticks crisp up nicely in the oven.
Choosing the right size for your cauliflower pieces matters too. When you rice the cauliflower, aim for small, uniform bits. This helps them cook evenly. If the pieces are too big, the breadsticks may turn out soggy.
Serving Tips
For dipping, marinara sauce is a classic choice. Its rich flavor pairs well with the cheesy breadsticks. You can also try ranch dressing or garlic sauce for a fun twist.
Garnishing adds a nice touch. I like to sprinkle fresh parsley on top before serving. It makes the dish look prettier and adds a hint of freshness.
Troubleshooting Common Issues
If your breadsticks turn out soggy, don’t worry. You can bake them a little longer. Just keep an eye on them to avoid burning.
Adjusting the seasonings to taste is simple. If you prefer a stronger flavor, add more garlic powder or herbs. Taste the mixture before baking to find the right balance for you.
Pro Tips
- Choose Fresh Cauliflower: Selecting a fresh, firm head of cauliflower will yield the best flavor and texture for your breadsticks.
- Drain Well: Make sure to squeeze out as much moisture as possible from the riced cauliflower; this is crucial for achieving crispy breadsticks.
- Even Thickness: Spread the cauliflower mixture evenly to about 1/4 inch thick to ensure all breadsticks cook uniformly.
- Customize Seasoning: Feel free to experiment with different herbs and spices like Italian seasoning or crushed red pepper for a unique flavor profile.
Variations
Cheese Variations
You can change the cheese for different flavors. Try using sharp cheddar for a bolder taste. Gouda adds a creamy touch and melts wonderfully. You can also layer extra cheese on top before the final bake. This creates a cheesy crust that everyone loves.
Herb and Spice Variations
Add fresh herbs to boost flavor. Chopped basil or parsley can make a big difference. You can also play with spices. Try adding some red pepper flakes for heat or smoked paprika for depth. These small changes can make the breadsticks exciting and unique.
Adding Ingredients
Mix in extra veggies for a fun twist. Spinach adds color and nutrients, while bell peppers add crunch. You can even turn these into pizza-style breadsticks. Just add your favorite toppings, like pepperoni or olives, before baking. This makes them a great snack or meal option.
Storage Info
How to Store Leftovers
To keep your cheesy cauliflower breadsticks fresh, you need to store them properly.
- Refrigeration guidelines: Place the baked breadsticks in an airtight container. Store them in the fridge for up to 4 days. Make sure they cool down first to avoid condensation inside the container.
- Freezing instructions: If you want to save them for later, wrap each breadstick in plastic wrap. Then, place them in a freezer bag. They can last in the freezer for up to 3 months. When you’re ready to eat, simply thaw them in the fridge overnight before reheating.
Reheating Tips
To enjoy your cheesy breadsticks at their best, reheating is key.
- Oven reheating for best results: Preheat your oven to 350°F (175°C). Place the breadsticks on a baking sheet. Heat them for about 10-15 minutes. This method keeps them crispy and tasty.
- Microwave options for faster heating: If you're in a hurry, you can use the microwave. Place the breadsticks on a microwave-safe plate. Heat them in 30-second intervals until warm. Keep in mind that they may not be as crispy this way.
FAQs
What can I use instead of cauliflower?
If you want to switch up the base, try broccoli. Broccoli riced in the same way works great. You can also use zucchini. Just squeeze out the water well. Another option is to use carrots. Grate them instead of ricing. Each veggie gives a different taste and texture.
Can I make these breadsticks in advance?
Yes, you can make these breadsticks ahead of time. Prepare the mixture and shape it. Then, place it in the fridge for up to 24 hours. When ready, just bake them as directed. You can also freeze the uncooked breadsticks. Wrap them tightly and store them for up to a month. Bake them directly from the freezer, just add a few extra minutes.
How can I make this recipe vegan?
To make these breadsticks vegan, swap the eggs for flax eggs. Mix 1 tablespoon of ground flaxseed with 3 tablespoons of water for each egg. Let it sit for a few minutes until it thickens. Replace the cheeses with vegan cheese options. Many brands offer great melting vegan cheese. You can also add nutritional yeast for a cheesy flavor.
This article covered how to make delicious cauliflower breadsticks. You learned about the ingredients, preparation steps, and tips to ensure they turn out crispy. We explored various cheese and herb options to make them your own. You also discovered how to store leftovers and reheat them for the best taste.
These breadsticks are a fun and tasty twist on a classic snack. Try them out and enjoy customizing them to fit your taste!