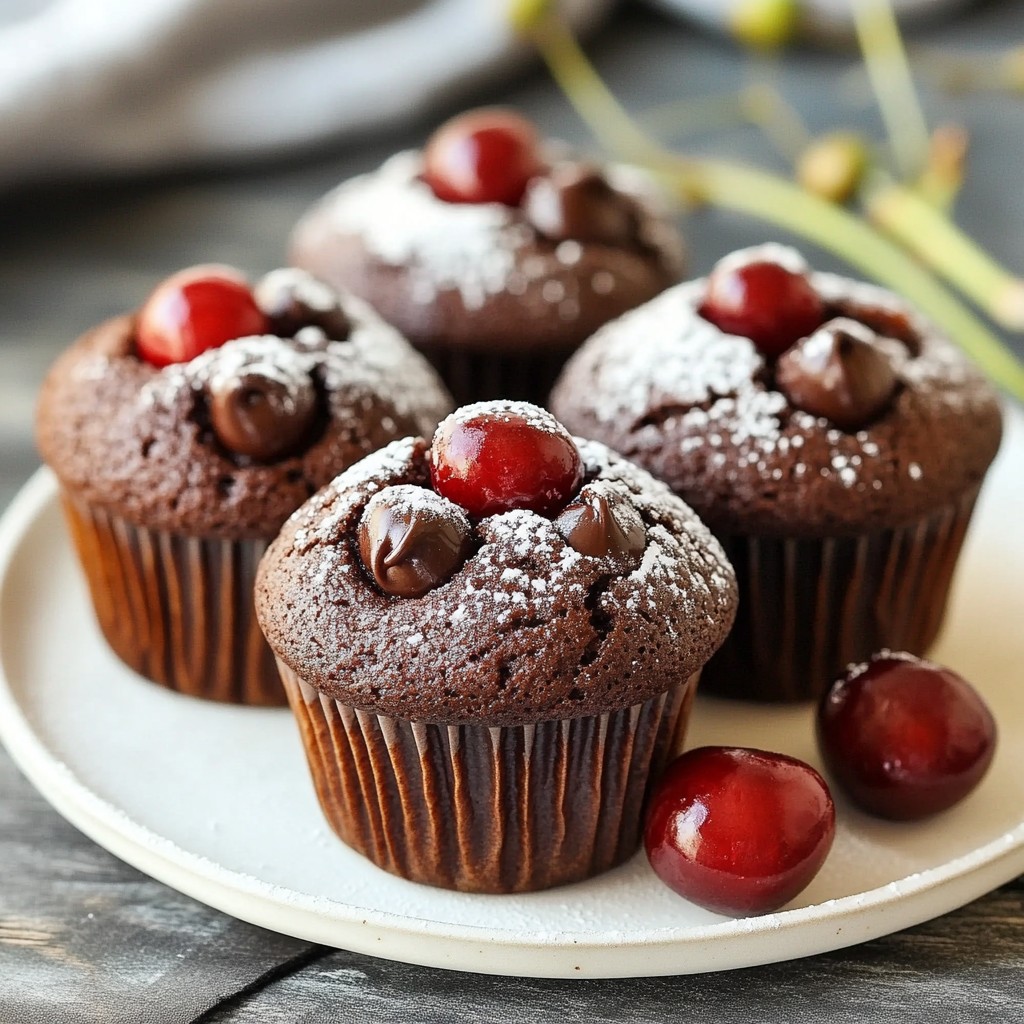
If you crave a sweet treat that combines tart cherries and rich chocolate, you’re in for a delight! These Cherry Chocolate Chip Muffins offer a burst of flavor in every bite. They are easy to make and perfect for breakfast or snacks. In this guide, I’ll share every detail, from the ingredients to baking tips. Get ready to enjoy a muffin that’s both delicious and satisfying!
Why I Love This Recipe
- Delicious Flavor Combination: The blend of tart cherries and rich chocolate creates a delightful contrast that excites the taste buds.
- Easy to Make: This recipe comes together quickly, making it perfect for busy mornings or last-minute gatherings.
- Customizable Ingredients: You can easily substitute ingredients like using different types of flour or adding nuts for extra crunch.
- A Crowd-Pleaser: These muffins are sure to impress friends and family, making them a great addition to any brunch or snack table.
Ingredients
To make Cherry Chocolate Chip Muffins, gather these tasty ingredients:
- 1 cup fresh or frozen cherries, pitted and halved
- 1 cup all-purpose flour
- 1/2 cup almond flour
- 3/4 cup granulated sugar
- 1/2 cup unsweetened cocoa powder
- 2 teaspoons baking powder
- 1/2 teaspoon baking soda
- 1/4 teaspoon salt
- 1/3 cup vegetable oil
- 2 large eggs
- 1 teaspoon vanilla extract
- 1/2 cup milk (dairy or non-dairy)
- 1/2 cup semi-sweet chocolate chips
Each ingredient plays a key role in making these muffins delicious. The cherries bring a sweet and tart flavor, while the chocolate adds richness. The mix of flours gives a nice texture. Sugar helps the muffins rise and adds sweetness. Baking powder and baking soda are key for fluffiness. Using eggs and oil keeps the muffins moist. Vanilla and milk round out the flavors and enhance the overall taste. Prepare to enjoy a delightful treat!
Step-by-Step Instructions
Prepping the Muffin Tin
Start by preheating your oven to 350°F (175°C). This step is key for even baking. Take a muffin tin and either line it with paper liners or grease each cup. Using cooking spray or butter works well. This prevents the muffins from sticking.
Mixing Dry Ingredients
In a large bowl, mix the following dry ingredients:
- 1 cup all-purpose flour
- 1/2 cup almond flour
- 1/2 cup unsweetened cocoa powder
- 3/4 cup granulated sugar
- 2 teaspoons baking powder
- 1/2 teaspoon baking soda
- 1/4 teaspoon salt
Stir these ingredients well. Make sure they are evenly combined. This helps the muffins rise and taste great.
Combining Wet Ingredients
In another medium bowl, whisk together:
- 1/3 cup vegetable oil
- 2 large eggs
- 1 teaspoon vanilla extract
- 1/2 cup milk
Mix until smooth. This will help the muffins stay moist and flavorful.
Creating the Muffin Batter
Now, pour the wet ingredients into the dry ingredients. Stir gently until just combined. It’s fine if a few lumps remain. Overmixing can make the muffins tough, so be gentle.
Filling the Muffin Cups
Carefully fold in:
- 1 cup fresh or frozen cherries, pitted and halved
- 1/2 cup semi-sweet chocolate chips
Make sure these goodies are evenly spread in the batter. Use a spoon or an ice cream scoop to fill each muffin cup about 3/4 full. This allows room for the muffins to rise.
Baking and Cooling the Muffins
Place the muffin tin in the preheated oven. Bake for 18 to 20 minutes. To check if they are done, insert a toothpick in the center. If it comes out clean, your muffins are ready. Take them out and let them cool in the pan for 5 minutes. Then, transfer the muffins to a wire rack to cool completely. Enjoy your delicious creation!
Tips & Tricks
How to Avoid Overmixing
To keep your muffins light, mix gently. When you combine the wet and dry ingredients, stir until just mixed. Leave some lumps in the batter. Overmixing makes muffins dense. You want them fluffy and soft, not tough.
Best Practices for Even Baking
For even baking, preheat your oven to 350°F (175°C). Fill each muffin cup about 3/4 full. This helps the muffins rise evenly. Place your muffin tin in the center of the oven. This way, they bake uniformly. Rotate the tin halfway through baking for extra evenness.
Suggested Serving Suggestions
These muffins taste great warm. Serve them with a light dusting of powdered sugar. Add whole cherries on the side for a lovely look. They also pair nicely with a cup of coffee or tea. Enjoy them as a snack or dessert!
Pro Tips
- Fresh vs. Frozen Cherries: If using fresh cherries, ensure they are ripe and sweet for the best flavor. Frozen cherries are a great alternative; just thaw and drain excess juice before adding them to the batter.
- Avoid Overmixing: When combining wet and dry ingredients, mix until just combined. Overmixing can lead to dense muffins; a few lumps are perfectly fine!
- Chocolate Chip Variations: Experiment with different types of chocolate chips, such as dark chocolate or white chocolate, to add a unique twist to your muffins.
- Storing Muffins: To keep your muffins fresh, store them in an airtight container at room temperature for up to 3 days or freeze them for longer storage.
Variations
Gluten-Free Alternatives
If you want gluten-free Cherry Chocolate Chip Muffins, try using gluten-free flour. You can mix equal parts of almond flour and coconut flour. This keeps the muffins moist and adds a nice texture. Look for a gluten-free blend that has xanthan gum. This will help bind the ingredients together.
Flavor Additions and Substitutions
To add more flavor, try different fruits. Blueberries or raspberries work great. You can also mix in spices like cinnamon or nutmeg for warmth. If you want to switch up the chocolate, use dark chocolate chips or white chocolate chips. For a nutty taste, add chopped walnuts or pecans.
Mini Muffin Adaptation
Making mini muffins is easy and fun! Just fill the mini muffin cups about halfway. Bake them for 10 to 12 minutes instead of the full time. They are perfect for snacks or parties. You can even serve them with a dollop of whipped cream for a treat!
Storage Info
How to Store Muffins
After baking your Cherry Chocolate Chip Muffins, let them cool completely. Once cool, you can store them in an airtight container. This keeps them fresh for up to three days. If you want them to last longer, consider placing a piece of bread in the container. This helps to keep the muffins moist.
Freezing Instructions
If you have extra muffins, freezing is a great option. Wrap each muffin tightly in plastic wrap or foil. Then, place them in a freezer-safe bag. Label the bag with the date. These muffins can last up to three months in the freezer. When you want to enjoy one, just take it out and let it thaw at room temperature.
Reheating Tips
To reheat your muffins, you have a few options. You can use a microwave for quick heating. Heat for about 20 seconds or until warm. If you prefer a crispy top, use an oven. Preheat the oven to 350°F (175°C) and place the muffins on a baking sheet. Heat them for about 5 to 10 minutes. Enjoy your warm, delightful muffins!
FAQs
Can I use dried cherries instead of fresh?
Yes, you can use dried cherries in place of fresh ones. They add sweetness and chew. However, dried cherries are sweeter. Reduce the sugar in the recipe slightly to balance the flavors.
What can I substitute for almond flour?
If you need a substitute for almond flour, use all-purpose flour. You can also try oat flour or coconut flour. Each flour changes the muffin’s flavor and texture. Keep this in mind when substituting.
How do I know when the muffins are done baking?
To check if the muffins are done, insert a toothpick into the center. If it comes out clean, the muffins are ready. They should also be springy to touch and golden brown on top.
Can I add nuts to the muffin recipe?
Yes, adding nuts is a great idea! Chopped walnuts or pecans work well. Just fold them in gently with the cherries and chocolate chips. This adds crunch and flavor to your muffins.
How to make these muffins healthier?
To make these muffins healthier, reduce the sugar and use whole wheat flour. You can also swap some oil for applesauce. These changes keep the muffins moist while lowering calories.
This article covered the essential ingredients and steps to make delicious cherry muffins. You learned how to mix dry and wet ingredients and create a smooth batter. I shared tips to avoid overmixing and detailed storage tips for your muffins.
In the end, enjoy customizing your muffins with different flavors, or keep it simple. Each delicious bite is worth the effort. Happy baking!