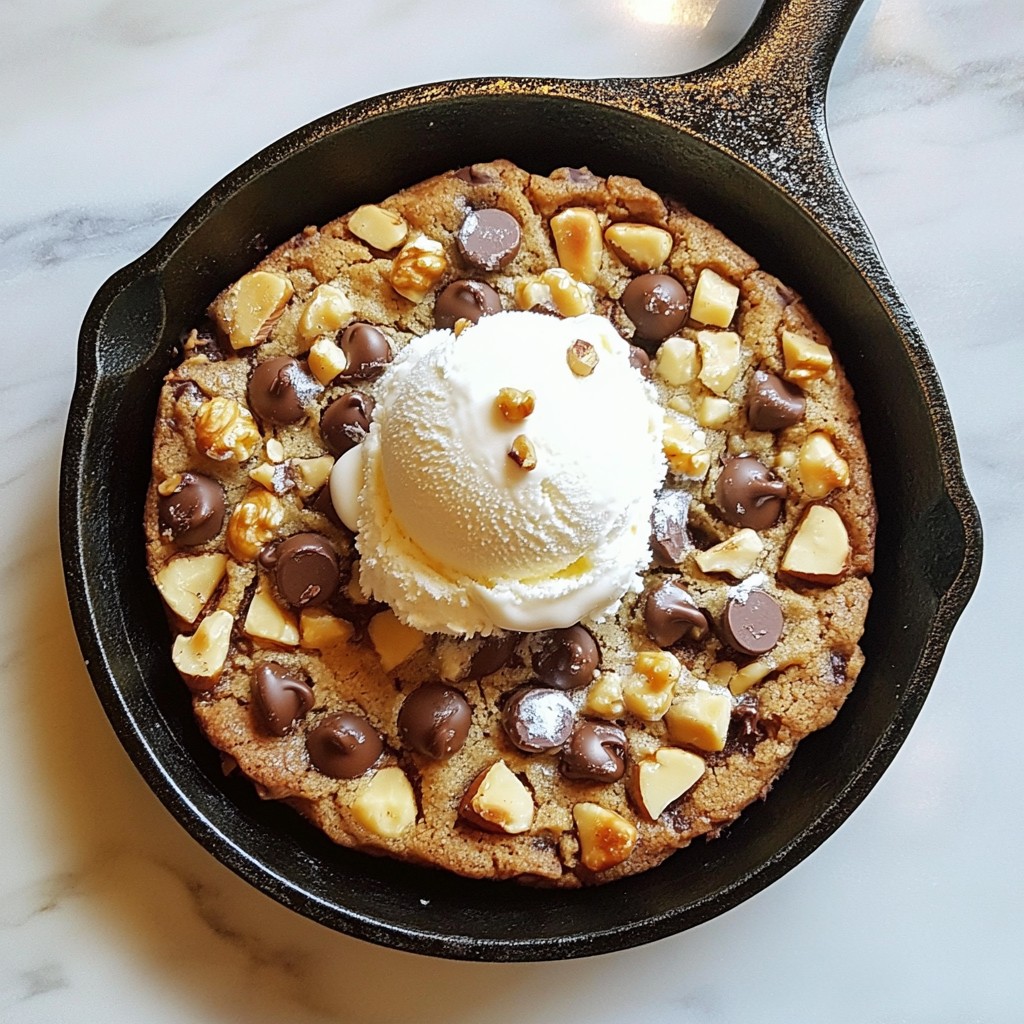
If you love warm, gooey chocolate chip cookies, you'll adore this Chocolate Chip Cookie Skillet! This fun dessert brings together all the comforts of classic cookies, baked right in a skillet. With simple ingredients and easy steps, you can create a treat that's perfect for sharing—or indulging all by yourself. Get ready to impress your friends and family with a dessert they'll crave! Let's dive into the delicious world of skillet cookies!
Why I Love This Recipe
- Decadent Flavor: This skillet cookie is a perfect blend of buttery richness and chocolatey goodness, making it an indulgent treat that satisfies any sweet tooth.
- Easy to Make: With simple ingredients and straightforward steps, this recipe is perfect for bakers of all levels, allowing you to whip up a delicious dessert in no time.
- Shareable Delight: Baking it in a skillet makes it easy to serve and share, creating a fun and interactive dessert experience for friends and family.
- Warm and Gooey: The texture is fantastic, with a crispy edge and a soft, gooey center that pairs beautifully with a scoop of vanilla ice cream.
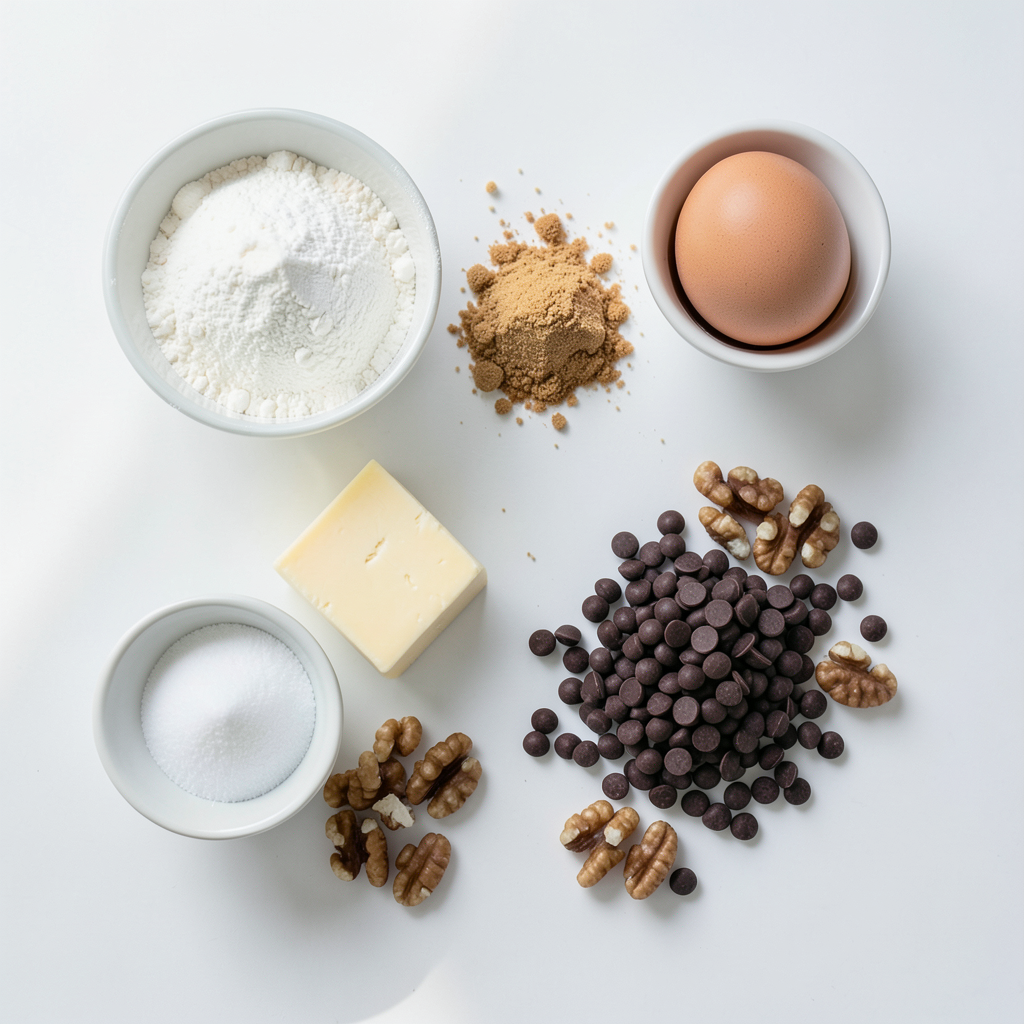
Ingredients
Main Ingredients
- 1 cup all-purpose flour
- 1/2 teaspoon baking soda
- 1/4 teaspoon salt
- 1/2 cup unsalted butter, softened
- 1/2 cup packed brown sugar
- 1/4 cup granulated sugar
- 1 teaspoon pure vanilla extract
- 1 large egg
- 1 cup semi-sweet chocolate chips
- 1/2 cup chopped nuts (optional)
To make this delicious dessert, let's gather the main ingredients. First, you need flour, baking soda, and salt. These help create a nice base for the cookie. Use unsalted butter to keep the flavors balanced. Brown sugar gives it a rich taste while granulated sugar adds sweetness.
Don't forget the vanilla extract! It adds depth to the flavor. You will also need a large egg to bind everything together. The star of the show is the semi-sweet chocolate chips. They melt beautifully and create gooey pockets of chocolate. If you're feeling adventurous, toss in some chopped nuts for a crunchy texture.
Optional Toppings
- Vanilla ice cream
- Whipped cream
- Chocolate sauce
For toppings, I recommend vanilla ice cream. It pairs perfectly with the warm cookie. Whipped cream adds a light touch, and chocolate sauce is a fun, sweet addition. You can mix and match these toppings to make your dessert extra special!
Step-by-Step Instructions
Preparing the Oven and Ingredients
- Preheat the oven to 350°F (175°C).
- Position the oven rack in the center of the oven.
Mixing the Dry and Wet Ingredients
- In a medium bowl, combine 1 cup of flour, 1/2 teaspoon of baking soda, and 1/4 teaspoon of salt.
- In a large bowl, cream together 1/2 cup of softened butter, 1/2 cup of brown sugar, and 1/4 cup of granulated sugar until light and fluffy.
Combining and Baking
- Next, incorporate 1 large egg and 1 teaspoon of vanilla extract into the butter-sugar mix.
- Gradually add the flour mixture to the wet ingredients. Mix until just combined; avoid over-mixing.
- Now, gently fold in 1 cup of chocolate chips and 1/2 cup of chopped nuts if you like.
- Grease a 10-inch cast-iron skillet with cooking spray or butter.
- Spread the dough evenly in the skillet and smooth the top.
- Bake for 20-25 minutes until golden brown around the edges and slightly soft in the center.
- Remove the skillet and let it cool for about 5 minutes before serving.
- For a special treat, serve slices warm with a scoop of vanilla ice cream on top.
Tips & Tricks
Achieving the Perfect Texture
To get the best texture, adjust your baking time and temperature. Bake at 350°F (175°C) for 20-25 minutes. The edges should be golden, while the middle stays soft. A shorter bake gives you a gooey center.
Over-mixing is another concern. Mix until the dough just comes together. This keeps the cookie soft and chewy. If you mix too much, your cookie becomes tough.
Enhancing Flavor
You can enhance flavor by trying different chocolate types. Dark chocolate gives a rich taste, while milk chocolate is sweeter. Experiment to find your favorite!
Adding a pinch of sea salt makes a big difference. It brings out the chocolate flavor and adds depth to your cookie. Just a small amount elevates the taste.
Presentation and Serving
Serve the cookie warm right from the skillet. It looks great and smells amazing! This rustic style adds to the fun of the dessert.
For a perfect finish, top each slice with vanilla ice cream. The warm cookie and cold ice cream create a delightful contrast. Enjoy every bite!
Pro Tips
- Chill the Dough: For thicker cookies, refrigerate the dough for at least 30 minutes before baking. This helps the flavors meld and results in a chewier texture.
- Check for Doneness: The cookie will continue to cook after being removed from the oven, so take it out when the edges are golden but the center is still soft.
- Use Quality Chocolate: Opt for high-quality chocolate chips for a richer flavor. Dark chocolate can also add a nice depth to the sweetness.
- Serve Warm: For the best experience, serve the cookie skillet warm with ice cream. The contrast of hot and cold will elevate your dessert.
Variations
Nut Additions
You can add chopped nuts to your skillet cookie for extra crunch. Chopped walnuts or pecans work well. You may also try other nuts, like almonds or hazelnuts. Just remember to chop them small for even mixing. Adding nuts gives a nice contrast to the soft cookie base.
Flavor Alternatives
Want to mix things up? Use peanut butter chips instead of chocolate chips. You can also swap chocolate chips for butterscotch or white chocolate chips. These changes can give your skillet cookie a new taste. Try different flavors to find your favorite combination.
Dietary Adjustments
If you need gluten-free options, use gluten-free flour instead of regular flour. This makes the cookie just as tasty. For vegan options, replace the butter with coconut oil and use a flax egg instead of a real egg. These adjustments let everyone enjoy your cookie skillet.
Storage Info
Room Temperature Storage
You can keep leftover cookie skillet at room temperature. Just cover it with plastic wrap or a lid. This helps keep it fresh for a day or two. Avoid leaving it uncovered. If it dries out, the cookie will lose its soft texture.
Refrigeration
If you want to store it longer, put the skillet in the fridge. It lasts up to a week when stored well. Use plastic wrap or a container with a lid. This keeps the cookie moist and tasty. Remember, cold cookies may harden a bit.
Reheating Tips
To enjoy your cookie skillet again, reheat it in the oven. Preheat to 350°F (175°C). Place the skillet inside for about 10 minutes. This warms it and keeps it soft. You can also microwave individual slices for 20-30 seconds. Just be careful not to overheat them, or they may become tough.
FAQs
Can I make the cookie dough ahead of time?
Yes, you can make the cookie dough ahead of time. Just mix all the ingredients and store them in the fridge. It will stay fresh for up to 24 hours. When you’re ready, spread the dough in the skillet and bake it as usual. This saves time and still gives you a warm, fresh cookie skillet.
What size skillet is best for baking?
A 10-inch cast-iron skillet works best for this cookie. It allows the cookie to bake evenly. If you use a smaller skillet, the cookie may be thicker and take longer to bake. A larger skillet can make a thinner cookie, which may bake too fast. So stick to a 10-inch for perfect results.
Can I freeze the cookie skillet?
Yes, you can freeze the cookie skillet. Once it cools, cover it well with plastic wrap or foil. It will stay good for about three months. To enjoy it later, thaw it in the fridge overnight. Then, reheat it in the oven for a warm treat.
How do I know when the cookie is done baking?
You can tell the cookie is done when the edges are golden brown. The center should look slightly soft. If you press the center gently, it should bounce back a bit. This means it will still be gooey and delicious inside.
Can the recipe be halved for smaller servings?
Yes, you can halve the recipe for smaller servings. Just cut all the ingredients in half. Use a smaller skillet, like an 8-inch one. This way, you still get a great cookie while adjusting for fewer people. Enjoy your smaller, perfect dessert!
This guide walks you through making a delicious cookie skillet. We covered the best ingredients, step-by-step instructions, and handy tips for perfecting your dish. Remember, small changes can make a big difference in taste and texture. Enjoy experimenting with different flavors and toppings to make it your own. Storing and reheating properly keeps your cookie fresh for later. Now, grab your skillet and start baking! You'll love sharing this warm treat with friends and family.