If you love coffee and chocolate, you’re in for a treat! Today, I’ll show you how to make chocolate-covered coffee beans right at home. With just a few simple ingredients, you can create a tasty snack that boosts your energy and satisfies your sweet tooth. Dive in and discover the joy of crafting these delightful bites, perfect for gifting or keeping all to yourself!
Why I Love This Recipe
- Rich Coffee Flavor: This recipe combines the boldness of dark roast coffee beans with the sweetness of dark chocolate, creating a deliciously rich treat.
- Simple and Quick: With just a few ingredients and minimal prep time, you can whip up these delightful snacks in no time.
- Versatile Treat: These chocolate-drenched coffee delights can be enjoyed on their own, used as a topping for desserts, or added to your favorite coffee for an extra kick.
- Customizable: Add your favorite flavors, such as vanilla extract or sea salt, to personalize this recipe and make it uniquely yours!
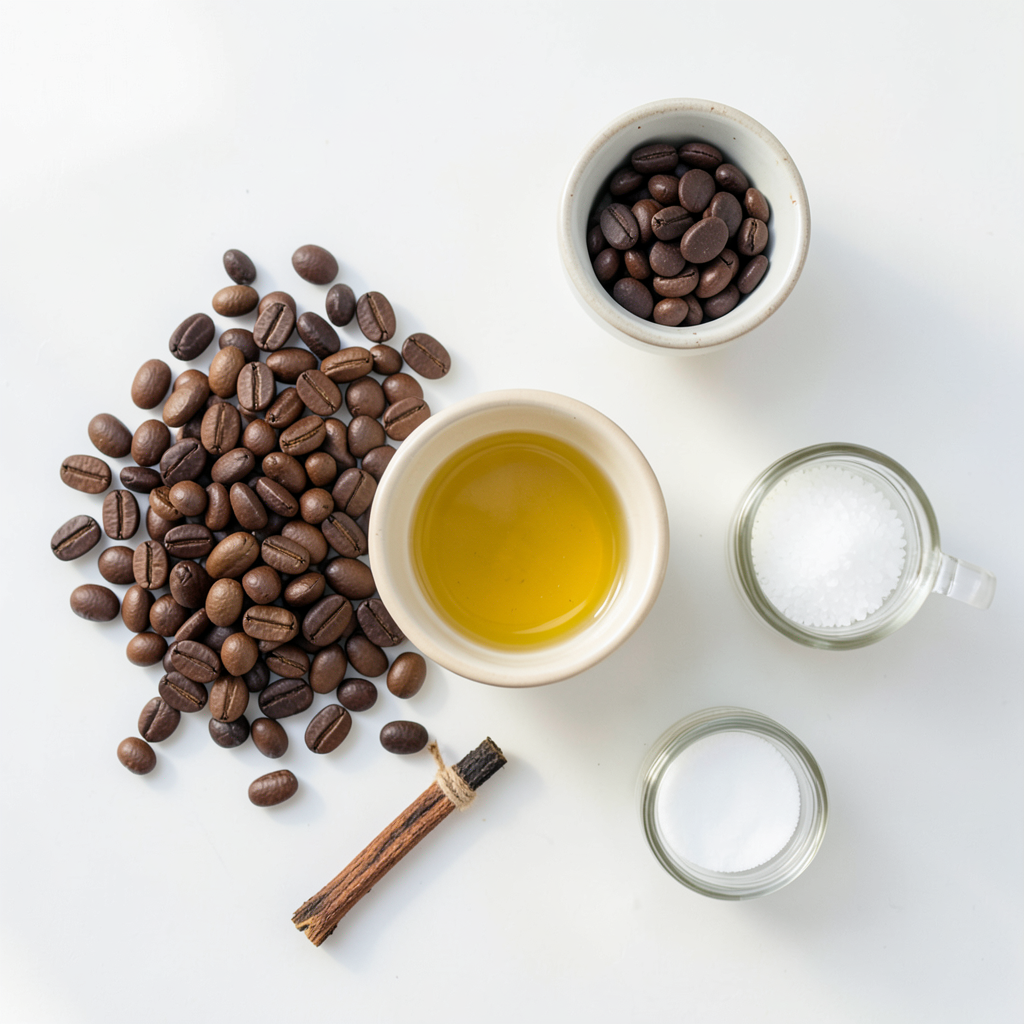
Ingredients
Essential Ingredients
- 1 cup whole coffee beans (dark roast for a richer flavor)
- 1 cup dark chocolate chips (or chopped dark chocolate for a gourmet touch)
- 1 tablespoon coconut oil (optional but adds a nice sheen)
- Sea salt, for a finishing sprinkle
- 1 teaspoon vanilla extract (optional for an aromatic boost)
Recommended Quality Tips
- Choosing high-quality coffee beans: Always pick fresh, whole beans. Dark roast beans give a deep flavor.
- Selecting premium dark chocolate: Look for chocolate with at least 70% cocoa. It has more flavor and less sugar.
- Importance of fresh ingredients: Fresh coffee beans and quality chocolate make a big difference in taste. Always check dates on packages.
Step-by-Step Instructions
Preparing Your Workspace
Start by lining a baking sheet with parchment paper. This step helps the beans release easily once they are set. It also keeps your workspace clean. Next, gather your tools. You will need a mixing bowl, a spatula, and a fork. Having everything ready makes the process smooth and fun.
Melting the Chocolate
You can melt the chocolate using two methods: the microwave or a double boiler. For the microwave, place the dark chocolate chips in a microwave-safe bowl. Add coconut oil if you want a nice shine. Microwave the chocolate in 30-second bursts. Stir well after each interval until it is smooth. If you like, mix in vanilla extract for extra flavor. This makes the chocolate even richer.
Coating the Coffee Beans
Now comes the fun part! Gently add the whole coffee beans to the melted chocolate. Use a spatula to stir gently. Make sure every bean is well coated in chocolate. This step is key for a great taste! To remove excess chocolate, use a fork or slotted spoon. Lift the beans out and let extra chocolate drip back into the bowl. Transfer the beans to your lined baking sheet.
Cooling and Storing
Once you have coated all the beans, it’s time to chill them. Place the baking sheet in the refrigerator. Let the chocolate set for about 30 minutes. You want the coating to be firm to the touch. After they harden, transfer the beans to an airtight container. Store them in a cool place or in the fridge. This keeps them fresh. Enjoy your chocolate-covered coffee beans as a tasty snack or a sweet treat with your coffee!
Tips & Tricks
Achieving the Perfect Coating
To get the best chocolate coating, you must control the temperature. Melt the chocolate slowly. If you heat it too fast, it may burn. Use a microwave in short bursts, stirring often. If you want to mix in flavors, add a bit of vanilla extract. This simple addition makes the chocolate even richer.
Enhancing Flavor Combinations
You can spice things up with extra toppings. Try a sprinkle of cinnamon or a touch of chili powder. These spices can bring new depth to your treat. Pair your chocolate-covered coffee beans with your favorite drink. They go well with coffee, tea, or even a glass of milk.
Common Mistakes to Avoid
Avoid overheating the chocolate. This mistake can ruin the smooth texture you want. Also, don't skip the cooling process. Let the chocolate set in the fridge for 30 minutes. This step ensures the coating stays firm and delicious.
Pro Tips
- Choose Quality Beans: Opt for high-quality dark roast coffee beans to ensure a rich flavor that pairs beautifully with the dark chocolate.
- Experiment with Chocolate: Try different types of dark chocolate, such as those with varying cocoa percentages, to find your perfect balance of bitterness and sweetness.
- Customize Your Coating: Add a dash of spice, like cinnamon or chili powder, to the melted chocolate for a unique flavor twist that complements the coffee.
- Revive Stale Beans: If your coffee beans are stale, roast them lightly in the oven for a few minutes before coating to enhance their flavor and aroma.
Variations
Flavor Enhancements
You can make your chocolate-covered coffee beans even more exciting. One way is to add spices. A pinch of cinnamon gives warmth. If you’re feeling bold, try chili powder for a kick. Each spice brings a unique taste that will surprise your palate.
Also, think about the chocolate type. While dark chocolate is classic, milk chocolate or white chocolate can change the game. Each choice alters the flavor and sweetness. Mixing different chocolates can create a layered experience.
Other Ingredients
Flavored coffee beans can take your treat to the next level. Think hazelnut or vanilla-infused coffee beans. These flavors blend well with chocolate and add depth. You can also mix in nuts or dried fruits for added texture. Almonds, walnuts, or cranberries work great. Each ingredient makes every bite special and unique.
Presentation Ideas
Don't forget about how you present your treats. Gift packaging can be fun and personal. Try using small jars or decorative bags. Add a ribbon for a special touch.
For serving, consider a pretty dish or a clear jar. You can layer the coffee beans with some nuts or fruits to create a colorful display. This makes your chocolate-covered coffee beans not just a snack but a delightful centerpiece.
Storage Info
Best Practices for Longevity
To keep chocolate-covered coffee beans fresh, store them in an airtight container. This prevents air and moisture from getting in. A cool, dry place works best. Avoid sunny spots or warm areas. The refrigerator is a great option too, especially in hot weather.
Shelf Life
Chocolate-covered coffee beans last about two weeks at room temperature. If you store them in the fridge, they can last about a month. Look out for signs of staleness. If they smell off or have a dry appearance, it’s time to toss them. Enjoy your tasty treat while they are fresh!
FAQs
Can I use milk chocolate instead of dark chocolate?
Yes, you can use milk chocolate. However, the flavor will be sweeter and creamier. Dark chocolate offers a rich taste that pairs well with coffee. It also has more antioxidants and less sugar. If you want a gourmet touch, try using high-quality dark chocolate.
Are chocolate-covered coffee beans healthy?
Chocolate-covered coffee beans can be a tasty treat with some health benefits. They contain caffeine, which may boost energy. Dark chocolate has antioxidants that help your body. However, watch the portion size due to added sugar and calories. Enjoy them in moderation for the best balance.
Can I make these ahead of time?
Absolutely! You can make these chocolate-covered coffee beans up to a week in advance. Store them in an airtight container in a cool place. For extra freshness, keep them in the fridge. They stay delicious and ready for snacking or gifting.
What is the best way to serve them?
There are many fun ways to serve chocolate-covered coffee beans! You can create a snack mix with nuts and dried fruit. Serve them in a bowl with desserts or on a dessert platter. They also make a great gift when packaged nicely.
In this post, we explored how to make delicious chocolate-covered coffee beans. We covered the essential ingredients, like whole coffee beans and dark chocolate. You learned step-by-step instructions, from melting chocolate to cooling and storing your treat.
My final thoughts: Enjoy experimenting with flavors and ingredients. Avoid common mistakes for the best results. With practice, you can create a tasty snack or gift that everyone will love!