Chocolate Espresso Lava Cakes Irresistible Dessert Recipe

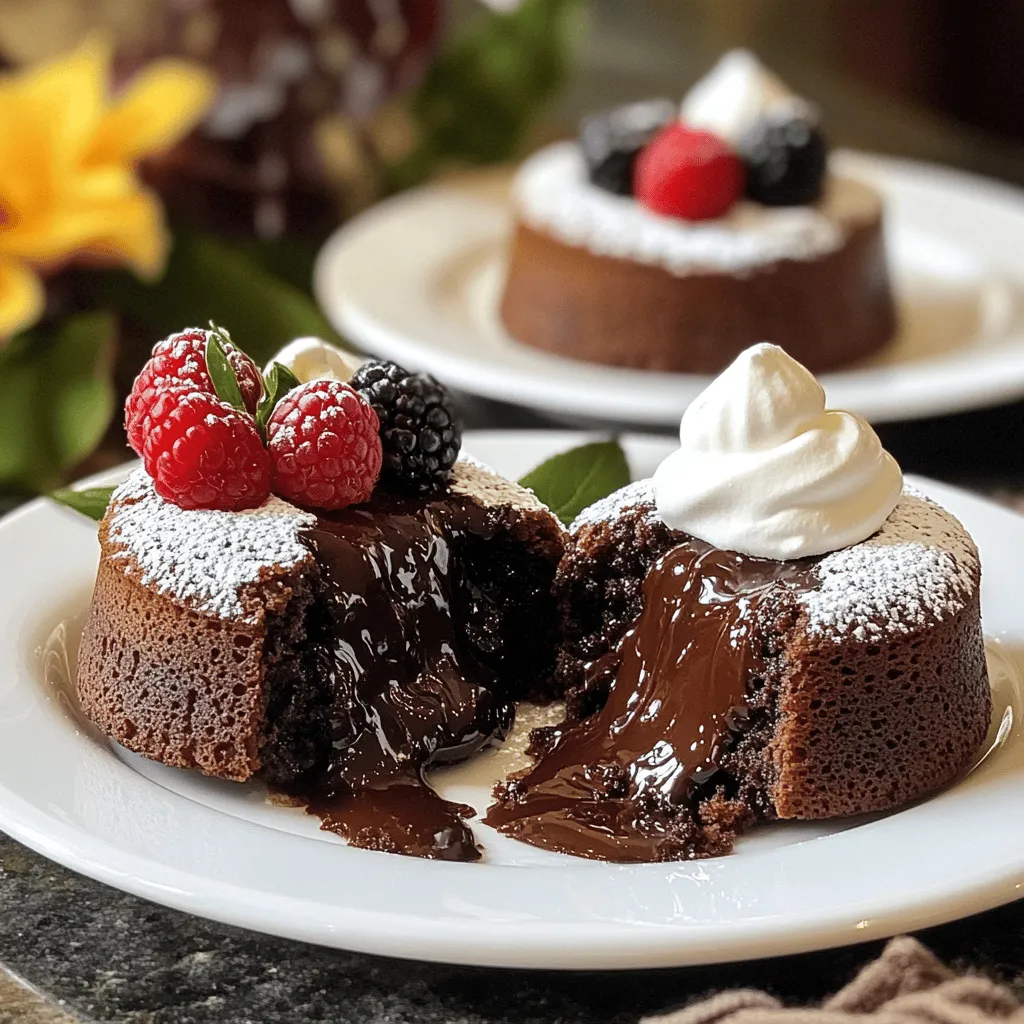
Indulging in Chocolate Espresso Lava Cakes takes dessert to a whole new level. Imagine cutting into a warm cake and finding a rich, gooey center! In this article, I’ll share the exact ingredients, tools, and step-by-step instructions to create this exquisite treat. Whether you’re a baking novice or a pro, my tips will ensure your cakes ooze with flavor. Ready to impress everyone at your next gathering? Let’s dive in!

- 1/2 cup unsalted butter (plus extra for greasing) - 1 cup dark chocolate chips (60% cocoa or higher) - 2 large eggs - 2 large egg yolks - 1/4 cup granulated sugar - 2 tablespoons all-purpose flour - 1 tablespoon brewed espresso (or strong coffee) - 1/4 teaspoon salt - Powdered sugar, for dusting - Fresh berries, for garnish (optional) - Whipped cream, for serving (optional) To create these lava cakes, I use rich dark chocolate chips. Choose chips with 60% cocoa or higher for the best flavor. Unsalted butter gives a smooth texture. Eggs and egg yolks add fluffiness and richness. Granulated sugar sweetens the treat nicely. Flour helps the cakes hold their shape while baking. Brewed espresso adds a deep coffee flavor that enhances the chocolate. A pinch of salt balances sweetness perfectly. For serving, powdered sugar and fresh berries add a lovely touch. Whipped cream is a nice extra for those who love it! - Ramekins or muffin pan - Microwave-safe bowl and spatula - Whisk and mixing bowls Using ramekins gives the cakes a nice shape and helps with baking. If you don’t have ramekins, a muffin pan can work too. A microwave-safe bowl is essential for melting the butter and chocolate together. A spatula helps mix the ingredients well. A whisk is key for combining eggs and sugar until light and frothy. Mixing bowls are a must for keeping your workspace tidy. With these tools in hand, you are all set to create these delicious lava cakes! First, you need to preheat your oven to 425°F (220°C). This step is key for baking. While the oven heats, generously grease four ramekins with unsalted butter. Make sure to cover the sides well. This helps the cakes come out easily after baking. For extra safety, dust the greased ramekins with a little flour. Tap out any excess flour so it does not stick to the batter. Next, it’s time to melt the chocolate and butter. In a microwave-safe bowl, combine 1/2 cup of unsalted butter and 1 cup of dark chocolate chips. Heat in the microwave in 30-second bursts. Stir after each burst until smooth. Let this mixture cool a bit. In a separate bowl, whisk together 2 large eggs, 2 large egg yolks, and 1/4 cup of granulated sugar. Whisk until the mix turns light and frothy. This will take about 3 to 4 minutes. This step gives the cakes a lovely texture. Now, gently pour the melted chocolate mixture into the egg mix. Fold them together slowly until just combined. Avoid mixing too hard; we want a light batter. Next, sift 2 tablespoons of all-purpose flour and 1/4 teaspoon of salt over the batter. Also, add in 1 tablespoon of brewed espresso. Use a spatula to fold everything together until no dry bits remain. Now it's time to fill the ramekins. Evenly distribute the batter into each ramekin, filling them about 3/4 full. This gives them room to rise. Place the ramekins in your preheated oven and bake for 12 to 14 minutes. The edges should be firm, but the center must be soft and slightly jiggly. This is how you get that gooey lava center we all love. After baking, remove the ramekins from the oven and let them sit for 1 minute. Carefully run a thin knife around the edges to loosen each cake. Then, invert the ramekins onto dessert plates. Let them sit inverted for about 10 seconds before lifting the ramekins away. For a beautiful touch, dust the tops with powdered sugar. You can serve the cakes right away, adding fresh berries and a dollop of whipped cream if you like. Enjoy your delicious chocolate espresso lava cakes! To get that ooey-gooey center, avoid overbaking. The key is to watch the time closely. Bake the cakes for 12 to 14 minutes. When the edges look firm and the center jiggles, they are done. If you notice the cakes are too set, adjust the bake time down next time. To make your lava cakes shine, try garnishing them. Fresh berries like raspberries or strawberries give a bright touch. A dollop of whipped cream adds creaminess and balance to the cake's rich taste. Serve the cakes warm for the best experience. If your cakes stick to the ramekins, make sure to grease them well. Grease with butter and dust with flour. This step is crucial for easy removal. If your lava cakes do not ooze, they might be overbaked. Next time, check them a minute earlier. Adjusting the baking time can help get that perfect flow. {{image_4}} You can make a vegan version of these lava cakes. To replace eggs, use flaxseed meal mixed with water. Mix 1 tablespoon of flaxseed meal with 2.5 tablespoons of water for each egg. This will help bind the batter. For dairy, use plant-based butter and dark chocolate that is dairy-free. Look for chocolate with 60% cocoa or higher. You can also try alternative sweeteners like maple syrup or coconut sugar. They add a nice touch without losing flavor. For flour, almond or coconut flour works well. Adjust the amount slightly, as these flours absorb more moisture. If you need a gluten-free option, use a gluten-free flour blend. Look for blends that include a mix of rice flour and tapioca flour. This will keep the cakes light and rich. You may need to add a bit more liquid to the batter. This keeps the cakes moist and helps them rise. The great news is that they can still taste just as rich and chocolatey as the original. Just ensure that all other ingredients, like chocolate, are also gluten-free. Want to spice things up? Try adding flavored liqueurs, like coffee or hazelnut. Just a tablespoon will add a unique twist to your lava cakes. You can also mix in spices like cinnamon or chili powder for warmth. For added texture, consider nuts or flavored chocolate chips. Chopped hazelnuts or walnuts give a nice crunch. You can also use flavored chocolate, like orange or peppermint. These small changes can create a whole new dessert experience. To store leftover lava cakes, keep them in the fridge. Place them in an airtight container to prevent drying out. You can store them for up to two days. If you want to keep them longer, consider freezing them. When you are ready to eat, reheat them in the oven. Set the oven to 350°F (175°C) for about 10 minutes to warm through. This method helps maintain their gooey center. Avoid using a microwave, as it can overcook the cakes. You can freeze both raw and baked lava cakes. For raw cakes, fill the ramekins and cover them well with plastic wrap. This keeps air out and prevents freezer burn. Place them in the freezer for up to three months. When you want to bake them, just remove them from the freezer and bake directly from frozen. Adjust baking time to about 15-18 minutes. If you freeze baked cakes, let them cool first. Store them in an airtight container or wrap them tightly. To thaw, move them to the fridge overnight. This keeps the texture nice. When ready to serve, gently reheat them in the oven as described above. This way, you’ll enjoy the perfect lava center again! Yes, you can make the batter ahead of time. Prepare the batter and cover it well. Store it in the fridge for up to 24 hours. When ready to bake, let it sit at room temperature for about 30 minutes. This helps the batter warm up before baking. This way, you can enjoy fresh lava cakes with less fuss. To check if the lava cakes are done, look for firm edges. The center should stay soft and jiggly. Bake them for 12-14 minutes. A toothpick test can help, but don’t overbake. You want that gooey lava center, so keep an eye on them as they bake. For a great presentation, turn the cakes out onto dessert plates. Dust the tops with powdered sugar for a nice touch. Add fresh berries for color and flavor. A dollop of whipped cream beside the cake makes it even better. Serve them warm for the best experience. Yes, you can easily scale the recipe. Just double the ingredients for eight servings. Use larger ramekins or bake in batches. Keep the baking time the same for smaller cakes. For larger cakes, you may need an extra minute or two. Enjoy creating more of this delicious dessert! To make chocolate espresso lava cakes, you need key ingredients and tools. We covered the steps, from preparing the oven to achieving that perfect gooey center. Tips and variations bring more fun to this dessert. Remember to store any extras properly to keep them tasty. With these insights, you can impress anyone with your baking skills. Dive in and enjoy your delicious creation!

Ingredients

Essential Ingredients for Chocolate Espresso Lava Cakes

– 1/2 cup unsalted butter (plus extra for greasing)

– 1 cup dark chocolate chips (60% cocoa or higher)

– 2 large eggs

– 2 large egg yolks

– 1/4 cup granulated sugar

– 2 tablespoons all-purpose flour

– 1 tablespoon brewed espresso (or strong coffee)

– 1/4 teaspoon salt

– Powdered sugar, for dusting

– Fresh berries, for garnish (optional)

– Whipped cream, for serving (optional)

To create these lava cakes, I use rich dark chocolate chips. Choose chips with 60% cocoa or higher for the best flavor. Unsalted butter gives a smooth texture. Eggs and egg yolks add fluffiness and richness. Granulated sugar sweetens the treat nicely. Flour helps the cakes hold their shape while baking. Brewed espresso adds a deep coffee flavor that enhances the chocolate. A pinch of salt balances sweetness perfectly. For serving, powdered sugar and fresh berries add a lovely touch. Whipped cream is a nice extra for those who love it!

Recommended Tools and Equipment

– Ramekins or muffin pan

– Microwave-safe bowl and spatula

– Whisk and mixing bowls

Using ramekins gives the cakes a nice shape and helps with baking. If you don’t have ramekins, a muffin pan can work too. A microwave-safe bowl is essential for melting the butter and chocolate together. A spatula helps mix the ingredients well. A whisk is key for combining eggs and sugar until light and frothy. Mixing bowls are a must for keeping your workspace tidy. With these tools in hand, you are all set to create these delicious lava cakes!

Step-by-Step Instructions

Prepping the Oven and Ramekins

First, you need to preheat your oven to 425°F (220°C). This step is key for baking. While the oven heats, generously grease four ramekins with unsalted butter. Make sure to cover the sides well. This helps the cakes come out easily after baking. For extra safety, dust the greased ramekins with a little flour. Tap out any excess flour so it does not stick to the batter.

Combining Ingredients

Next, it’s time to melt the chocolate and butter. In a microwave-safe bowl, combine 1/2 cup of unsalted butter and 1 cup of dark chocolate chips. Heat in the microwave in 30-second bursts. Stir after each burst until smooth. Let this mixture cool a bit.

In a separate bowl, whisk together 2 large eggs, 2 large egg yolks, and 1/4 cup of granulated sugar. Whisk until the mix turns light and frothy. This will take about 3 to 4 minutes. This step gives the cakes a lovely texture.

Now, gently pour the melted chocolate mixture into the egg mix. Fold them together slowly until just combined. Avoid mixing too hard; we want a light batter. Next, sift 2 tablespoons of all-purpose flour and 1/4 teaspoon of salt over the batter. Also, add in 1 tablespoon of brewed espresso. Use a spatula to fold everything together until no dry bits remain.

Baking the Lava Cakes

Now it’s time to fill the ramekins. Evenly distribute the batter into each ramekin, filling them about 3/4 full. This gives them room to rise. Place the ramekins in your preheated oven and bake for 12 to 14 minutes. The edges should be firm, but the center must be soft and slightly jiggly. This is how you get that gooey lava center we all love.

After baking, remove the ramekins from the oven and let them sit for 1 minute. Carefully run a thin knife around the edges to loosen each cake. Then, invert the ramekins onto dessert plates. Let them sit inverted for about 10 seconds before lifting the ramekins away.

For a beautiful touch, dust the tops with powdered sugar. You can serve the cakes right away, adding fresh berries and a dollop of whipped cream if you like. Enjoy your delicious chocolate espresso lava cakes!

Tips & Tricks

Achieving the Perfect Lava Center

To get that ooey-gooey center, avoid overbaking. The key is to watch the time closely. Bake the cakes for 12 to 14 minutes. When the edges look firm and the center jiggles, they are done. If you notice the cakes are too set, adjust the bake time down next time.

Serving Suggestions

To make your lava cakes shine, try garnishing them. Fresh berries like raspberries or strawberries give a bright touch. A dollop of whipped cream adds creaminess and balance to the cake’s rich taste. Serve the cakes warm for the best experience.

Troubleshooting Common Issues

If your cakes stick to the ramekins, make sure to grease them well. Grease with butter and dust with flour. This step is crucial for easy removal. If your lava cakes do not ooze, they might be overbaked. Next time, check them a minute earlier. Adjusting the baking time can help get that perfect flow.

Variations

Vegan Chocolate Espresso Lava Cakes

You can make a vegan version of these lava cakes. To replace eggs, use flaxseed meal mixed with water. Mix 1 tablespoon of flaxseed meal with 2.5 tablespoons of water for each egg. This will help bind the batter.

For dairy, use plant-based butter and dark chocolate that is dairy-free. Look for chocolate with 60% cocoa or higher. You can also try alternative sweeteners like maple syrup or coconut sugar. They add a nice touch without losing flavor. For flour, almond or coconut flour works well. Adjust the amount slightly, as these flours absorb more moisture.

Gluten-Free Options

If you need a gluten-free option, use a gluten-free flour blend. Look for blends that include a mix of rice flour and tapioca flour. This will keep the cakes light and rich. You may need to add a bit more liquid to the batter. This keeps the cakes moist and helps them rise.

The great news is that they can still taste just as rich and chocolatey as the original. Just ensure that all other ingredients, like chocolate, are also gluten-free.

Flavor Enhancements

Want to spice things up? Try adding flavored liqueurs, like coffee or hazelnut. Just a tablespoon will add a unique twist to your lava cakes. You can also mix in spices like cinnamon or chili powder for warmth.

For added texture, consider nuts or flavored chocolate chips. Chopped hazelnuts or walnuts give a nice crunch. You can also use flavored chocolate, like orange or peppermint. These small changes can create a whole new dessert experience.

Storage Info

How to Store Leftover Lava Cakes

To store leftover lava cakes, keep them in the fridge. Place them in an airtight container to prevent drying out. You can store them for up to two days. If you want to keep them longer, consider freezing them. When you are ready to eat, reheat them in the oven. Set the oven to 350°F (175°C) for about 10 minutes to warm through. This method helps maintain their gooey center. Avoid using a microwave, as it can overcook the cakes.

Freezing and Thawing Tips

You can freeze both raw and baked lava cakes. For raw cakes, fill the ramekins and cover them well with plastic wrap. This keeps air out and prevents freezer burn. Place them in the freezer for up to three months. When you want to bake them, just remove them from the freezer and bake directly from frozen. Adjust baking time to about 15-18 minutes.

If you freeze baked cakes, let them cool first. Store them in an airtight container or wrap them tightly. To thaw, move them to the fridge overnight. This keeps the texture nice. When ready to serve, gently reheat them in the oven as described above. This way, you’ll enjoy the perfect lava center again!

FAQs

Can I make the batter in advance?

Yes, you can make the batter ahead of time. Prepare the batter and cover it well. Store it in the fridge for up to 24 hours. When ready to bake, let it sit at room temperature for about 30 minutes. This helps the batter warm up before baking. This way, you can enjoy fresh lava cakes with less fuss.

How do I know when the lava cakes are done?

To check if the lava cakes are done, look for firm edges. The center should stay soft and jiggly. Bake them for 12-14 minutes. A toothpick test can help, but don’t overbake. You want that gooey lava center, so keep an eye on them as they bake.

What is the best way to serve chocolate espresso lava cakes?

For a great presentation, turn the cakes out onto dessert plates. Dust the tops with powdered sugar for a nice touch. Add fresh berries for color and flavor. A dollop of whipped cream beside the cake makes it even better. Serve them warm for the best experience.

Can I make a larger batch?

Yes, you can easily scale the recipe. Just double the ingredients for eight servings. Use larger ramekins or bake in batches. Keep the baking time the same for smaller cakes. For larger cakes, you may need an extra minute or two. Enjoy creating more of this delicious dessert!

To make chocolate espresso lava cakes, you need key ingredients and tools. We covered the steps, from preparing the oven to achieving that perfect gooey center. Tips and variations bring more fun to this dessert. Remember to store any extras properly to keep them tasty. With these insights, you can impress anyone with your baking skills. Dive in and enjoy your delicious creation!

- 1/2 cup unsalted butter (plus extra for greasing) - 1 cup dark chocolate chips (60% cocoa or higher) - 2 large eggs - 2 large egg yolks - 1/4 cup granulated sugar - 2 tablespoons all-purpose flour - 1 tablespoon brewed espresso (or strong coffee) - 1/4 teaspoon salt - Powdered sugar, for dusting - Fresh berries, for garnish (optional) - Whipped cream, for serving (optional) To create these lava cakes, I use rich dark chocolate chips. Choose chips with 60% cocoa or higher for the best flavor. Unsalted butter gives a smooth texture. Eggs and egg yolks add fluffiness and richness. Granulated sugar sweetens the treat nicely. Flour helps the cakes hold their shape while baking. Brewed espresso adds a deep coffee flavor that enhances the chocolate. A pinch of salt balances sweetness perfectly. For serving, powdered sugar and fresh berries add a lovely touch. Whipped cream is a nice extra for those who love it! - Ramekins or muffin pan - Microwave-safe bowl and spatula - Whisk and mixing bowls Using ramekins gives the cakes a nice shape and helps with baking. If you don’t have ramekins, a muffin pan can work too. A microwave-safe bowl is essential for melting the butter and chocolate together. A spatula helps mix the ingredients well. A whisk is key for combining eggs and sugar until light and frothy. Mixing bowls are a must for keeping your workspace tidy. With these tools in hand, you are all set to create these delicious lava cakes! First, you need to preheat your oven to 425°F (220°C). This step is key for baking. While the oven heats, generously grease four ramekins with unsalted butter. Make sure to cover the sides well. This helps the cakes come out easily after baking. For extra safety, dust the greased ramekins with a little flour. Tap out any excess flour so it does not stick to the batter. Next, it’s time to melt the chocolate and butter. In a microwave-safe bowl, combine 1/2 cup of unsalted butter and 1 cup of dark chocolate chips. Heat in the microwave in 30-second bursts. Stir after each burst until smooth. Let this mixture cool a bit. In a separate bowl, whisk together 2 large eggs, 2 large egg yolks, and 1/4 cup of granulated sugar. Whisk until the mix turns light and frothy. This will take about 3 to 4 minutes. This step gives the cakes a lovely texture. Now, gently pour the melted chocolate mixture into the egg mix. Fold them together slowly until just combined. Avoid mixing too hard; we want a light batter. Next, sift 2 tablespoons of all-purpose flour and 1/4 teaspoon of salt over the batter. Also, add in 1 tablespoon of brewed espresso. Use a spatula to fold everything together until no dry bits remain. Now it's time to fill the ramekins. Evenly distribute the batter into each ramekin, filling them about 3/4 full. This gives them room to rise. Place the ramekins in your preheated oven and bake for 12 to 14 minutes. The edges should be firm, but the center must be soft and slightly jiggly. This is how you get that gooey lava center we all love. After baking, remove the ramekins from the oven and let them sit for 1 minute. Carefully run a thin knife around the edges to loosen each cake. Then, invert the ramekins onto dessert plates. Let them sit inverted for about 10 seconds before lifting the ramekins away. For a beautiful touch, dust the tops with powdered sugar. You can serve the cakes right away, adding fresh berries and a dollop of whipped cream if you like. Enjoy your delicious chocolate espresso lava cakes! To get that ooey-gooey center, avoid overbaking. The key is to watch the time closely. Bake the cakes for 12 to 14 minutes. When the edges look firm and the center jiggles, they are done. If you notice the cakes are too set, adjust the bake time down next time. To make your lava cakes shine, try garnishing them. Fresh berries like raspberries or strawberries give a bright touch. A dollop of whipped cream adds creaminess and balance to the cake's rich taste. Serve the cakes warm for the best experience. If your cakes stick to the ramekins, make sure to grease them well. Grease with butter and dust with flour. This step is crucial for easy removal. If your lava cakes do not ooze, they might be overbaked. Next time, check them a minute earlier. Adjusting the baking time can help get that perfect flow. {{image_4}} You can make a vegan version of these lava cakes. To replace eggs, use flaxseed meal mixed with water. Mix 1 tablespoon of flaxseed meal with 2.5 tablespoons of water for each egg. This will help bind the batter. For dairy, use plant-based butter and dark chocolate that is dairy-free. Look for chocolate with 60% cocoa or higher. You can also try alternative sweeteners like maple syrup or coconut sugar. They add a nice touch without losing flavor. For flour, almond or coconut flour works well. Adjust the amount slightly, as these flours absorb more moisture. If you need a gluten-free option, use a gluten-free flour blend. Look for blends that include a mix of rice flour and tapioca flour. This will keep the cakes light and rich. You may need to add a bit more liquid to the batter. This keeps the cakes moist and helps them rise. The great news is that they can still taste just as rich and chocolatey as the original. Just ensure that all other ingredients, like chocolate, are also gluten-free. Want to spice things up? Try adding flavored liqueurs, like coffee or hazelnut. Just a tablespoon will add a unique twist to your lava cakes. You can also mix in spices like cinnamon or chili powder for warmth. For added texture, consider nuts or flavored chocolate chips. Chopped hazelnuts or walnuts give a nice crunch. You can also use flavored chocolate, like orange or peppermint. These small changes can create a whole new dessert experience. To store leftover lava cakes, keep them in the fridge. Place them in an airtight container to prevent drying out. You can store them for up to two days. If you want to keep them longer, consider freezing them. When you are ready to eat, reheat them in the oven. Set the oven to 350°F (175°C) for about 10 minutes to warm through. This method helps maintain their gooey center. Avoid using a microwave, as it can overcook the cakes. You can freeze both raw and baked lava cakes. For raw cakes, fill the ramekins and cover them well with plastic wrap. This keeps air out and prevents freezer burn. Place them in the freezer for up to three months. When you want to bake them, just remove them from the freezer and bake directly from frozen. Adjust baking time to about 15-18 minutes. If you freeze baked cakes, let them cool first. Store them in an airtight container or wrap them tightly. To thaw, move them to the fridge overnight. This keeps the texture nice. When ready to serve, gently reheat them in the oven as described above. This way, you’ll enjoy the perfect lava center again! Yes, you can make the batter ahead of time. Prepare the batter and cover it well. Store it in the fridge for up to 24 hours. When ready to bake, let it sit at room temperature for about 30 minutes. This helps the batter warm up before baking. This way, you can enjoy fresh lava cakes with less fuss. To check if the lava cakes are done, look for firm edges. The center should stay soft and jiggly. Bake them for 12-14 minutes. A toothpick test can help, but don’t overbake. You want that gooey lava center, so keep an eye on them as they bake. For a great presentation, turn the cakes out onto dessert plates. Dust the tops with powdered sugar for a nice touch. Add fresh berries for color and flavor. A dollop of whipped cream beside the cake makes it even better. Serve them warm for the best experience. Yes, you can easily scale the recipe. Just double the ingredients for eight servings. Use larger ramekins or bake in batches. Keep the baking time the same for smaller cakes. For larger cakes, you may need an extra minute or two. Enjoy creating more of this delicious dessert! To make chocolate espresso lava cakes, you need key ingredients and tools. We covered the steps, from preparing the oven to achieving that perfect gooey center. Tips and variations bring more fun to this dessert. Remember to store any extras properly to keep them tasty. With these insights, you can impress anyone with your baking skills. Dive in and enjoy your delicious creation!

Chocolate Espresso Lava Cakes

Indulge in the rich flavors of these decadent chocolate espresso lava cakes! Perfect for any occasion, this simple recipe combines dark chocolate and espresso for a dessert that's simply irresistible. With a gooey center and a dusting of powdered sugar, it's sure to impress your guests. Click through for the full recipe and learn how to create this impressive treat that will delight chocolate lovers every time!

Ingredients
  

1/2 cup unsalted butter (plus extra for greasing)

1 cup dark chocolate chips (60% cocoa or higher)

2 large eggs

2 large egg yolks

1/4 cup granulated sugar

2 tablespoons all-purpose flour

1 tablespoon brewed espresso (or strong coffee)

1/4 teaspoon salt

Powdered sugar, for dusting

Fresh berries, for garnish (optional)

Whipped cream, for serving (optional)

Instructions
 

Begin by preheating your oven to 425°F (220°C). Generously grease four ramekins with butter to ensure the cakes release smoothly after baking. For added assurance, dust the greased ramekins with flour, tapping out any excess flour.

    In a microwave-safe bowl, combine the unsalted butter and dark chocolate chips. Place in the microwave and heat in 30-second intervals, stirring after each session until completely smooth and melted. Allow the mixture to cool slightly while you prepare the other ingredients.

      In a separate mixing bowl, whisk together the whole eggs, egg yolks, and granulated sugar. Continue whisking until the mixture is light in color and slightly frothy, which should take about 3-4 minutes for a perfect airy texture.

        Gently pour the melted chocolate and butter mixture into the egg mixture, taking care to fold it in slowly until the two mixtures are just combined, avoiding excessive mixing.

          Sift the all-purpose flour and salt over the chocolate batter. Then, add the brewed espresso to the mix. Using a spatula, elegantly fold the ingredients together until no dry bits remain, creating a luxurious chocolate batter.

            Evenly distribute the batter into the prepared ramekins, filling each one about 3/4 of the way full, ensuring they have enough space to rise while baking.

              Place the ramekins in the preheated oven and bake for 12-14 minutes. The edges should appear firm while the center remains distinctly soft and slightly jiggly. It's crucial not to overbake them, as the signature gooey lava center is the loved characteristic of these cakes.

                Once baked, remove the ramekins from the oven and allow them to rest for 1 minute. Carefully run a thin knife around the edges of each cake to loosen. Then, invert the ramekins onto dessert plates. Allow them to sit inverted for about 10 seconds before gently lifting the ramekins away.

                  For a sophisticated finish, dust the tops of the lava cakes with powdered sugar. Serve them immediately alongside fresh berries and a dollop of whipped cream if desired, enhancing both flavor and presentation.

                    Prep Time: 20 minutes | Total Time: 30 minutes | Servings: 4