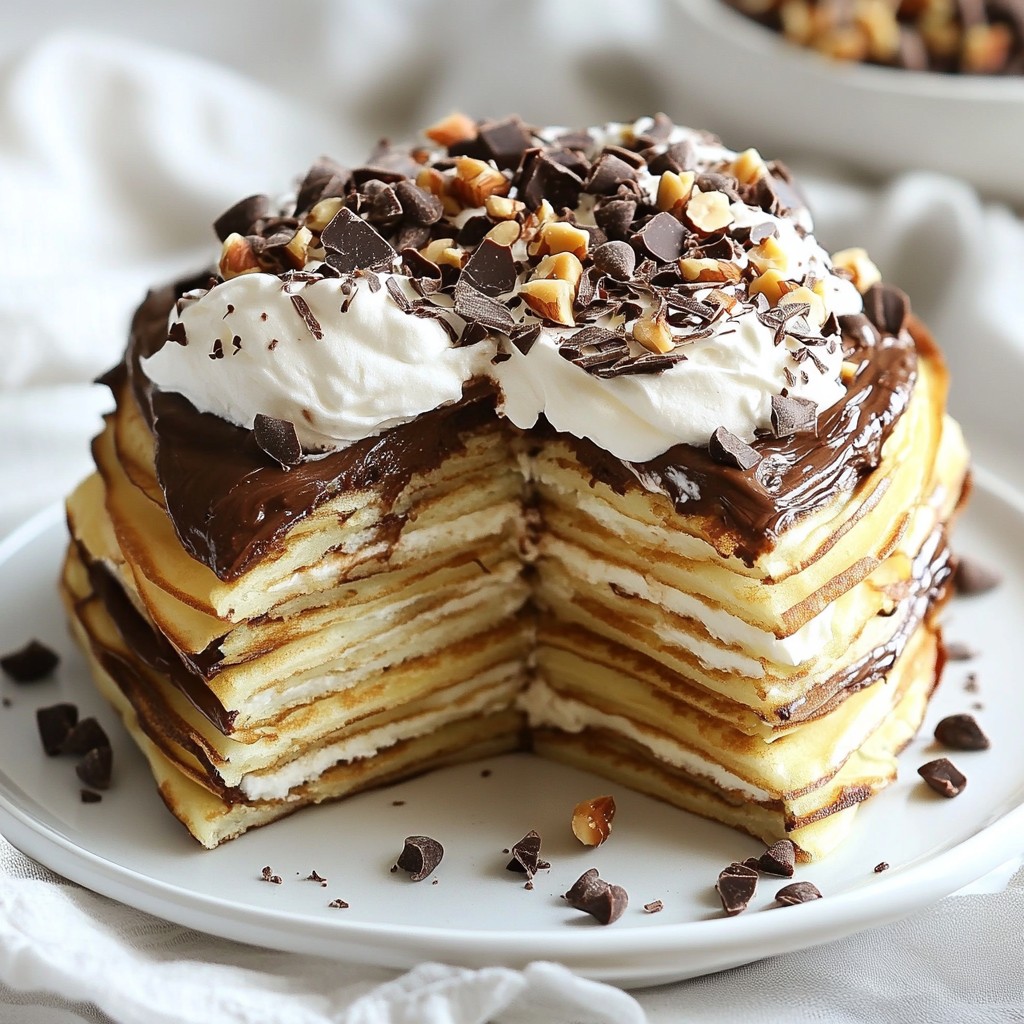
When you crave an indulgent dessert, the Chocolate Hazelnut Crepe Cake is your answer. Imagine layers upon layers of delicate crepes, rich chocolate hazelnut spread, and fluffy whipped cream. This cake is not just delicious; it’s a feast for the eyes too. In this post, I'll guide you step-by-step through making this irresistible treat, ensuring you impress your friends and family with your baking skills. Let’s dive in!
Why I Love This Recipe
- Decadent Layers: This crepe cake boasts rich layers of chocolate hazelnut spread and fluffy whipped cream, creating a delightful contrast of textures and flavors in every bite.
- Impressive Presentation: The elegant stacked layers make this cake a stunning centerpiece for any gathering, sure to impress your guests.
- Customizable Recipe: Feel free to experiment with different fillings or toppings, such as fruits or flavored whipped creams, making it versatile for various occasions.
- Make-Ahead Convenience: Chilling the cake enhances its flavor and texture, allowing you to prepare it in advance and enjoy it stress-free during your event.
Ingredients
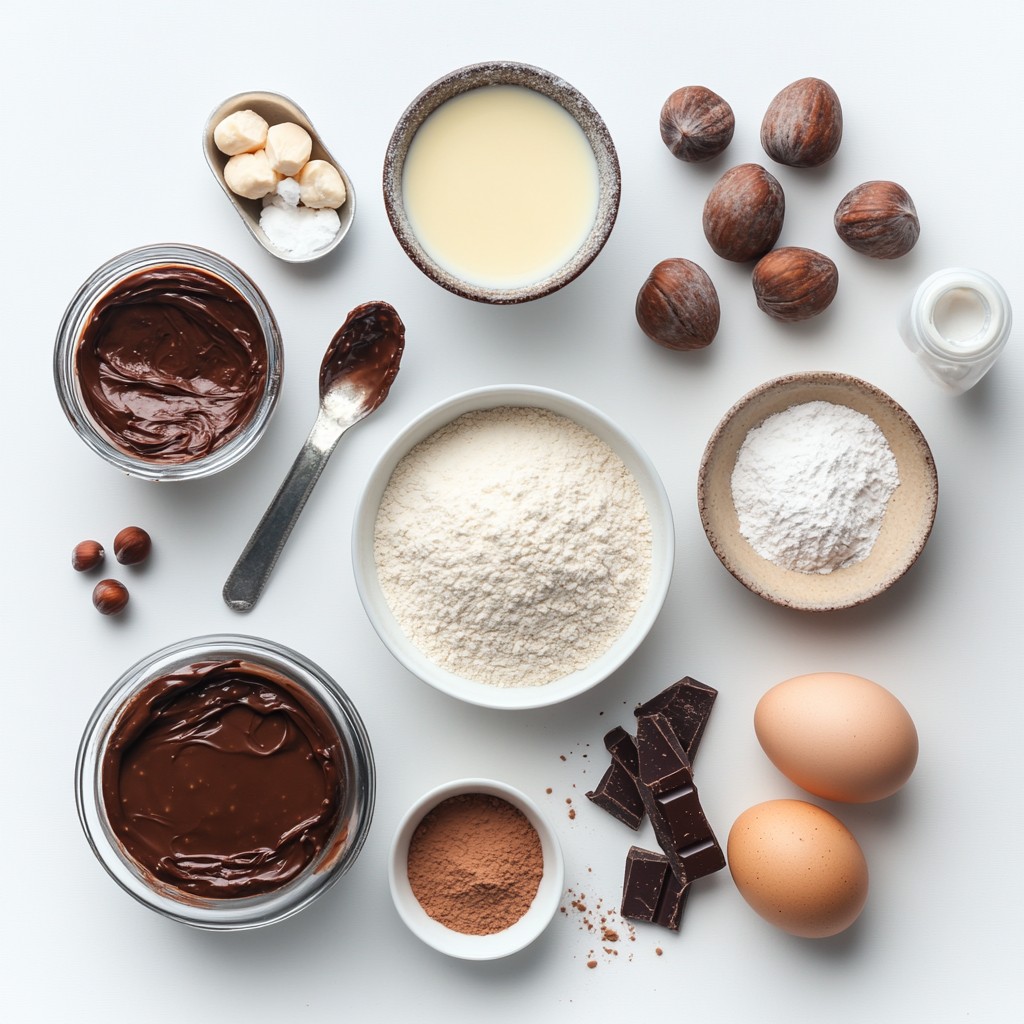
To create a delightful Chocolate Hazelnut Crepe Cake, you'll need the following ingredients:
- All-Purpose Flour: 1 cup
- Cocoa Powder: 2 tablespoons
- Granulated Sugar: 2 tablespoons
- Eggs: 2 large
- Milk: 2 cups
- Unsalted Butter: 2 tablespoons (melted)
- Vanilla Extract: 1 teaspoon
- Chocolate Hazelnut Spread: 1 cup
- Heavy Cream: 1 cup
- Powdered Sugar: 2 tablespoons
- Vanilla Extract: 1 teaspoon (for whipped cream)
- Chopped Hazelnuts: For garnish
- Dark Chocolate Shavings: For decoration
Each ingredient plays a key role in creating this layered dessert. The flour and cocoa powder form the base of the crepes, while sugar adds sweetness. Eggs bind everything together, making the crepes light and fluffy.
Milk and butter enrich the batter, giving it a smooth texture. Vanilla adds warmth and depth of flavor. The chocolate hazelnut spread fills the layers with rich, creamy goodness.
Heavy cream and powdered sugar whip into a fluffy topping that contrasts nicely with the dense crepes. Lastly, garnishes of chopped hazelnuts and dark chocolate shavings make your cake look and taste even better.
Gather these ingredients, and you're on your way to making a sweet treat that everyone will love!
Step-by-Step Instructions
Prepare the Crepe Batter
- Combine Dry Ingredients and Whisk: In a large bowl, mix 1 cup of all-purpose flour, 2 tablespoons of cocoa powder, and 2 tablespoons of granulated sugar. Whisk them together until well blended.
- Add Wet Ingredients and Mix: Now, crack in 2 large eggs. Pour in 2 cups of milk, 2 tablespoons of melted unsalted butter, and 1 teaspoon of vanilla extract. Whisk until the batter is smooth and free of lumps.
- Resting the Batter for Optimal Crepes: Let the batter rest at room temperature for about 30 minutes. This helps to relax the gluten, making your crepes tender and easy to flip.
Cook the Crepes
- Heating the Pan and Preparing to Cook: Heat a non-stick frying pan over medium heat. Lightly grease it with a bit of oil or butter to prevent sticking.
- Pouring and Flipping the Crepes: Pour about 1/4 cup of batter into the pan. Tilt the pan to spread it evenly. Cook for 1-2 minutes until the edges lift and become crisp. Flip the crepe and cook for another minute.
- Stacking and Storing Cooked Crepes: Once cooked, transfer the crepe to a plate. Continue until all batter is used. Stack the crepes with parchment paper between them to keep them from sticking.
Make the Whipped Cream
- Ingredients for Whipped Cream: In a chilled mixing bowl, combine 1 cup of heavy cream, 2 tablespoons of powdered sugar, and 1 teaspoon of vanilla extract.
- Whipping Techniques for Perfect Cream: Use an electric mixer to whip the cream. Whip until soft peaks form. Be careful not to overwhip. You want it light and fluffy.
Assemble the Cake
- Layering Crepes with Chocolate Hazelnut Spread: Start with one crepe on a serving plate. Spread about 2 tablespoons of chocolate hazelnut spread on top.
- Adding Whipped Cream Between Layers: Add a layer of whipped cream, roughly 1-2 tablespoons. Place another crepe on top. Repeat this process until all crepes are layered.
- Final Layering and Preparation for Chilling: Ensure the last layer is a crepe. Now, the cake is ready for chilling.
Chill the Cake
- Wrapping and Refrigerating: Wrap the assembled cake loosely with plastic wrap. Place it in the fridge.
- Recommended Chill Time for Best Results: Chill for at least 2 hours. For the best taste and texture, let it chill overnight.
Garnish and Serve
- Adding Final Touches: Just before serving, sprinkle the top with chopped hazelnuts and dark chocolate shavings.
- Slicing and Serving Suggestions: Slice the cake into wedges like a traditional cake. Each slice is a treat! Enjoy every indulgent bite!
Tips & Tricks
Best Practices for Cooking Crepes
- Maintaining Even Heat on the Pan: Start with a medium heat. You want the pan hot but not smoking. If it's too hot, the crepes burn. If it’s too cool, they won't cook right. Test with a drop of batter. If it sizzles, you’re ready.
- Preventing Sticking and Ensuring Smooth Cooking: Use a non-stick pan. Lightly grease it with butter or oil before each crepe. This helps the crepes slide out easily. Wipe the pan with a paper towel between crepes to remove any excess fat.
Ideal Components for Whipped Cream
- Choosing the Right Cream for Whipping: Always use heavy cream. It has enough fat to whip well. Avoid half-and-half or light cream, as they won’t hold peaks.
- Tips for Perfect Consistency: Chill your mixing bowl and beaters before whipping. This helps the cream whip faster. Watch closely while mixing. Stop when you see soft peaks. Overwhipping can turn it into butter!
Enhancing Flavor and Texture
- Suggestions for Additional Flavors: Add a splash of almond extract for a nutty twist. You can also mix in a bit of espresso powder for a mocha flavor.
- Ways to Make It Extra Indulgent: Drizzle melted chocolate on each layer of crepes. For a crunch, sprinkle crushed hazelnuts between layers. These touches make every bite a delight!
Pro Tips
- Rest the Batter: Allowing the crepe batter to rest for at least 30 minutes helps to relax the gluten, resulting in more tender and pliable crepes.
- Use a Non-Stick Pan: A non-stick frying pan is essential for easy flipping and to prevent the crepes from sticking, ensuring a smooth cooking process.
- Layer Creatively: Feel free to add additional layers of flavor between the crepes, such as sliced bananas or strawberries, to enhance the cake's taste and visual appeal.
- Chill for Best Results: Letting the assembled cake chill overnight allows the flavors to meld together beautifully, making each slice even more delicious.
Variations
Flavor Variations
You can switch up the nut spread in this cake. Almond or peanut spreads work great. Each nut brings its own taste and texture. Almond spread adds a light, sweet flavor. Peanut spread gives a rich, earthy twist. Feel free to experiment and find your favorite!
For the whipped cream, add flavors to make it unique. Try a splash of coffee or a hint of orange zest. These small changes can completely change the taste. You can also use flavored extracts, like almond or coconut, for a fun kick.
Dietary Adjustments
If you need gluten-free crepes, swap the all-purpose flour. Use a gluten-free blend instead. Many brands offer mixes that work well in crepes. This way, everyone can enjoy the cake without worry.
For dairy-free options, substitute the cream and milk. Use almond milk or oat milk instead. Coconut cream makes a great non-dairy whipped cream. These choices keep the cake rich and creamy while fitting different diets.
Presentation Styles
Presentation can elevate your dessert. Try stacking the cake high for a dramatic look. Or, lay the crepes flat on a large platter. Top with extra chocolate hazelnut spread and nuts for flair.
Serve the cake with a side of fresh fruits, like berries or slices of banana. This adds color and freshness. You can also drizzle some extra chocolate sauce on the plate for a beautiful finish. Your guests will love the look and taste!
Storage Info
Storing Leftover Crepe Cake
How to Store in the Refrigerator To keep your Chocolate Hazelnut Crepe Cake fresh, wrap it gently in plastic wrap. Place it on a plate or in an airtight container. This way, it stays moist and tasty. You can store it in the fridge for up to four days.
Freezing Options for Longer Storage If you want to save it for later, you can freeze the crepe cake. First, slice it into pieces. Wrap each slice in plastic wrap, then place them in a freezer-safe bag. This helps prevent freezer burn. The cake can last in the freezer for about two months.
Best Practices for Reheating
Techniques for Maintaining Texture When it’s time to enjoy the crepe cake again, don’t rush the reheating. For the best results, let it thaw in the fridge overnight. Then, reheat it gently in the oven at 300°F (150°C) for about 10-15 minutes. This keeps the crepes soft and the layers intact.
Do's and Don'ts When Reheating
- Do use a low heat to avoid drying out the cake.
- Don’t microwave the cake; this can make the crepes tough.
- Do check the center to ensure it’s warm throughout.
- Don’t rush the process; good food deserves patience!
FAQs
How to make Chocolate Hazelnut Crepe Cake from scratch?
To make this cake from scratch, follow these steps:
1. Prepare the Crepe Batter: Mix 1 cup of flour, 2 tablespoons of cocoa powder, and 2 tablespoons of sugar in a bowl. Add 2 large eggs, 2 cups of milk, 2 tablespoons of melted butter, and 1 teaspoon of vanilla. Whisk until smooth. Let it rest for 30 minutes.
2. Cook the Crepes: Heat a non-stick pan over medium heat. Grease it lightly. Pour 1/4 cup of batter, tilting to cover the pan. Cook for 1-2 minutes until edges lift. Flip and cook for 1 more minute. Stack cooked crepes with parchment paper between them.
3. Make the Whipped Cream: In a chilled bowl, mix 1 cup of heavy cream, 2 tablespoons of powdered sugar, and 1 teaspoon of vanilla. Whip until soft peaks form.
4. Assemble the Cake: Layer one crepe on a plate. Spread 2 tablespoons of chocolate hazelnut spread and add 1-2 tablespoons of whipped cream. Repeat these layers until all crepes are used.
5. Chill the Cake: Wrap the cake in plastic wrap and refrigerate for at least 2 hours. For best taste, chill overnight.
6. Garnish and Serve: Before serving, top with chopped hazelnuts and dark chocolate shavings.
What can I do if the crepes are sticking to the pan?
If your crepes stick, try these tips:
- Use a Non-Stick Pan: A good non-stick surface helps prevent sticking.
- Grease the Pan: Lightly grease the pan with butter or oil before each crepe.
- Heat the Pan Properly: Ensure your pan is hot enough before adding batter. A medium heat works best.
- Let Crepes Cook Fully: If you try to flip too soon, they may stick. Wait until the edges lift.
How long will the crepe cake last in the fridge?
This crepe cake will last in the fridge for about 3 days. To keep it fresh:
- Cover It: Wrap it with plastic wrap or store it in an airtight container.
- Chill Promptly: Refrigerate it soon after preparing to maintain flavor and texture.
Can I make this crepe cake ahead of time?
Yes, you can make this crepe cake ahead of time. Here’s how:
- Prepare and Chill: You can make the cake up to a day in advance. Just assemble it and chill overnight.
- Garnish Before Serving: Add any garnishes, like nuts or chocolate shavings, just before serving for the best look.
Making a Chocolate Hazelnut Crepe Cake is fun and rewarding. You learned about essential ingredients, step-by-step instructions, and helpful tips. Each layer brings flavor, and every bite offers delight. Remember, you can change flavors and adjust for diets too. Whether you store it in the fridge or freeze it, it stays tasty. Keep experimenting with new ideas and presentation styles to impress your friends and family. Enjoy the joy of creating this delicious treat!