Chocolate Peanut Butter No-Bake Pie Delightful Treat

WANT TO SAVE THIS RECIPE?

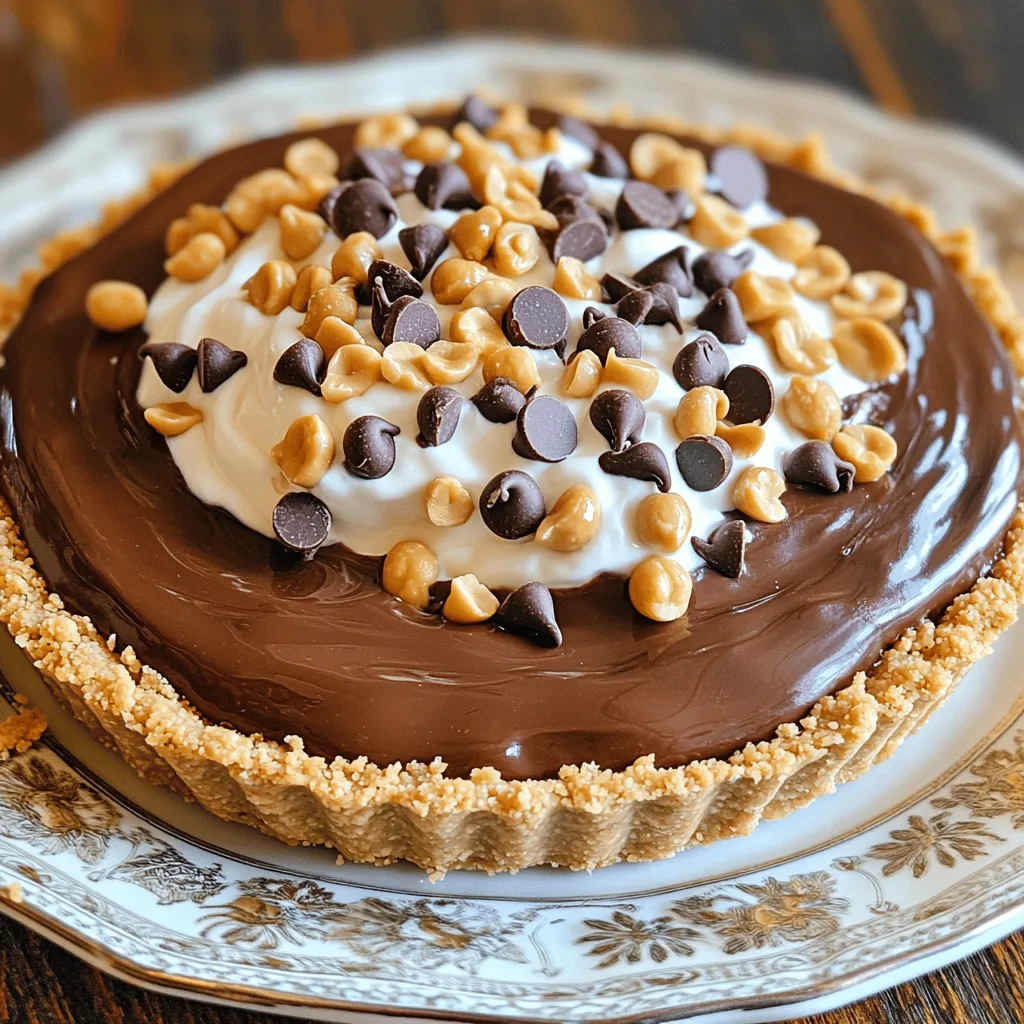
Craving a sweet treat that’s both easy to make and downright delicious? Look no further! My Chocolate Peanut Butter No-Bake Pie combines rich flavors and creamy textures, making it perfect for any occasion. With simple ingredients and step-by-step instructions, you’ll whip up this delightful dessert in no time. Ready to impress your friends and family? Let’s dive into this tasty recipe that’s sure to satisfy your sweet tooth!

- 1 ½ cups chocolate graham cracker crumbs - ½ cup unsalted butter, melted - 1 cup creamy peanut butter - 1 cup powdered sugar - 8 oz cream cheese, softened to room temperature - 1 ½ cups whipped cream (or whipped topping) - ½ cup chocolate chips (for garnish) - Chopped peanuts (for garnish) Serving size for this pie is about 8-10 slices. If you need more or less, just adjust the ingredients. For example, double everything for a bigger pie. For the crust, you can swap chocolate graham crackers with regular graham crackers. This will change the flavor a bit but will still taste great. If you want a nut-free option, use crushed cookies instead. If you cannot find creamy peanut butter, try crunchy peanut butter. It adds a fun texture. You can also use almond or cashew butter for a different taste. If you need a dairy-free option, use a non-dairy cream cheese and whipped topping. Just check the labels to ensure they fit your needs. These simple swaps can help you make the pie your own while keeping it delicious! To make the chocolate graham cracker crust, start by mixing the crumbs and melted butter. In a medium bowl, combine 1 ½ cups of chocolate graham cracker crumbs with ½ cup of melted unsalted butter. Stir until it looks like wet sand. This step is key for a great crust. Next, press the mixture into a 9-inch pie dish. Make sure to cover the bottom and up the sides evenly. Use the back of a measuring cup to help you press it down flat. This helps the crust hold together. Chill the crust in the fridge for about 10 minutes. This will firm it up nicely. For the filling, mix 1 cup of creamy peanut butter with 8 oz of softened cream cheese. Use an electric mixer to beat them until smooth. This will create a creamy base for your pie. Next, sift in 1 cup of powdered sugar while mixing. This adds sweetness and makes the filling rich. After that, gently fold in 1 ½ cups of whipped cream. This gives the filling a light, airy texture. Be careful not to deflate the whipped cream; it should stay fluffy. Now it’s time to pour the filling into the chilled crust. Spread it evenly using a spatula. Make sure the top is smooth and nice. This step is important for a beautiful pie. After assembling, return the pie to the fridge. Chill it for at least 2 hours. This helps the filling set properly. When it is firm, your pie will be ready to slice and enjoy! - Overmixing the filling: When you mix the peanut butter and cream cheese, stop when it's smooth. Overmixing can make it too dense. - Not chilling the pie long enough: Be patient! Let the pie chill for at least two hours. This helps the filling set properly. - Tips for making the filling fluffier: Fold the whipped cream gently into the peanut butter mixture. This keeps the filling light and airy. - Serving suggestions for paired toppings: Try adding a drizzle of melted chocolate or a dollop of whipped cream on top. Chopped peanuts also add a nice crunch. - Creative ways to garnish the pie: Sprinkle chocolate chips and chopped peanuts on top. You can also add fresh berries for color. - Plate arrangements for stunning visuals: Serve slices on colorful dessert plates. Drizzle chocolate sauce around the plate for an extra touch. {{image_4}} You can create fun twists on this pie. Try different types of chocolate, like dark or white chocolate. Each type adds a new flavor. You can also substitute peanut butter with almond or cashew butter. This gives the pie a nice nutty taste. Explore these options to find your favorite! Want a vegan pie? Use plant-based cream cheese and whipped topping. Make sure your crust is vegan too. You can use coconut oil instead of butter. For a gluten-free version, swap chocolate graham crackers with gluten-free crumbs. These changes keep the pie tasty and friendly for various diets. Mini no-bake pies are easy to make! Use muffin tins or small jars. This way, each person gets their own pie. You can also turn the pie into parfaits. Layer the filling and crust in glasses for a fun presentation. This makes a great treat for parties or gatherings! To keep your Chocolate Peanut Butter No-Bake Pie fresh, store it in the fridge. Cover it tightly with plastic wrap or foil. This prevents it from absorbing other smells and flavors. If you want to save it longer, you can freeze it. Cut the pie into slices, wrap each piece in plastic, then place them in a freezer-safe bag. This method keeps the pie tasty for later enjoyment. In the fridge, this pie lasts about 4 to 5 days. Always check for signs of spoilage. If the pie looks dry or has an off smell, it’s best to toss it. Mold is another clear sign that the pie is no longer good. When you see these signs, do not eat it. When you’re ready to enjoy your stored pie, thaw it in the fridge overnight. This keeps the texture nice. If you’ve frozen slices, let them sit at room temperature for about 15 minutes before eating. To refresh the pie, add a dollop of whipped cream on top. This makes it look fresh and tasty! The pie needs to chill for at least 2 hours. This allows the filling to firm up nicely. I recommend checking it after this time. If it feels soft, give it more time. Yes, you can use crunchy peanut butter. This will add a nice texture to the pie. It gives little bites of peanut that add fun. The flavor remains rich and nutty, which I love. Cream cheese is important for a creamy texture. However, you can swap it with Greek yogurt or silken tofu. These options will change the taste slightly. They can still keep the pie smooth and delicious. You can definitely add more chocolate! Try adding chocolate syrup or more chocolate chips. Just be careful not to add too much. This can make the pie too heavy and change the texture. This blog post covered everything you need for a delicious no-bake peanut butter pie. We discussed the key ingredients, proper measurements, and tasty variations. I shared step-by-step instructions to guide you through the process and offered tips to avoid common mistakes. With some creativity, you can present this pie beautifully and store it properly. Enjoying this treat can be fun and easy. Now, it's time for you to gather your ingredients and start making your own pie masterpiece!

Ingredients

List of Ingredients

– 1 ½ cups chocolate graham cracker crumbs

– ½ cup unsalted butter, melted

– 1 cup creamy peanut butter

– 1 cup powdered sugar

– 8 oz cream cheese, softened to room temperature

– 1 ½ cups whipped cream (or whipped topping)

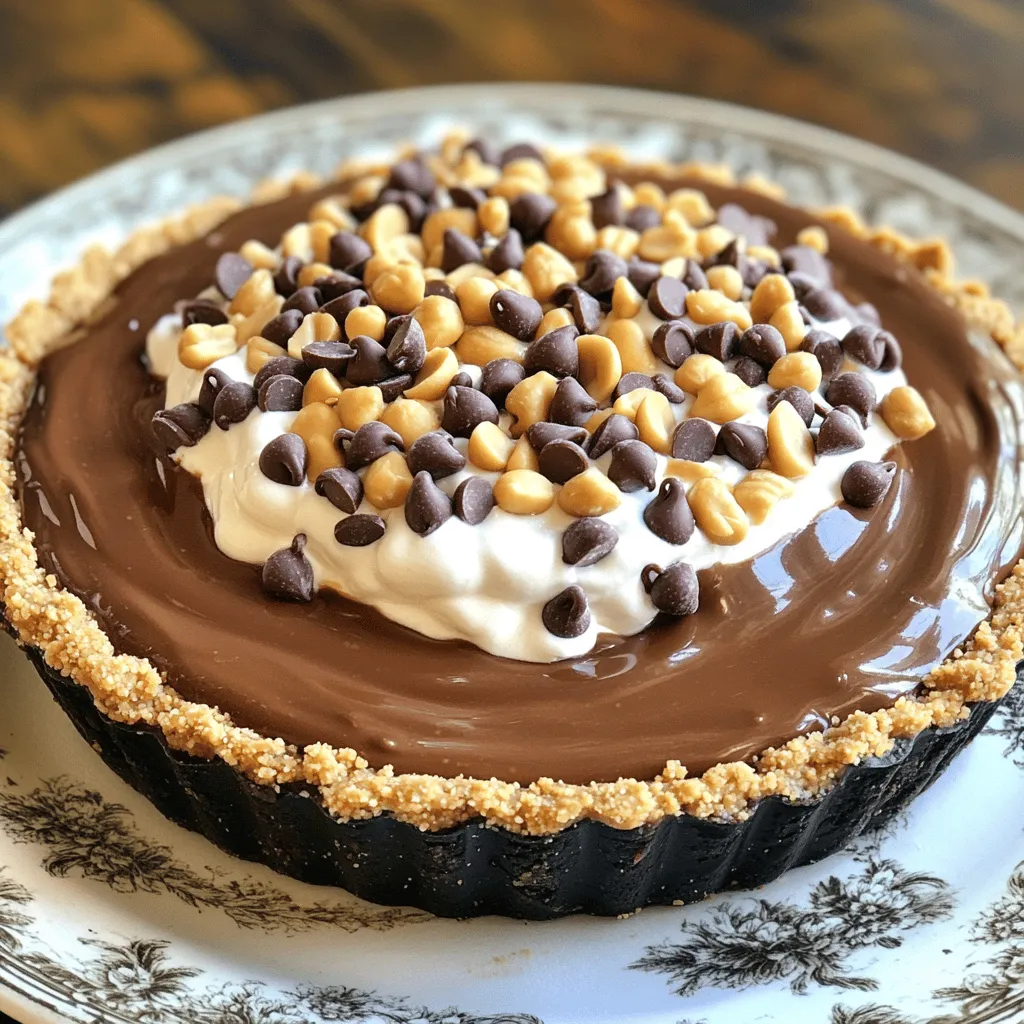
– ½ cup chocolate chips (for garnish)

– Chopped peanuts (for garnish)

Measurement & Substitution Tips

Serving size for this pie is about 8-10 slices. If you need more or less, just adjust the ingredients. For example, double everything for a bigger pie.

For the crust, you can swap chocolate graham crackers with regular graham crackers. This will change the flavor a bit but will still taste great. If you want a nut-free option, use crushed cookies instead.

If you cannot find creamy peanut butter, try crunchy peanut butter. It adds a fun texture. You can also use almond or cashew butter for a different taste.

If you need a dairy-free option, use a non-dairy cream cheese and whipped topping. Just check the labels to ensure they fit your needs.

These simple swaps can help you make the pie your own while keeping it delicious!

Step-by-Step Instructions

Preparation of the Crust

To make the chocolate graham cracker crust, start by mixing the crumbs and melted butter. In a medium bowl, combine 1 ½ cups of chocolate graham cracker crumbs with ½ cup of melted unsalted butter. Stir until it looks like wet sand. This step is key for a great crust.

Next, press the mixture into a 9-inch pie dish. Make sure to cover the bottom and up the sides evenly. Use the back of a measuring cup to help you press it down flat. This helps the crust hold together. Chill the crust in the fridge for about 10 minutes. This will firm it up nicely.

Making the Filling

For the filling, mix 1 cup of creamy peanut butter with 8 oz of softened cream cheese. Use an electric mixer to beat them until smooth. This will create a creamy base for your pie.

Next, sift in 1 cup of powdered sugar while mixing. This adds sweetness and makes the filling rich. After that, gently fold in 1 ½ cups of whipped cream. This gives the filling a light, airy texture. Be careful not to deflate the whipped cream; it should stay fluffy.

Assembling the Pie

Now it’s time to pour the filling into the chilled crust. Spread it evenly using a spatula. Make sure the top is smooth and nice. This step is important for a beautiful pie.

After assembling, return the pie to the fridge. Chill it for at least 2 hours. This helps the filling set properly. When it is firm, your pie will be ready to slice and enjoy!

Tips & Tricks

Common Mistakes to Avoid

Overmixing the filling: When you mix the peanut butter and cream cheese, stop when it’s smooth. Overmixing can make it too dense.

Not chilling the pie long enough: Be patient! Let the pie chill for at least two hours. This helps the filling set properly.

Enhancing Flavor and Texture

Tips for making the filling fluffier: Fold the whipped cream gently into the peanut butter mixture. This keeps the filling light and airy.

Serving suggestions for paired toppings: Try adding a drizzle of melted chocolate or a dollop of whipped cream on top. Chopped peanuts also add a nice crunch.

Serving Presentation Ideas

Creative ways to garnish the pie: Sprinkle chocolate chips and chopped peanuts on top. You can also add fresh berries for color.

Plate arrangements for stunning visuals: Serve slices on colorful dessert plates. Drizzle chocolate sauce around the plate for an extra touch.

Variations

Flavor Alternatives

You can create fun twists on this pie. Try different types of chocolate, like dark or white chocolate. Each type adds a new flavor. You can also substitute peanut butter with almond or cashew butter. This gives the pie a nice nutty taste. Explore these options to find your favorite!

Dietary Adjustments

Want a vegan pie? Use plant-based cream cheese and whipped topping. Make sure your crust is vegan too. You can use coconut oil instead of butter. For a gluten-free version, swap chocolate graham crackers with gluten-free crumbs. These changes keep the pie tasty and friendly for various diets.

Mini Versions and Other Formats

Mini no-bake pies are easy to make! Use muffin tins or small jars. This way, each person gets their own pie. You can also turn the pie into parfaits. Layer the filling and crust in glasses for a fun presentation. This makes a great treat for parties or gatherings!

Storage Information

How to Store the Pie

To keep your Chocolate Peanut Butter No-Bake Pie fresh, store it in the fridge. Cover it tightly with plastic wrap or foil. This prevents it from absorbing other smells and flavors. If you want to save it longer, you can freeze it. Cut the pie into slices, wrap each piece in plastic, then place them in a freezer-safe bag. This method keeps the pie tasty for later enjoyment.

Shelf Life

In the fridge, this pie lasts about 4 to 5 days. Always check for signs of spoilage. If the pie looks dry or has an off smell, it’s best to toss it. Mold is another clear sign that the pie is no longer good. When you see these signs, do not eat it.

Re-serving Once Stored

When you’re ready to enjoy your stored pie, thaw it in the fridge overnight. This keeps the texture nice. If you’ve frozen slices, let them sit at room temperature for about 15 minutes before eating. To refresh the pie, add a dollop of whipped cream on top. This makes it look fresh and tasty!

FAQs

How long does it take for the pie to set?

The pie needs to chill for at least 2 hours. This allows the filling to firm up nicely. I recommend checking it after this time. If it feels soft, give it more time.

Can I use crunchy peanut butter?

Yes, you can use crunchy peanut butter. This will add a nice texture to the pie. It gives little bites of peanut that add fun. The flavor remains rich and nutty, which I love.

Is it necessary to use cream cheese?

Cream cheese is important for a creamy texture. However, you can swap it with Greek yogurt or silken tofu. These options will change the taste slightly. They can still keep the pie smooth and delicious.

Can I add more chocolate to the recipe?

You can definitely add more chocolate! Try adding chocolate syrup or more chocolate chips. Just be careful not to add too much. This can make the pie too heavy and change the texture.

This blog post covered everything you need for a delicious no-bake peanut butter pie. We discussed the key ingredients, proper measurements, and tasty variations. I shared step-by-step instructions to guide you through the process and offered tips to avoid common mistakes. With some creativity, you can present this pie beautifully and store it properly. Enjoying this treat can be fun and easy. Now, it’s time for you to gather your ingredients and start making your own pie masterpiece!

- 1 ½ cups chocolate graham cracker crumbs - ½ cup unsalted butter, melted - 1 cup creamy peanut butter - 1 cup powdered sugar - 8 oz cream cheese, softened to room temperature - 1 ½ cups whipped cream (or whipped topping) - ½ cup chocolate chips (for garnish) - Chopped peanuts (for garnish) Serving size for this pie is about 8-10 slices. If you need more or less, just adjust the ingredients. For example, double everything for a bigger pie. For the crust, you can swap chocolate graham crackers with regular graham crackers. This will change the flavor a bit but will still taste great. If you want a nut-free option, use crushed cookies instead. If you cannot find creamy peanut butter, try crunchy peanut butter. It adds a fun texture. You can also use almond or cashew butter for a different taste. If you need a dairy-free option, use a non-dairy cream cheese and whipped topping. Just check the labels to ensure they fit your needs. These simple swaps can help you make the pie your own while keeping it delicious! To make the chocolate graham cracker crust, start by mixing the crumbs and melted butter. In a medium bowl, combine 1 ½ cups of chocolate graham cracker crumbs with ½ cup of melted unsalted butter. Stir until it looks like wet sand. This step is key for a great crust. Next, press the mixture into a 9-inch pie dish. Make sure to cover the bottom and up the sides evenly. Use the back of a measuring cup to help you press it down flat. This helps the crust hold together. Chill the crust in the fridge for about 10 minutes. This will firm it up nicely. For the filling, mix 1 cup of creamy peanut butter with 8 oz of softened cream cheese. Use an electric mixer to beat them until smooth. This will create a creamy base for your pie. Next, sift in 1 cup of powdered sugar while mixing. This adds sweetness and makes the filling rich. After that, gently fold in 1 ½ cups of whipped cream. This gives the filling a light, airy texture. Be careful not to deflate the whipped cream; it should stay fluffy. Now it’s time to pour the filling into the chilled crust. Spread it evenly using a spatula. Make sure the top is smooth and nice. This step is important for a beautiful pie. After assembling, return the pie to the fridge. Chill it for at least 2 hours. This helps the filling set properly. When it is firm, your pie will be ready to slice and enjoy! - Overmixing the filling: When you mix the peanut butter and cream cheese, stop when it's smooth. Overmixing can make it too dense. - Not chilling the pie long enough: Be patient! Let the pie chill for at least two hours. This helps the filling set properly. - Tips for making the filling fluffier: Fold the whipped cream gently into the peanut butter mixture. This keeps the filling light and airy. - Serving suggestions for paired toppings: Try adding a drizzle of melted chocolate or a dollop of whipped cream on top. Chopped peanuts also add a nice crunch. - Creative ways to garnish the pie: Sprinkle chocolate chips and chopped peanuts on top. You can also add fresh berries for color. - Plate arrangements for stunning visuals: Serve slices on colorful dessert plates. Drizzle chocolate sauce around the plate for an extra touch. {{image_4}} You can create fun twists on this pie. Try different types of chocolate, like dark or white chocolate. Each type adds a new flavor. You can also substitute peanut butter with almond or cashew butter. This gives the pie a nice nutty taste. Explore these options to find your favorite! Want a vegan pie? Use plant-based cream cheese and whipped topping. Make sure your crust is vegan too. You can use coconut oil instead of butter. For a gluten-free version, swap chocolate graham crackers with gluten-free crumbs. These changes keep the pie tasty and friendly for various diets. Mini no-bake pies are easy to make! Use muffin tins or small jars. This way, each person gets their own pie. You can also turn the pie into parfaits. Layer the filling and crust in glasses for a fun presentation. This makes a great treat for parties or gatherings! To keep your Chocolate Peanut Butter No-Bake Pie fresh, store it in the fridge. Cover it tightly with plastic wrap or foil. This prevents it from absorbing other smells and flavors. If you want to save it longer, you can freeze it. Cut the pie into slices, wrap each piece in plastic, then place them in a freezer-safe bag. This method keeps the pie tasty for later enjoyment. In the fridge, this pie lasts about 4 to 5 days. Always check for signs of spoilage. If the pie looks dry or has an off smell, it’s best to toss it. Mold is another clear sign that the pie is no longer good. When you see these signs, do not eat it. When you’re ready to enjoy your stored pie, thaw it in the fridge overnight. This keeps the texture nice. If you’ve frozen slices, let them sit at room temperature for about 15 minutes before eating. To refresh the pie, add a dollop of whipped cream on top. This makes it look fresh and tasty! The pie needs to chill for at least 2 hours. This allows the filling to firm up nicely. I recommend checking it after this time. If it feels soft, give it more time. Yes, you can use crunchy peanut butter. This will add a nice texture to the pie. It gives little bites of peanut that add fun. The flavor remains rich and nutty, which I love. Cream cheese is important for a creamy texture. However, you can swap it with Greek yogurt or silken tofu. These options will change the taste slightly. They can still keep the pie smooth and delicious. You can definitely add more chocolate! Try adding chocolate syrup or more chocolate chips. Just be careful not to add too much. This can make the pie too heavy and change the texture. This blog post covered everything you need for a delicious no-bake peanut butter pie. We discussed the key ingredients, proper measurements, and tasty variations. I shared step-by-step instructions to guide you through the process and offered tips to avoid common mistakes. With some creativity, you can present this pie beautifully and store it properly. Enjoying this treat can be fun and easy. Now, it's time for you to gather your ingredients and start making your own pie masterpiece!

Chocolate Peanut Butter No-Bake Pie

Indulge in the ultimate dessert with this Chocolate Peanut Butter No-Bake Pie! It's easy to make, requiring minimal prep time, and perfect for any occasion. With a rich chocolate graham cracker crust and a creamy peanut butter filling, this pie is a treat for your taste buds. Ready to impress your friends and family?

Ingredients
  

1 ½ cups chocolate graham cracker crumbs

½ cup unsalted butter, melted

1 cup creamy peanut butter

1 cup powdered sugar

8 oz cream cheese, softened to room temperature

1 ½ cups whipped cream (or whipped topping)

½ cup chocolate chips (for garnish)

Chopped peanuts (for garnish)

Instructions
 

In a medium mixing bowl, combine the chocolate graham cracker crumbs with the melted unsalted butter. Stir until the mixture has the consistency of wet sand, ensuring that all crumbs are moistened.

    Firmly press the crumb mixture into the bottom and up the sides of a 9-inch pie dish, creating an even layer. Place the crust in the refrigerator for about 10 minutes to allow it to set and firm up.

      In a large mixing bowl, use an electric mixer to beat together the creamy peanut butter and softened cream cheese until the mixture is completely smooth and combined.

        Gradually sift in the powdered sugar while continuing to mix, ensuring that it is fully incorporated into the peanut butter and cream cheese mixture.

          With a spatula, gently fold in the whipped cream until the filling is airy and light, being careful not to deflate it.

            Pour the creamy peanut butter filling into the chilled chocolate graham cracker crust, spreading it evenly with a spatula to create a smooth top.

              Return the pie to the refrigerator and chill for at least 2 hours, or until the filling is set firm to the touch.

                When ready to serve, take the pie out of the fridge and sprinkle the top generously with chocolate chips and chopped peanuts for a delightful garnish.

                  Prep Time: 15 mins | Total Time: 2 hrs 15 mins | Servings: 8-10 slices

                    - Presentation Tips: Cut the pie into slices and serve on individual dessert plates. For an added visual and flavor element, drizzle melted chocolate over each slice or add a dollop of whipped cream on top before serving. Enjoy your delicious creation!

                      WANT TO SAVE THIS RECIPE?