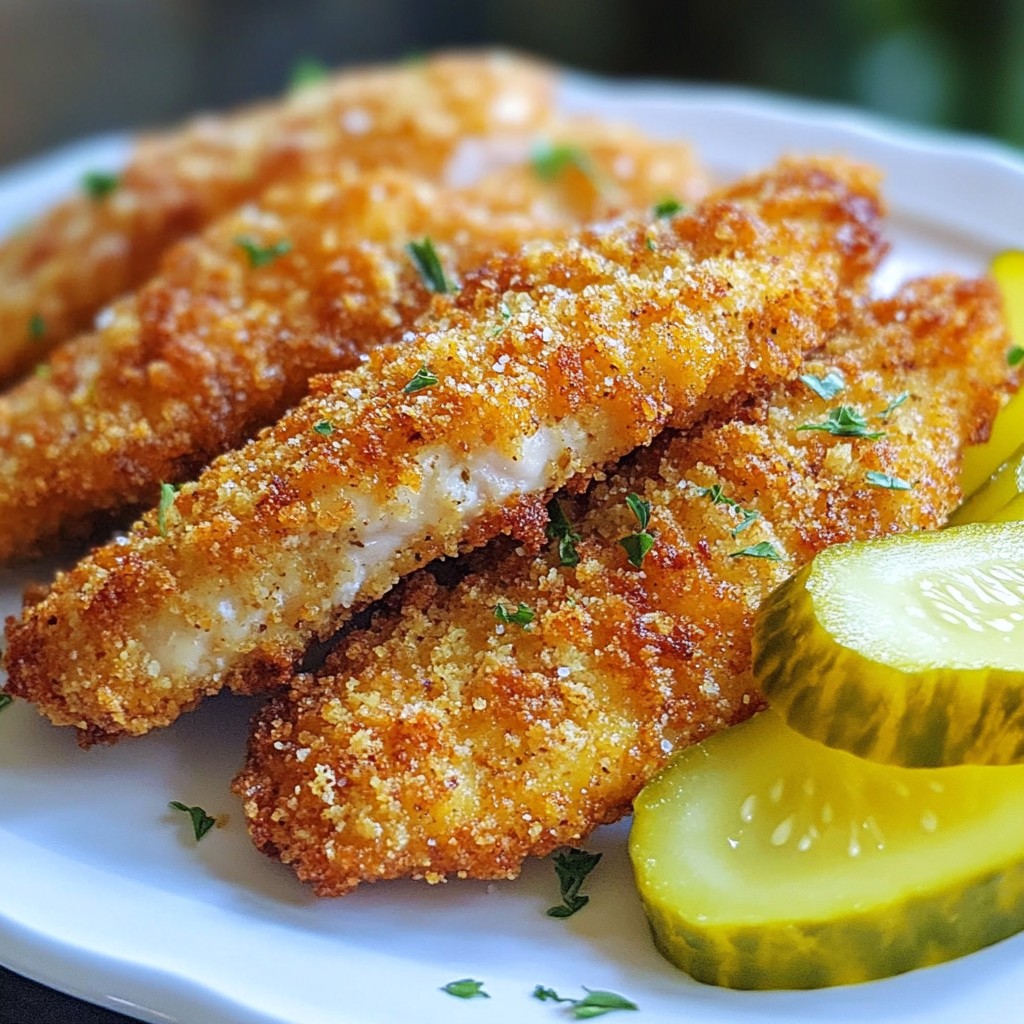
Looking for a tasty twist on chicken tenders? You’ll love these Garlic Dill Pickle Chicken Tenders! Marinated in tangy dill pickle juice, coated with crunchy panko, and packed with flavor, these tenders are a must-try. Whether you're cooking for a family dinner or a game night snack, these crispy delights will impress everyone. Let's dive into the simple steps to make this mouthwatering dish!
Why I Love This Recipe
- Tender and Flavorful: The marination in dill pickle juice adds a unique tanginess and helps keep the chicken incredibly tender.
- Crunchy Coating: The combination of all-purpose flour and panko breadcrumbs creates an irresistible crunchy texture that contrasts perfectly with the tender chicken.
- Easy to Make: This recipe is straightforward and requires minimal ingredients, making it perfect for a quick dinner or a fun cooking project with kids.
- Perfect for Dipping: Serve these chicken tenders with your favorite sauces, whether it’s ranch or a spicy aioli, for a delicious dipping experience.
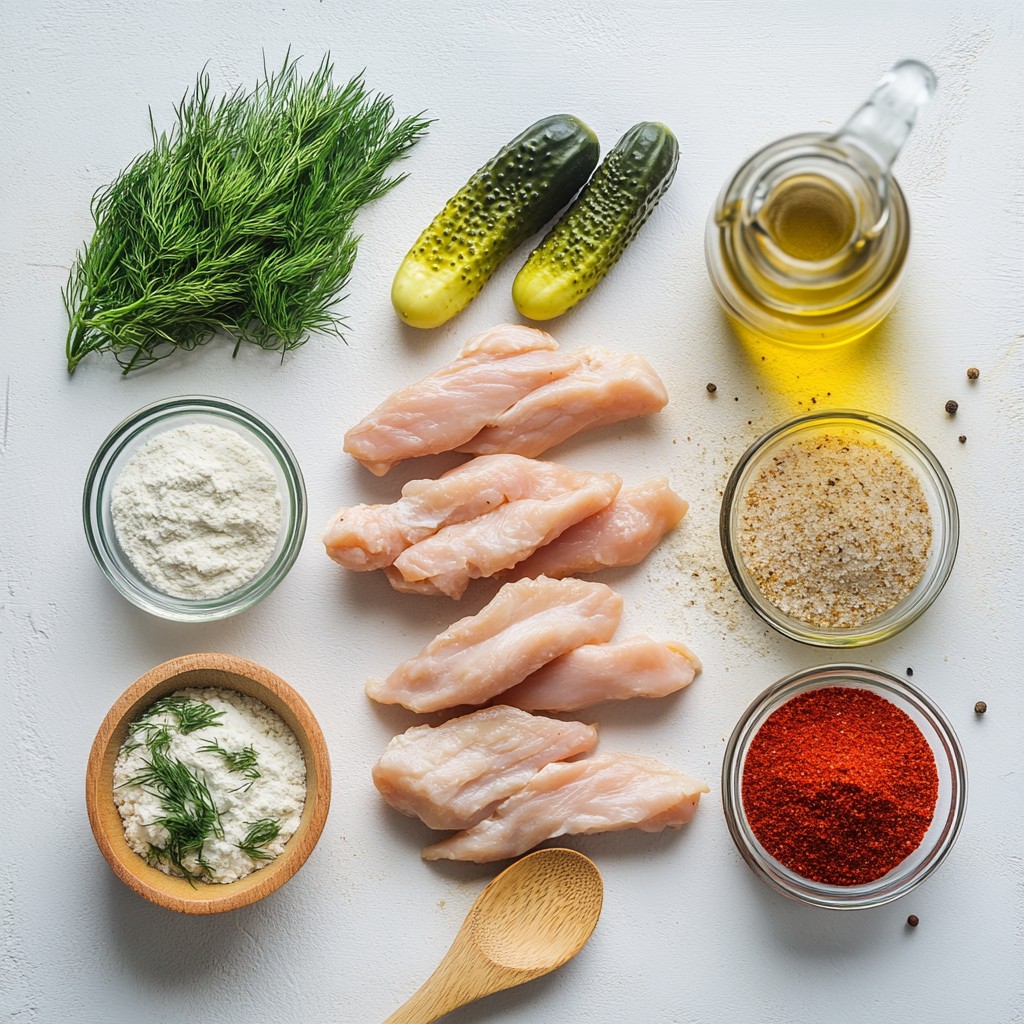
Ingredients
Main Ingredients
- 1 lb chicken breast
- 1 cup dill pickle juice
- 1 cup buttermilk
Seasonings and Coating
- 1 cup all-purpose flour
- 1 tablespoon garlic powder
- 1 tablespoon dried dill
- 1 teaspoon paprika
- 1 teaspoon salt
- ½ teaspoon black pepper
Additional Ingredients
- 1 cup panko breadcrumbs
- Vegetable oil
The ingredients for Garlic Dill Pickle Chicken Tenders create a delicious dish. First, you need chicken breasts. I like to use 1 pound. Cut them into strips for easy frying. The chicken needs flavor, so we use dill pickle juice. One cup gives a tangy taste. Marinate the chicken in this juice for at least one hour. For best results, overnight is ideal.
Next, we add buttermilk. It makes the chicken tender. You will also need some seasonings. Combine 1 cup of flour, 1 tablespoon of garlic powder, and 1 tablespoon of dried dill. Add 1 teaspoon of paprika, 1 teaspoon of salt, and ½ teaspoon of black pepper. These spices give the chicken a bold flavor.
For crunch, we use panko breadcrumbs. One cup will do. They create a crispy outside when fried. Finally, you will need vegetable oil for frying. Use enough to cover half an inch in your pan. This oil will make your chicken tenders golden and delicious. Each ingredient plays a key role in making this dish a hit!
Step-by-Step Instructions
Marinating the Chicken
To get the best flavor, marinate the chicken for at least one hour. For even better taste, let it sit overnight. The pickle juice helps tenderize the meat and adds a zesty kick. Make sure each chicken strip is fully covered in the juice. This soaking step is key to achieving juicy, flavorful tenders.
Preparing for Breading
After marinating, drain the chicken. Rinse it gently under cold water to remove excess brine. This step is important to avoid salty tenders. Next, use paper towels to pat the chicken dry. Drying is crucial, as wet chicken can make the breading soggy.
Making the Buttermilk Mixture
In a bowl, whisk together one cup of buttermilk, garlic powder, dried dill, paprika, salt, and black pepper. This mix adds great flavor. Soak the chicken strips in this mixture for about 20 minutes. This soaking time helps the chicken absorb all the spices.
Setting Up the Breading Station
In a shallow dish, mix one cup of all-purpose flour with one cup of panko breadcrumbs. This ratio provides a perfect crunch. When you coat the chicken, ensure each piece is evenly covered. This helps create a crispy exterior when frying.
Cooking the Chicken Tenders
Heat about half an inch of vegetable oil in a large skillet over medium heat. The oil should shimmer when it's ready for frying. Carefully add the chicken tenders, frying in batches to avoid overcrowding. Cook each side for 4 to 5 minutes until golden brown and cooked through.
Final Steps for Serving
Once the chicken is done, place it on a plate lined with paper towels. This drains excess oil and keeps the tenders crispy. For serving, add garnishes like dill pickle slices. Pair with your favorite dipping sauce, like ranch or a spicy aioli, for an extra flavor boost.
Tips & Tricks
Perfecting the Flavor
To enhance the dill and garlic flavor, use fresh herbs when possible. Fresh dill adds a bright taste. You can also mix in garlic cloves for a more intense flavor. If you want to switch things up, try adding a pinch of cayenne pepper for heat. Other options include lemon zest for brightness or smoked paprika for depth. Experiment with these flavors to find your favorite mix.
Ensuring Crispiness
For crunch, panko breadcrumbs are key. They absorb less oil, making your tenders crispier. To make things even crunchier, double-bread your chicken. First, coat it in flour, then dip it back into the buttermilk, and finally coat it again in the panko. This extra layer adds a great crunch. You can also try frying at a slightly higher temperature for a quicker crisp.
Cooking Equipment Recommendations
A cast-iron skillet is great for frying chicken tenders. It retains heat well, ensuring even cooking. If you don't have one, a non-stick frying pan works too. For oil, use vegetable oil or canola oil. They have high smoke points, which makes them perfect for frying. Make sure to heat the oil properly before adding the chicken for the best results.
Pro Tips
- Marinate Longer for Flavor: For the best flavor and tenderness, marinate your chicken strips in dill pickle juice overnight. This allows the flavors to penetrate deeply and makes the chicken juicier.
- Use Panko for Extra Crunch: Incorporating panko breadcrumbs in your breading mixture gives your chicken tenders a delightful crunch. Don’t skip this step for that extra crispy texture!
- Temperature Matters: Ensure your oil is hot enough before frying. A good test is to drop a small piece of bread into the oil; it should sizzle and turn golden brown in about 30 seconds.
- Rest After Frying: Allow the fried chicken tenders to rest on paper towels for a few minutes after frying. This helps retain their crunch and prevents them from becoming soggy.
Variations
Baked Garlic Dill Pickle Chicken Tenders
For a healthier option, you can bake the chicken tenders instead of frying. Start by preheating your oven to 425°F. Use a baking sheet lined with parchment paper for easy cleanup. Instead of frying, spray the coated chicken with cooking oil. This helps achieve a golden color and crisp texture. Bake for about 20-25 minutes or until the chicken reaches an internal temperature of 165°F.
Spicy Dill Pickle Chicken Tenders
To add some heat, mix cayenne pepper or chili powder into the flour-panko mixture. This gives your chicken tenders a spicy kick. You can also serve them with zesty dipping sauces like spicy ranch or sriracha mayo. These sauces add extra flavor and excitement to every bite.
Herb Variations
If you want to get creative, try swapping dill with other herbs. Fresh parsley or thyme can bring a new taste. Mix and match herbs to find your favorite combo. For a bold twist, add lemon zest or smoked paprika to deepen the flavor. Enjoy experimenting with different herbs to make this dish your own!
Storage Info
Storing Leftovers
To store leftovers, place the chicken tenders in the fridge. Use an airtight container to keep them fresh. This helps to avoid moisture loss. Try to eat them within three days for the best taste.
Reheating Tips
For reheating, the oven works best to keep them crispy. Preheat your oven to 375°F. Place the chicken tenders on a baking sheet. Heat them for about 10-12 minutes. This method avoids sogginess. You can also use an air fryer. Set it to 350°F and heat for 5-7 minutes.
Freezing Instructions
You can freeze chicken tenders before or after cooking. If freezing before cooking, wrap them tightly. Use plastic wrap and then place in a freezer bag. This keeps them fresh for up to three months. If you freeze them after cooking, let them cool first. Store in the same way. They can last for about two months in the freezer.
FAQs
How long can I marinate chicken tenders?
You can marinate chicken tenders for at least 1 hour. For the best flavor, I recommend marinating overnight. This gives the chicken time to soak up the dill pickle juice. The longer it sits, the more tender and tasty it becomes.
Can I substitute dill pickle juice?
Yes, you can use lemon juice or vinegar if you need a substitute. These options will still add acidity. You can also try apple cider vinegar for a milder taste. However, dill pickle juice adds a unique flavor that is hard to beat.
What dipping sauces pair well with these chicken tenders?
You can serve these tenders with ranch or honey mustard for a classic touch. A zesty spicy aioli also works great to add some heat. If you enjoy bold flavors, try a sriracha mayo. These sauces enhance the taste and keep things interesting.
How can I make this recipe gluten-free?
To make this recipe gluten-free, use gluten-free flour and breadcrumbs. Almond flour is a great option. You can also look for gluten-free panko breadcrumbs. These swaps will keep the crunch while being safe for gluten-free diets.
What side dishes go well with Garlic Dill Pickle Chicken Tenders?
These chicken tenders pair well with coleslaw or a fresh garden salad. You can also serve them with sweet potato fries for a fun twist. Pickled vegetables or corn on the cob make great sides too. They balance the flavors and add color to your plate.
In this post, we explored a tasty recipe for Garlic Dill Pickle Chicken Tenders. We covered key ingredients, step-by-step instructions, and helpful tips for the perfect crunch. You learned flavor variations, how to store leftovers, and answers to common questions.
With these simple steps, you can enjoy great meals at home. Don't be scared to try new flavors! Enjoy cooking and savoring these chicken tenders with your favorite sides. Your kitchen can be a fun place for tasty discoveries!