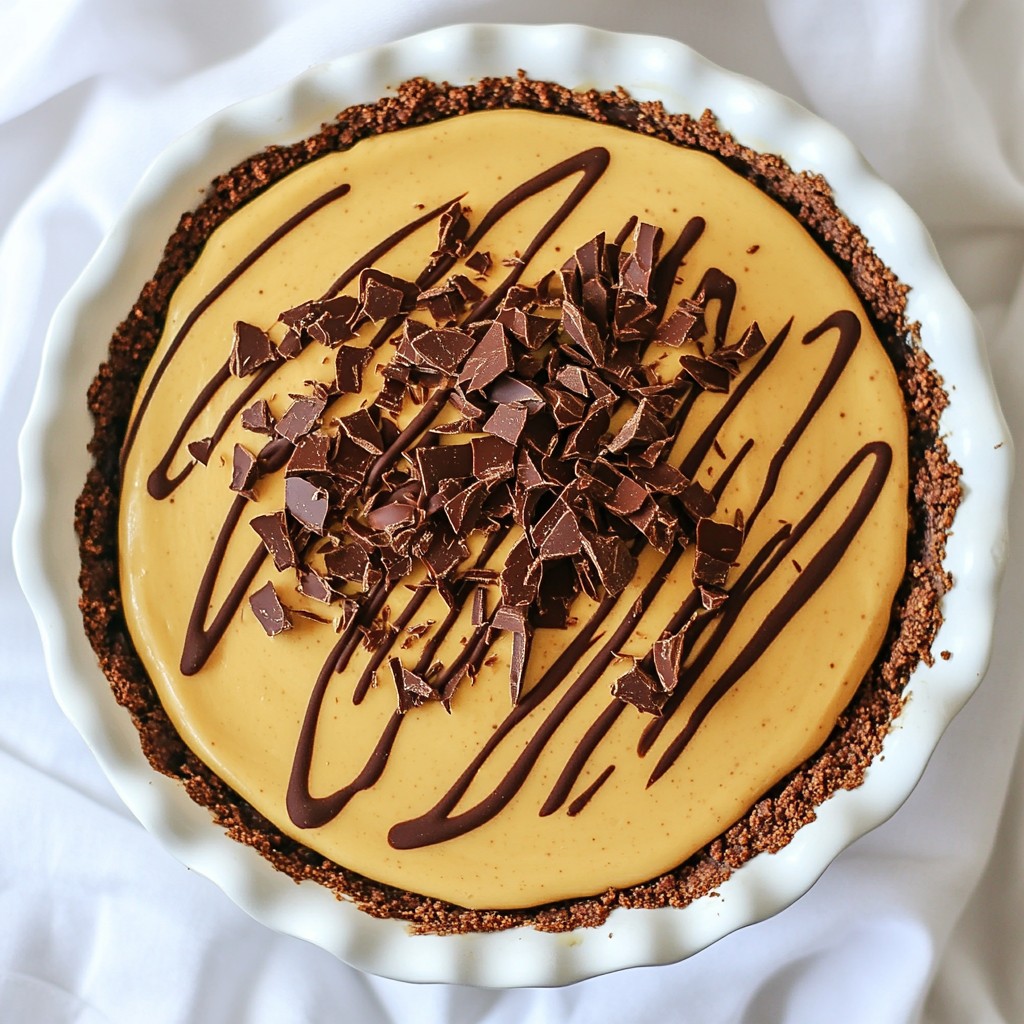
Craving a sweet treat that’s easy to make? Look no further! My No Bake Peanut Butter Pie is a dream for peanut butter lovers. With just a few simple ingredients, you can whip up a creamy, dreamy dessert that requires no baking at all. Perfect for any occasion, this pie is a crowd-pleaser. Let’s dive into how to create this delightful dessert that will make you the star of the dessert table!
Why I Love This Recipe
- Decadent Flavor Combination: This pie perfectly balances rich chocolate and creamy peanut butter, creating a deliciously indulgent treat that satisfies sweet cravings.
- No-Bake Convenience: With no baking required, this recipe is ideal for hot days or when you want a quick dessert without the fuss of an oven.
- Easy Preparation: Simple steps and readily available ingredients make this pie easy to whip up, even for novice bakers or busy cooks.
- Impressive Presentation: With its gorgeous layers and optional chocolate garnish, this pie looks as good as it tastes, perfect for any gathering or special occasion.
Ingredients
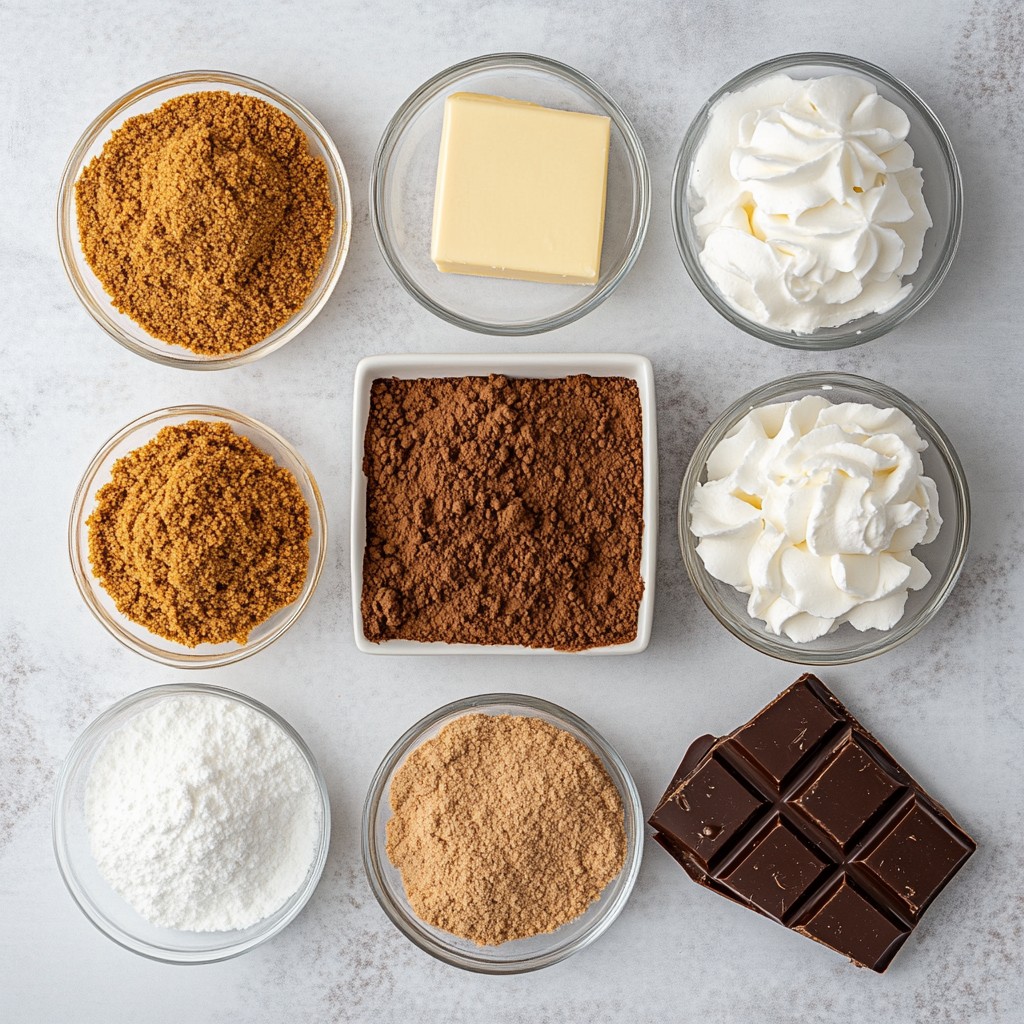
List of Ingredients
- 1 ½ cups graham cracker crumbs
- ½ cup unsweetened cocoa powder
- ½ cup granulated sugar
- ½ cup unsalted butter, melted
- 1 cup creamy peanut butter
- 8 oz cream cheese, softened to room temperature
- 1 cup powdered sugar
- 1 teaspoon pure vanilla extract
- 1 cup whipped cream (store-bought or homemade)
- Garnish options (chocolate shavings or chocolate drizzle)
When I make this delightful no-bake peanut butter pie, I love gathering my ingredients first. It helps to have everything ready. The graham cracker crumbs form the crust. They give a nice crunch and sweetness. I always use unsweetened cocoa powder for a rich chocolate flavor.
The granulated sugar adds just the right sweetness. I melt unsalted butter to bind the crust. This step is key for a firm base. Creamy peanut butter is the star of the filling. It adds that nutty taste we all crave.
I also use cream cheese, which adds creaminess. Make sure it’s soft for easy mixing. The powdered sugar sweetens the filling and makes it smooth. A splash of pure vanilla extract gives a lovely aroma.
Lastly, whipped cream adds lightness to the filling. It helps create that airy texture. For garnish, I like chocolate shavings or a drizzle of chocolate. They make the pie look fancy and taste even better!
Step-by-Step Instructions
Preparing the Crust
- In a large mixing bowl, combine 1 ½ cups of graham cracker crumbs, ½ cup of unsweetened cocoa powder, and ½ cup of granulated sugar.
- Pour in ½ cup of melted unsalted butter and stir well. Mix until the crumbs look like wet sand.
- Press this mixture firmly into the bottom and up the sides of a 9-inch pie dish. Use your fingers or the back of a measuring cup to compact it.
- After pressing, refrigerate the crust for 30 minutes. This helps it set nicely.
Making the Peanut Butter Filling
- In another bowl, beat 8 ounces of softened cream cheese with an electric mixer. Mix until smooth and creamy, which takes about 2-3 minutes.
- Gradually add in 1 cup of creamy peanut butter, 1 cup of powdered sugar, and 1 teaspoon of pure vanilla extract. Mix until it is fully combined and lump-free.
- Carefully fold in 1 cup of whipped cream using a spatula. Do this gently to keep the mixture light and airy.
Assembling and Setting the Pie
- Pour the peanut butter filling into the chilled crust. Spread it evenly with a spatula.
- Smooth the top to make it look nice.
- Cover the pie with plastic wrap and refrigerate it for at least 4 hours, or overnight if you can wait. This helps the pie set and brings out the flavors.
Tips & Tricks
Tips for the Perfect Crust
- Ensuring proper compacting: Press the graham cracker mix firmly into the pie dish. Use the back of a measuring cup or your fingers. This helps the crust hold its shape when sliced.
- Refrigeration tips for the crust: Chill the crust for at least 30 minutes. This sets the crust well and makes it easier to fill.
Achieving a Creamy Texture
- Importance of softened cream cheese: Always use softened cream cheese. It blends smoothly, which keeps your filling creamy and lump-free.
- Techniques for folding in whipped cream: Gently fold in the whipped cream with a spatula. This keeps the mixture light and fluffy. Avoid stirring too hard, as you want to keep the air in the cream.
Garnishing Suggestions
- Best options for visual appeal: Top your pie with chocolate shavings or a drizzle of chocolate sauce. This adds a nice look and a rich flavor.
- Alternative toppings and their flavors: Try crushed nuts or fresh berries for a twist. They bring different tastes and textures to your pie. Experiment to find your favorite combination!
Pro Tips
- Use Fresh Ingredients: Always opt for fresh cream cheese and whipped cream for a richer flavor and better texture in your pie.
- Chill Your Tools: Chill your mixing bowls and beaters before whipping the cream to help achieve maximum volume and stability.
- Customize Your Sweetness: Feel free to adjust the amount of powdered sugar based on your sweetness preference; taste as you go!
- Let It Set: For the best flavor and texture, allow the pie to chill overnight; this enhances the peanut butter flavor and helps it firm up.
Variations
Gluten-Free Option
To make a gluten-free crust, swap graham cracker crumbs for gluten-free cookies. You can also use almond flour or crushed gluten-free pretzels. Mix these with unsweetened cocoa powder, sugar, and melted butter. Press this mixture into your pie dish just like the regular crust. This way, everyone can enjoy the pie!
Flavor Variations
You can change the pie's flavor by adding extracts. For a nutty twist, try almond extract instead of vanilla. Want chocolate? Mix in some melted chocolate or chocolate chips into the peanut butter filling. You can also layer flavors by adding a thin layer of chocolate ganache before the peanut butter filling. These tweaks will keep the pie exciting!
Dietary Adjustments
If you want a vegan pie, replace cream cheese with a vegan cream cheese. Use maple syrup instead of granulated sugar. For lower-sugar options, consider using a sugar substitute like stevia. These changes make the pie fit different diets while still tasting great!
Storage Info
Best Practices for Refrigeration
To store your No Bake Peanut Butter Pie in the fridge, cover it well. Use plastic wrap or a lid to keep out air. This helps maintain its creamy texture and flavor. Place the pie on a flat shelf for even cooling. Leftovers will taste great for up to four days.
Freezing Instructions
You can freeze the pie for longer storage. To do this, wrap it tightly in plastic wrap, and then in aluminum foil. This prevents ice crystals from forming. When you're ready to eat it, move the pie to the fridge overnight to thaw. Avoid using a microwave, as it can change the texture.
Shelf Life of the Pie
The No Bake Peanut Butter Pie lasts in the fridge for about four days. If you freeze it, it can last up to two months. Always check for signs of spoilage. Look for changes in color or texture. If it smells off, it’s best to discard it. Enjoy your pie fresh for the best taste!
FAQs
Can I use natural peanut butter?
Yes, you can use natural peanut butter. However, it can change the pie's texture and taste. Natural peanut butter has less sugar and oil. This can make the filling thicker and less sweet. If you prefer a sweeter pie, consider adding a bit more sugar. I recommend mixing it well to avoid lumps.
How long should I refrigerate the pie?
You should refrigerate the pie for at least 4 hours. This time allows the pie to set correctly. If you can, chilling it overnight is even better. This extra time deepens the flavors and makes the pie firmer. Slicing it is easier after a long chill.
Can I make this pie ahead of time?
Yes, this pie is great to make ahead. You can prepare it a day or two before serving. Just keep it covered in the fridge. This way, you save time on busy days. Serve it cold for the best taste and texture.
You learned how to make a delicious peanut butter pie in this post. We covered the key ingredients, step-by-step instructions, and helpful tips. You can try different flavors or adjust the pie for special diets. Remember to store it properly to keep its taste fresh. Enjoy making this dessert for friends and family. Your efforts will surely impress them!