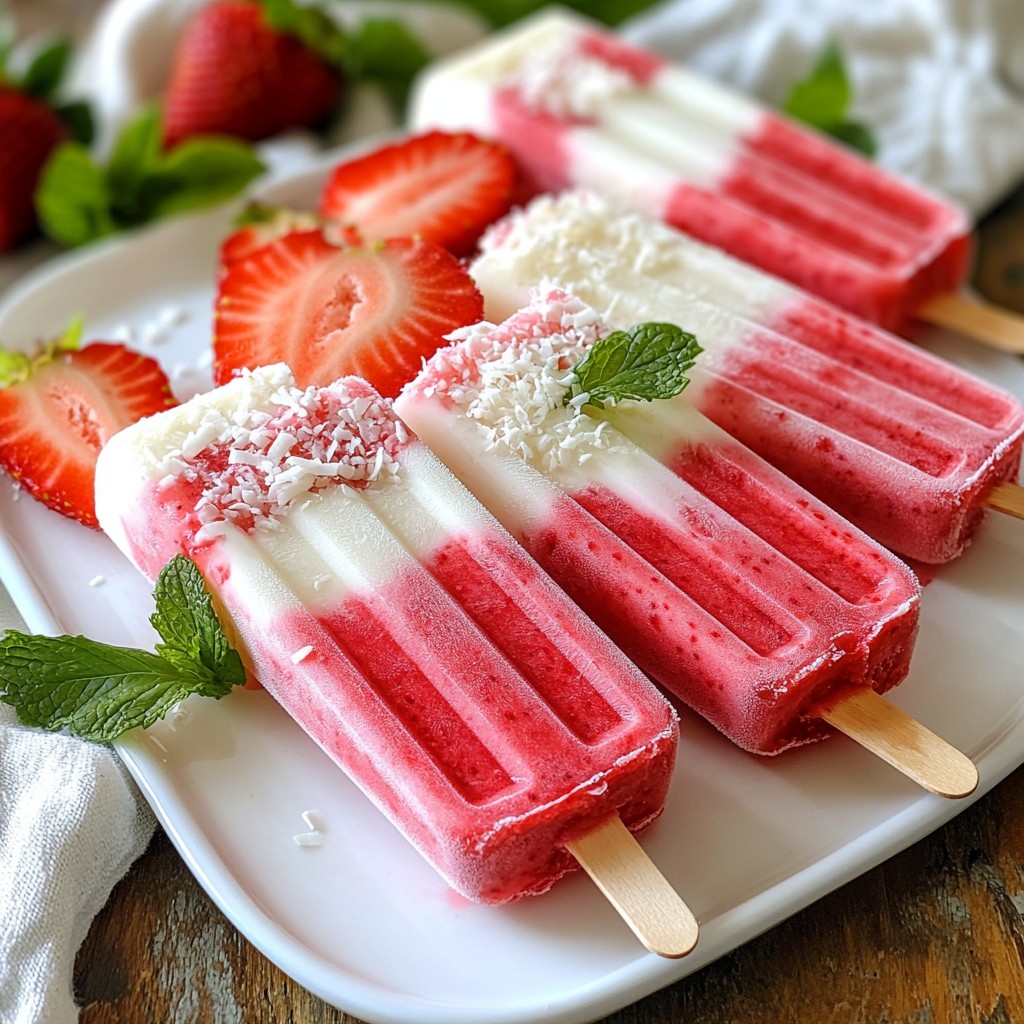
Are you ready to cool down with a tasty treat? These strawberry coconut popsicles are fun and easy to make. With just a few fresh ingredients, you can whip up a sweet delight that will impress your family and friends. Plus, I’ll share tips and tricks to make them perfect every time. Let’s dive in and create a refreshing snack that everyone will love!
Why I Love This Recipe
- Refreshing Flavor: The combination of strawberries and coconut milk creates a tropical taste that’s perfect for hot summer days.
- Easy to Make: This recipe requires minimal ingredients and can be prepared in just 15 minutes, making it a quick and fun activity.
- Customizable: You can adjust the sweetness and add your favorite mix-ins, allowing for endless variations to suit your taste.
- Healthier Treat: With fresh fruit and coconut milk, these popsicles are a delicious and nutritious alternative to store-bought ice cream.
Ingredients
Fresh Ingredients Needed
For my strawberry coconut popsicles, I use a few key fresh ingredients:
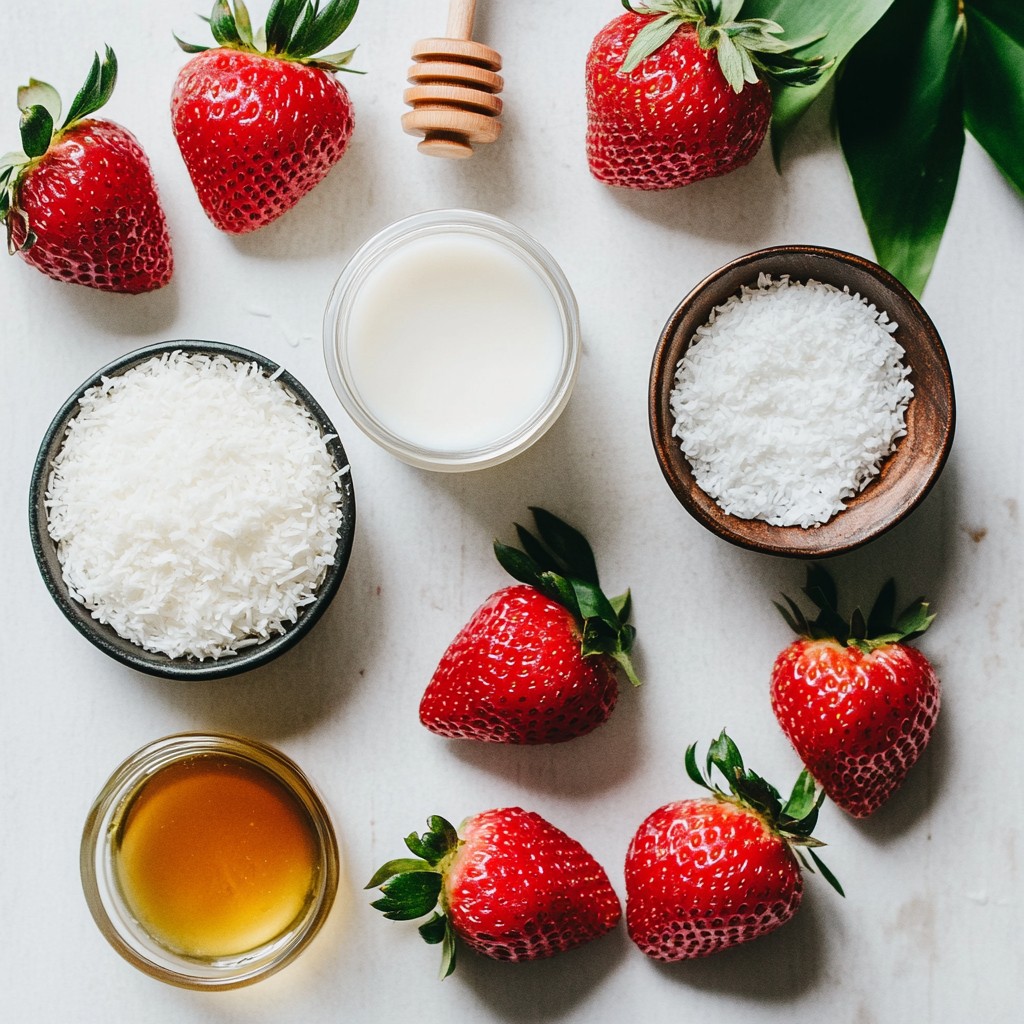
- 2 cups fresh strawberries, hulled and sliced
- 1 can (13.5 oz) coconut milk
These strawberries are sweet and juicy. They give the popsicles a bright flavor. The coconut milk adds creaminess and richness.
Additional Ingredients for Flavor
To enhance the taste, I add:
- 1/4 cup honey or maple syrup (adjust based on your sweetness preference)
- 1 teaspoon pure vanilla extract
- A pinch of salt
Honey or maple syrup sweetens the popsicles. The vanilla extract brings warmth and depth. Salt balances the sweetness and brightens the flavors.
Substitutions and Dietary Adjustments
You can make swaps to fit your needs:
- Substitute honey with agave syrup for a vegan option.
- Use light coconut milk if you want a lower-fat version.
- For a nut-free option, ensure your coconut milk is pure.
These adjustments keep the popsicles tasty and fit for everyone! Enjoy creating your own unique version!
Step-by-Step Instructions
Blending the Base
To start, gather your fresh strawberries and coconut milk. In a high-speed blender, combine 2 cups of hulled and sliced strawberries with 1 can of coconut milk. Add 1/4 cup of honey or maple syrup for sweetness, 1 teaspoon of pure vanilla extract, and a pinch of salt. Blend on high until the mixture is smooth. This creates a creamy, fruity base. The blend should look vibrant and smell amazing.
Adjusting Sweetness
After blending, taste the mixture. If it seems a bit bland, add more honey or maple syrup. Blend again for a few seconds to mix in the added sweetness. If you enjoy chunks in your popsicles, set aside a few slices of strawberries. You can stir them in later for extra flavor and texture.
Adding Texture and Pouring Mixture
If you want a chewier texture, fold in 1/2 cup of shredded unsweetened coconut. Make sure to mix it evenly into the blended base. Now, carefully pour the mixture into your popsicle molds. Leave a small gap at the top for expansion. If you set aside strawberry slices, add them now for bursts of fresh fruit. Lastly, insert the popsicle sticks and place the molds in the freezer. Let them freeze for 4 to 6 hours, or until solid.
Tips & Tricks
Best Practices for Freezing
Freezing popsicles can be simple if you follow a few steps. First, ensure the mixture is smooth. This helps them freeze evenly. Pour the mixture into molds, but don’t fill them to the top. Leave a small space for expansion. This makes it easier when you remove them later. Place the molds in a flat area of the freezer. This keeps them upright and prevents spills. Let them freeze for at least 4 to 6 hours. For best results, freeze overnight.
How to Remove Popsicles from Molds
Removing popsicles from molds can be tricky. To make it easy, run warm water over the outside of the molds. This warms the sides and helps loosen the popsicles. Hold the mold upside down and gently pull the popsicle out. If it sticks, give it a little twist. Be gentle to avoid breaking them. This method works well for all types of molds. Patience is key; don’t rush this step.
Serving and Presentation Ideas
Serving popsicles can be fun and creative. Place your popsicles on a colorful platter. This adds a nice touch to your table. You can garnish with fresh mint leaves for a pop of color. For added texture, sprinkle some shredded coconut on top. If you want, serve them with a side of fresh fruit. This makes your treat look even more inviting. Enjoy these popsicles on hot days as a refreshing snack!
Pro Tips
- Use Ripe Strawberries: Ensure your strawberries are perfectly ripe for maximum sweetness and flavor in your popsicles.
- Experiment with Sweeteners: Try different sweeteners like agave or stevia to find the best flavor profile that suits your taste.
- Mix in Other Fruits: Feel free to add other fruits like mango or banana for a tropical twist on your popsicles.
- Check for Doneness: Make sure your popsicles are fully frozen before removing them from the molds to avoid breakage.
Variations
Adding Other Fruits
You can mix in other fruits for fun flavors. Try adding bananas, blueberries, or mangoes. Each fruit will add its unique taste. Blend these fruits with strawberries for a fruity twist. You can also layer different fruit purees in the molds. This will create a colorful, fun design.
Dairy-Free or Vegan Options
This recipe is easy to make dairy-free or vegan. Use coconut milk, which is already dairy-free. For sweetening, substitute honey with maple syrup or agave nectar. Both work well and keep your popsicles vegan. You can also skip the shredded coconut if you prefer a smoother texture.
Different Flavor Combinations
Get creative with flavor combinations! Try mixing lime juice for a zesty kick. You can also add a dash of almond extract for a nutty taste. Mixing in herbs, like mint or basil, can add depth. Experiment with spices like cinnamon for a warm touch. Each new flavor can lead to a tasty surprise!
Storage Info
How to Properly Store Popsicles
Store your strawberry coconut popsicles in airtight containers or freezer bags. This keeps them fresh and free from ice crystals. Make sure to label them with the date so you know when you made them. You can also wrap each popsicle in plastic wrap for extra protection.
Shelf Life and Freezing Tips
These popsicles can last up to two months in the freezer. They will taste best within the first month. To maintain texture, keep the freezer at a steady temperature. Avoid opening the door too often, as temperature swings can affect your popsicles.
Reusing Popsicle Molds
After you finish your popsicles, clean your molds with warm soapy water. Rinse them well and let them dry completely. You can use the same molds for different flavors. Just ensure they are clean to avoid mixing flavors unintentionally.
FAQs
What are the health benefits of strawberry coconut popsicles?
Strawberry coconut popsicles are packed with vitamins and nutrients. Fresh strawberries give you Vitamin C, which helps boost your immune system. Strawberries also have fiber, which is good for digestion. Coconut milk adds healthy fats that can help keep you full. These popsicles are a tasty way to enjoy fruit and stay hydrated, especially on hot days.
Can I make these without honey or maple syrup?
Yes, you can make these popsicles without honey or maple syrup. You can use ripe bananas to add natural sweetness. You can also use stevia or agave syrup instead. Just keep in mind that these options may change the taste a bit. Always taste the mixture and adjust as needed to find your perfect flavor.
How can I ensure my popsicles are creamy?
To make creamy popsicles, use full-fat coconut milk. It has more fat, which helps create a smooth texture. Blend the mixture until it is very smooth. If you want extra creaminess, you can add a few tablespoons of yogurt. Make sure to freeze them long enough, so they set well and stay creamy.
You learned how to make tasty strawberry coconut popsicles. We covered fresh ingredients, adding flavor, and swaps for diets. I shared steps for blending, sweetening, and pouring your mixture. You got tips for freezing and serving your popsicles. We explored fun variations and smart storage ideas. Finally, I answered common questions about health benefits and creaminess. Now, you can enjoy your flavorful, homemade popsicles any time. Experiment and have fun with your creations!